Introduction
This manual provides detailed instructions for the installation, operation, and maintenance of the mGYDY H6C Ebike LCD Display Meter. This display is designed to enhance your electric bike or scooter riding experience by providing real-time data and control functions. Please read this manual thoroughly before use to ensure proper functionality and safety.
Product Overview and Features
The H6C Ebike LCD Display Meter is a horizontal mid-mounted VA color LCD display featuring high-definition and full lamination technology for a clear and vibrant interface. Its design offers a more agile, three-dimensional, and larger display space.
Key Functions:
- Battery Indicator
- Headlight Control
- Boost Function
- Boost Gear Display
- Speed Display
- Subtotal Mileage / Total Mileage
- Running Time
- Metric Conversion
- Fault Prompt
- Walk-assist Mode
- Cruise Control
- Real-time Trip Tracking
- Voltage Display
- Ability to modify key bike parameters (e.g., wheel diameter, speed limits)
Durability and Compatibility:
The display is engineered with a rugged ABS and PC housing, a tempered glass screen, and a nylon bracket to withstand various terrains and weather conditions. It includes a built-in 5V/500mA USB port for charging mobile devices.
It is compatible with 24V, 36V, 48V, and 60V battery systems (24V-60V adjustable) and utilizes UART No. 2 communication protocol. Ensure your ebike controller also uses the UART No. 2 protocol and is compatible with a 5-pin connector for proper operation.
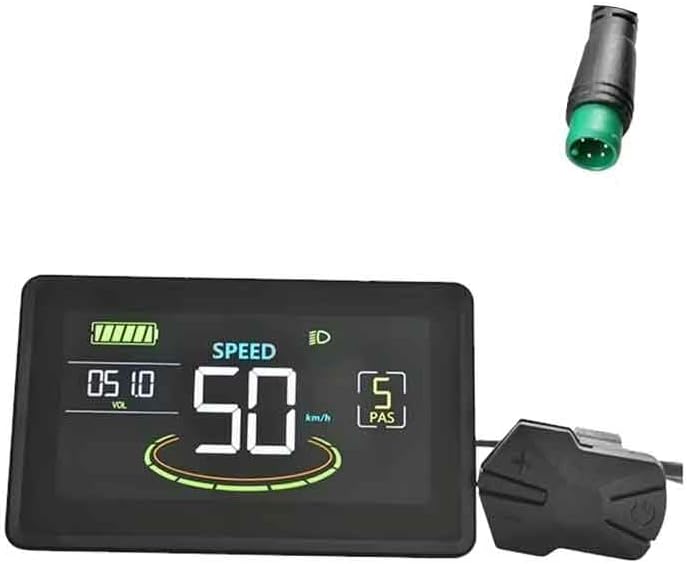
Figure 1: Front view of the H6C Ebike LCD Display Meter and its 5-pin connector.
Installation Guide
Proper installation is crucial for the display's functionality and your safety. Follow these steps carefully.
1. Handlebar Mounting:
The display comes with a holder compatible with handlebar sizes: 22.2mm, 25.4mm, 28.6mm, and 31.8mm. Select the appropriate mounting position on your handlebar that allows for clear visibility and easy access to controls without obstructing your view or steering.

Figure 2: The H6C display mounted on a handlebar, showing the integrated USB charging port.

Figure 3: Dimensional specifications of the H6C display (71.3mm x 116.1mm x 22.8mm) and its mounting bracket (31.8mm clamp).
2. Electrical Connection:
The H6C display uses a 5-pin male waterproof cable. Connect this cable to your ebike controller's corresponding 5-pin female connector. Ensure the communication protocol of your controller is UART No. 2, as this display is only compatible with controllers using the same protocol.

Figure 4: Detailed view of the 5-pin male waterproof connector and its pin assignments (Red: D+, Blue: K, Black: GND, Green: RX, Yellow: TX).

Figure 5: Line sequence diagram illustrating the wiring connections and the corresponding functional interface elements on the display, such as power display, mileage, speed, and power assist system.
Important Note: Verify the communication protocol of your ebike controller. This H6C display is designed exclusively for UART No. 2 protocol. Incompatibility will prevent the display from functioning correctly.
Operating Instructions
Once installed and powered on, the H6C display provides a wealth of information and control options.
Display Interface:
The main screen displays real-time data including current speed, battery level, mileage (subtotal/total), and the active power assist level (PAS). The display also indicates headlight status and any fault prompts.

Figure 6: The H6C display showing typical operational data: battery charge, current speed (50 km/h), and Power Assist System (PAS) level 5.
Controls and Settings:
The display allows for various adjustments and mode selections. Refer to your ebike controller's manual for specific button functions and navigation through the display's menu system to access settings such as:
- Headlight Control: Activate or deactivate your ebike's headlights.
- Boost Function: Engage a temporary power boost.
- Boost Gear: Adjust the level of power assistance.
- Mileage Reset: Reset subtotal mileage for trip tracking.
- Metric/Imperial Conversion: Switch between km/h and mph, or kilometers and miles.
- Wheel Diameter Setting: Calibrate the display for accurate speed and distance readings based on your wheel size.
- Speed Limit Adjustment: Modify the maximum assisted speed (subject to local regulations).
- Walk-assist Mode: Provides low-speed assistance for walking the bike.
- Cruise Control: Maintain a constant speed without continuous throttle input.
The integrated USB charging port (5V/500mA) can be used to charge mobile devices while riding.
Maintenance
To ensure the longevity and optimal performance of your H6C Ebike LCD Display Meter, follow these maintenance guidelines:
- Cleaning: Wipe the display screen and housing with a soft, damp cloth. Avoid using abrasive cleaners or solvents that could damage the screen or plastic components.
- Protection: While the display is designed to be rugged and waterproof, avoid prolonged exposure to extreme weather conditions or direct high-pressure water jets.
- Connection Check: Periodically inspect the 5-pin connector for any signs of wear, corrosion, or loose connections. Ensure it remains securely fastened.
- Storage: If storing your ebike for an extended period, ensure the display is clean and dry. Store in a cool, dry place away from direct sunlight.
Troubleshooting
If you encounter issues with your H6C Ebike LCD Display Meter, refer to the following common problems and solutions:
- Display Not Powering On:
- Check the main power supply to your ebike.
- Ensure the 5-pin connector is securely and correctly plugged into the controller.
- Verify that your ebike controller is powered on.
- Incorrect Readings (Speed/Mileage):
- Ensure the wheel diameter setting in the display's menu is correctly configured for your ebike's wheel size.
- Check the speed sensor connection on your ebike.
- Display Shows "Fault Prompt" or Error Code:
- Consult your ebike controller's manual for specific error code interpretations.
- Common issues include motor, battery, or sensor malfunctions.
- Display Not Communicating with Controller:
- Crucial: Confirm that your ebike controller uses the UART No. 2 communication protocol. This display is only compatible with controllers using this specific protocol. If your controller uses a different protocol, the display will not function.
- Check for any damage to the 5-pin communication cable.
- USB Charging Not Working:
- Ensure the ebike system is powered on.
- Check the USB cable and the device being charged.
If problems persist after attempting these solutions, please contact customer support.
Specifications
| Brand | mGYDY |
| Model Name | H6C 5 Pin Electric Bike LCD Meter |
| Color | Black |
| Material | ABS |
| Screen Size | 135.4 Millimeters |
| Display Type | LCD |
| Sensor Type | Speed Sensor |
| Connectivity Technology | UART (No. 2 Protocol) |
| Applicable Voltage | 24V / 36V / 48V / 60V (Adjustable) |
| USB Charging Output | 5V / 500mA |
| Applicable Handlebar Size | 22.2mm / 25.4mm / 28.6mm / 31.8mm |
| Included Components | 1 x H6C 5 Pin Electric Bike LCD Meter |
| Dimensions (L x W x H) | 116.1mm x 71.3mm x 22.8mm |
Warranty and Support
Warranty Information:
The mGYDY H6C Ebike LCD Display Meter comes with a 1 Year Manufacturer Warranty from the date of purchase. This warranty covers defects in materials and workmanship under normal use. It does not cover damage caused by misuse, accidents, unauthorized modifications, or improper installation.
Customer Support:
For technical assistance, troubleshooting beyond this manual, or warranty claims, please contact your retailer or the manufacturer's customer support. Please have your product model number and purchase date available when contacting support.