1. Introduction
Thank you for choosing the XIMIBI Red Laser Pointer Model 9127. This device is designed for various applications including presentations, teaching, astronomy, and outdoor activities. Please read this manual thoroughly before use to ensure proper operation and safety.

Image 1.1: Overview of the XIMIBI Red Laser Pointer, showcasing its design, USB charging capability, starlight patterns, and long-range projection.
Important Safety Warning:
- Do not directly shine the laser pointer into the eyes of humans or animals.
- Avoid pointing the laser at reflective surfaces that could redirect the beam into eyes.
- Keep out of reach of children.
- This product is not a toy.
2. Product Overview
The XIMIBI Red Laser Pointer Model 9127 features a durable aluminum alloy body, USB charging, and a versatile star hat for different light patterns.

Image 2.1: Detailed diagram illustrating the main components of the laser pointer, including the USB cover, aluminum alloy body, large capacity battery, touch switch, star hat, and wrist rope.
Components:
- USB Cover: Protects the USB charging port.
- Aluminum Alloy Body: Provides durability and a comfortable grip.
- Large Capacity Battery: Internal rechargeable battery.
- Touch Switch: Activates and deactivates the laser.
- Star Hat: Removable cap for projecting various patterns.
- Rope: For convenient carrying and securing the device.
3. Setup
3.1. Initial Charge
Before first use, fully charge the laser pointer.
- Unscrew the bottom USB cover of the laser pointer.
- Connect the exposed USB plug directly into any standard USB port (e.g., computer, laptop, wall charger, power bank).
- Observe the power indicator light:
- Red Light: Indicates the device is currently charging.
- Light Off: Indicates the device is fully charged.
- Once fully charged, disconnect the laser pointer and securely screw the USB cover back on.

Image 3.1: Visual guide for USB charging, showing the laser pointer connected to a laptop USB port and examples of compatible charging sources like wall chargers, portable chargers, and car chargers.
4. Operating Instructions
4.1. Basic Operation
To activate the laser, press and hold the touch switch located on the body of the pointer. Release the switch to turn off the laser.
4.2. Starlight Mode
The laser pointer comes with a removable "star hat" that allows for projection of various patterns.
- To project patterns: Ensure the silver star hat is securely attached to the laser pointer's head. Rotate the star hat to cycle through different light patterns.
- To project a single focused laser dot: Gently unscrew and remove the silver star hat from the laser pointer's head. This will provide a focused laser beam, suitable for longer distances.

Image 4.1: Illustration of the starlight mode, showing how rotating the star cap creates different patterns and how removing the cap results in a single, focused laser beam for long-range projection.
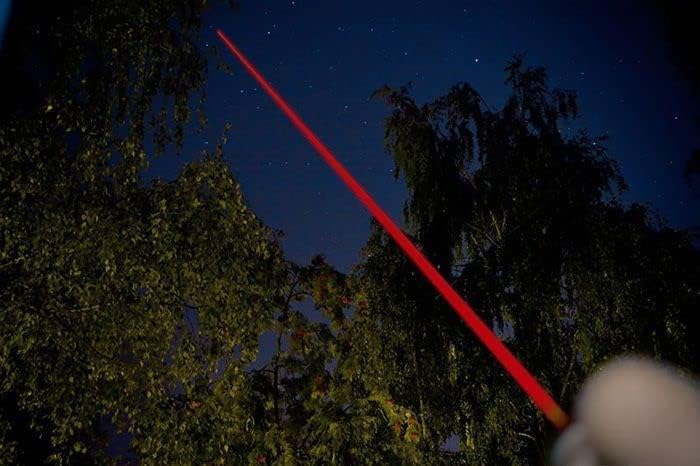
Image 4.2: The red laser beam projected into the night sky, demonstrating its visibility and long-range capability.
5. Maintenance
5.1. Cleaning
Wipe the exterior of the laser pointer with a soft, dry cloth. Do not use abrasive cleaners or solvents.
5.2. Storage
Store the device in a cool, dry place away from direct sunlight and extreme temperatures. Ensure the USB cover is securely fastened to protect the charging port.
6. Troubleshooting
| Problem | Possible Cause | Solution |
|---|---|---|
| Laser does not turn on. | Battery is depleted. | Charge the laser pointer using a USB port until the indicator light turns off. |
| Laser beam is dim. | Low battery. | Recharge the device. |
| Patterns are not clear or visible. | Star hat is loose or dirty. | Ensure the star hat is securely attached and clean any dust or debris from its surface. |
| Device not charging. | USB connection issue or faulty port. | Ensure the USB plug is fully inserted. Try a different USB port or charging adapter. |
7. Specifications
| Feature | Detail |
|---|---|
| Model Number | 9127 |
| Brand | XIMIBI |
| Color | Red |
| Power Supply | USB Charging |
| Material | Aluminum Alloy |
| Item Weight | 1.76 ounces (approx. 50 grams) |
| Package Dimensions | 6.5 x 1.22 x 0.91 inches |
| Special Feature | Lightweight, Starlight Pattern |
| Compatible Devices | Teaching indicator Red |
8. Safety Information
WARNING: Laser Radiation. Avoid Direct Eye Exposure.
- Never look directly into the laser beam.
- Do not point the laser at aircraft, vehicles, or any moving objects.
- Do not point the laser at people or animals.
- Do not point the laser at highly reflective surfaces.
- Use only as intended for pointing and presentation purposes.
- Store the laser pointer in a secure location, out of reach of children and unauthorized users.
- Do not attempt to disassemble or modify the device. This can lead to hazardous laser exposure and voids any potential warranty.
9. Warranty and Support
Specific warranty details for the XIMIBI Red Laser Pointer Model 9127 are not provided in this manual. For warranty information, technical support, or service inquiries, please refer to the product packaging or contact the retailer where the product was purchased.