1. Introduction
Thank you for choosing the AKEYDIY 5-in-1 Digital Multifunction Heat Press Machine. This versatile machine is designed for transferring images onto a variety of materials, including T-shirts, caps, mugs, and plates. Featuring advanced digital controls and a durable design, it ensures precise temperature and time settings for high-quality transfers. Please read this manual thoroughly before operation to ensure safe and efficient use.
2. Safety Instructions
- Always operate the machine on a stable, heat-resistant surface.
- Keep hands and clothing clear of the heating elements during operation to prevent burns.
- Do not touch the heating platen or attachments when hot. Use heat-resistant gloves if necessary.
- Ensure proper ventilation in the work area.
- Unplug the machine from the power outlet when not in use or before cleaning/maintenance.
- Do not immerse the machine or its electrical components in water or other liquids.
- Keep out of reach of children and pets.
- Use only the provided attachments and accessories.
3. Package Contents
Your AKEYDIY 5-in-1 Heat Press Machine package includes the following components:
- Main Heat Press Machine (12" x 15" Flat Platen)
- Cap/Hat Press Attachment (6" x 3")
- Mug Press Attachment (for various sizes including 9oz, 11oz, 12oz, 17oz)
- Plate Press Attachments (5" and 6" diameter)
- Power Cord
- User Manual

Image: Overview of the AKEYDIY 5-in-1 Heat Press Machine and its included attachments for different sublimation projects.
4. Setup
- Unpacking: Carefully remove all components from the packaging. Inspect for any damage.
- Placement: Place the main heat press machine on a sturdy, level, and heat-resistant workbench. Ensure there is adequate space around the machine for safe operation and heat dissipation.
- Power Connection: Connect the power cord to the machine and then to a grounded 110V power outlet.
- Control Box: The digital control box is integrated. Ensure all connections are secure.
- Attachment Installation: For specific projects, attach the appropriate heating element (mug press, cap press, plate press) by following the instructions for securing them to the main unit. The main flat platen is pre-installed.

Image: Detailed view of the heat press machine, showing its dimensions and various components.
5. Operating Instructions
5.1 Digital Control Panel
The machine features an advanced digital control panel for precise temperature and time management.
- Power Switch: Located on the side of the control box. Turn it ON to power the machine.
- Temperature Setting: Press the 'TEMP' button, then use '+' or '-' to adjust the desired temperature. The range is 104°F to 390°F (40°C to 200°C). Long press '+' and '-' simultaneously for 5 seconds to switch between Fahrenheit (°F) and Celsius (°C).
- Time Setting: Press the 'TIME' button, then use '+' or '-' to adjust the desired time in seconds. The range is 0 to 999 seconds.
- Start Button: Press 'START' to begin the heating process or the countdown after pressing.
- Counting Function: The display includes a counting function to track the number of presses.
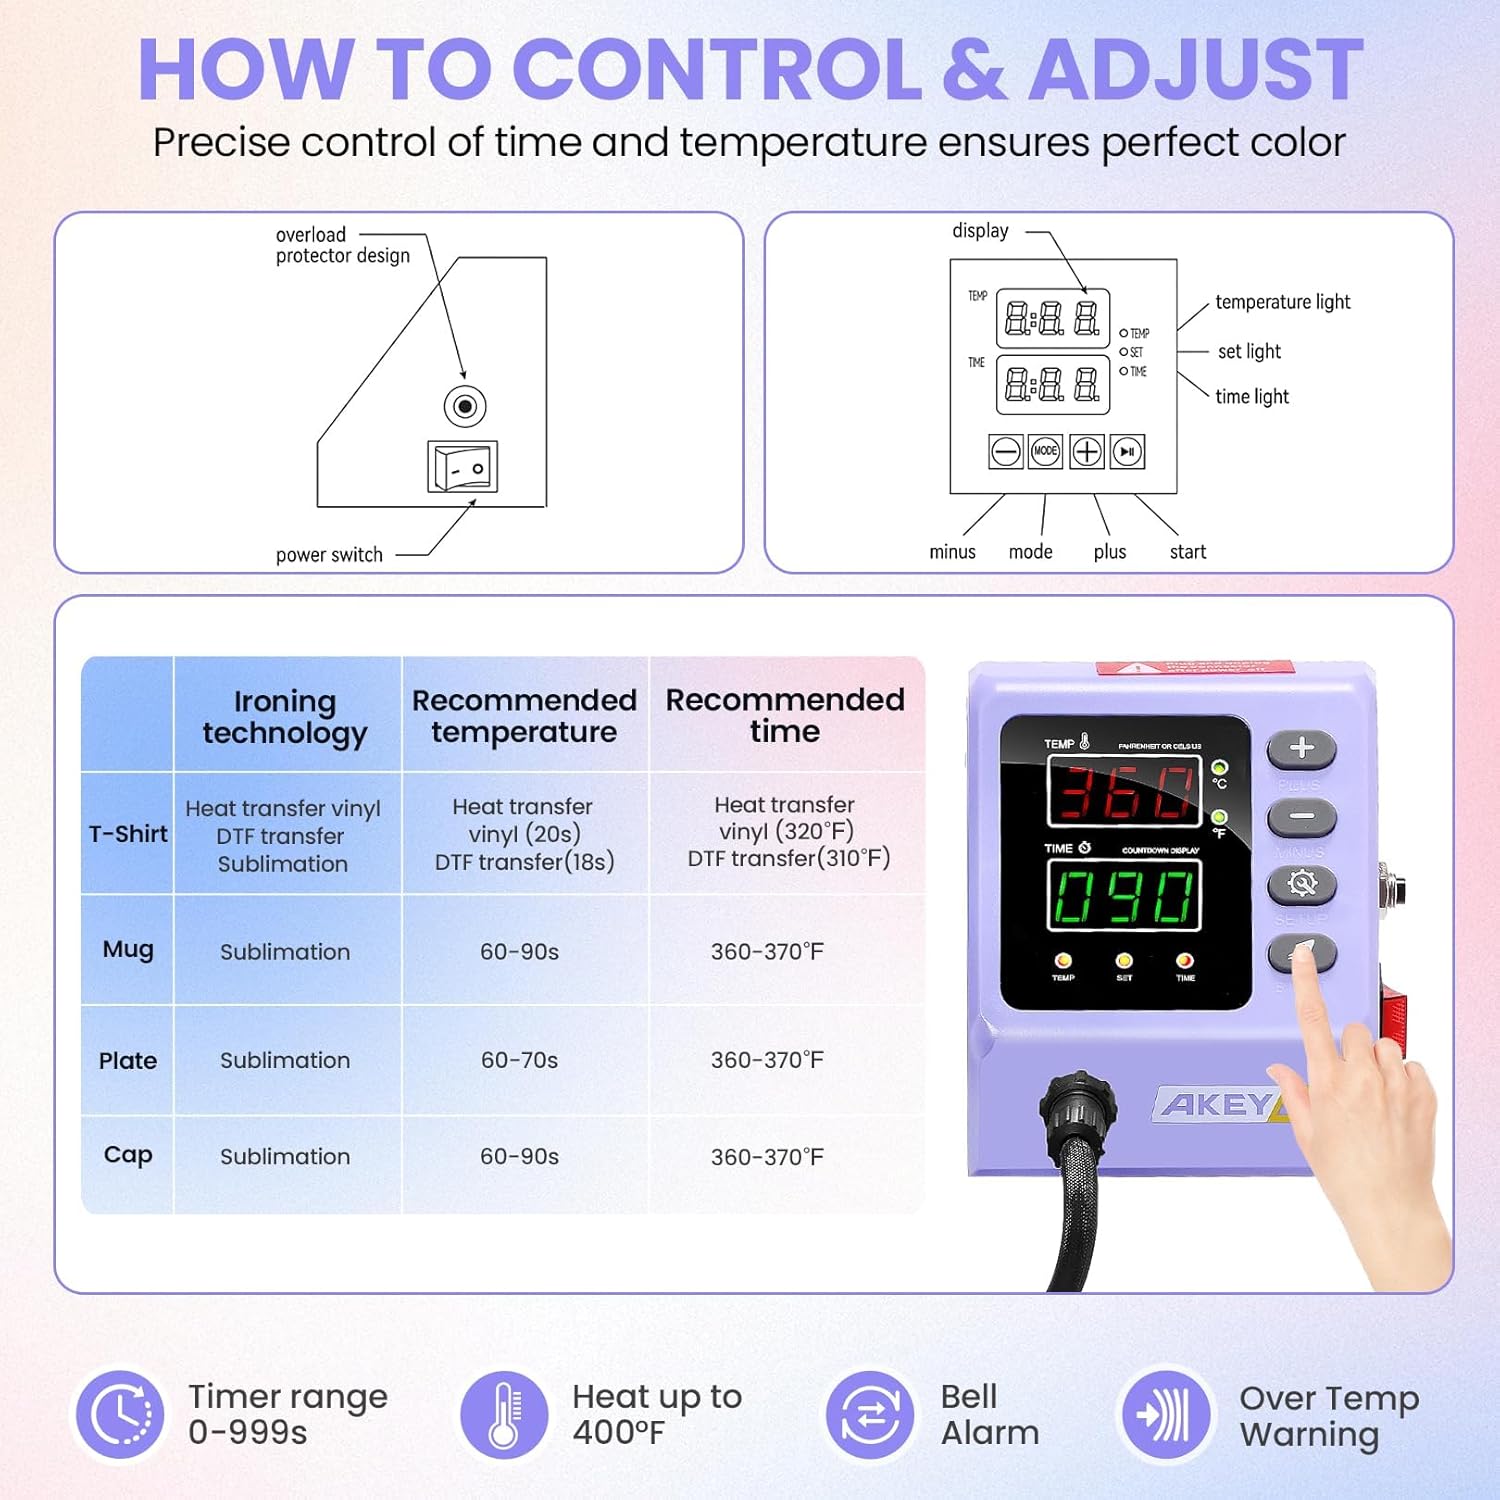
Image: Digital control panel with temperature and time settings, along with a table of recommended ironing settings for various materials.
5.2 Pressure Adjustment
The machine features a pressure adjustment knob located on top of the main platen. Turn the knob clockwise to increase pressure and counter-clockwise to decrease pressure. Adjust the pressure based on the thickness of the material being pressed to ensure even heat distribution and optimal transfer quality.
5.3 360-Degree Swing Away Function
The 360-degree swing-away design allows the heating platen to be rotated away from the lower platen. This provides a clear workspace, reducing the risk of accidental contact with the hot platen and making it easier to arrange your materials.
5.4 Using Different Attachments
The AKEYDIY heat press comes with multiple attachments for diverse projects. Ensure the machine is unplugged and cooled before changing attachments.
5.4.1 Flat Press (T-shirts, Bags, etc.)
- Ensure the flat platen is installed.
- Place the garment or material onto the silicone pad on the lower platen. Smooth out any wrinkles.
- Position your transfer design (e.g., heat transfer vinyl, sublimation paper) onto the material.
- Cover the design with a Teflon sheet or parchment paper to protect the heating platen.
- Swing the heating platen over the material.
- Lower the handle to apply pressure and press the 'START' button.
- Once the timer beeps, lift the handle and swing the heating platen away.
- Carefully remove the Teflon sheet and peel off the transfer paper according to your transfer material's instructions (hot peel or cold peel).

Image: Step-by-step guide on how to print a T-shirt using the heat press machine, demonstrating pressure adjustment, parameter setting, design placement, and final transfer.
5.4.2 Mug Press (Mugs, Tumblers)
- Install the mug press attachment.
- Wrap your sublimation design around the mug or tumbler, securing it with heat-resistant tape.
- Place the mug into the mug press.
- Close the clamp to apply pressure and press the 'START' button.
- After the timer beeps, open the clamp and carefully remove the hot mug using heat-resistant gloves.
- Allow the mug to cool before removing the transfer paper.
5.4.3 Cap Press (Hats)
- Install the cap press attachment.
- Place the cap onto the lower platen of the cap press.
- Position your design onto the cap.
- Lower the heating element onto the cap and press the 'START' button.
- Once the timer beeps, lift the heating element and carefully remove the cap.
5.4.4 Plate Press (Plates)
- Install the appropriate size plate press attachment (5" or 6").
- Place the plate onto the lower platen of the plate press.
- Position your design onto the plate.
- Lower the heating element onto the plate and press the 'START' button.
- Once the timer beeps, lift the heating element and carefully remove the plate.
5.5 Recommended Settings
| Item | Ironing Technology | Recommended Temperature | Recommended Time |
|---|---|---|---|
| T-Shirt | Heat transfer vinyl (HTV) | 320°F (160°C) | 20s |
| T-Shirt | DTF transfer | 310°F (155°C) | 18s |
| Mug | Sublimation | 360-370°F (182-188°C) | 60-90s |
| Plate | Sublimation | 360-370°F (182-188°C) | 60-70s |
| Cap | Sublimation | 360-370°F (182-188°C) | 60-90s |
Note: These settings are general recommendations. Always perform test presses and refer to your transfer material manufacturer's guidelines for optimal results.
Official Product Video: AKEYDIY Heat Press Machine in Action
Video: This video demonstrates the operation of the AKEYDIY heat press, showcasing its energy-saving features and ease of use for various applications.
Official Product Video: Upgraded Heat Press Machine Combo Overview
Video: An overview of the upgraded AKEYDIY Heat Press Machine Combo, highlighting its features and versatility for different heat transfer projects.
6. Maintenance
- Cleaning: Regularly clean the heating platen and silicone pads with a soft, damp cloth when the machine is cool. Do not use abrasive cleaners.
- Storage: Store the machine in a dry, dust-free environment when not in use.
- Inspection: Periodically check all electrical connections and moving parts for wear or damage.
- Teflon Sheet: Replace the Teflon sheet if it becomes damaged or excessively dirty to ensure optimal transfer quality and protection.
7. Troubleshooting
- Uneven Heating: Ensure the pressure is evenly distributed across the platen. Check for any debris or damage on the heating element or silicone pad. The dual-tube heating design minimizes temperature differences.
- Poor Transfer Quality: Verify that the correct temperature and time settings are used for your specific material and transfer type. Ensure adequate pressure is applied. Check the quality of your transfer paper and ink.
- Machine Not Powering On: Check the power cord connection and the power outlet. Ensure the main power switch is in the 'ON' position.
- Over-Temperature Warning: If an over-temperature warning occurs, immediately turn off the machine, unplug it, and allow it to cool down before inspecting for any issues.
8. Specifications
- Brand: AKEYDIY
- Model: Digital 5 in 1
- Material: Metal, Plastic
- Color: Purple/Lavender (as depicted in product images)
- Product Dimensions (L x W x H): 21" x 17.5" x 18"
- Recommended Uses: Bottle, Cap, Cup, Mug, T-Shirt
- Upper Temperature Rating: 450°F (232°C)
- Voltage: 110 Volts
- Wattage: 850 Watts
- Flat Platen Size: 12" x 15"
9. Warranty & Support
The AKEYDIY Heat Press Machine comes with a manufacturer warranty for 365 days from the date of purchase. For technical support, warranty claims, or any questions regarding your product, please refer to the contact information provided with your purchase documentation or visit the official AKEYDIY website.