Kestanlora 2
Kestanlora WiFi HD 1080P Hidden Camera Smoke Detector User Manual
Model: 2 | Brand: Kestanlora
1. Introduction
This manual provides detailed instructions for the Kestanlora WiFi HD 1080P Hidden Camera Smoke Detector, Model 2. This device integrates a high-definition wireless camera into a discreet smoke detector housing, offering indoor surveillance capabilities with features such as motion detection and night vision. Please read this manual thoroughly before operating the device to ensure proper setup and functionality.
2. Package Contents
Verify that all items listed below are included in your package:
- Camera Body (Smoke Detector Housing)
- Charging Cable
- Instruction Manual
- Reset Pin

Image: Contents of the Kestanlora Hidden Camera Smoke Detector package, including the camera unit, charging cable, instruction manual, and reset pin.
3. Product Overview
The Kestanlora Hidden Camera Smoke Detector is designed to blend seamlessly into indoor environments. It features a 1080P HD camera with night vision capabilities and motion detection.
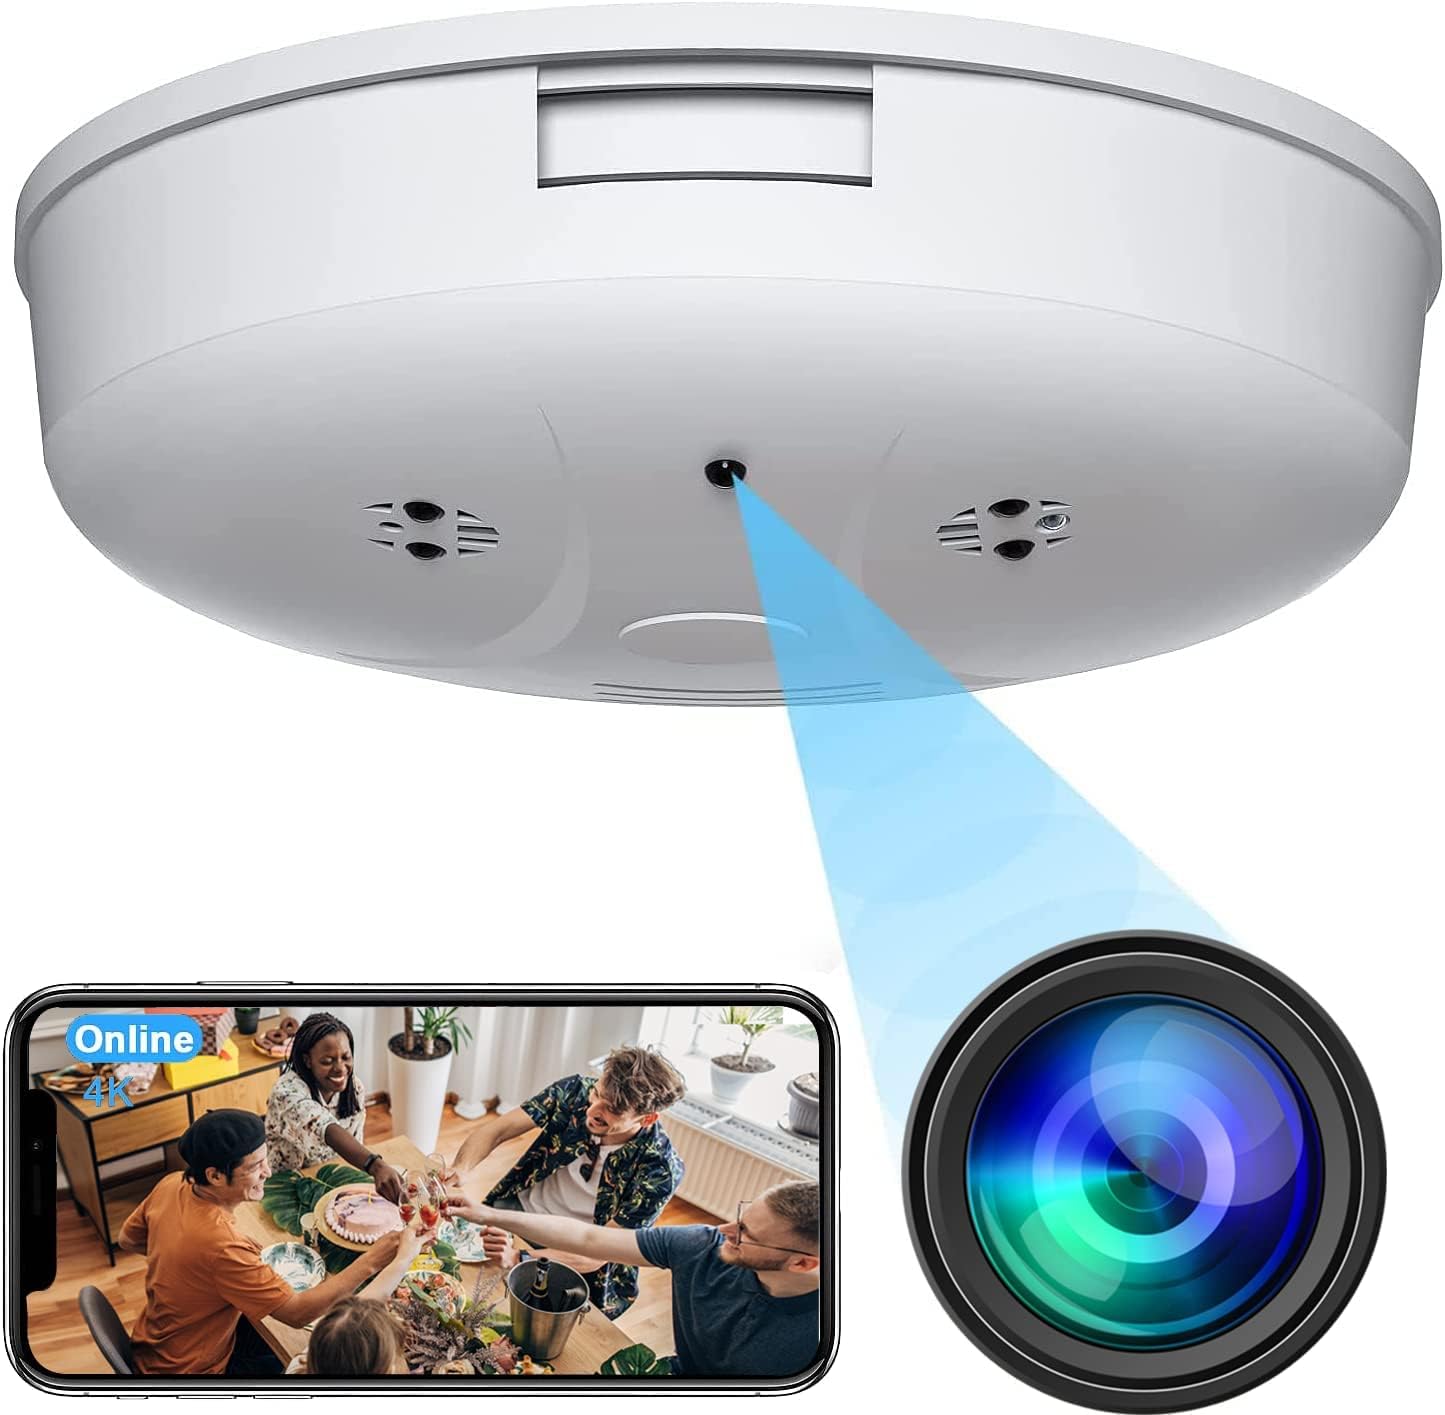
Image: Front view of the Kestanlora Hidden Camera Smoke Detector, illustrating the discreet camera lens and a smartphone displaying a live feed from the camera.
3.1. Components and Dimensions

Image: Diagram detailing the dimensions (4.5 inches diameter, 1.2 inches height) and key components such as the camera lens and IR lights on the Kestanlora Hidden Camera Smoke Detector.
- Camera Lens: Discreetly integrated for video capture.
- IR Lights: For enhanced night vision in low-light conditions.
- Indicator Light: (Location not specified, but common for status)
- Reset Button: Used for factory reset (requires reset pin).
- Charging Port: For power input.
- Micro SD Card Slot: Supports up to 128GB for local storage (card not included).
4. Setup and Installation
Follow these steps to set up your Kestanlora Hidden Camera Smoke Detector.
4.1. Charging the Device
Before first use, fully charge the device using the provided charging cable. A full charge provides approximately 130 minutes of continuous working time. For continuous operation, keep the device connected to a USB power source.
4.2. Inserting a Micro SD Card (Optional)
To enable local recording, insert a Micro SD card (up to 128GB, not included) into the designated slot. The camera supports continuous loop recording, overwriting the oldest files when the card is full.
4.3. App Download and Installation
Download the companion application to your smartphone. The app name is typically provided in the included instruction manual or on the product packaging. Search for it on the Apple App Store (for iOS) or Google Play Store (for Android).
4.4. Connecting to Your Device
There are two primary connection methods:
- AP Mode (No WiFi Required):
- Power on the camera.
- On your smartphone, connect to the camera's direct Wi-Fi signal (SSID will typically start with a unique identifier).
- Open the app to view the live feed.
- Note: In AP mode, your device and the camera must remain within approximately 49.2 feet (15 meters) for a stable connection.
- P2P Mode (Requires 2.4GHz WiFi):
- Ensure your home or office Wi-Fi network is 2.4GHz. This camera does not support 5GHz Wi-Fi.
- Follow the in-app instructions to connect the camera to your Wi-Fi network. This usually involves scanning a QR code generated by the app or entering your Wi-Fi credentials.
- Once connected, you can remotely monitor the camera feed from anywhere in the world via the app, using either Wi-Fi or mobile data.

Image: Illustration of the easy setup process, showing the smartphone app interface for device management and a diagram of how the camera unit can be mounted.
4.5. Mounting the Device
The device is designed for wall or ceiling mounting. Use appropriate screws and anchors (not included) for secure installation. Ensure the camera lens has an unobstructed view of the area you wish to monitor.
5. Operating Instructions
5.1. Live View
Once connected via the app, select your device to access the live 1080P HD video feed. You can monitor the area in real-time from your smartphone.
5.2. Motion Detection and Alerts
The camera features motion sensing. When motion is detected, the camera will send a push notification with an image to your phone. You can then log into the app to view the event. Motion detection settings can be configured within the app.
5.3. Night Vision
Equipped with infrared lights, the camera provides improved night vision for monitoring in low-light conditions. The night vision range is approximately 15 feet. The camera automatically adjusts to low light, but manual adjustment may be available in the app.

Image: A split image demonstrating the camera's 120-degree wide-angle view and its night vision capability, showing a clear view in both daytime and low-light conditions.
5.4. Recording
The camera supports continuous loop video recording to a Micro SD card (if installed). New content will automatically overwrite the oldest content when the storage is full. Recorded videos can be accessed and managed through the mobile application.

Image: A screenshot illustrating the 1080P high-definition video quality captured by the hidden camera, showing clear details of an indoor scene.
5.5. Multi-Scene Application
The discreet design of the Kestanlora Hidden Camera Smoke Detector allows for versatile placement in various indoor environments, including homes, offices, and warehouses, for general surveillance, monitoring pets, or observing children and elderly family members.

Image: Examples of the hidden camera's application in diverse indoor settings, demonstrating its utility for general surveillance and monitoring.
6. Maintenance
- Cleaning: Use a soft, dry cloth to clean the exterior of the device. Do not use liquid cleaners or aerosols.
- Lens Care: Gently wipe the camera lens with a microfiber cloth to ensure clear image quality.
- Battery Life: For optimal performance, keep the device connected to power for continuous operation.
- Software Updates: Periodically check the mobile application for firmware updates to ensure the best performance and security.
7. Troubleshooting
| Problem | Possible Solution |
|---|---|
| Device not powering on. | Ensure the device is fully charged or connected to a power source. Check the charging cable and adapter. |
| Cannot connect to Wi-Fi. |
|
| Poor video quality or choppy feed. |
|
| Motion detection alerts not received. |
|
| SD card not recording. |
|
8. Specifications
| Feature | Detail |
|---|---|
| Model Name | brao-YG |
| Item Model Number | 2 |
| Video Capture Resolution | 1080p |
| Viewing Angle | 150 Degrees |
| Night Vision Range | 15 Feet |
| Connectivity Technology | Wireless (Wi-Fi 2.4GHz) |
| Compatible Devices | Desktop, Laptop, Smartphone (Android, iOS) |
| Power Source | Battery Powered (rechargeable via USB) |
| Continuous Working Time (Battery) | Approx. 130 minutes |
| Storage | Micro SD Card (Max 128GB, not included) |
| Indoor/Outdoor Usage | Indoor |
| Mounting Type | Wall Mount / Ceiling Mount |
| Product Dimensions (L x W x H) | 4.5 x 1.2 x 4.5 inches |
| Item Weight | 6.7 ounces |
9. Warranty and Support
For warranty information and technical support, please refer to the contact details provided on the product packaging or the official Kestanlora website. Keep your purchase receipt for warranty claims.
If you encounter any issues not covered in this manual, please contact Kestanlora customer service for assistance.
Ask a question about this manual
Ask about setup, troubleshooting, compatibility, parts, safety, or missing instructions. Manuals+ will review the question and use this page’s manual context to help answer it.