1. Introduction
Thank you for choosing the VEVOR Nugget Ice Maker, Model DIM-15A. This manual provides essential information for the safe operation, installation, maintenance, and troubleshooting of your new ice maker. Please read this manual thoroughly before use and retain it for future reference.
The VEVOR Nugget Ice Maker is designed to produce chewable nugget ice efficiently, suitable for various beverages and applications in home, kitchen, and office environments.
2. Safety Instructions
- Read all instructions before operating the appliance.
- Ensure the power supply voltage matches the rating label on the appliance.
- Do not operate any appliance with a damaged cord or plug. If the supply cord is damaged, it must be replaced by the manufacturer or a qualified service agent.
- Do not immerse the appliance, power cord, or plug in water or other liquids.
- Unplug the appliance from the outlet when not in use, before cleaning, or before adding/removing parts.
- Keep the appliance away from heat sources and direct sunlight.
- This appliance is for indoor use only.
- Do not allow children to operate the ice maker without supervision.
- Use only potable water in the water tank.
- Ensure proper ventilation around the appliance. Maintain at least 5 inches of clearance on all sides.
3. Product Components
Familiarize yourself with the parts of your VEVOR Nugget Ice Maker:
- Ice Maker Unit
- Ice Scoop
- Drip Tray
- Instruction Manual

Figure 3.1: The VEVOR Nugget Ice Maker showing its dimensions (9.5"D x 13.9"W x 11.9"H) and included accessories: an ice scoop and a drip tray. The image also highlights the model number DIM-15A and key specifications.
4. Setup
4.1 Unpacking
- Carefully remove the ice maker from its packaging.
- Remove all packing materials, including tape and protective films.
- Check for any damage during transit. If damaged, do not operate and contact customer support.
4.2 Placement
- Place the ice maker on a stable, level surface, away from direct sunlight and heat sources.
- Ensure there is at least 5 inches (12.7 cm) of space around the unit for proper ventilation.
- Do not place the unit near appliances that generate heat, such as ovens or radiators.
4.3 Initial Cleaning
Before first use, it is recommended to clean the unit. Refer to the "Maintenance and Cleaning" section for detailed instructions, or use the self-cleaning function.
4.4 Filling the Water Tank

Figure 4.1: Illustrates the process of pouring water into the ice maker's 1.5L water tank, which is essential for ice production.
- Open the lid of the ice maker.
- Fill the water tank with potable water up to the MAX fill line. The tank capacity is 1.5 liters (1.6 quarts).
- Close the lid securely.
5. Operating Instructions
5.1 Powering On/Off
- Plug the ice maker into a grounded electrical outlet.
- Press the ON/OFF button on the control panel to turn the unit on. The indicator light will illuminate.
- To turn off the unit, press the ON/OFF button again.
5.2 Ice Making Process

Figure 5.1: The VEVOR Nugget Ice Maker in operation, showing the transparent window and the blue light inside, indicating ice production.
- Once powered on and with sufficient water, the ice maker will automatically begin the ice production cycle.
- The unit can produce up to 33 pounds of nugget ice within 24 hours.
- Nugget ice is characterized by its chewable, brittle texture, which is ideal for retaining beverage flavor.

Figure 5.2: A visual representation of nugget ice, highlighting its desirable characteristics: it retains flavor, is chewable, and brittle.
5.3 Indicator Lights
- Water Low Indicator: This light will illuminate when the water level in the tank is too low. Refill the water tank to resume ice production.
- Ice Full Indicator: This light will illuminate when the ice basket is full. The ice maker will pause operation until ice is removed.
5.4 Ice Transfer

Figure 5.3: Demonstrates the convenient transfer of ice from the machine using the included ice scoop and the removable ice basket.
Use the provided ice scoop to transfer ice from the ice basket. The ice basket is removable for easier access and cleaning.
6. Maintenance and Cleaning
6.1 Automatic Self-Cleaning
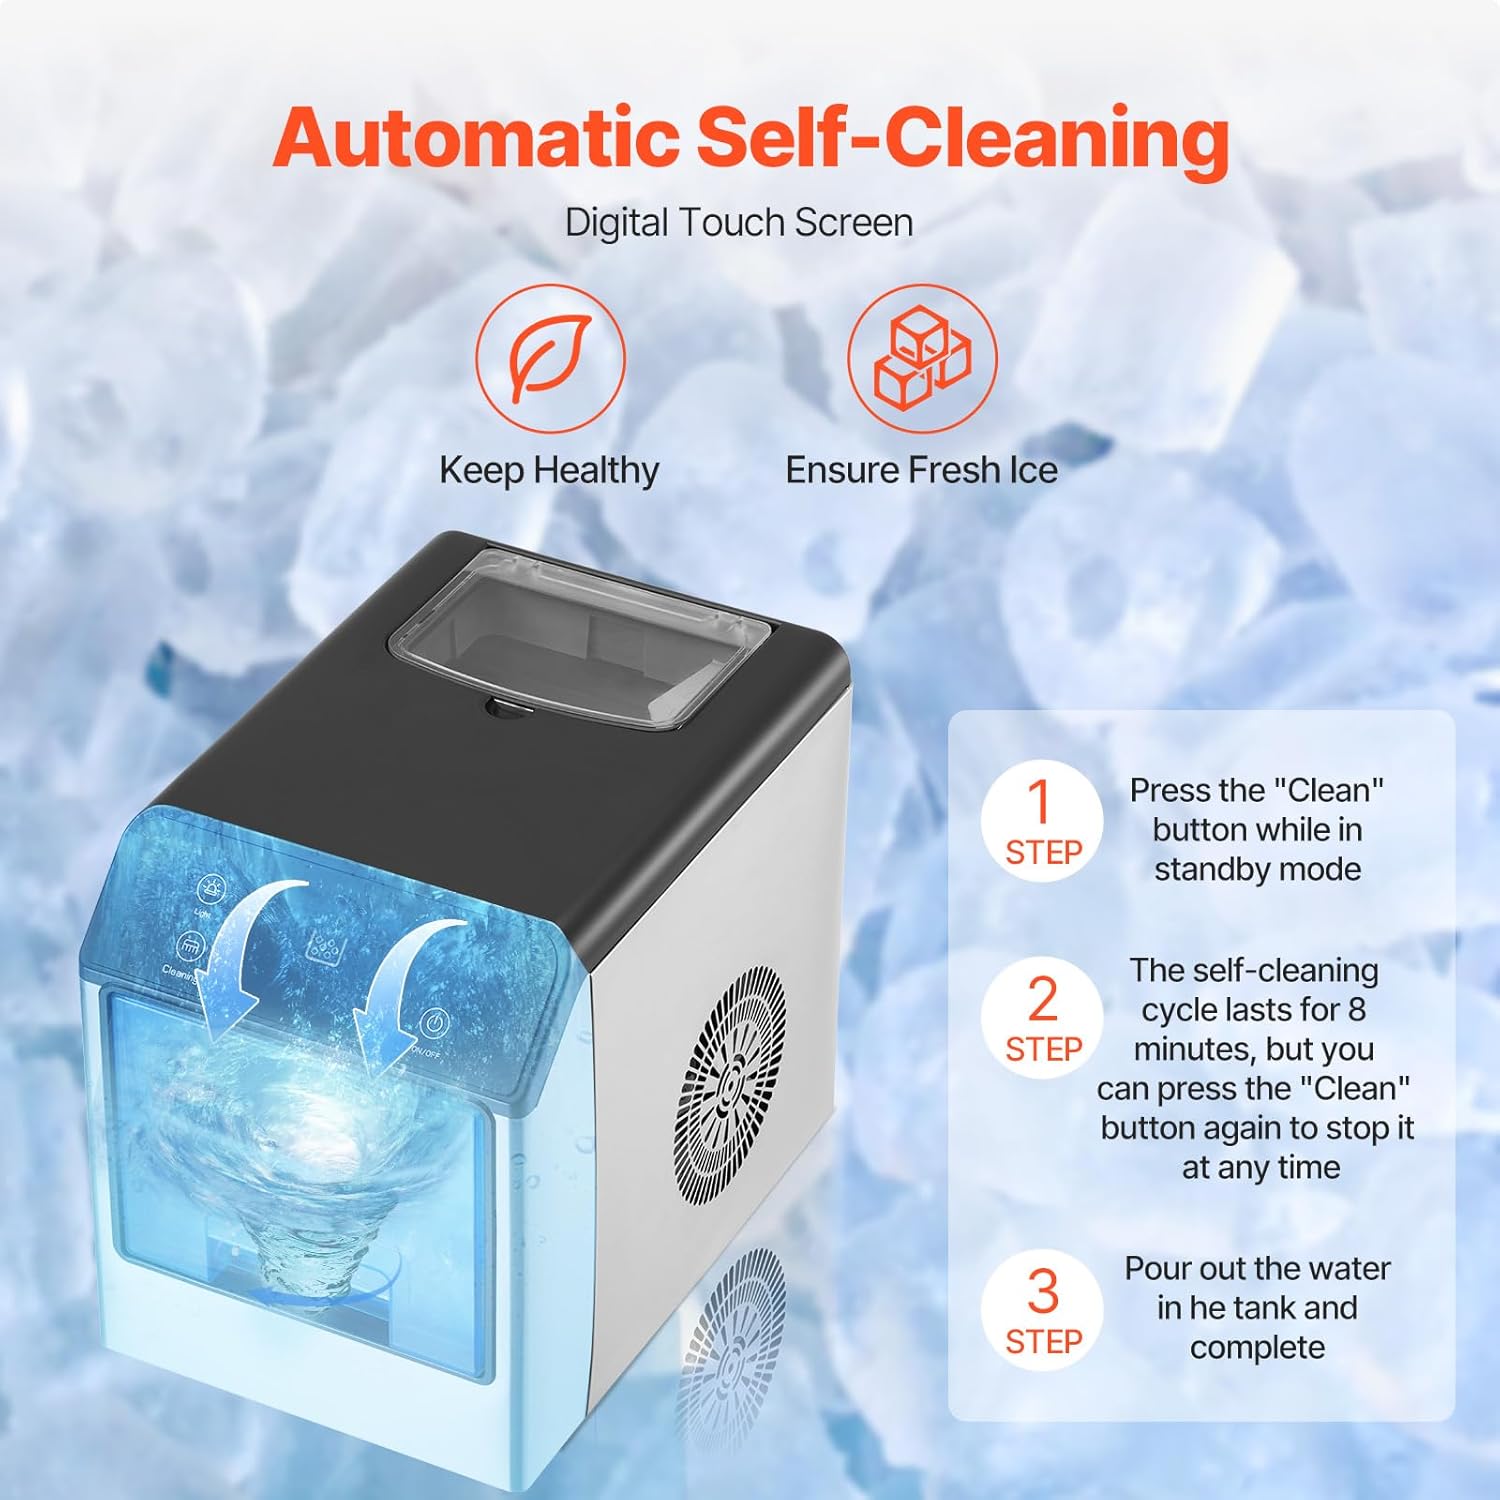
Figure 6.1: Visual guide for the automatic self-cleaning process, detailing steps to initiate and complete the cycle.
- Ensure the unit is in standby mode (powered on but not making ice).
- Press and hold the Cleaning button for 5 seconds to activate the 30-minute self-cleaning mode.
- The self-cleaning cycle will run for 30 minutes. You can press the Cleaning button again at any time to stop it.
- After the cycle, drain the water from the unit and wipe the interior dry.
6.2 Regular Cleaning
- Always unplug the ice maker before cleaning.
- Clean the exterior with a soft, damp cloth. Do not use abrasive cleaners or solvents.
- Remove the ice basket and drip tray and wash them with mild soap and warm water. Rinse thoroughly and dry.
- For the interior, wipe surfaces with a soft cloth dampened with a solution of water and white vinegar (1:1 ratio). Rinse by wiping with a clean, damp cloth.
- Ensure all parts are completely dry before reassembling and operating the unit.
- It is recommended to clean the ice maker at least once a week, or more frequently depending on usage.
7. Troubleshooting
| Problem | Possible Cause | Solution |
|---|---|---|
| Ice maker not producing ice. | No water in the tank. Power cord unplugged. Ambient temperature too high. | Fill water tank to MAX line. Ensure power cord is securely plugged in. Operate in a cooler environment. |
| "Water Low" indicator is on. | Water tank is empty or below minimum level. | Refill the water tank with potable water. |
| "Ice Full" indicator is on. | Ice basket is full. | Remove ice from the ice basket. |
| Unusual noise during operation. | Unit not level. Internal components vibrating. | Ensure the unit is on a flat, stable surface. This is often normal during ice production; if excessive, contact support. |
| Ice has an unusual taste or odor. | Unit needs cleaning. Stale water. | Perform a self-cleaning cycle and regular cleaning. Use fresh, potable water. |
If you encounter issues not listed here or if the problem persists after attempting the solutions, please contact VEVOR customer support.
8. Specifications
| Feature | Specification |
|---|---|
| Brand | VEVOR |
| Model Name | Nugget Ice Maker |
| Model Number | DIM-15A |
| Product Dimensions (D x W x H) | 9.5" x 13.9" x 11.9" (242 x 354 x 302 mm) |
| Water Tank Capacity | 1.5 Liters (1.6 Quarts) |
| Max Ice Making Capacity | 33 lbs / 24 hours |
| Ice Storage Capacity | 1.35 kg (3 lbs) |
| Voltage | 110 Volts |
| Refrigerant | R600a |
| Item Weight | 26 pounds (11.8 kg) |
| Noise Level | ≤ 50 dB |
| Main Materials | Stainless Steel, ABS |
9. Warranty and Support
This product comes with a standard manufacturer's warranty. Please refer to the warranty card included in your packaging or visit the official VEVOR website for detailed warranty terms and conditions.
For technical support, service, or replacement parts, please contact VEVOR customer service. Have your model number (DIM-15A) and purchase information ready when contacting support.
Included Components: 1 x Instruction Manual, 1 x Ice Scoop, 1 x Drip Tray.