1. Introduction
Thank you for choosing the EMKE Round Bathroom Mirror with LED Lighting. This manual provides detailed instructions to ensure safe installation, proper operation, and effective maintenance of your new mirror. Please read this manual thoroughly before installation and use, and retain it for future reference.

Image 1.1: EMKE Round Bathroom Mirror with LED Lighting, featuring a black frame and adjustable leather strap.
2. Important Safety Instructions
- Always disconnect power before installation, maintenance, or cleaning.
- Installation should be performed by a qualified electrician if you are unsure.
- Ensure the mounting surface is strong enough to support the mirror's weight.
- Do not expose the mirror to excessive moisture or direct water spray.
- Keep children away from the mirror during installation.
- Do not attempt to repair or modify the mirror yourself. Contact customer support for assistance.
- Dispose of packaging materials responsibly.
3. Package Contents
Please check that all components are present and undamaged before proceeding with installation:
- EMKE Round Bathroom Mirror (1 unit)
- Adjustable Leather Hanging Strap (1 unit)
- Mounting Hardware (screws, wall anchors)
- User Manual (this document)
4. Product Specifications
| Brand | EMKE |
| Model Number | OLM04CKD-NLADR |
| Dimensions | 80L x 80B cm (Diameter 800mm) |
| Thickness | 35mm |
| Mounting Type | Wall Mount |
| Light Colors | Cool White (6500K), Neutral White (4000K), Warm White (3000K) |
| Brightness | Dimmable (10% to 100%) |
| Features | Anti-fog Function, Touch Switch, Memory Function, Automatic Shut-off (3 hours) |

Image 4.1: Diagram illustrating the mirror's dimensions (800mm diameter, 35mm thickness) and the location of hanging points.
5. Installation Guide
The EMKE Round Bathroom Mirror is designed for easy wall mounting. Follow these steps carefully:
- Measure: Determine the desired height and position for your mirror. Mark the center point on the wall.
- Mark: Use a level to ensure the mirror will hang straight. Mark the positions for the mounting holes based on the mirror's hanging points.
- Drill: Drill holes at the marked positions. Ensure the drill bit size matches the wall anchors provided.
- Insert Anchors: Gently tap the wall anchors into the drilled holes until flush with the wall surface.
- Secure Screws: Insert the mounting screws into the anchors, leaving a small gap for the mirror's hanging hooks.
- Wiring: Connect the mirror's electrical wiring to your household electrical supply. This step should be performed by a qualified electrician if you are not experienced with electrical work. Ensure power is OFF before connecting.
- Mount: Carefully lift the mirror and align its hanging hooks with the screws on the wall. Lower the mirror to secure it in place.
- Finish: Ensure the mirror is stable and level. You can choose to attach the adjustable leather strap for aesthetic purposes or hang the mirror directly using the integrated hooks. The strap length is adjustable in 4 positions.

Image 5.1: Visual guide for the 8-step installation process, including measuring, marking, drilling, inserting anchors, securing screws, wiring, mounting, and finishing.

Image 5.2: Detail of the removable and adjustable leather strap, which can be set to four different lengths.
6. Operating Instructions
The EMKE mirror features intuitive touch controls for its various functions.
6.1 Touch Switch Operation
- The touch switch illuminates softly in blue when the mirror's LED lighting is off, making it easy to locate in the dark.
- When the LED lighting is on, the touch switch illuminates in milky white.

Image 6.1: Illustration of the touch switch indicator light: blue when off, white when on.
6.2 Dimmable Lighting and Color Temperature Adjustment
- Power On/Off: Tap the power icon on the touch panel to turn the LED lighting on or off.
- Adjust Brightness (Dimming Function): With the light on, press and hold the brightness icon (usually represented by a sun or plus/minus symbol) on the touch panel. The brightness will smoothly adjust from 10% to 100%. Release when the desired brightness is reached.
- Change Light Color (Color Temperature): With the light on, short press the 'M' (Mode) icon on the touch panel to cycle through the three available light colors: Cool White (6500K), Neutral White (4000K), and Warm White (3000K).
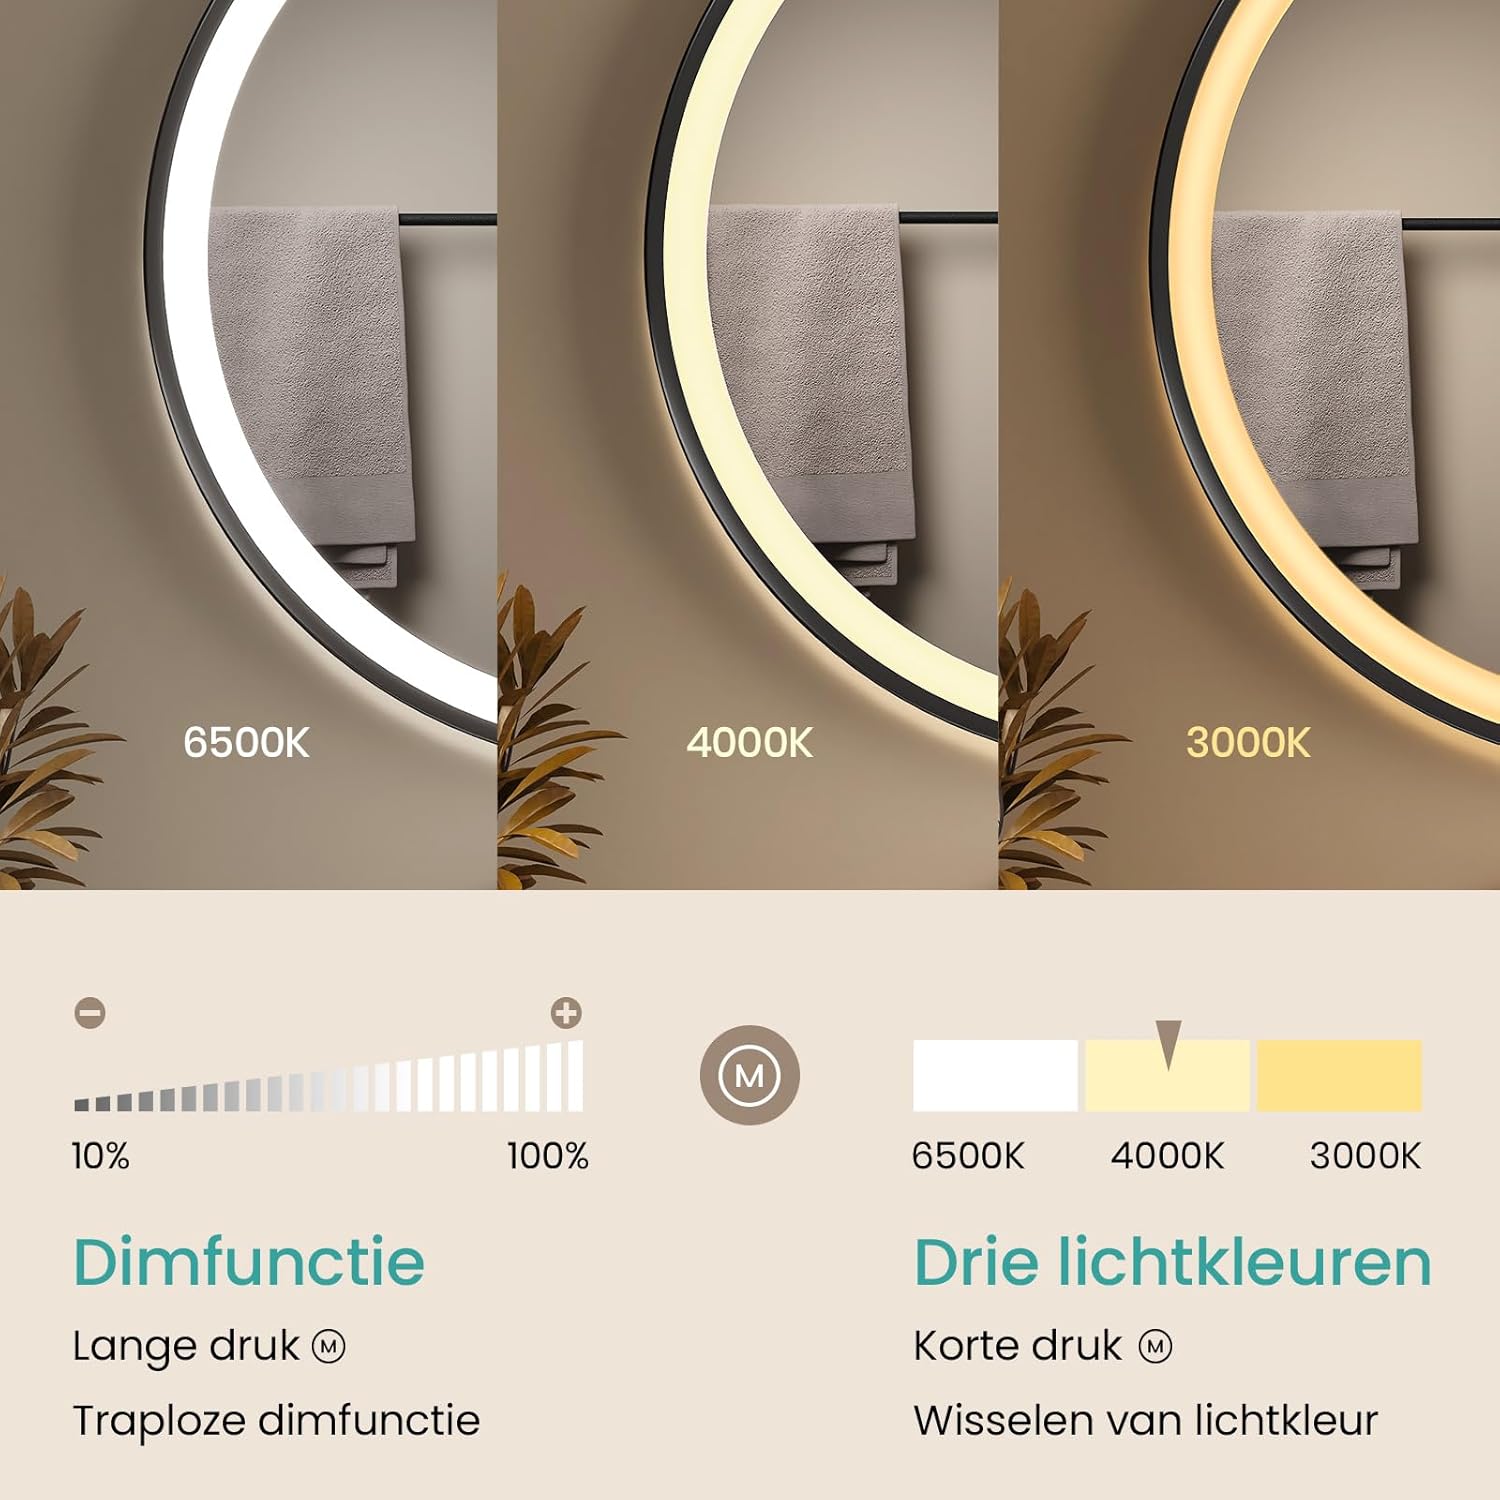
Image 6.2: Visual representation of the dimming range (10%-100%) and the three selectable light color temperatures (6500K, 4000K, 3000K).
6.3 Memory Function
The mirror is equipped with a memory function that retains the last used light setting (brightness and color temperature). When you turn the mirror off and then on again, it will automatically revert to your previous setting, eliminating the need to readjust it every time.

Image 6.3: Steps illustrating the memory function: 1. Set light (e.g., 4000K, 100%). 2. Turn off. 3. Restart, and the mirror automatically returns to 4000K, 100%.
6.4 Anti-fog Function
The mirror includes a separate anti-fog function to keep the mirror surface clear in humid environments. This function can be activated or deactivated as needed, saving energy.
- Activate/Deactivate: Tap the anti-fog icon (usually represented by steam or a fan symbol) on the touch panel to turn the anti-fog function on or off.
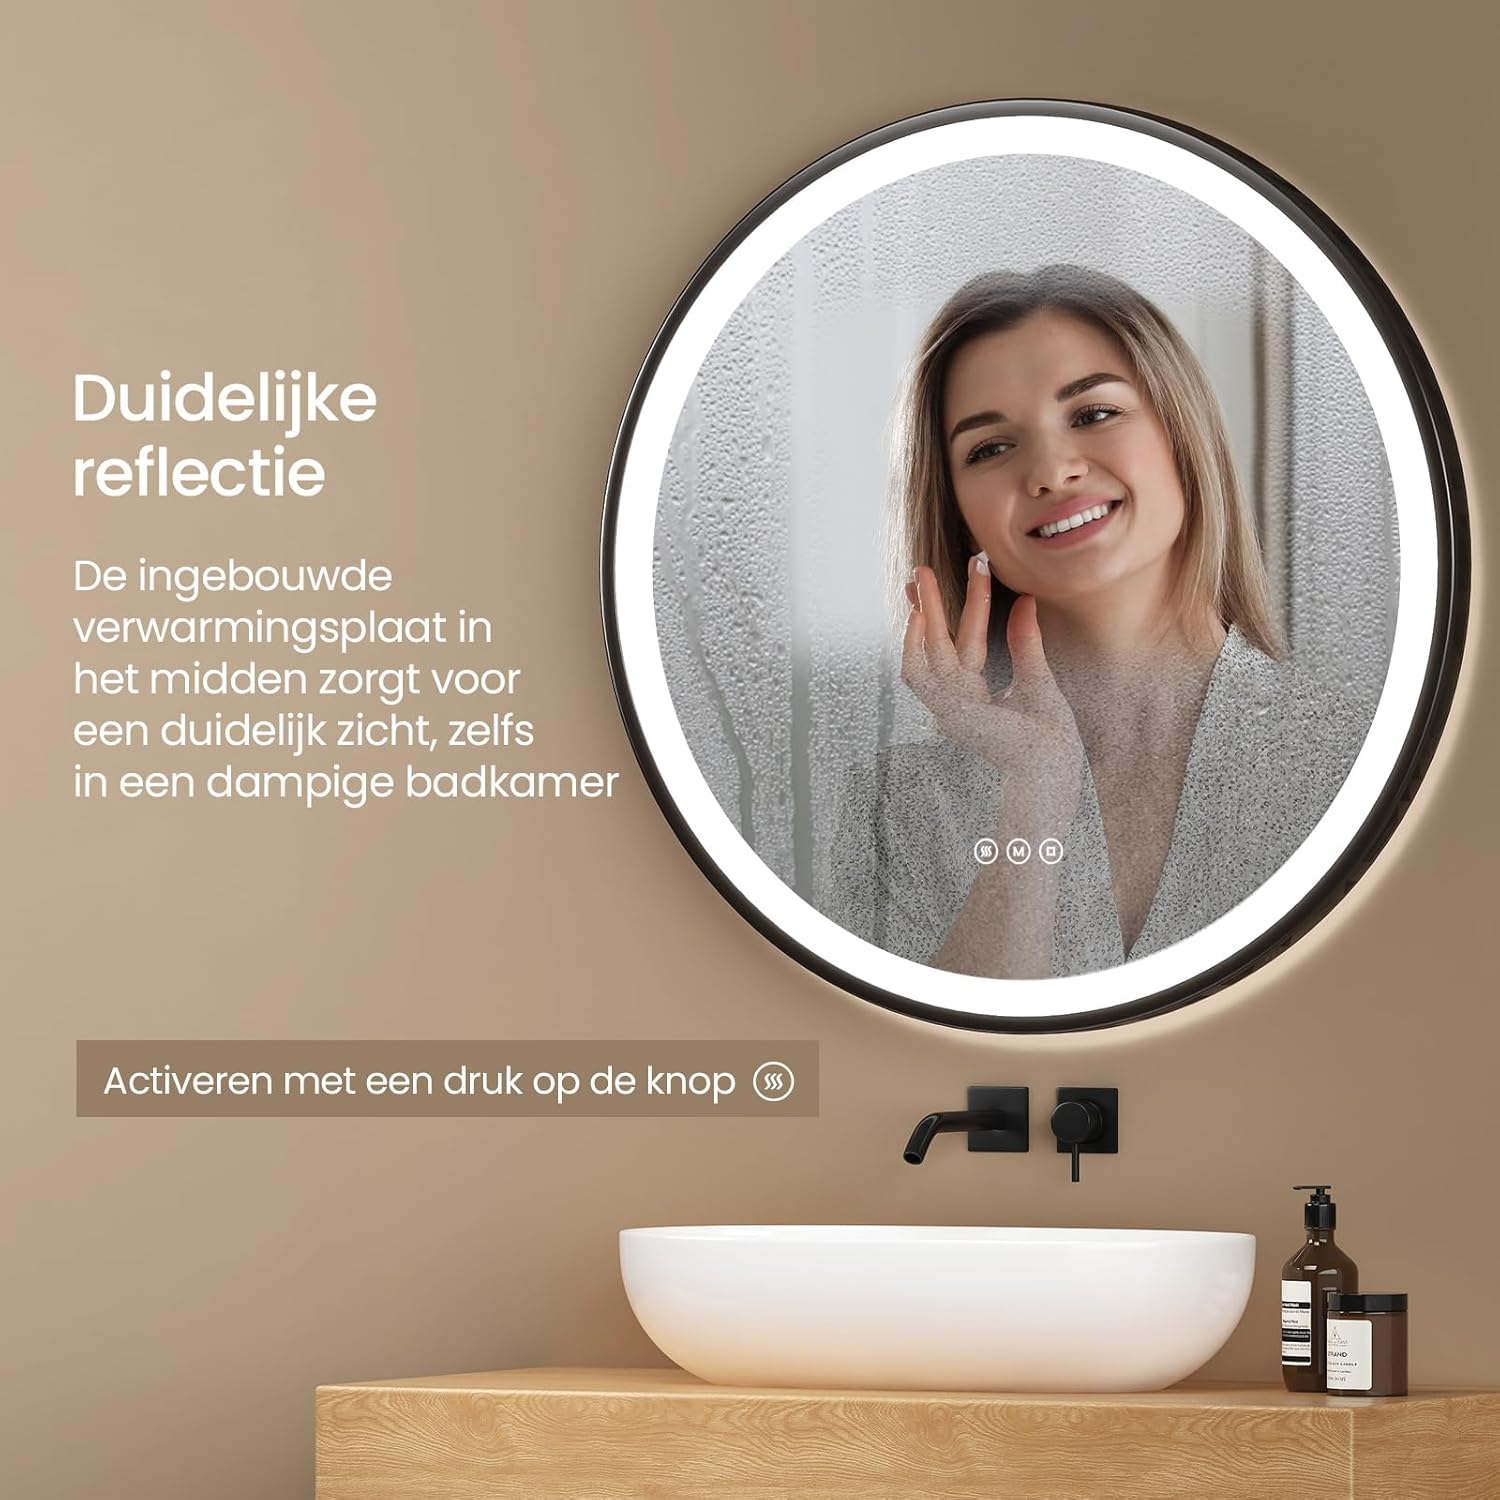
Image 6.4: The anti-fog function ensures a clear reflection even in a steamy bathroom environment.
6.5 Wall Switch Control
In addition to the touch controls, the mirror's lighting can also be controlled via a wall switch. For this functionality to work, the mirror's touch button must remain in the "on" position. This allows for convenient control of the mirror's lighting from your existing wall switch.

Image 6.5: The mirror offers flexible control via its integrated touch panel or an external wall switch (wall switch not included).
6.6 Automatic Shut-off
For energy saving, the mirror's LED lighting will automatically turn off after three hours of continuous operation.

Image 6.6: The mirror's LED lighting automatically turns off after three hours of inactivity to conserve energy.
7. Care and Maintenance
To ensure the longevity and optimal performance of your EMKE bathroom mirror, follow these maintenance guidelines:
- Cleaning the Mirror Surface: Use a soft, lint-free cloth and a non-abrasive glass cleaner. Spray the cleaner onto the cloth, not directly onto the mirror, to prevent liquid from seeping into the electrical components.
- Cleaning the Frame: Wipe the black metal frame and leather strap with a soft, damp cloth. Avoid harsh chemicals or abrasive cleaners that could damage the finish.
- Electrical Components: Never spray water or cleaning solutions directly onto the electrical parts or touch panel. Ensure the mirror is completely dry before reconnecting power.
- Regular Inspection: Periodically check the mounting hardware to ensure it remains secure.
8. Troubleshooting
If you encounter any issues with your EMKE mirror, please refer to the following common problems and solutions:
| Problem | Possible Cause | Solution |
|---|---|---|
| LED light does not turn on. | No power supply, loose wiring, faulty touch switch. | Check power connection. Ensure wall switch is on. Verify wiring connections (consult an electrician if needed). Contact customer support if the touch switch is unresponsive. |
| Anti-fog function is not working. | Function not activated, power issue. | Tap the anti-fog icon to activate. Check if the main power to the mirror is on. |
| Light brightness or color cannot be adjusted. | Incorrect operation, temporary glitch. | Refer to Section 6.2 for correct operation. Try turning the mirror off and on again. |
| Mirror surface is still foggy. | Anti-fog not activated, extreme humidity. | Ensure the anti-fog function is active. Allow a few minutes for the function to take effect. In extremely high humidity, some residual fogging may occur. |
If the problem persists after attempting these solutions, please contact EMKE customer support.
9. Warranty and Customer Support
EMKE products are manufactured to high-quality standards and come with a standard manufacturer's warranty. For specific warranty details, please refer to the documentation provided with your purchase or visit the official EMKE website.
If you require technical assistance, have questions about your product, or need to report a defect, please contact EMKE customer support:
- Website: www.emke.com (Please check for the correct regional website)
- Email: Refer to your purchase documentation for specific contact email.
- Phone: Refer to your purchase documentation for specific contact number.
Please have your model number (OLM04CKD-NLADR) and purchase date ready when contacting support.


