1. Introduction
Thank you for choosing the PowMr 60Amp MPPT Solar Charge Controller. This device is designed to efficiently manage power flow from your solar panels to your battery bank, ensuring optimal charging and system protection. It is compatible with 12V, 24V, 36V, and 48V DC systems and supports various battery types, including sealed lead-acid, flooded, gel, and lithium batteries.
2. Safety Information
- Read all instructions carefully before installation and operation.
- Ensure all wiring is correctly polarized and securely connected to prevent damage to the controller or batteries.
- Do not disassemble or attempt to repair the controller yourself. Contact qualified personnel for service.
- Install the controller in a well-ventilated area, away from flammable materials and direct sunlight.
- Always disconnect the solar array and battery bank before performing any maintenance or wiring.
3. Product Overview
The PowMr 60Amp MPPT Solar Charge Controller features an intuitive display and robust design for reliable performance in various off-grid applications.

Figure 3.1: Front view of the PowMr 60Amp MPPT Solar Charge Controller, showing the display screen and control buttons.

Figure 3.2: Detailed view of the controller's dimensions (165mm x 230mm x 72mm) and the display interface, indicating icons for day/night, battery status, work mode, and various power readings.
Key Features:
- 60A Charging Current: Provides a robust charging capacity for your solar system.
- Multi-Voltage Auto-Detection: Automatically detects 12V, 24V, 36V, or 48V DC system voltages.
- Wide PV Input Voltage: Supports up to 160V maximum PV input voltage.
- High PV Input Power: Handles up to 2880W maximum PV input power (for 48V system).
- Parallel Connection: Supports connecting up to 12 units in parallel for increased system capacity.
- Multiple Battery Compatibility: Works with sealed lead-acid, flooded, gel, and lithium batteries.
- 4-Stage Charging: Bulk Charge, Boost Charge, Float Charge, and Equalization for efficient and safe battery charging.
- Comprehensive Protections: Includes PV overcurrent, PV short circuit, PV reverse polarity, battery reverse polarity, battery over-voltage, battery over-discharge, lithium battery low temperature, load overload, load short circuit, and over-temperature protection.

Figure 3.3: Overview of the 60 Amp MPPT Solar Charge Controller's main features, including voltage compatibility, max PV input, cooling, and parallel support.

Figure 3.4: Illustration of the 9 built-in electronic protections, safeguarding against various electrical faults and ensuring system longevity.
4. Setup and Installation
Proper installation is crucial for the safe and efficient operation of your solar charge controller. Follow these steps carefully.
4.1 Wiring Diagram
Refer to the following diagram for standard solar system connections. Ensure all connections are tight and correct before powering on the system.
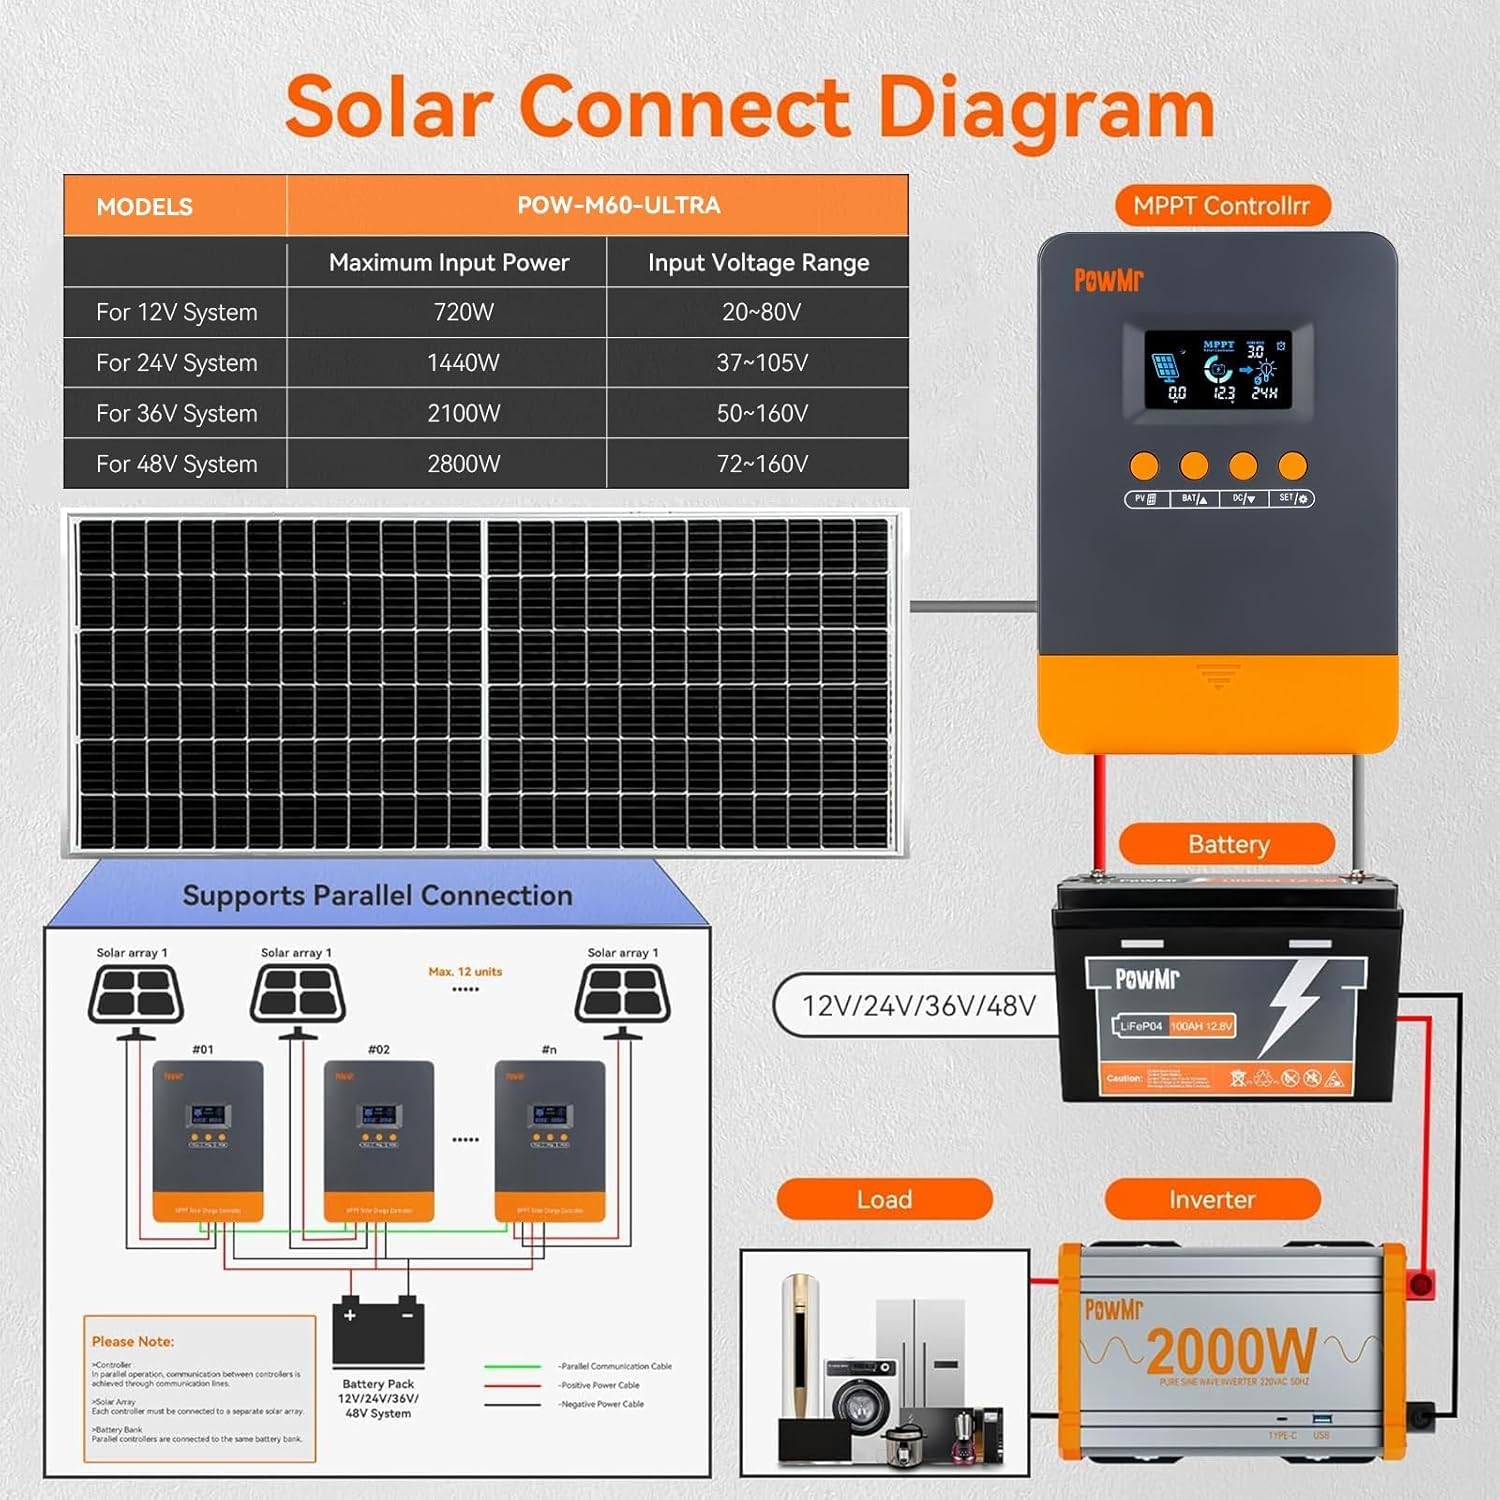
Figure 4.1: Solar connection diagram illustrating how to connect the solar array, battery, load, and inverter to the PowMr MPPT controller. It also shows maximum input power and voltage ranges for different system voltages.
4.2 Parallel Operation
The PowMr 60Amp MPPT controller supports parallel connection of up to 12 units to increase system capacity. Communication between controllers is achieved through communication lines. Each controller must be connected to a separate solar array, while all parallel controllers are connected to the same battery bank.
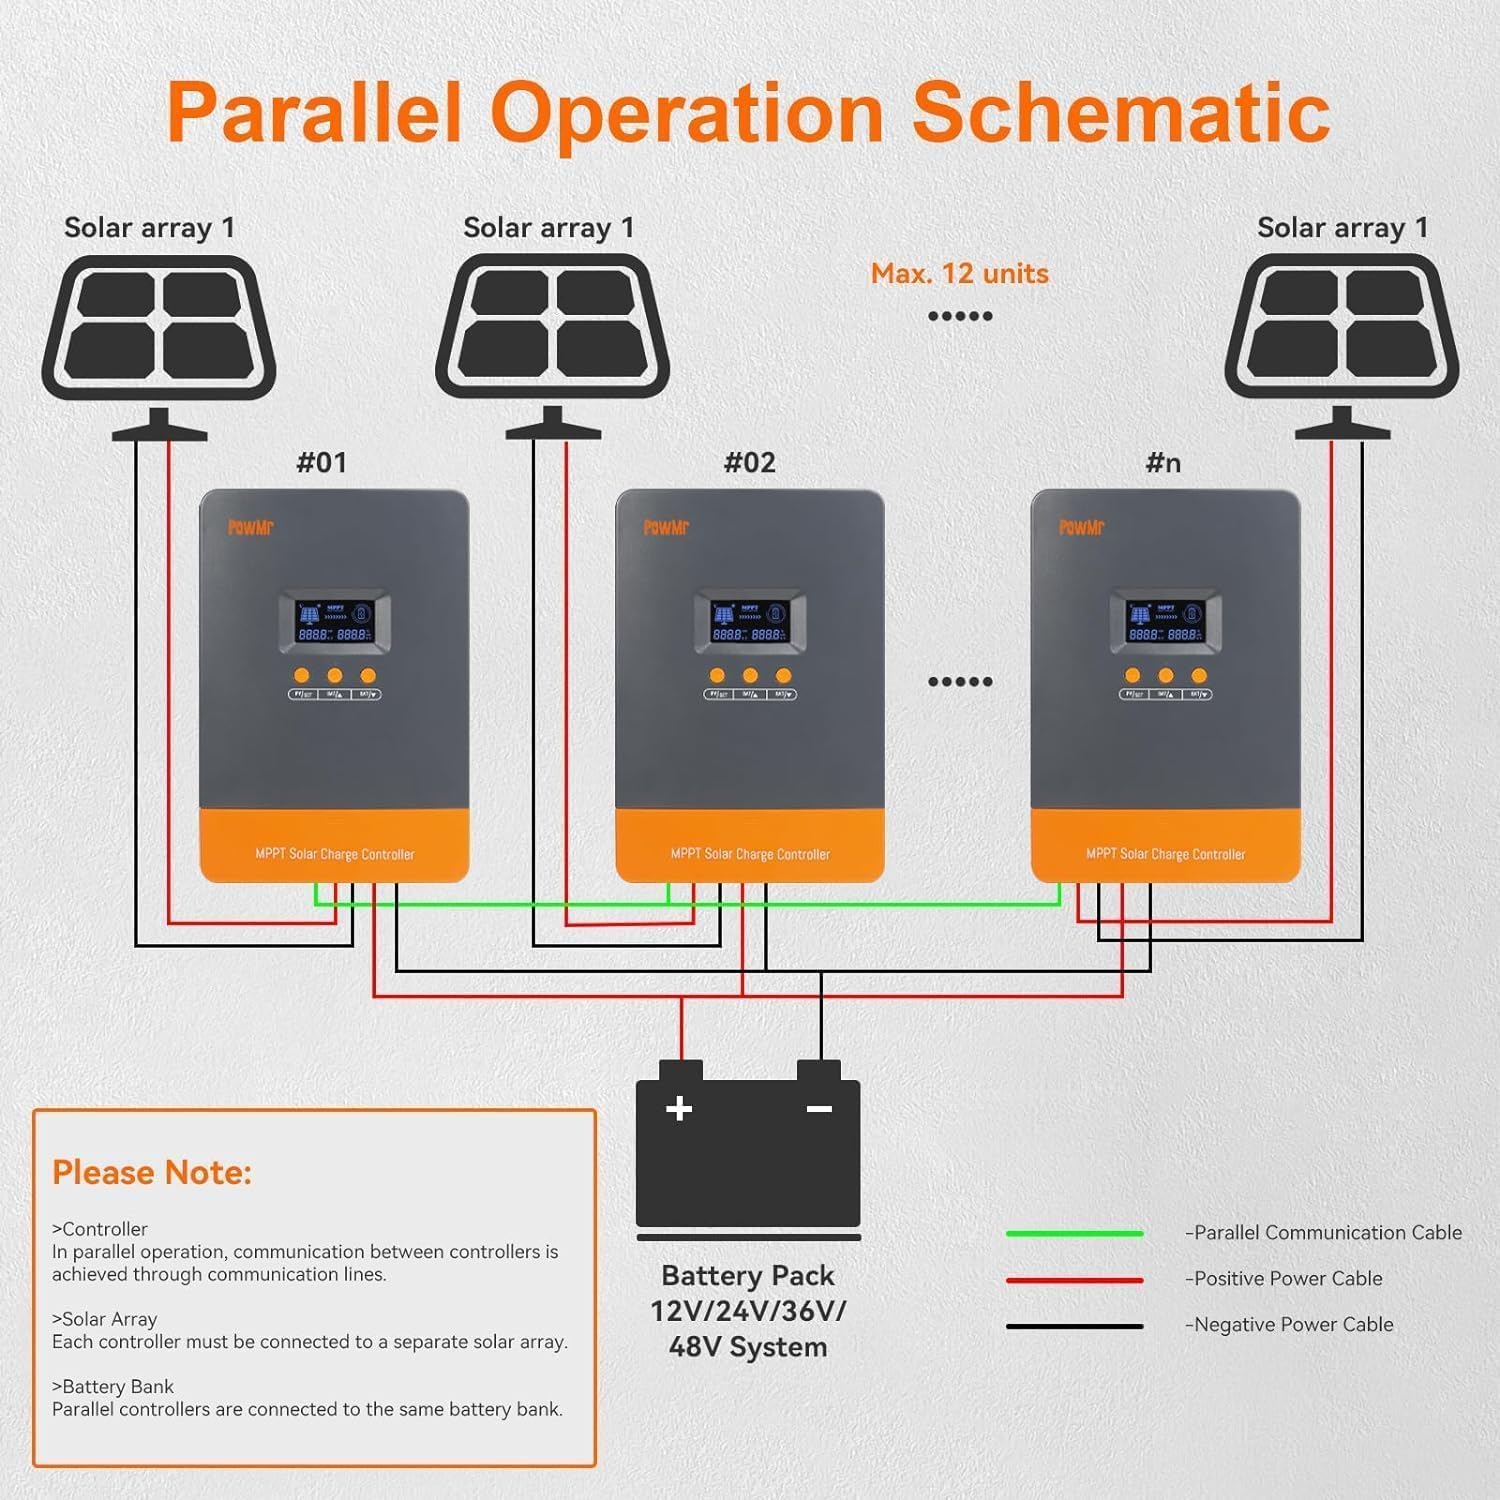
Figure 4.2: Schematic demonstrating the parallel operation of multiple PowMr MPPT controllers, showing connections for solar arrays, communication cables, and a shared battery bank.
4.3 Installation Steps:
- Mounting: Choose a suitable location for mounting the controller, ensuring adequate ventilation and protection from environmental elements. Use the provided mounting holes.
- Battery Connection: Connect the battery cables to the controller's battery terminals first. Ensure correct polarity (+ to + and - to -).
- Solar Panel Connection: Connect the solar panel cables to the controller's PV terminals. Verify correct polarity.
- Load Connection (Optional): If using the load output, connect your DC load to the controller's load terminals.
- Power On: Once all connections are secure, the controller will power on and begin operation.
5. Operating Instructions
The controller features an LCD display and four buttons for navigation and settings adjustment.
5.1 Display and Buttons
The LCD provides real-time system information. Use the buttons (PV, BAT, DC, SET) to cycle through display screens and adjust parameters.
5.2 Battery Type Selection
The controller automatically detects system voltage. For optimal charging, ensure the correct battery type (sealed, flooded, gel, or lithium) is selected in the settings. Refer to the manual's detailed settings section for specific battery parameter adjustments, especially for lithium batteries.
5.3 Charging Stages
The controller employs a 4-stage charging algorithm:
- Bulk Charge: Charges the battery at maximum current until voltage reaches the boost voltage.
- Boost Charge: Charges at a constant voltage for a set period to ensure full charge.
- Float Charge: Maintains the battery at a lower voltage to prevent self-discharge and overcharging.
- Equalization: (For flooded batteries) Periodically overcharges the battery to balance cell voltages.
6. Specifications
Detailed technical specifications for the PowMr 60Amp MPPT Solar Charge Controller.
| Specification | Value |
|---|---|
| Rated Battery Charging Current | 60A (Configurable 2A-60A) |
| Rated Load Output Current | 25A |
| System Voltage Auto-Detection | 12V/24V/36V/48V DC |
| Max PV Input Voltage | 160V |
| Max PV Input Power (12V System) | 720W (DC 20V–80V) |
| Max PV Input Power (24V System) | 1440W (DC 37V–105V) |
| Max PV Input Power (36V System) | 2100W (DC 50V–160V) |
| Max PV Input Power (48V System) | 2800W (DC 72V–160V) |
| Parallel Units Supported | Up to 12 units |
| Package Dimensions | 8.2 x 7.6 x 4.5 inches |
| Item Weight | 3.5 pounds |
| Color | Orange |
| Display Type | LCD or LED |
7. Maintenance
Regular maintenance ensures the longevity and optimal performance of your solar charge controller.
- Cleaning: Periodically clean the controller's exterior with a dry cloth to remove dust and debris. Ensure ventilation openings are clear.
- Connections: Annually check all wiring connections for tightness and corrosion. Loose connections can cause overheating and damage.
- Ventilation: Ensure the installation area remains well-ventilated to prevent overheating of the unit.
- Firmware Updates: Check the manufacturer's website for any available firmware updates that may improve performance or add features.
8. Troubleshooting
This section provides solutions to common issues you might encounter.
| Problem | Possible Cause | Solution |
|---|---|---|
| Controller not powering on | No battery connection or reverse polarity; Blown fuse. | Check battery connections and polarity. Verify battery voltage. Check system fuses. |
| No charging current | PV array not connected; Insufficient sunlight; PV reverse polarity; Faulty PV array. | Connect PV array. Ensure adequate sunlight. Check PV wiring and polarity. Test PV array voltage. |
| Battery not fully charged | Incorrect battery type setting; Insufficient PV power; Excessive load. | Verify battery type setting. Increase PV array size or reduce load. |
| Over-temperature alarm | Poor ventilation; High ambient temperature; Overload. | Improve ventilation around the controller. Reduce load if possible. |
For issues not listed here, please contact PowMr customer support.
9. Official Product Videos
No official product videos from the seller are available in the provided data for this model.
10. Warranty and Support
For warranty information, please refer to the product packaging or the official PowMr website. For technical support, product inquiries, or service requests, please contact PowMr customer service through their official channels.