1. Introduction
Thank you for purchasing the AWithZ H5 Portable Spot Welder. This device is designed for precise spot welding of various battery types and thin metal sheets, offering a compact and efficient solution for DIY battery pack assembly and repair. This manual provides essential information for safe and effective operation, maintenance, and troubleshooting.
2. Safety Information
Please read all safety warnings and instructions carefully before using this product to prevent electric shock, fire, or serious injury.
- Always wear appropriate personal protective equipment, including safety glasses, when operating the spot welder.
- Ensure the work area is well-ventilated and free from flammable materials.
- Do not touch the welding pens or the area around them immediately after welding, as they will be hot and can cause burns.
- Do not operate the device in wet conditions or expose it to rain.
- Keep the device out of reach of children.
- Only use the provided charging cable and a compatible 5V/1A adapter for charging.
- Do not attempt to weld materials thicker than specified (0.3mm maximum).
- If the device overheats (reaches 60°C), it will automatically shut off for safety. Allow it to cool down before resuming operation.
- Always ensure the device is cooled before charging to prevent damage.

Image: AWithZ H5 Spot Welder with safety icons indicating voltage protection, short circuit protection, low temperature protection, high temperature protection, overcharge protection, and over-discharge protection.
3. Product Overview
3.1. Key Features
- Integrated Design: Power source and welding pens are integrated into a single handheld unit, eliminating the need for external welding pens.
- High Capacity Battery: Equipped with a 5000mAh internal battery, allowing for extended use.
- Wide Welding Range: Capable of welding nickel strips from 0.1mm to 0.3mm thick, including pure nickel up to 0.2mm.
- 99 Power Levels: Offers precise control over welding output for various materials and thicknesses.
- Dual Pulse Output: Provides stable and reliable welding results.
- Minimalist OLED Display: Features a color LCD display showing temperature, mode, preheat time, trigger time, output level, and language selection.
- One-Handed Operation: Designed for ease of use with a single hand.
- Automatic Shut-off: Configurable auto-off time for safety and power saving.
3.2. Package Contents
The AWithZ H5 Portable Spot Welder package includes:
- AWithZ H5 Spot Welder Unit
- Nickel Sheet Roll
- Sandpaper
- USB-C Charging Cable
- Replacement Welding Pins

Image: Contents of the AWithZ H5 Spot Welder package, including the welder unit, nickel sheet, sandpaper, charging cable, and replacement pins.
4. Specifications
| Parameter | Value |
|---|---|
| Model | H5 |
| Battery Capacity | 5000mAh |
| Output Voltage | 4.2V (max) |
| Output Current | 1020A (max) |
| Welding Thickness | 0.1mm - 0.3mm |
| Pure Nickel Welding | Up to 0.2mm |
| Power Levels | 99 levels |
| Charging Time | 2.5 - 3 hours |
| Charging Port | USB Type-C |
| Dimensions | 182mm (Length) x 47.5mm (Width) x 31.4mm (Thickness) |
| Weight | 260g |

Image: Exploded view of the AWithZ H5 Spot Welder showing internal components and key specifications.
5. Setup
5.1. Initial Charging
Before first use, fully charge the spot welder. Connect the provided USB-C charging cable to the device and a 5V/1A power adapter. The display will indicate charging status. Ensure the device is cool before charging.
Video: Demonstrates the charging process for an AWithZ spot welder, similar to the H5 model. Connect the USB-C cable to the charging port.
5.2. Preparing the Welding Pins
The welding pins are integrated. Ensure they are clean and sharp for optimal performance. Use the included sandpaper to gently clean the tips if necessary. The recommended welding distance between the tips is approximately 0.8mm.

Image: AWithZ H5 Spot Welder with nickel strip and screwdriver, illustrating the welding pins.
6. Operating Instructions
6.1. Power On/Off and Mode Selection
Press and hold the power button to turn the device on or off. The H5 features a minimalist OLED display for easy navigation. Use the adjustment keys to select between automatic and manual welding modes, adjust power levels, preheat time, and trigger time.

Image: AWithZ H5 display showing various settings like mode, gear, preheat, trigger time, and stitch welding.
6.2. Adjusting Welding Parameters
The device offers 99 adjustable power levels. Start with lower settings and gradually increase until the desired weld strength is achieved. The OLED display provides real-time feedback on settings. For optimal results, practice on scrap material first.
- Power Level: Adjust from 1 to 99. Higher numbers indicate more power.
- Preheat Time: Sets the duration of the initial pulse.
- Trigger Time: Sets the main welding pulse duration (0.5ms to 5ms).
- Language: Select your preferred language from the UI settings.

Image: AWithZ H5 Spot Welder display showing language selection, continuous spot welding, and trigger time settings.
6.3. Welding Procedure
- Ensure the battery terminals and nickel strip are clean. Use sandpaper if necessary.
- Place the nickel strip firmly on the battery terminal.
- Position the welding pins onto the nickel strip, ensuring both pins make good contact and are evenly spaced.
- In Automatic Mode, the device will detect contact and automatically trigger the weld.
- In Manual Mode, press the trigger button on the side of the device to initiate the weld.
- After welding, inspect the joint for strength and consistency. Adjust power settings as needed.
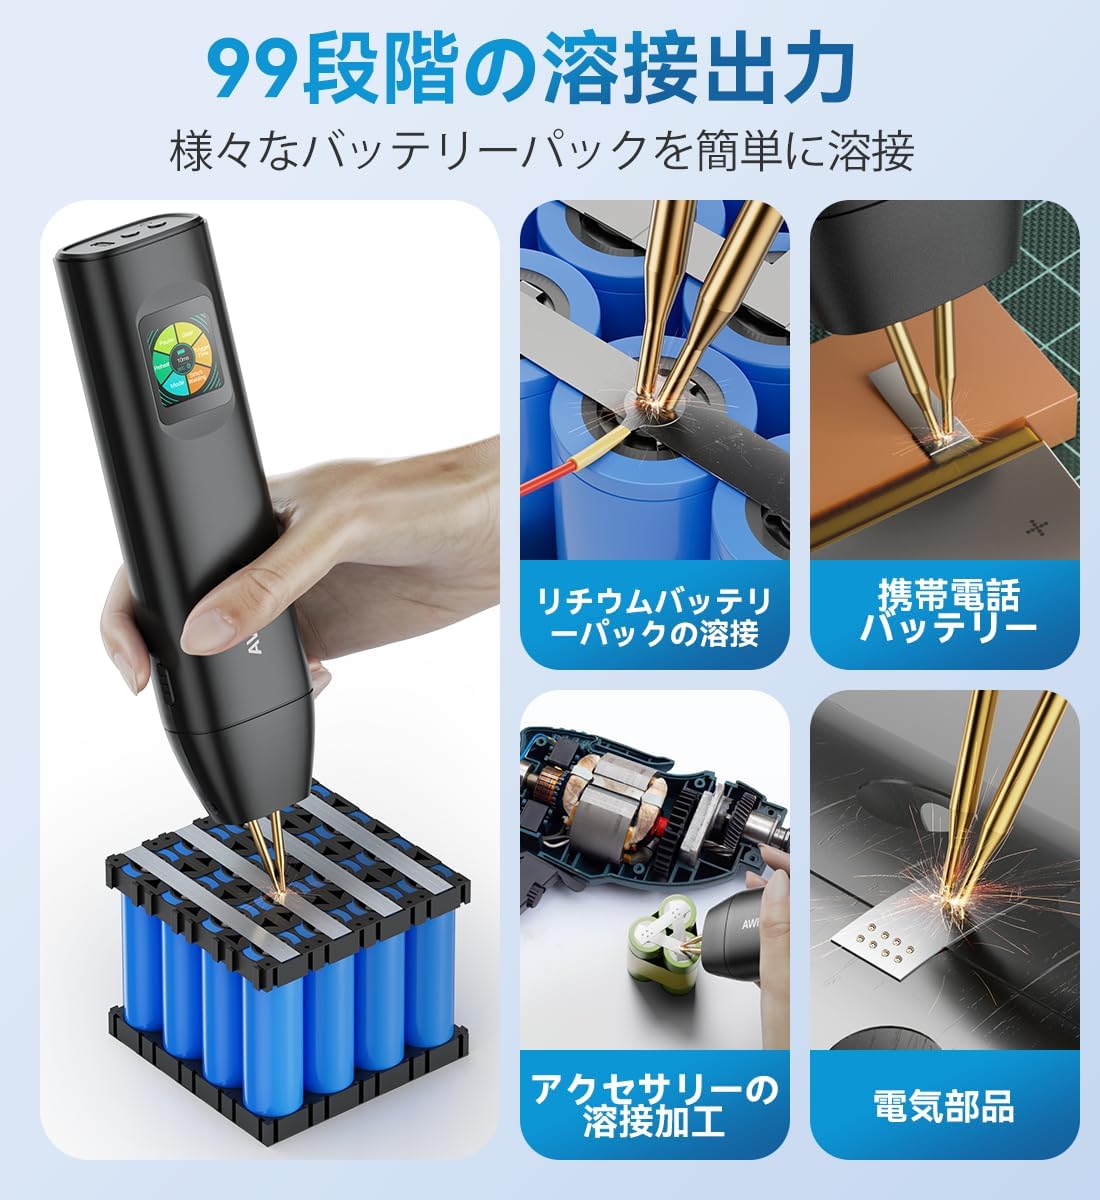
Image: AWithZ H5 Spot Welder demonstrating various welding applications.
Video: Demonstrates the one-handed operation of an AWithZ battery spot welder (H1Pro model), showing how to position the welder and perform a spot weld.
Video: Illustrates continuous spot welding and the capability to weld 0.3mm nickel-plated sheets with an AWithZ spot welder.
7. Maintenance
7.1. Cleaning
Regularly clean the welding pins and the device body. Use a soft, dry cloth. For the welding pins, use the provided sandpaper to remove any residue or oxidation that may affect welding performance.
7.2. Replacing Welding Pins
Over time, the welding pins may wear down. To replace them, carefully unscrew the retaining screws and pull out the old pins. Insert new pins and secure them with the screws. Ensure the pins are properly aligned and protrude evenly.
Video: Demonstrates the method for replacing spot welding needles on an AWithZ spot welder.
7.3. Storage
Store the device in a cool, dry place away from direct sunlight and moisture. Use the original packaging or a protective case to prevent damage.
8. Troubleshooting
| Problem | Possible Cause | Solution |
|---|---|---|
| No weld or weak weld | Low power setting, dirty welding pins, poor contact, material too thick. | Increase power level, clean welding pins, ensure firm contact, verify material thickness is within limits. |
| Excessive sparking or holes in material | Too high power setting, dirty welding pins. | Decrease power level, clean welding pins. |
| Device not turning on | Battery depleted. | Charge the device fully. |
| Device overheats and shuts off | Continuous use, high ambient temperature. | Allow the device to cool down before resuming operation. Avoid prolonged continuous use. |
9. Warranty and Support
For warranty information or technical support, please refer to the contact details provided with your purchase or visit the AWithZ official website. Keep your purchase receipt as proof of purchase.