Introduction
This manual provides detailed instructions for the installation, operation, and maintenance of your CHAOZHU Ebike Light Kit. This comprehensive kit includes a headlight, taillight with brake light function, horn, and turn signal indicators, designed to enhance visibility and safety for your e-bike. It is compatible with 36V, 48V, 52V, 60V, and 72V e-bike systems, making it suitable for various DIY builds.
Safety Information
- Always ensure the e-bike's power is off before installing or performing maintenance on the light kit.
- Verify correct voltage compatibility (36V-72V) before connecting the kit to your e-bike's power supply. Incorrect voltage can damage the components.
- Ensure all connections are secure and waterproofed where necessary to prevent short circuits and water damage.
- Do not modify the wiring or components of the kit, as this may void the warranty and pose safety risks.
- Regularly check all lights and the horn for proper function before each ride.
Package Contents
The CHAOZHU Ebike Light Kit typically includes the following components:
- 1 x LED Headlight with integrated horn
- 1 x Taillight with brake light function
- 2 x Front Turn Signal Indicators
- 2 x Rear Turn Signal Indicators
- 1 x Handlebar Control Switch
- Necessary wiring harnesses and connectors

Figure 1: Overview of all components included in the Ebike Light Kit.
Setup and Installation
Follow these steps to install your Ebike Light Kit. It is recommended to have basic electrical knowledge or seek professional assistance if unsure.
1. Mounting Components
- Headlight: Mount the headlight securely to the front fork or handlebar using the provided bracket. Ensure it is positioned to illuminate the path ahead without blinding oncoming traffic.
- Taillight: Attach the taillight to the rear fender or seat post. Ensure it is visible from behind.
- Turn Signals: Mount the front turn signals near the headlight and the rear turn signals near the taillight. Ensure they are clearly visible from their respective directions.
- Control Switch: Install the control switch on your e-bike's handlebar within easy reach of your thumb.

Figure 2: Headlight and front turn signals mounted on the e-bike's front.

Figure 3: Detail of the front turn signal, showing its design and indicator lights.

Figure 4: The rear taillight unit, which also functions as a brake light.
2. Wiring Connections
The kit is designed for DIY installation and requires careful wiring. Refer to the diagram below for typical connections. The main power input supports 36V to 72V systems.
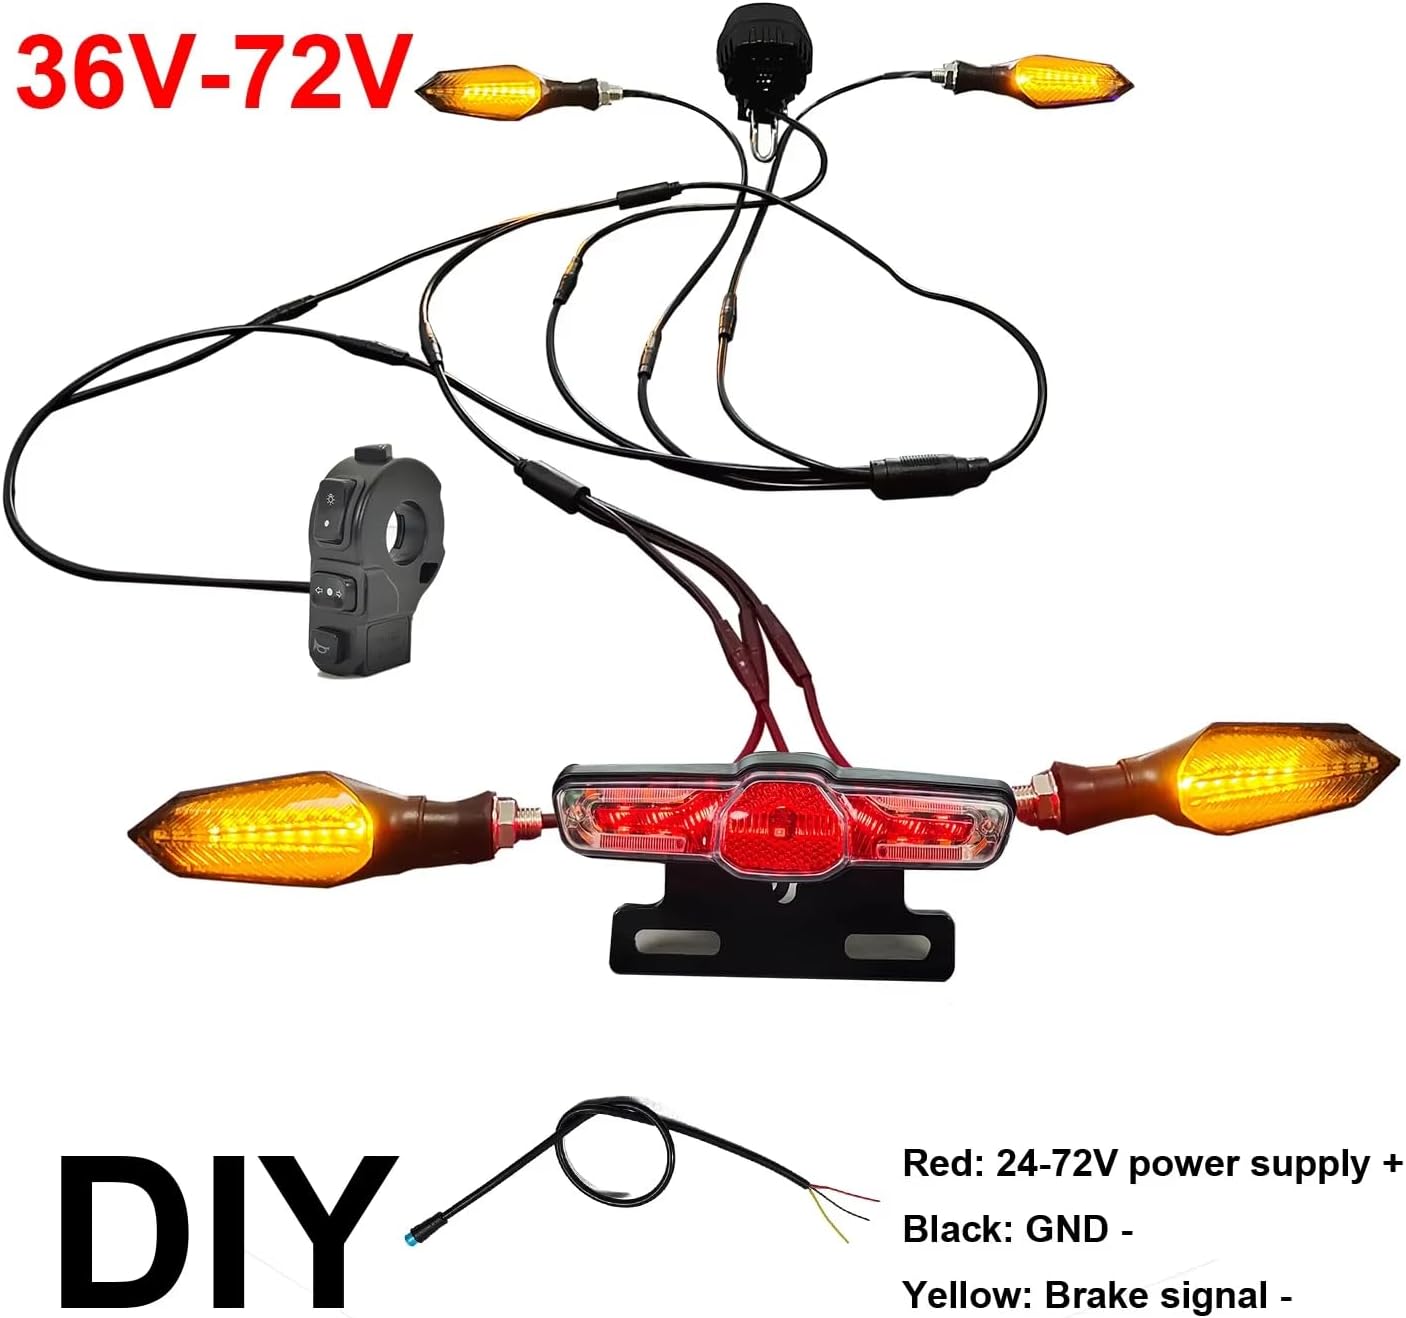
Figure 5: Wiring schematic. Connect the Red wire to 24-72V power supply (+), Black wire to GND (-), and Yellow wire to the Brake signal (-).
- Power Connection: Connect the main power cable from the light kit to your e-bike's battery output. Ensure the voltage matches the kit's compatibility (36V-72V). The red wire is typically positive (+), and the black wire is negative (GND).
- Brake Signal: Connect the yellow wire from the taillight to your e-bike's brake lever sensor or controller's brake signal input. This enables the brake light function.
- Component Connections: Connect the headlight, taillight, and turn signals to the main wiring harness using the provided connectors. Ensure all connections are firm and properly seated.
- Control Switch Connection: Connect the handlebar control switch to the main harness.
After all connections are made, secure any loose wires with zip ties and ensure they do not interfere with moving parts of the bike.
Operating Instructions
The handlebar control switch provides easy access to all lighting and horn functions.

Figure 6: Handlebar control switch layout.
- Driving Light ON/OFF: Press the "Driving light ON" button to turn on the headlight and taillight. Press the "Driving light OFF" button to turn them off.
- Horn: Press the "Horn" button to activate the horn.
- Turn Signals:
- Press "Turn left" to activate the left turn signals.
- Press "Turn Right" to activate the right turn signals.
- Press the active turn signal button again to cancel.
- Double Flash (Hazard Lights): Press the "Double flash" button to activate all turn signals simultaneously as hazard lights. Press again to deactivate.
- Brake Light: The taillight will automatically illuminate brighter when the e-bike's brakes are applied, provided the brake signal wire is correctly connected.
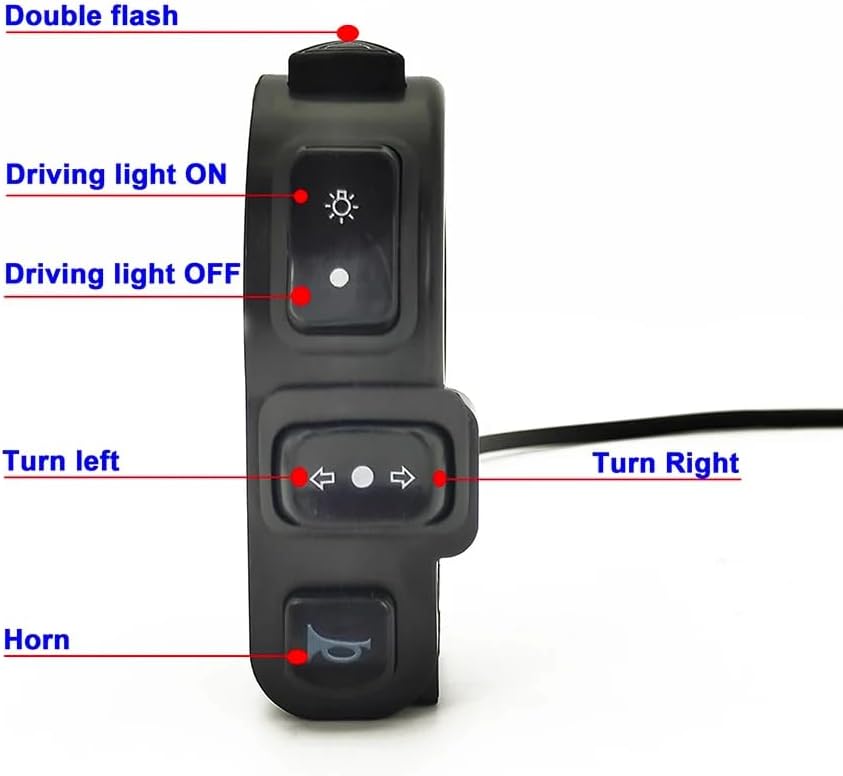
Figure 7: The headlight provides strong illumination for night riding.
Maintenance
- Cleaning: Wipe down the light components with a soft, damp cloth. Do not use abrasive cleaners or solvents.
- Connections: Periodically check all wiring connections to ensure they are secure and free from corrosion.
- Damage Inspection: Inspect the lights and wiring for any signs of physical damage, cracks, or frayed wires. Replace damaged components immediately.
- Water Resistance: While the kit is weather-resistant (IPX4 for switch), avoid submerging components in water.
Troubleshooting
| Problem | Possible Cause | Solution |
|---|---|---|
| Lights do not turn on. | No power to the kit; loose connection; incorrect wiring; faulty switch. | Check power source from e-bike battery. Verify all wiring connections are secure. Ensure the control switch is functioning. Check for blown fuses in the e-bike system if applicable. |
| Horn does not sound. | Loose horn connection; faulty horn button; horn unit failure. | Check the horn's wiring connection. Test the horn button on the control switch. |
| Turn signals do not flash. | Loose connection to turn signal; faulty turn signal button; incorrect wiring. | Verify connections to individual turn signals. Test the turn signal buttons on the control switch. |
| Brake light not working. | Brake signal wire not connected or faulty; faulty taillight. | Ensure the yellow brake signal wire is correctly connected to the e-bike's brake sensor/controller. Check the taillight unit. |
| One component (e.g., headlight) not working, others are. | Faulty component; specific connection issue. | Check the specific wiring connection for that component. If connections are good, the component itself may be faulty and require replacement. |
Specifications
| Feature | Detail |
|---|---|
| Applicable Voltage | 36V / 48V / 52V / 60V / 72V |
| Total Net Weight | 580g |
| Headlight Model | L-030 (Aluminum alloy) |
| Headlight Power | 6W |
| Headlight Brightness | 650 LM |
| Horn Volume | 75-100 dB |
| Control Switch Model | WUXING 336/2 |
| Control Switch Waterproof Rating | IPX4 |
| Taillight Model | WD-10C |
| Taillight Power | 1.1W |
| Taillight Brightness | 30 LM |
| Turn Signal Power | 3W |
| Turn Signal Light Color | Yellow & Blue |
| Material | Aluminum (Headlight), PA6+20GF TPR (Switch) |
Warranty and Support
This product comes with a manufacturer's warranty. For specific warranty terms and conditions, please refer to the documentation provided with your purchase or contact the seller directly. Keep your proof of purchase for warranty claims.
For technical support, installation assistance, or troubleshooting beyond this manual, please contact CHAOZHU customer service or your authorized dealer. Provide your product model number and purchase details when seeking support.
Note: The warranty may not cover damage caused by improper installation, misuse, or unauthorized modifications.