1. Introduction
This manual provides essential information for the proper setup, operation, and maintenance of your Retro GamePro RG35XX Plus handheld game console. Please read this manual thoroughly before using the device to ensure optimal performance and longevity.
2. What's in the Box
- RG35XX Plus Game Console
- 64GB Game Card (pre-installed)
- Charging Cable (USB Type-C)
- Screen Protector
- User Manual (this document)

Image 2.1: Included items with the RG35XX Plus console.
3. Product Overview
The RG35XX Plus is a portable retro handheld game console featuring a 3.5-inch IPS screen and a Linux-based operating system. It supports various game formats and offers multiple connectivity options.
3.1 Key Features
- Display: 3.5-inch IPS full viewing angle, OCA full lamination, 640x480 resolution.
- Processor: H700 quad-core ARM Cortex-A53, 1.5GHz frequency.
- Graphics: Dual-core G31 MP2.
- Memory: LPDDR4 1GB RAM.
- Storage: 64GB TF/MicroSD card (expandable up to 512GB).
- Operating System: Linux.
- Connectivity: 2.4/5G WiFi (802.11a/b/g/n/ac), Bluetooth 4.2.
- Battery: 3300mAh Li-polymer, approximately 8 hours of battery life.
- Ports: USB Type-C for charging, 3.5mm headphone jack, HDMI output.
- Additional: Supports 2.4G wireless and wired controllers, Bluetooth handle connection, HDMI TV output, vibration motor, WIFI online pairing, streaming.

Image 3.1: The RG35XX Plus supports multiple emulator platforms.
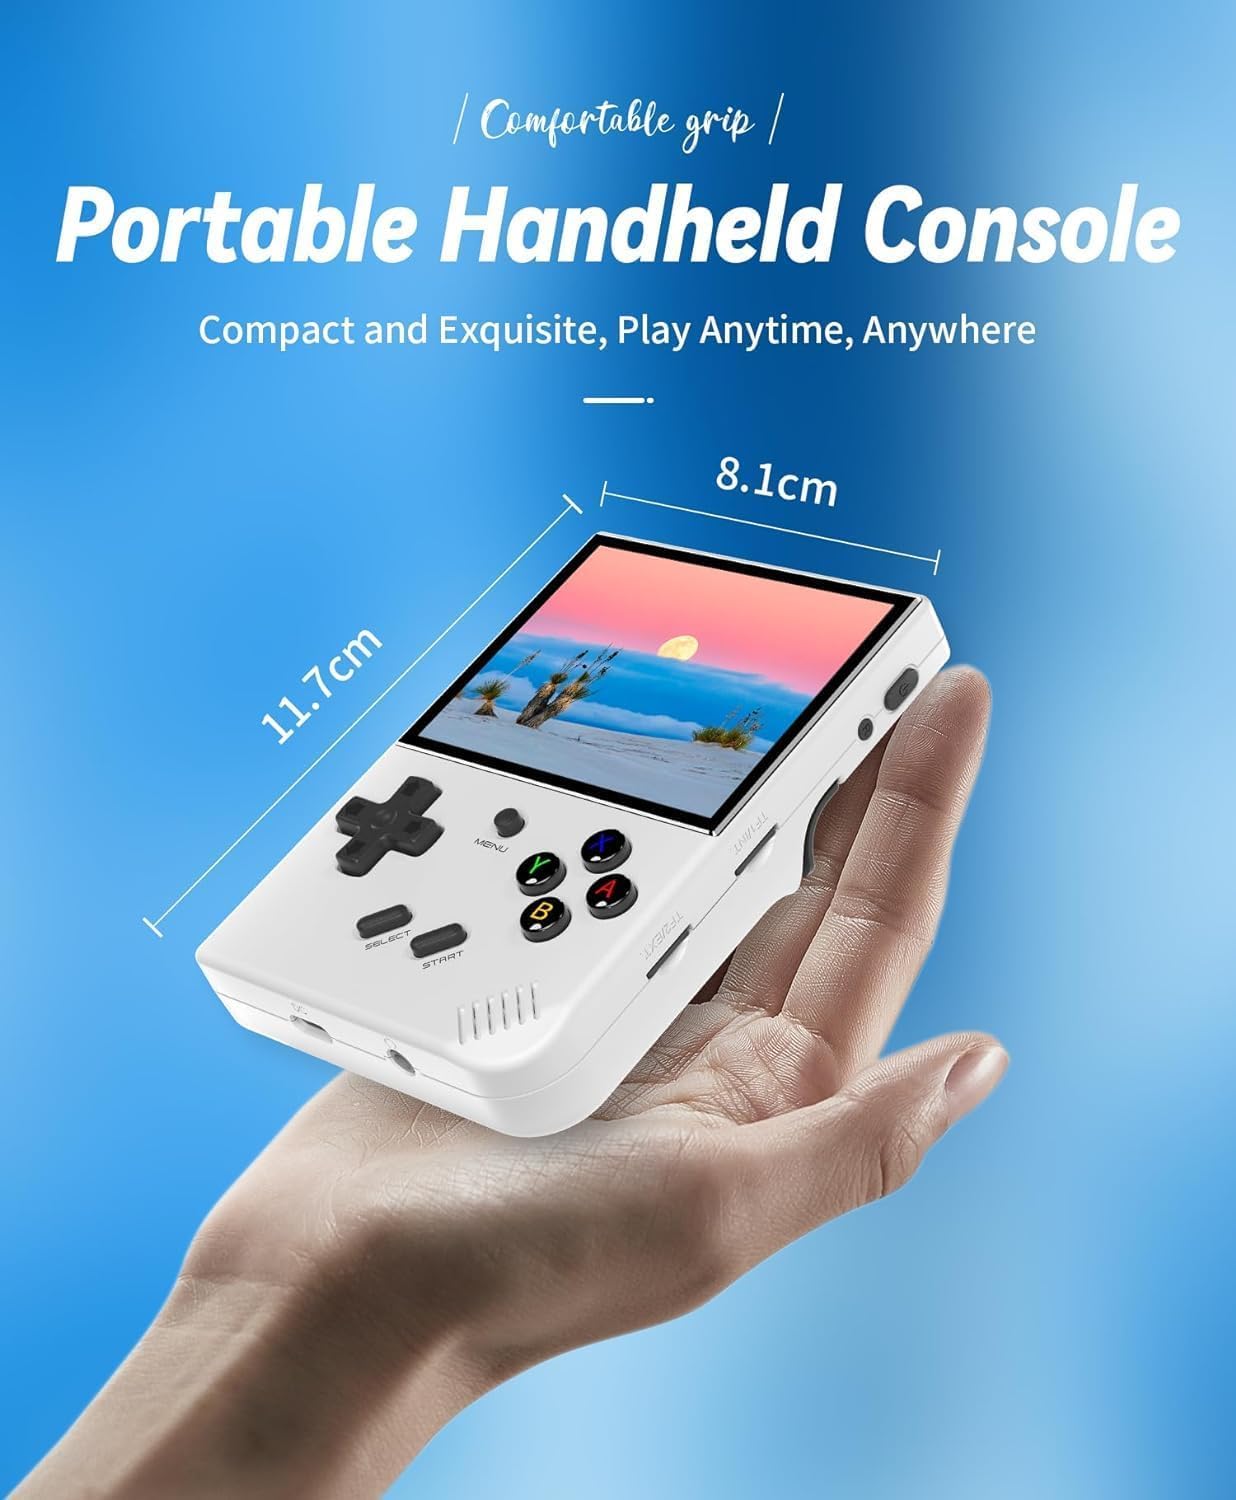
Image 3.2: Compact and portable design of the console.
4. Setup
4.1 Initial Charging
Before first use, fully charge the console. Connect the provided USB Type-C charging cable to the console's USB-C port and a compatible 5V/1.5A power adapter. The device supports C2C chargers.

Image 4.1: The console features a 3300mAh battery for extended play.
4.2 SD Card Installation
The console comes with a 64GB TF/MicroSD card pre-installed, containing approximately 5515 games. The device features dual card slots and supports expansion up to 512GB. Users can download additional games in relevant formats to the SD card.
Note: Some users report improved performance and stability by replacing the pre-installed SD card with a higher quality one and installing a custom operating system. This process typically requires a PC and an SD card reader.
4.3 Powering On/Off
- To power on, press and hold the power button until the screen illuminates.
- To power off, navigate to the system settings and select the 'Shut down' option. Alternatively, press and hold the power button for several seconds.
- The device has a 'Sleep' button, but for extended periods of non-use, it is recommended to fully power off the device to prevent battery drain.
5. Operating Instructions
5.1 Basic Navigation
Use the directional pad (D-pad) to navigate through menus and game lists. The 'A', 'B', 'X', 'Y' buttons are used for selection and actions within games. 'SELECT' and 'START' buttons serve various functions depending on the game or menu context.
5.2 Game Selection and Play
From the main menu, select the desired emulator or game list. Browse through the available games using the D-pad and press the 'A' button to launch a game.
5.3 Saving and Loading Game Progress
The console supports in-game save states. During gameplay, press the 'MENU' button to access options such as 'Save Game' and 'Load Game'. This allows you to save your progress at any point and resume later.
Video 5.1: Demonstration of the RG35XX Plus interface, game selection, and save state functionality. This video illustrates how to navigate the system, choose games, and utilize the save/load features.
5.4 Connectivity Options
- HDMI TV Output: Connect the console to a TV using an HDMI cable for a larger display experience.
- Wireless/Wired Controllers: The RG35XX Plus supports connecting 2.4G wireless controllers and wired controllers for multi-player gaming or alternative control methods.
- Bluetooth Handle Connection: Connect Bluetooth-enabled gamepads to the console.
- WiFi: Utilize the 2.4/5G WiFi for online pairing and streaming functionalities.

Image 5.2: The console supports HDMI output to a TV and Bluetooth controller connection.
6. Maintenance
- Screen Care: Apply the included screen protector to prevent scratches. Clean the screen with a soft, dry, lint-free cloth. Avoid harsh chemicals.
- General Cleaning: Wipe the console's exterior with a slightly damp cloth. Do not immerse the device in water or use abrasive cleaners.
- Battery Longevity: To maximize battery life, avoid fully discharging the battery frequently. Store the device in a cool, dry place when not in use for extended periods.
7. Troubleshooting
- Device not turning on or charging: Ensure the USB Type-C cable is securely connected to both the console and a 5V/1.5A power adapter. Try a different compatible charger and cable.
- Boot screen freezing: This issue can sometimes be resolved by replacing the pre-installed SD card with a new, high-quality SD card and installing a fresh operating system image.
- Games not loading or performing poorly: Ensure the game files are in the correct format for the emulator. For performance issues, consider updating the operating system or using a different SD card.
- Bluetooth connectivity issues: Ensure the Bluetooth device is in pairing mode and within range. Check the console's Bluetooth settings. Note that Bluetooth is primarily for controllers, not headphones.
8. Specifications
| Feature | Specification |
|---|---|
| Screen | 3.5-inch IPS, 640x480, OCA full lamination |
| CPU | H700 quad-core ARM Cortex-A53, 1.5GHz |
| GPU | Dual-core G31 MP2 |
| RAM | LPDDR4 1GB |
| Storage | 64GB TF/MicroSD (expandable to 512GB) |
| System | Linux |
| WiFi | 2.4/5G WiFi 802.11a/b/g/n/ac |
| Bluetooth | Bluetooth 4.2 |
| Battery | 3300mAh Li-polymer, 8 hours life |
| Charging | 5V/1.5A, USB Type-C, C2C charger support |
| Dimensions | 1.18 x 5.11 x 3.94 inches |
| Weight | 13.6 ounces |
| Material | Plastic |
9. Warranty and Support
For warranty information or technical support, please contact Retro GamePro directly. Refer to the product packaging or the seller's information for specific contact details.