MiOYOOW GY21738
MiOYOOW Light Painting Lamp DIY Soldering Kit (Model GY21738) Instruction Manual
Model: GY21738 | Brand: MiOYOOW
1. Introduction
This instruction manual provides detailed guidance for assembling and operating your MiOYOOW Light Painting Lamp DIY Soldering Kit. This kit is designed to enhance soldering skills while creating a unique decorative light with dual PCB patterns: "Sunlit Mountains" and "Astronaut on the Moon". Please read all instructions carefully before beginning assembly.
Note: This soldering kit requires a foundational understanding of basic electronic theory and practical soldering ability.
2. What's in the Box
Verify that all components listed below are present in your kit:
- Main PCB (Printed Circuit Board) with dual patterns
- SMD light control chip (JL7010S)
- Various through-hole electronic components (resistors, capacitors, LEDs, etc.)
- USB power cable
- Acrylic casing panels
- Screws and standoffs for assembly
- Printed installation manual (this document's physical counterpart)

Detailed Description: This image shows a complete set of components for the MiOYOOW Light Painting Lamp DIY Soldering Kit, neatly laid out on a surface. It includes the main PCB, various small electronic components, screws, standoffs, and a USB cable, indicating everything needed for assembly.
3. Safety Information
- Always work in a well-ventilated area when soldering to avoid inhaling fumes.
- Wear appropriate safety glasses to protect your eyes from solder splashes or flying debris.
- Use a soldering iron stand to prevent accidental burns.
- Ensure the soldering iron is properly grounded.
- Keep flammable materials away from your soldering workstation.
- Allow components to cool before handling them after soldering.
- Dispose of electronic waste and solder residue responsibly.
- Keep the kit and tools out of reach of children and pets.
4. Assembly Instructions
Follow these steps carefully to assemble your Light Painting Lamp. Refer to the provided images for visual guidance.
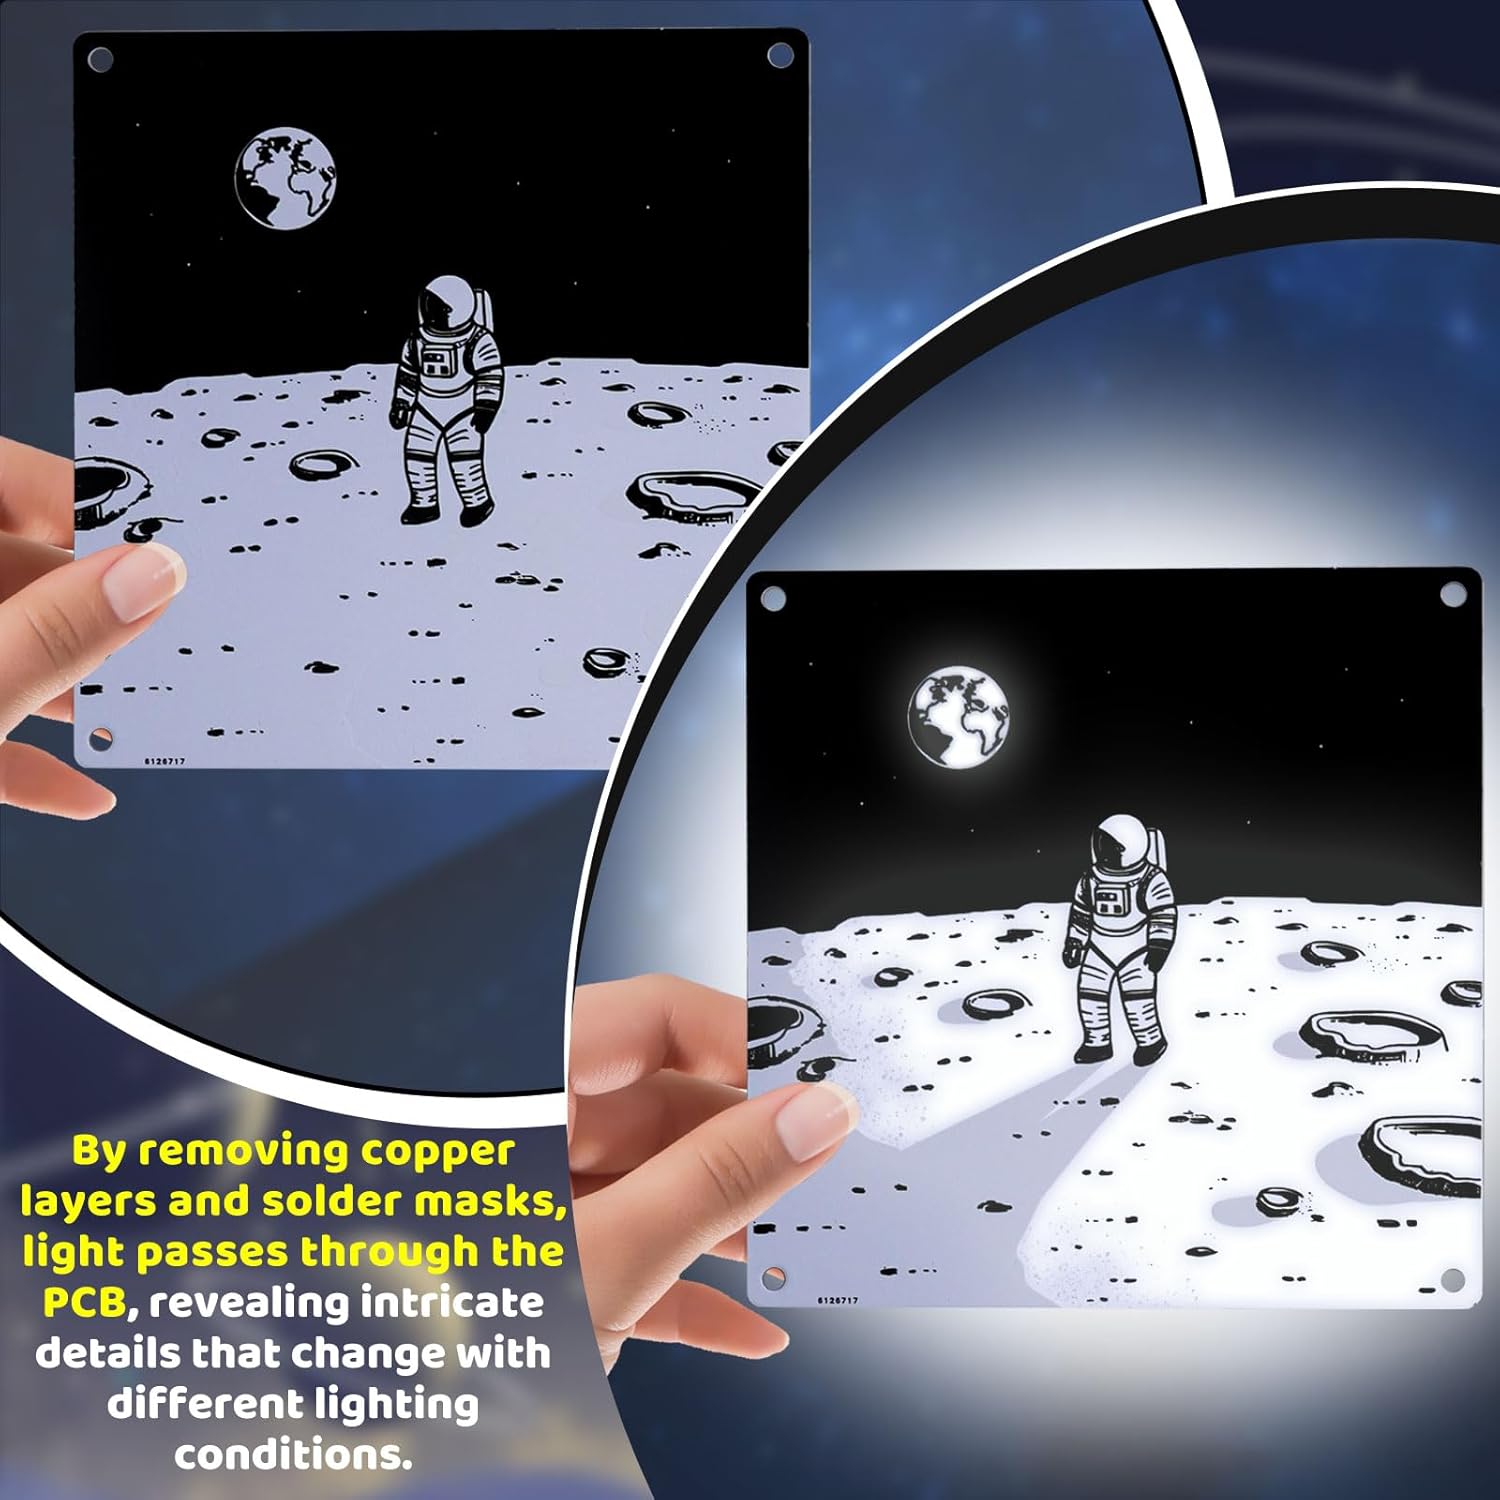
4.1. Prepare the PCB
- Identify the main PCB. Note the "Sunlit Mountains" pattern on one side and "Astronaut on the Moon" on the other.
- Carefully remove any protective films or copper layers as indicated in the detailed paper manual. This step is crucial for the light painting effect.

Detailed Description: This image shows a close-up of the PCB with the "Astronaut on the Moon" design. It highlights the process of removing copper layers and solder masks to enable light transmission, which is fundamental to the light painting effect. The left side shows the PCB before modification, and the right side shows it after, with the design becoming translucent.
4.2. Soldering Components
Begin by soldering the components onto the PCB. Pay close attention to component polarity and placement as indicated in the included paper manual.
- Start with the SMD light control chip (JL7010S). Ensure correct orientation.
- Proceed with the through-hole components such as resistors, capacitors, and LEDs.
- Double-check all solder joints for proper connection and absence of short circuits.

Detailed Description: This image depicts an individual engaged in the soldering process, carefully attaching electronic components to the PCB. A soldering iron is visible, along with various small components and a printed circuit board, emphasizing the practical skill required for assembly.

Detailed Description: This image displays a series of smaller images, illustrating different stages of the PCB assembly. It shows the bare PCB, the placement of various components, and the partially assembled board, serving as a visual aid for the soldering process.
4.3. Casing Assembly
- Once all soldering is complete and verified, carefully place the assembled PCB into the acrylic casing.
- Secure the acrylic panels using the provided screws and standoffs. Ensure the USB port and touch sensor are accessible.

Detailed Description: This image presents the final assembled product, featuring two views of the light painting lamp. One side displays an astronaut on the moon, and the other shows a mountain landscape, both encased in clear acrylic with visible screws and a USB port.
5. Operating Instructions
5.1. Powering On
Connect the provided USB cable to the lamp's USB port and a suitable 5V USB power source (e.g., computer, USB wall adapter).
5.2. Touch Control
The lamp features a touch-sensitive button for control:
- Turn On/Off: A short press on the touch button will toggle the light on or off.
- Adjust Brightness: Long press the touch button to continuously adjust the brightness level. Release when the desired brightness is reached.
- Restore Preset Brightness: After adjusting the brightness, turn off the light. Tap the touch button three times to restore the previously saved brightness setting.

Detailed Description: This image provides a clear infographic detailing the touch control functions of the lamp. It shows icons and text explaining how to tap to turn on/off, long press to adjust brightness, and tap three times after turning off to restore the preset brightness.
5.3. Dual Pattern Display
The lamp features two distinct patterns on opposite sides of the PCB. You can choose which pattern to display by simply rotating the lamp.
Detailed Description: This image shows the light painting lamp in a bedroom setting, illustrating its dual pattern capability. The top half shows the "Sunlit Mountains" design, while the bottom half displays the "Astronaut on the Moon" design, both functioning as decorative night lights.
6. Working Principle
The unique light painting effect is achieved by selectively removing the copper layer and welding film from the PCB. This allows light from the internal LEDs to pass through the board, illuminating specific areas and outlining the intricate pattern details. The appearance of the patterns subtly shifts with different brightness levels, creating a dynamic visual effect.
Detailed Description: This video demonstrates the MiOYOOW Light Painting Lamp in action. It showcases both the "Astronaut Walking in Space" and "Sunlit Mountain Peaks" designs, illustrating how light passes through the PCB to create the patterns. The video also highlights the touch control features for turning the light on/off and adjusting brightness.
7. Maintenance
- Cleaning: Use a soft, dry cloth to gently wipe the acrylic casing. Avoid abrasive cleaners or solvents.
- Storage: When not in use, store the lamp in a dry, dust-free environment.
- Component Care: Avoid dropping the lamp or subjecting it to strong impacts, which could damage internal soldered components.
8. Troubleshooting
| Problem | Possible Cause | Solution |
|---|---|---|
| Lamp does not turn on. |
|
|
| Brightness adjustment not working. |
|
|
| Light is uneven or parts of the pattern are not illuminated. |
|
|
9. Specifications
- Model: GY21738
- Brand: MiOYOOW
- Power Source: DC 5V (via USB)
- Light Source Type: Light Emitting Diode (LED)
- Control: Touch button (On/Off, Adjustable Brightness)
- Design: Dual-sided PCB with "Sunlit Mountains" and "Astronaut on the Moon" patterns
- Dimensions: Approximately 3.93 x 3.93 x 1.04 inches (10 x 10 x 2.6 cm)
- Item Weight: 5.9 ounces (approx. 167 grams)

Detailed Description: This image provides a clear diagram of the assembled light painting lamp with its dimensions labeled. It shows the height and width as 3.93 inches and the depth as 1.04 inches.
10. Warranty and Support
For any questions, technical assistance, or support regarding your MiOYOOW Light Painting Lamp DIY Soldering Kit, please refer to the contact information provided by your retailer or visit the official MiOYOOW store page on Amazon.
Note: As a DIY kit, successful operation is dependent on correct assembly and soldering techniques. Please ensure you follow all instructions carefully.