Introduction
This manual provides detailed instructions for the safe and efficient use of your Wefomey 65.6ft COB LED Strip Light. Please read this manual thoroughly before installation and operation to ensure proper functionality and safety.
Package Contents
- 65.6ft warm white COB LED strip (2 rolls of 32.8ft)
- RF remote control
- Controller
- UL Listed DC 24V 48W power supply
- 2-pin 8mm COB LED connectors
- 2-pin 8mm COB LED connector extension wire
- Mounting brackets
Important Safety Instructions
- Ensure the power supply is disconnected before installation or maintenance.
- This product is designed for indoor use only.
- Do not expose the LED strip to water or high humidity.
- Use only the provided power adapter.
- Do not bend the LED strip sharply or apply excessive force.
- Keep out of reach of children.
Setup and Installation
Step 1: Prepare the Installation Surface
Ensure the surface is clean, dry, and smooth for optimal adhesive performance. Remove any dust, grease, or moisture.
Step 2: Connect the Components
Connect the COB LED strip to the controller, and then connect the controller to the DC 24V 48W power supply. Finally, plug the power supply into a standard electrical outlet.

Image: Illustration of how to connect the LED strip to the controller and power supply. The strip is flexible and can be used for various DIY lighting projects.
Step 3: Mount the LED Strip
Peel off the backing from the adhesive tape on the back of the LED strip and firmly press the strip onto the desired surface. For added security, use the included mounting brackets and screws.
Step 4: Cutting and Reconnecting (Optional)
The LED strip can be cut at designated marks (every 50mm / 1.97 inches) to achieve the desired length. The middle of the metal point on the strip light indicates a cutting mark.
To reconnect cut sections, use the provided 2-pin 8mm COB LED connectors. Ensure correct polarity (positive to positive, negative to negative) when making connections.
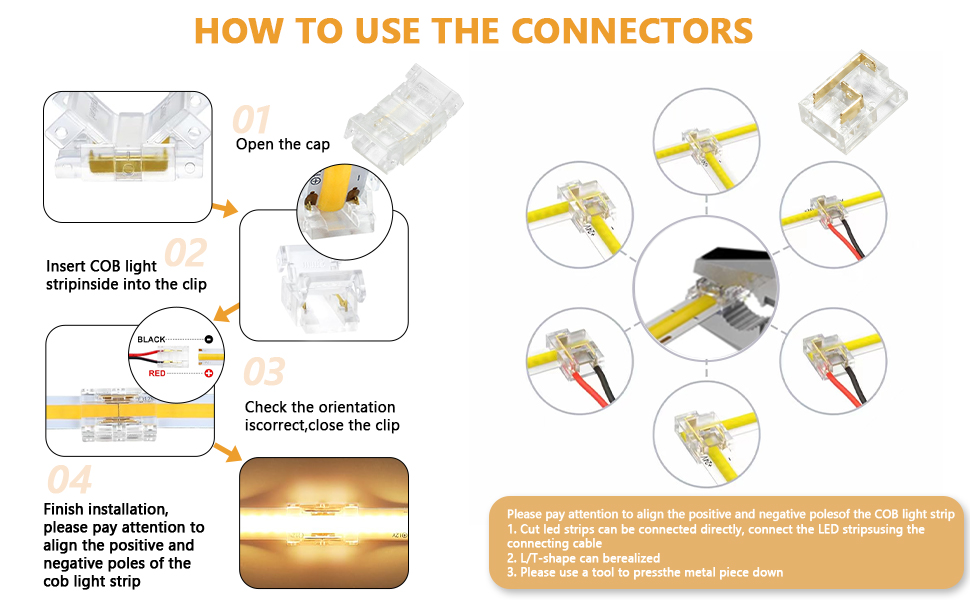
Image: Detailed instructions on how to use 2-pin 8mm COB LED strip connectors, including opening the cap, inserting the strip, checking orientation, and closing the clip. Examples of L-shaped and T-shaped connections are shown.
Operating Instructions
Power On/Off
Use the ON/OFF button on the RF remote control or the inline controller to turn the lights on or off.
Dimmable Brightness
The LED strip offers dimmable brightness with 6 levels (10%, 25%, 40%, 60%, 80%, 100%). Use the brightness increase/decrease buttons on the remote or the fixed brightness level buttons (10%, 25%, 50%, 100%).
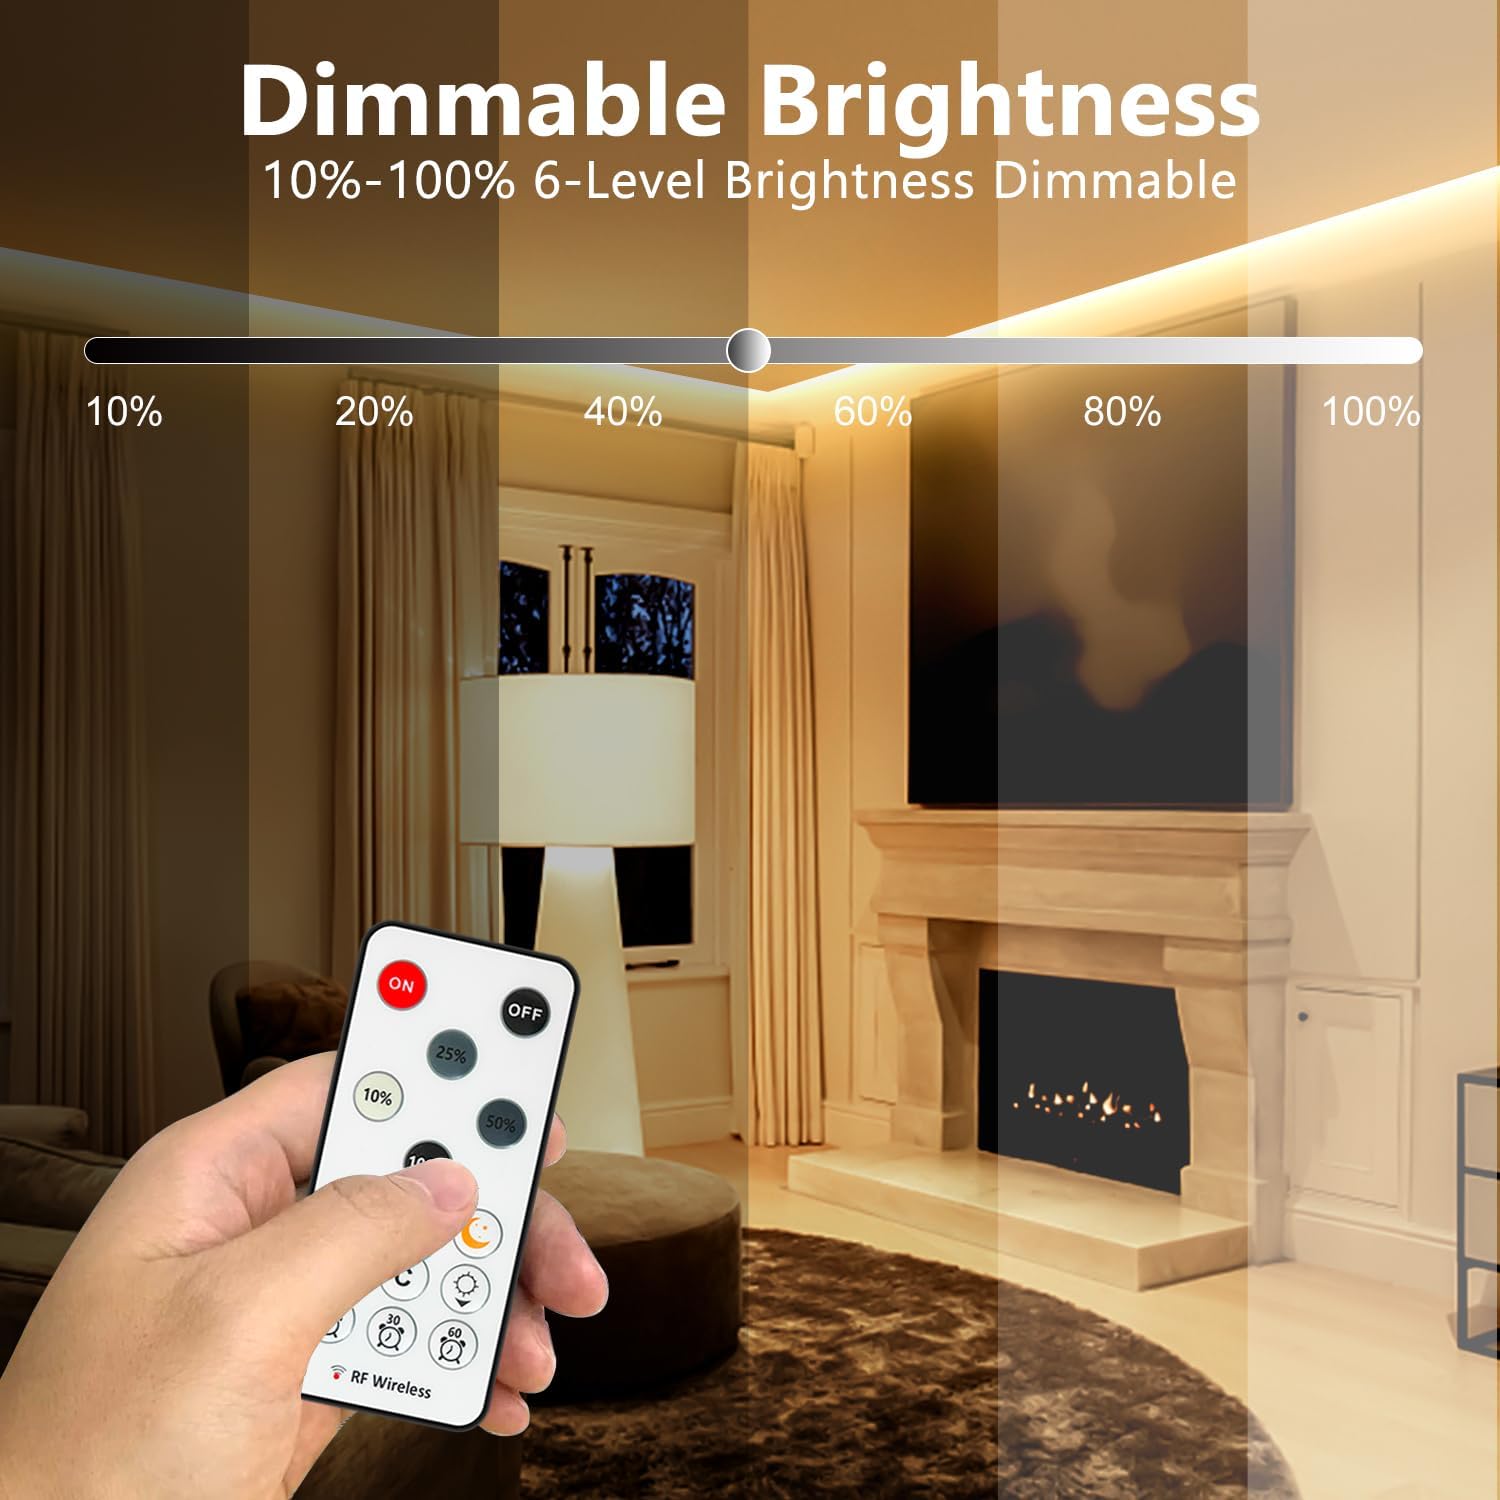
Image: A remote control is shown adjusting the brightness of the LED strip light, illustrating the 10% to 100% dimming capability in a room with a fireplace.
Lighting Modes
The remote control provides 3 dynamic lighting modes: Jump, Gradient, and Flicker. Select these modes using the dedicated buttons on the remote.
Timer Function
Set the LED strip to automatically turn off after 10, 30, or 60 minutes using the timer buttons on the RF remote.

Image: A bedroom scene showing the LED strip light installed behind a headboard, with a remote control indicating timer settings for 10, 30, and 60 minutes.
Memory Function
The controller has a memory function that restores the LED strip to its last used setting when powered on.
Remote Control Pairing
To pair the remote control (1 to 1 pairing) or cancel pairing: After powering on, press and hold the "Sun" button and the "Moon" button simultaneously for 1-3 seconds until the strip light flashes.
Image: An RF remote control highlighting the "Sun" and "Moon" buttons for pairing, with an example of LED strip lights illuminating the exterior of a house.
Maintenance
- Regularly wipe the LED strip with a soft, dry cloth to remove dust.
- Do not use abrasive cleaners or solvents.
- Ensure all connections are secure.
Troubleshooting
| Problem | Possible Cause | Solution |
|---|---|---|
| Lights do not turn on. | Power supply disconnected, faulty connection, or remote battery low. | Check all power connections. Ensure the power adapter is plugged in. Replace remote battery if necessary. |
| Lights flicker or dim unexpectedly. | Loose connection, insufficient power, or faulty strip section. | Check all connections for tightness. Ensure the power supply wattage is adequate for the total strip length. |
| Remote control not responding. | Remote battery low, remote not paired, or obstruction. | Replace remote battery. Re-pair the remote control (refer to "Remote Control Pairing" section). Ensure no obstructions between remote and controller. |
| Adhesive not holding. | Surface not clean or smooth, or strip too heavy for adhesive. | Clean the surface thoroughly before application. Use additional mounting brackets or clips for better support. |
Specifications
| Feature | Detail |
|---|---|
| Model Number | WF-WWCOB-20M |
| Brand | Wefomey |
| Light Color | 3000K Warm White |
| Length | 65.6 ft (2 rolls of 32.8 ft) |
| Voltage | DC 24V |
| Wattage | 48W |
| Light Source Type | COB LED |
| CRI | >90 |
| Dimmable | Yes |
| Control Method | RF Remote Control |
| Indoor/Outdoor Usage | Indoor |
| Cutting Unit | 50mm (1.97 inches) |
| Strip Width | 8mm (0.32 inches) |

Image: A table summarizing key specifications such as CRI (>90), CCT (3000K), Length (65.6ft/20m), Cutting Size (1.97in/50mm), Power Rated (48W), LEDs Quantity (6480), Width (0.31in/8mm), and Waterproof (IP22).
Warranty and Support
Warranty Information
This Wefomey COB LED Strip Light comes with a 2-year manufacturer's warranty.
Customer Support
For technical assistance, troubleshooting, or warranty claims, please contact Wefomey customer support. Refer to the product packaging or the seller's information for contact details.