1. Introduction
Thank you for purchasing the M-Amazup RD-305S Retro Portable Radio. This device combines classic radio functionality with modern features like Bluetooth connectivity, MP3 playback, and multiple power options. This manual provides detailed instructions for safe operation, setup, and maintenance of your radio.
Important Safety Instructions
- Read all instructions before using the device.
- Keep this manual for future reference.
- Do not expose the device to rain or moisture to prevent fire or electric shock.
- Do not block any ventilation openings.
- Use only attachments/accessories specified by the manufacturer.
- Unplug the device during lightning storms or when unused for long periods.
- Refer all servicing to qualified service personnel.
2. Package Contents
Verify that all items are present in your package:
- M-Amazup RD-305S Portable Radio
- USB Charging Cable
- Owner's Manual (this document)
3. Product Overview
Familiarize yourself with the components and controls of your M-Amazup RD-305S radio.
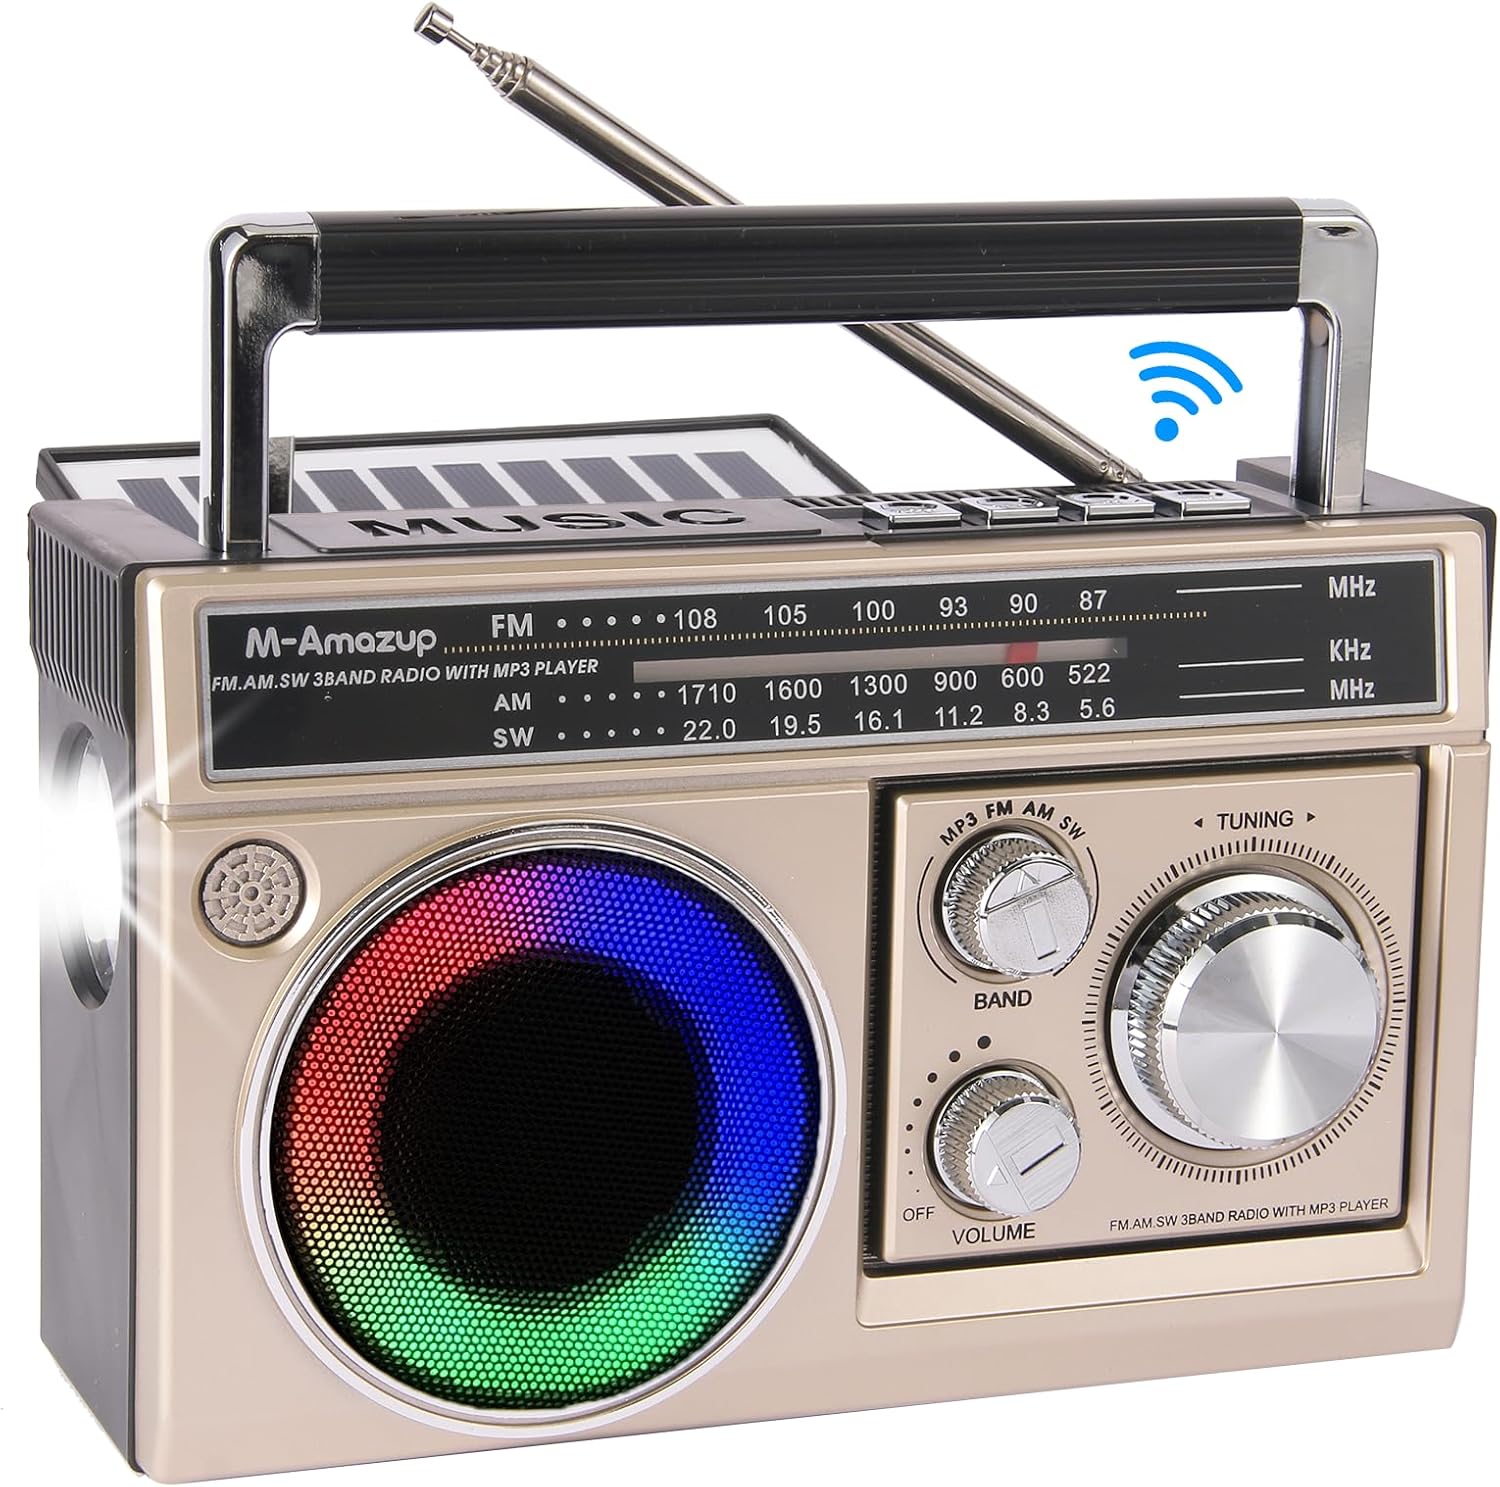
Figure 3.1: Front View of the M-Amazup RD-305S Radio. This image displays the front of the radio, highlighting the speaker with colorful mood lights, the tuning dial, volume knob, band selector, and the extendable antenna.
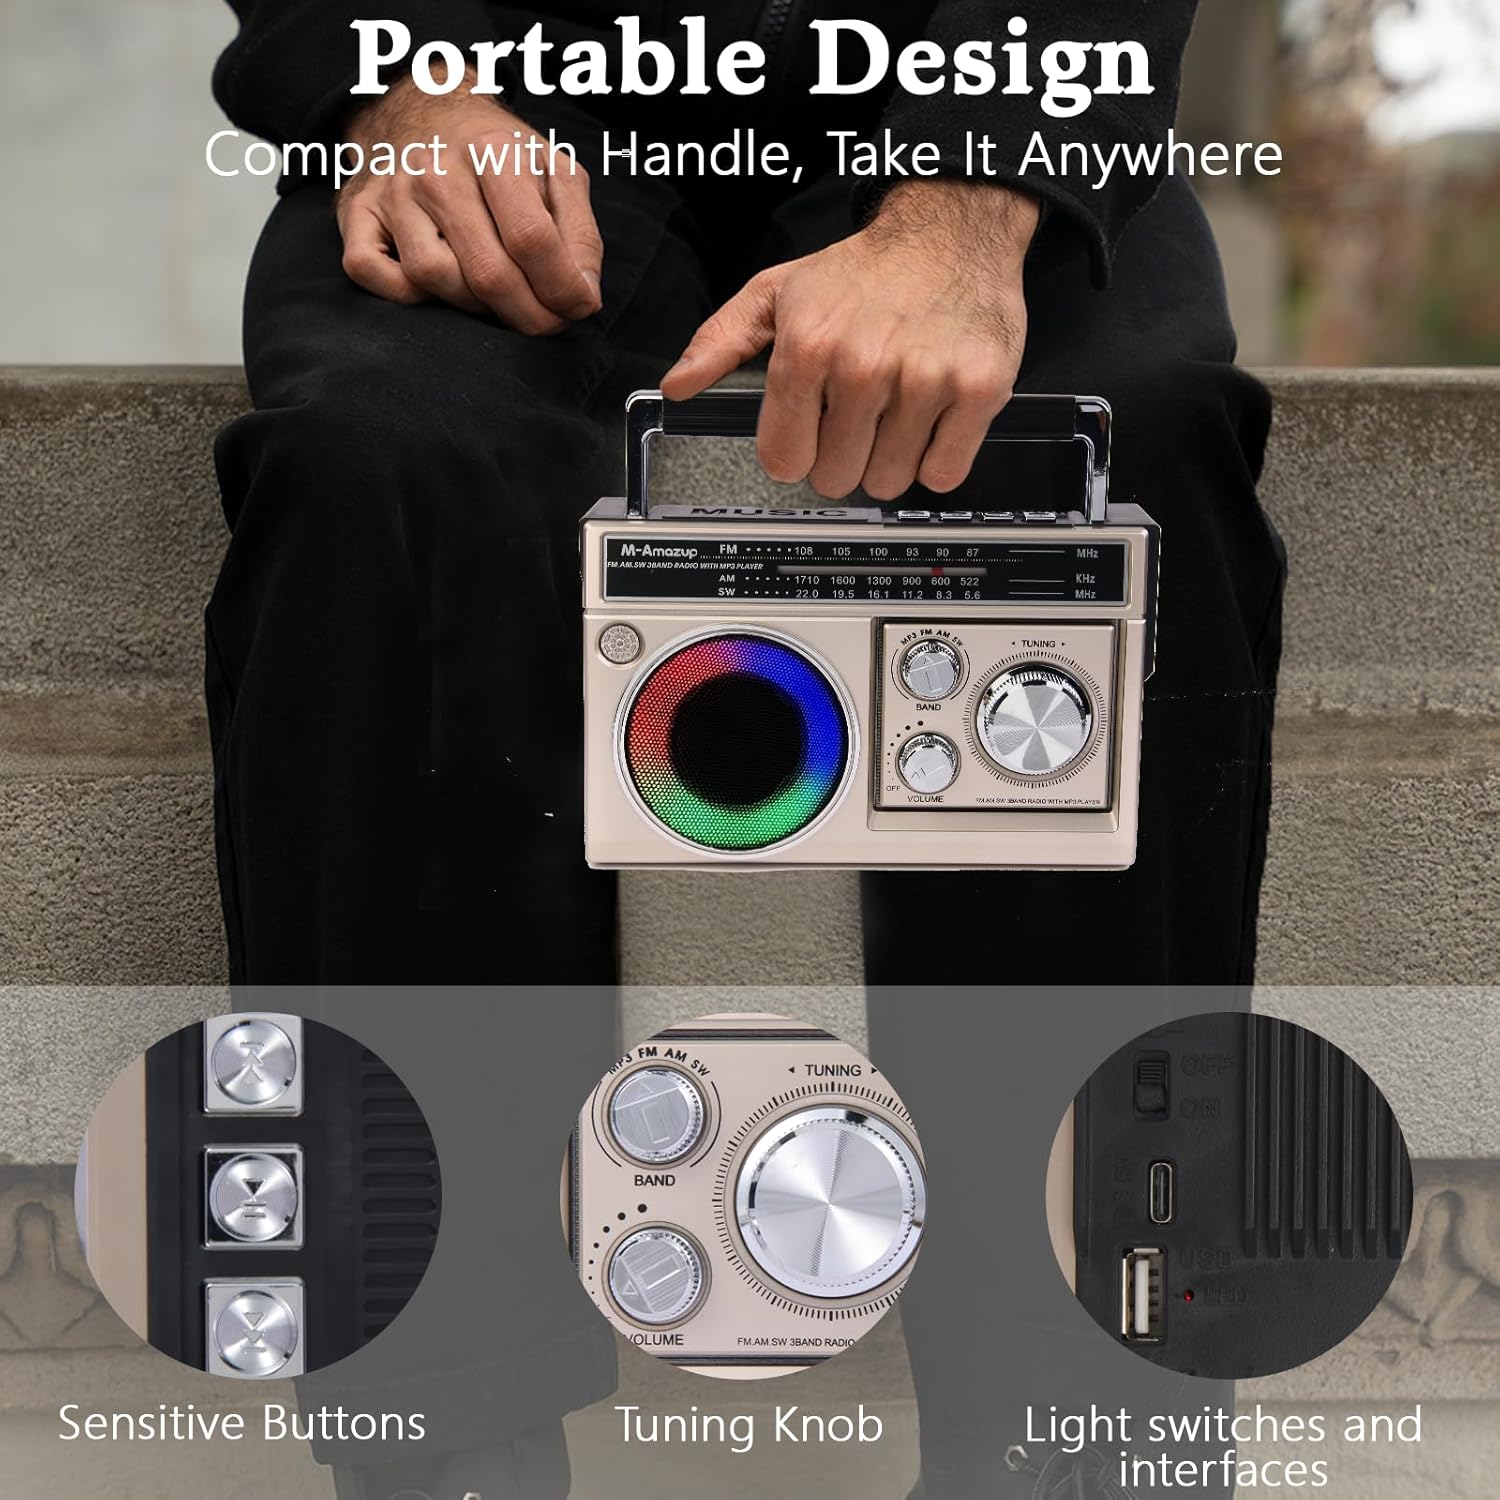
Figure 3.2: Detailed View of Controls and Ports. This image shows close-ups of the sensitive buttons, the large tuning knob, and the light switches and interfaces, including the USB port and TF card slot.
Key Components:
- Extendable Antenna: For improved radio reception.
- Band Selector: Switch between FM, AM, and SW bands.
- Tuning Knob: Adjust frequency for radio stations.
- Volume Knob: Control audio output level.
- Mode Button: Switch between Radio, Bluetooth, and MP3 playback modes.
- Speaker: Audio output, features colorful mood lights.
- Flashlight: Integrated light for illumination.
- USB Port: For MP3 playback from USB drives and charging.
- TF Card Slot: For MP3 playback from TF (MicroSD) cards.
- Solar Panel: Located on top for solar charging.
- Carry Handle: For easy portability.
4. Setup and Charging
4.1 Battery Installation
The radio uses a rechargeable battery. Ensure the battery is correctly installed before first use.
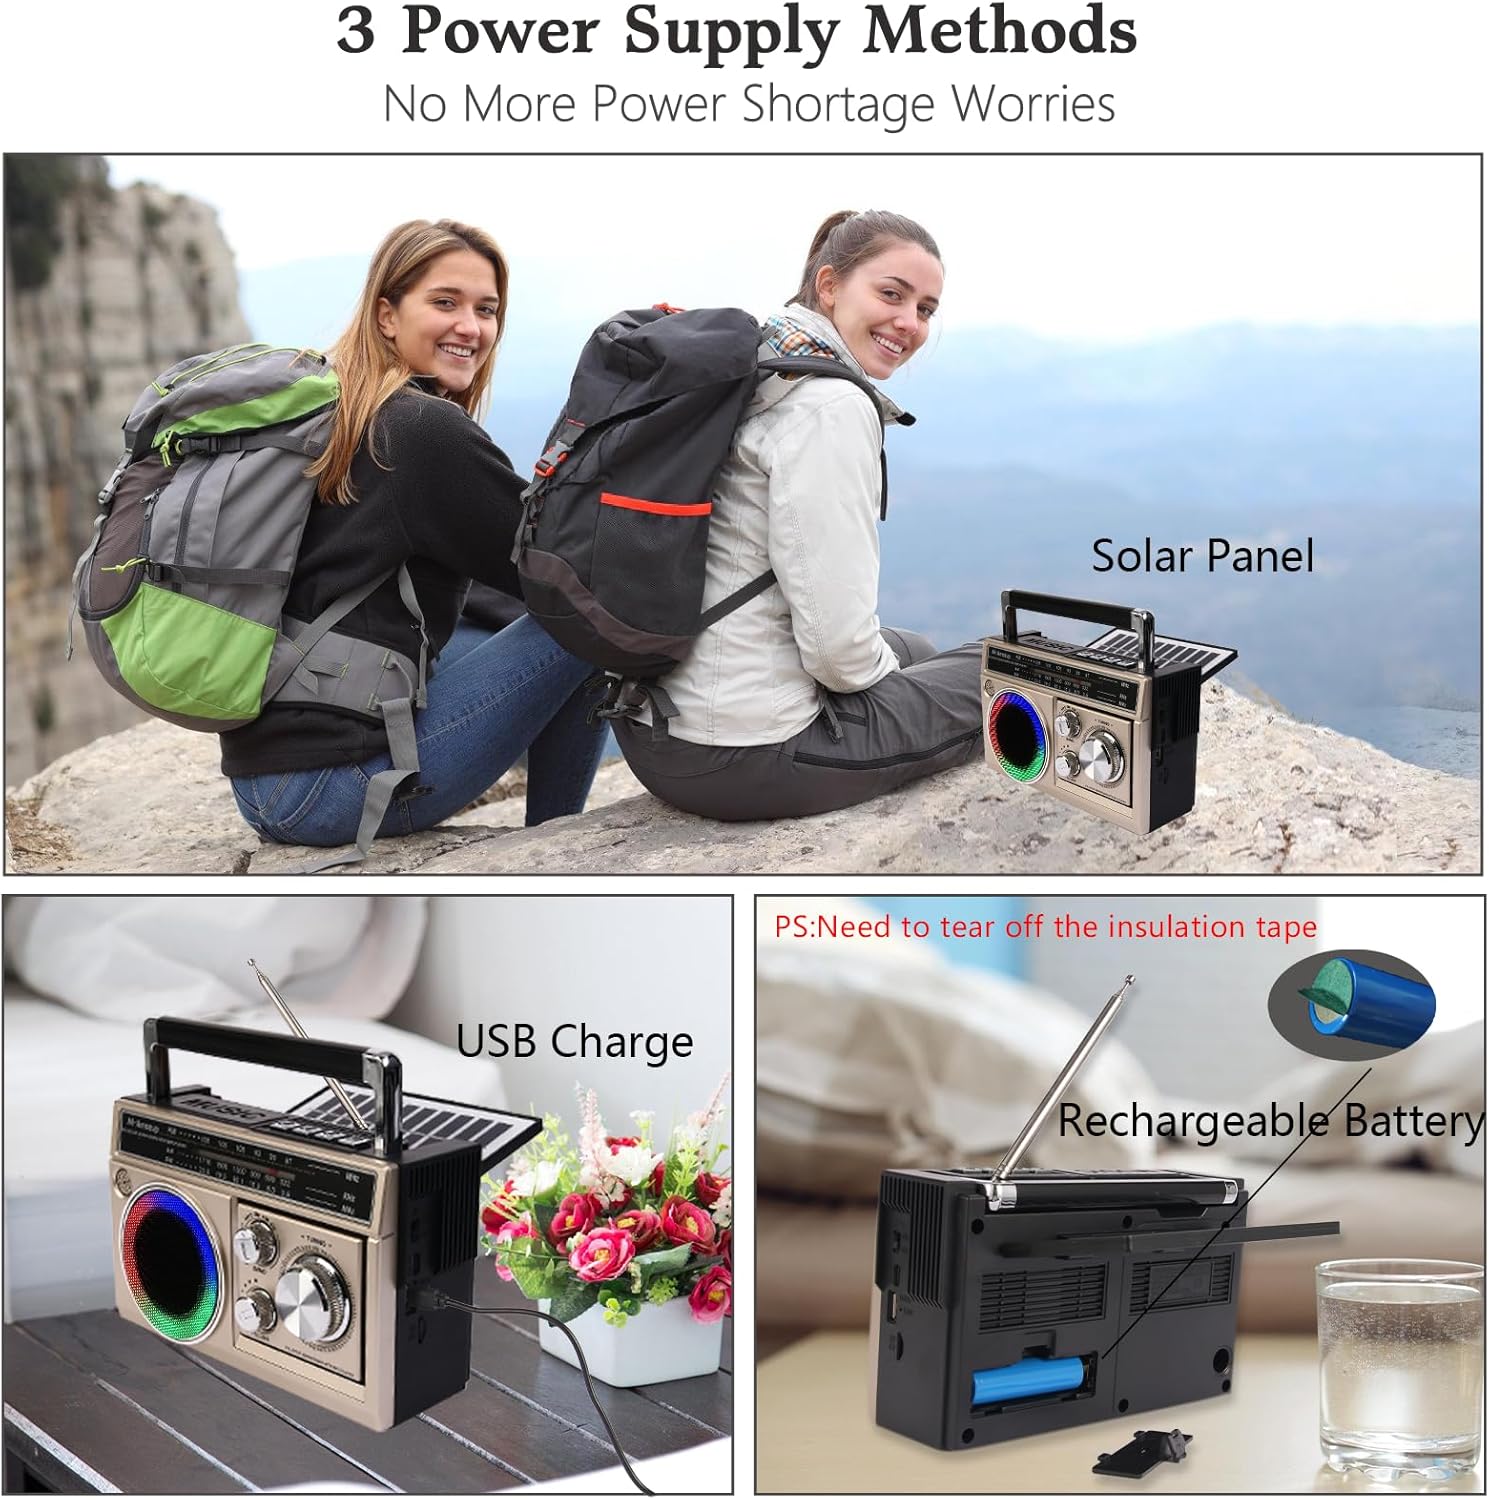
Figure 4.1: Battery Compartment and Power Supply Methods. This image illustrates the location of the rechargeable battery compartment and the three power supply methods: solar panel, USB charging, and AC charging.
- Locate the battery compartment on the back of the radio.
- Open the compartment cover.
- Insert the included rechargeable battery, ensuring correct polarity.
- Close the battery compartment cover securely.
- Note: Remove the insulation tape from the battery terminals before first use.
4.2 Charging the Radio
Your M-Amazup RD-305S radio offers three charging methods:
- USB Charging: Connect the provided USB cable to the radio's USB port and a standard USB power adapter (not included) or a computer USB port.
- AC Charging: Use a compatible AC adapter (not included) to connect the radio to a wall outlet.
- Solar Charging: Place the radio in direct sunlight. The solar panel on top will convert sunlight into energy to charge the internal battery. This method is ideal for outdoor use and emergencies.
The charging indicator light will illuminate during charging and turn off or change color when fully charged (specific behavior may vary by unit).
5. Operating Instructions
5.1 Radio Operation (AM/FM/SW)
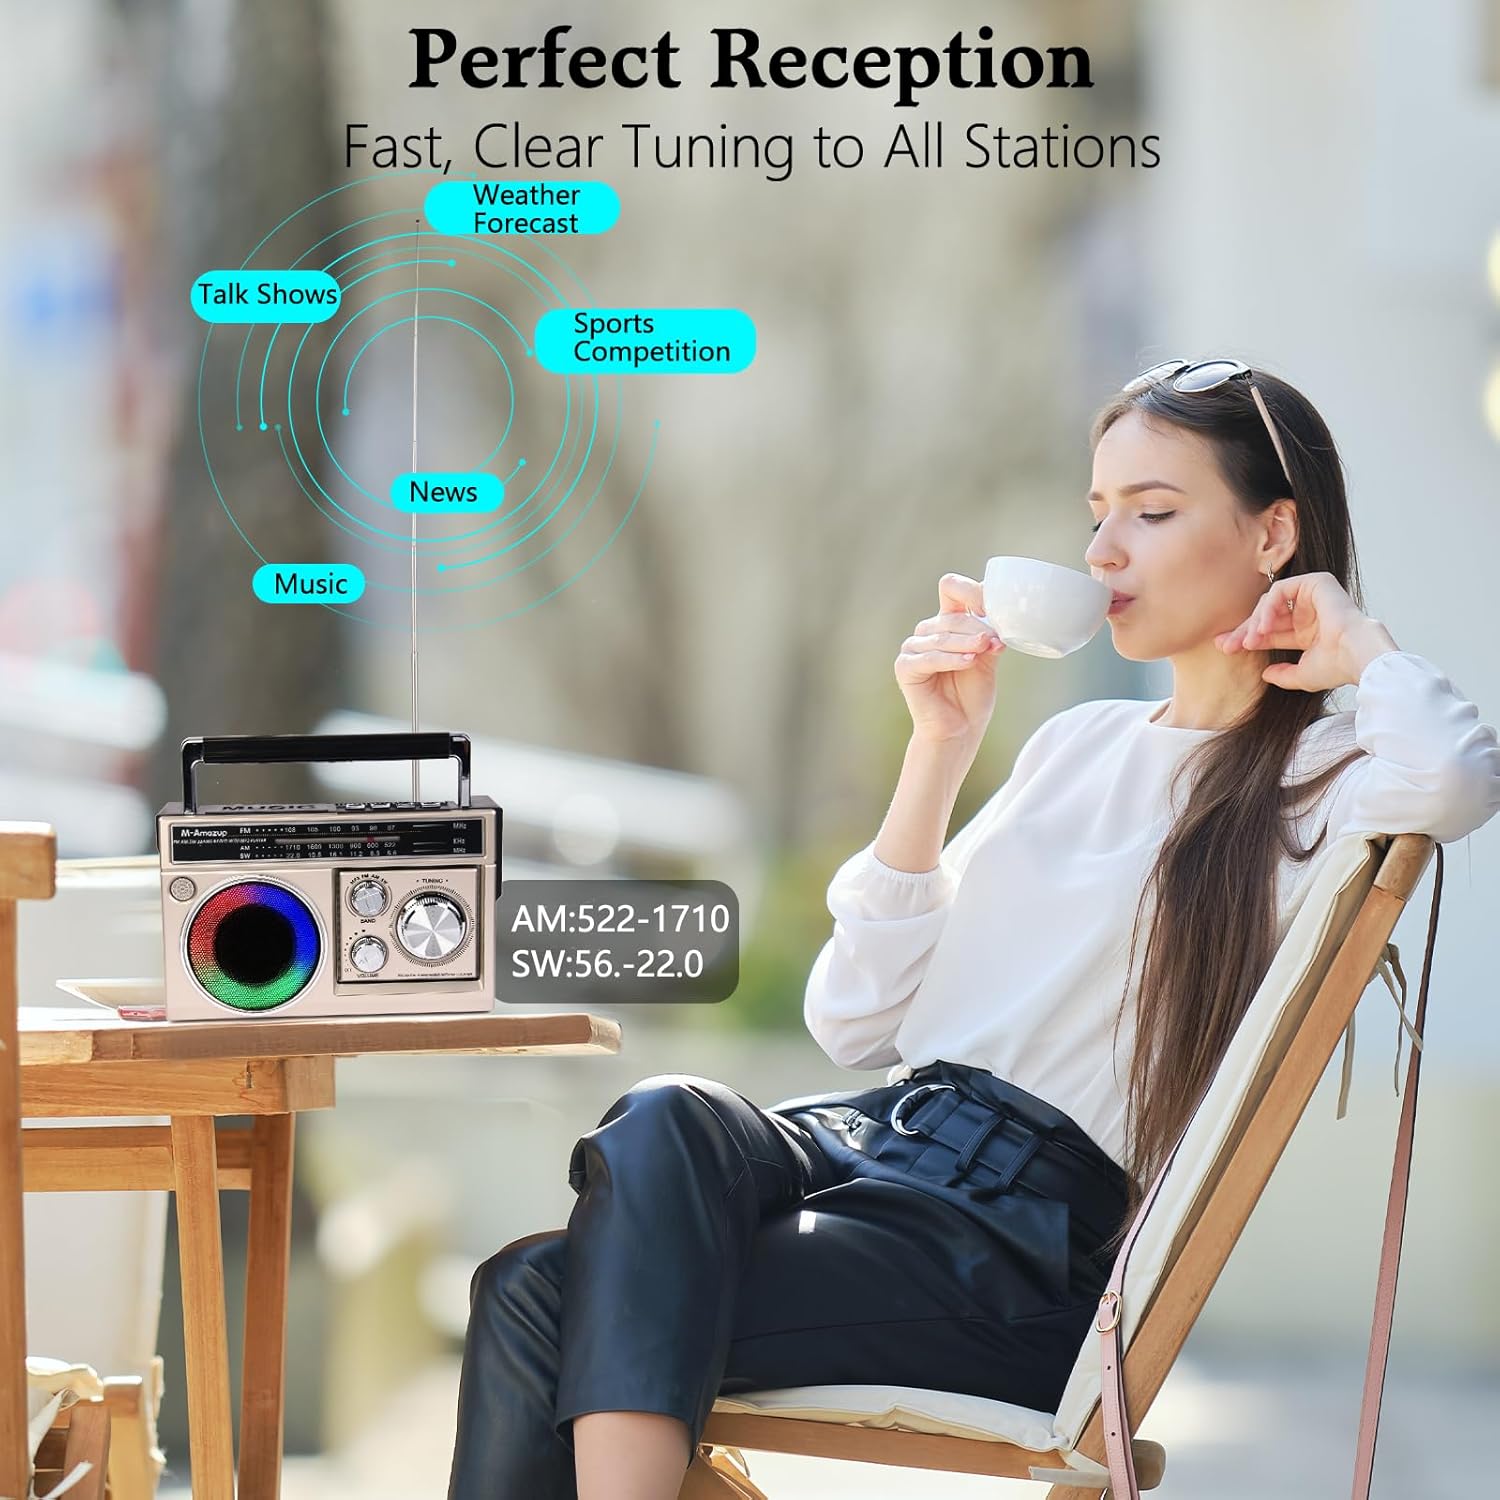
Figure 5.1: Radio Reception. This image illustrates the radio's capability to receive various broadcasts like news, music, weather forecasts, and sports competitions across AM, FM, and SW bands.
- Turn the radio ON using the power switch (often integrated with the volume knob).
- Extend the telescopic antenna for optimal reception, especially for FM and SW bands.
- Use the BAND selector to choose between FM (87-108 MHz), AM (522-1710 KHz), or SW (5.6-22.0 MHz).
- Rotate the TUNING knob to scan for radio stations.
- Adjust the VOLUME knob to your desired listening level.
5.2 Bluetooth Speaker Function
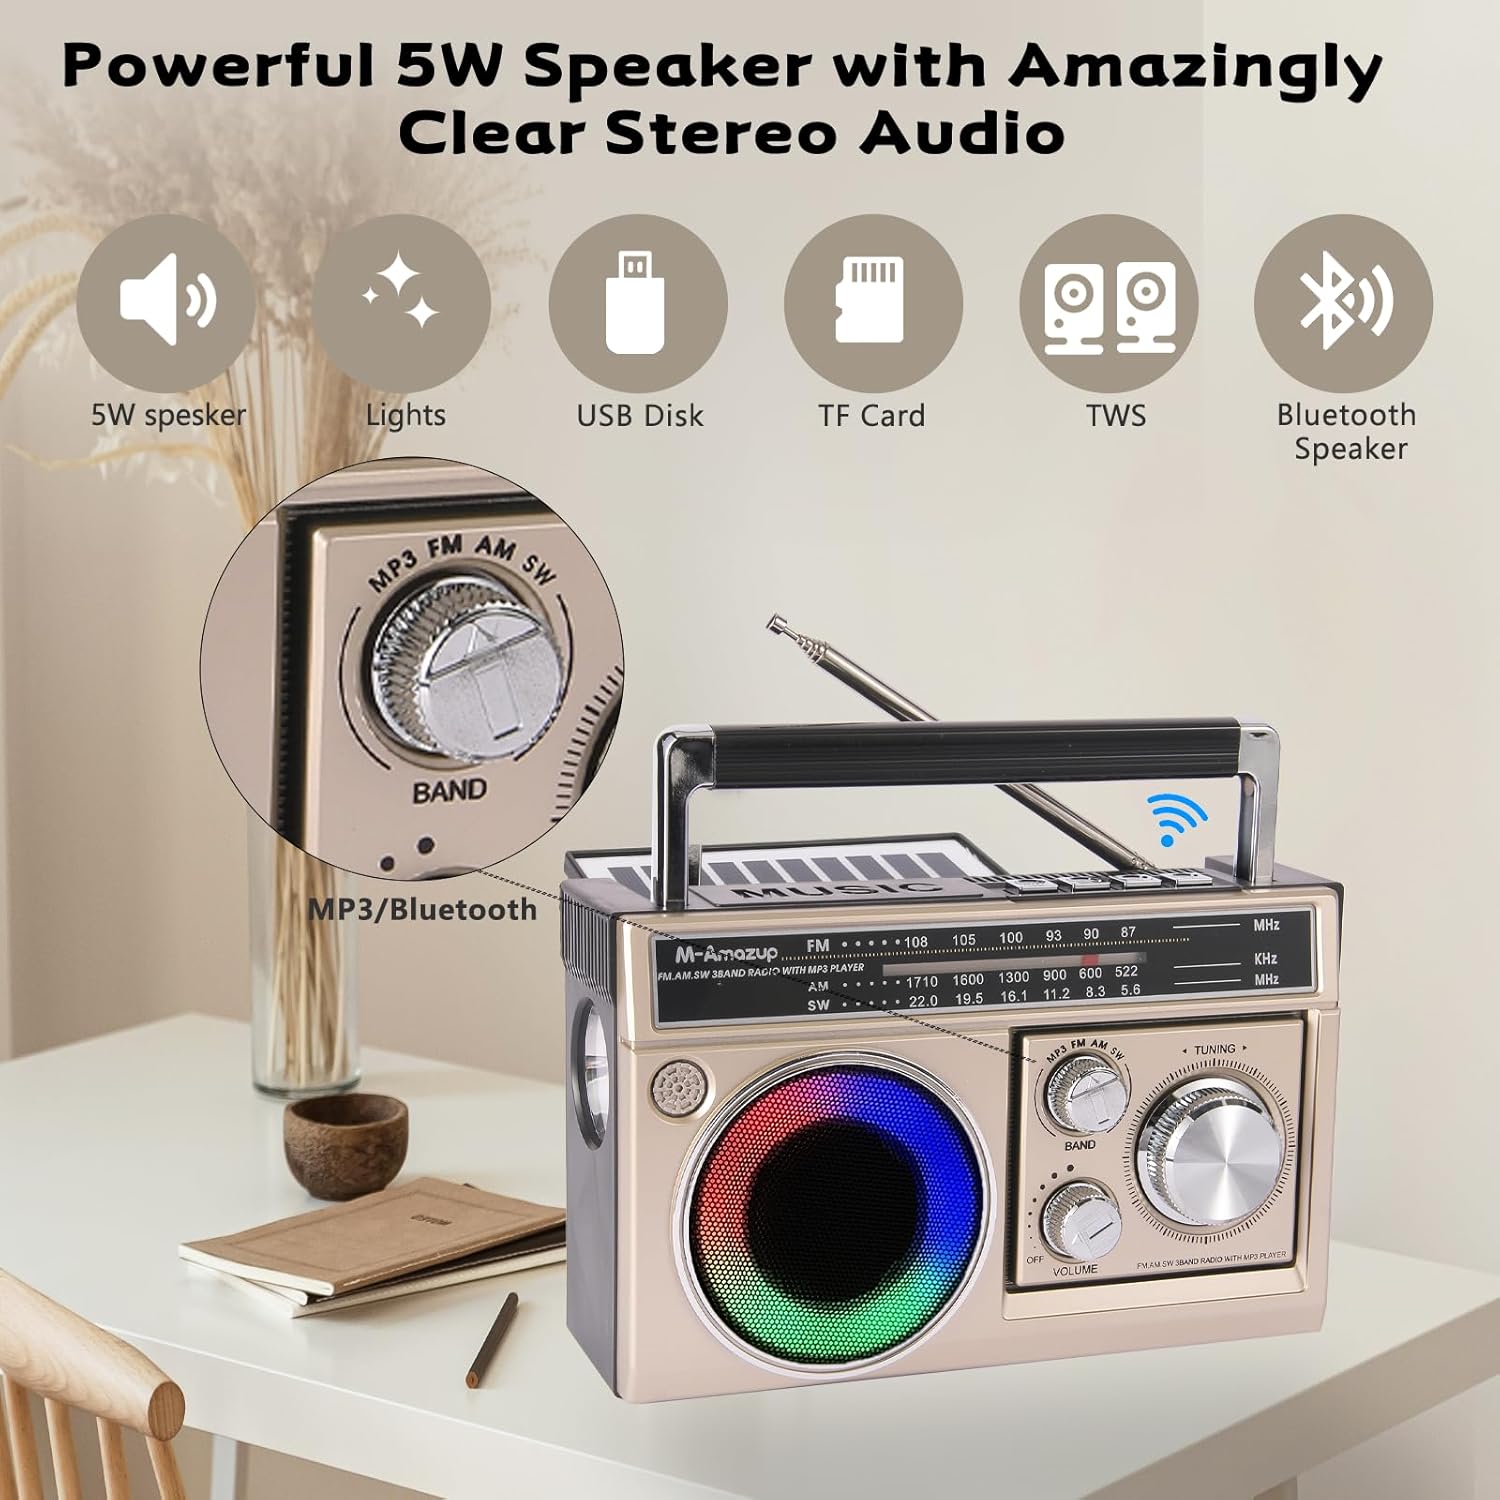
Figure 5.2: Bluetooth and MP3 Playback. This image emphasizes the radio's powerful 5W speaker and its capabilities for Bluetooth 5.1 connectivity, USB disk playback, TF card playback, and TWS pairing.
- Turn the radio ON.
- Switch the mode to Bluetooth (usually indicated by an audible prompt or a specific LED).
- On your mobile device, enable Bluetooth and search for available devices.
- Select "M-Amazup RD-305S" (or similar name) from the list to pair.
- Once paired, you can play audio from your device through the radio's speaker.
- TWS Pairing: If you have two M-Amazup RD-305S radios, you can pair them together for true wireless stereo sound. Refer to the specific TWS pairing instructions if provided separately or on the product packaging.
5.3 MP3 Playback (USB/TF Card)
- Turn the radio ON.
- Insert a USB flash drive or a TF (MicroSD) card containing MP3 audio files into the respective port.
- The radio should automatically switch to MP3 playback mode or you may need to select it using the MODE button.
- Use the playback control buttons (e.g., Play/Pause, Next Track, Previous Track) if available.
5.4 Flashlight Operation
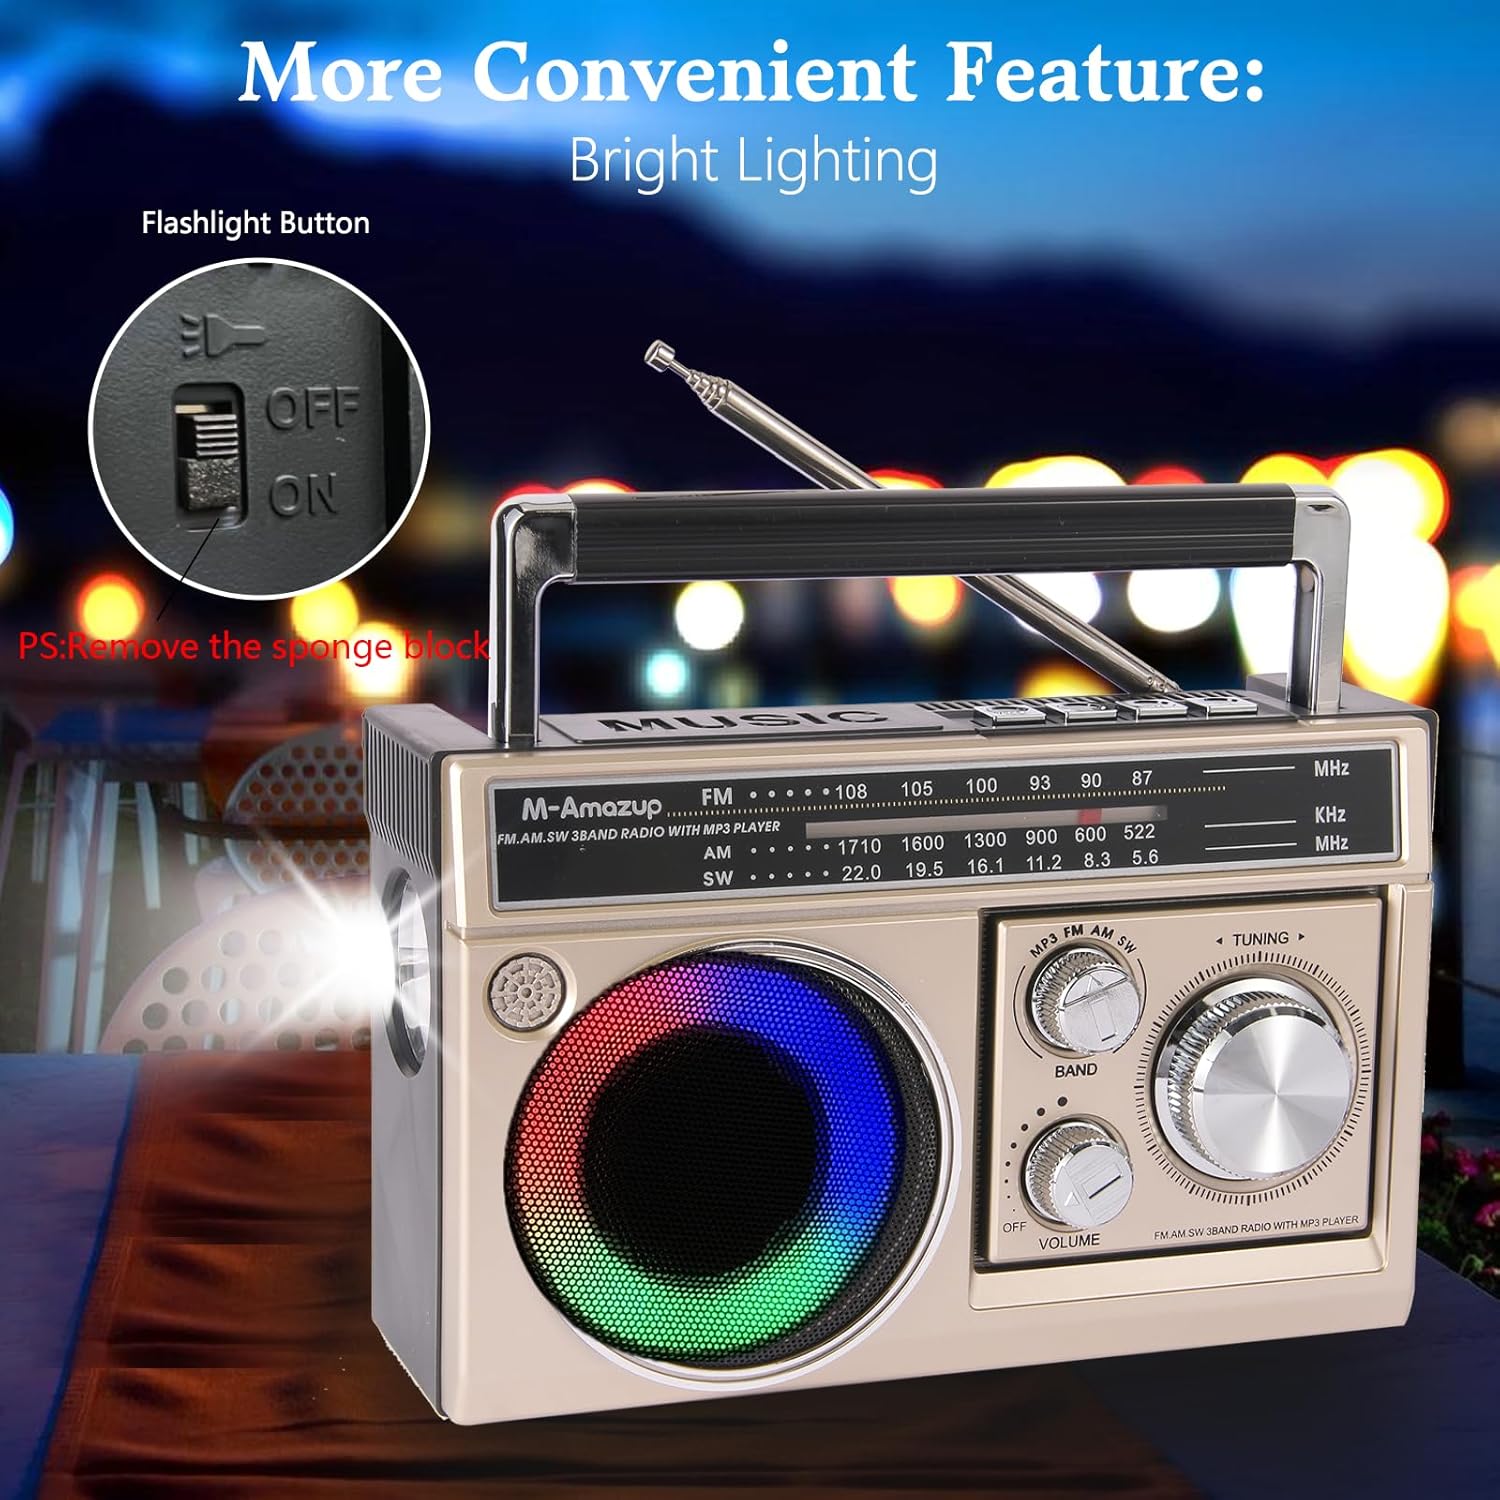
Figure 5.3: Flashlight Functionality. This image highlights the flashlight button and demonstrates the radio's integrated flashlight providing bright illumination, useful for emergencies or low-light conditions.
The radio includes a built-in flashlight for convenience.
- Locate the flashlight switch, typically on the side of the unit.
- Slide the switch to the ON position to activate the flashlight.
- Slide the switch to the OFF position to turn off the flashlight.
- Note: Remove the sponge block from the flashlight lens before first use if present.
5.5 Colorful Mood Lights
The speaker features integrated colorful mood lights to enhance the ambiance.
- These lights typically activate automatically when the radio is powered on or when playing audio.
- Some units may have a dedicated button or switch to cycle through different light modes or turn them off. Refer to your specific unit's controls.
6. Maintenance
- Cleaning: Use a soft, dry cloth to clean the exterior of the radio. Do not use abrasive cleaners or solvents.
- Storage: When not in use for extended periods, store the radio in a cool, dry place away from direct sunlight and extreme temperatures.
- Battery Care: If the radio will not be used for a long time, it is recommended to fully charge the battery every 3 months to maintain its lifespan.
7. Troubleshooting
| Problem | Possible Cause | Solution |
|---|---|---|
| Radio does not turn on. | Battery is depleted or not installed correctly. | Charge the battery or ensure it is properly installed with insulation tape removed. |
| Poor radio reception. | Antenna not extended, weak signal, or interference. | Fully extend the antenna. Try repositioning the radio. Tune slowly to find a clear signal. |
| Bluetooth not connecting. | Radio not in Bluetooth mode, device too far, or already paired. | Ensure radio is in Bluetooth mode. Keep devices within 10 meters. Disconnect from other devices if necessary. |
| MP3 playback not working. | USB/TF card not inserted correctly, unsupported file format, or corrupted files. | Reinsert the card/USB. Ensure files are in MP3 format. Try a different card/USB. |
| Flashlight not working. | Switch is off, or sponge block is still in place. | Ensure the flashlight switch is ON. Remove any protective sponge block from the lens. |
8. Specifications
| Feature | Detail |
|---|---|
| Model Number | RD-305S |
| Product Dimensions | 7.9 x 3.2 x 4.9 inches (20.1 x 8.1 x 12.4 cm) |
| Item Weight | 13.2 ounces (374 grams) |
| Tuner Technology | AM/FM/SW |
| FM Frequency Range | 87-108 MHz |
| AM Frequency Range | 522-1710 KHz |
| SW Frequency Range | 5.6-22.0 MHz |
| Connectivity Technology | Bluetooth 5.1, USB, TF Card |
| Power Source | Rechargeable Battery (1500mAh), USB Powered, Solar Powered, AC Powered |
| Included Components | Radio, USB Cable, Owner's Manual |
| Special Features | Flashlight, Colorful Mood Lights, TWS Pairing, Portable, Lightweight |
9. Warranty and Support
M-Amazup products are designed for reliability and performance. For warranty information or technical support, please refer to the contact details provided on the product packaging or visit the official M-Amazup website.
Please retain your proof of purchase for any warranty claims.