1. Introduction
This manual provides comprehensive instructions for the installation, operation, and maintenance of the EAMB-1130 Advantech Industrial Control Machine Motherboard. It is designed to assist users in maximizing the performance and longevity of their system. Please read this manual thoroughly before proceeding with any installation or operation procedures.
The EAMB-1130 motherboard is engineered for robust performance in industrial control, server, and workstation environments, offering stability and durability for demanding applications.
2. Product Overview
The EAMB-1130 is an industrial-grade motherboard designed for high-reliability applications. It features an LGA 1366 socket, supporting Intel processors, and DDR4 memory. Its robust design ensures stable operation in various scenarios, including office, workstation, and server environments.

Figure 2.1: Top-down view of the EAMB-1130 motherboard. This image displays the overall layout of the motherboard, including the CPU socket, RAM slots, various connectors, and integrated circuits.
Key features include:
- Extensive Expertise: Designed with over a decade of experience in computer and server solutions.
- Diverse Product Range: Compatible with various components like HDDs, SSDs, RAM, and cooling systems.
- High Stability: Engineered for smooth and stable operation in critical systems.
- Outstanding Durability: Built for high load-bearing capacity and extended lifespan.
- Server System Specialization: Optimized for efficient server infrastructure operation.
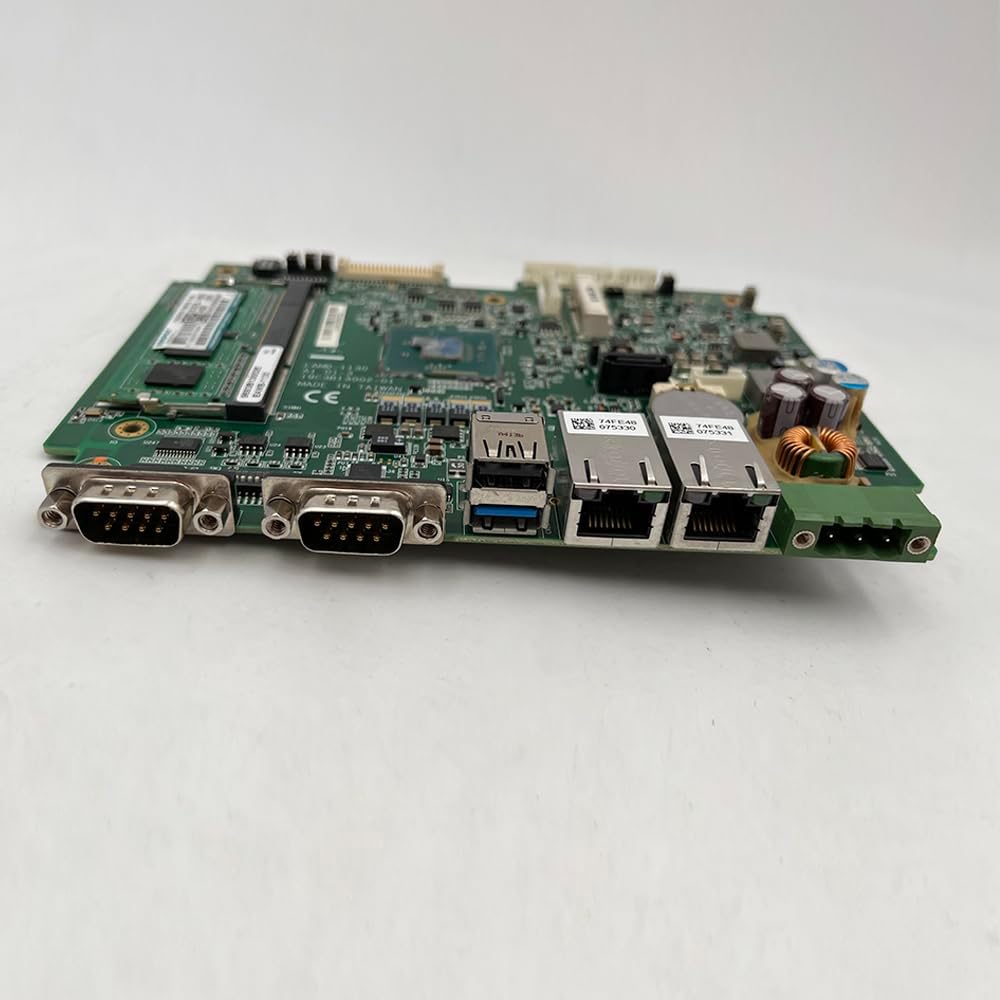
Figure 2.2: Side view of the EAMB-1130 motherboard. This image highlights the various input/output ports available on the board, including network and serial connectors.

Figure 2.3: Rear view of the EAMB-1130 motherboard. This image provides a perspective of the underside of the board, revealing solder points and additional components.
3. Specifications
The following table details the technical specifications of the EAMB-1130 motherboard:
| Feature | Detail |
|---|---|
| Model | EAMB-1130 |
| Processor Compatibility | Intel (LGA 1366 Socket) |
| Chipset | Intel C602 |
| Memory Type Supported | DDR4 |
| Maximum RAM Capacity | 64 GB |
| Memory Channels | Single |
| Storage Interface Type | U.2, SATA 3 |
| PCI-E Standards | PCI-E 4.0 |
| Number of PCI Slots | 0 |
| Back I/O Ports | 1x RJ45s (LAN) |
| Onboard LAN | 1x RJ45s |
| RAID Supported | Yes |
| Usage Scenario | Office, Workstation, Server |
| Form Factor | Others (Specific industrial form factor) |

Figure 3.1: Detailed view of the EAMB-1130 motherboard's CPU socket and RAM slot. This image provides a closer look at the processor area and memory interface.
4. Setup
Proper installation is crucial for the stable operation of your EAMB-1130 motherboard. Follow these steps carefully:
- Safety Precautions:
- Always disconnect power before installing or removing components.
- Wear an anti-static wrist strap to prevent electrostatic discharge (ESD) damage.
- Handle the motherboard by its edges to avoid touching sensitive components.
- Prepare the Chassis: Ensure your server or industrial chassis is compatible with the motherboard's form factor. Install standoffs in the correct positions.
- Install the CPU:
- Open the CPU socket lever.
- Carefully align the CPU with the socket, matching the golden triangle or notch on the CPU with the corresponding mark on the socket.
- Gently place the CPU into the socket without forcing it.
- Close the lever to secure the CPU.
- Install the CPU Cooler: Apply thermal paste (if not pre-applied) and install the CPU cooler according to its manufacturer's instructions. Connect the CPU fan cable to the designated header on the motherboard.
- Install RAM Modules:
- Open the clips at both ends of the DIMM slot.
- Align the notch on the DDR4 memory module with the key in the DIMM slot.
- Press down firmly on both ends of the module until the clips snap into place.
- Mount the Motherboard: Carefully place the motherboard into the chassis, aligning the screw holes with the installed standoffs. Secure the motherboard with screws.
- Connect Power Supply: Connect the main 24-pin ATX power connector and the 8-pin (or 4-pin) CPU power connector from your power supply to the motherboard.
- Connect Storage Devices: Connect SATA or U.2 cables from your storage drives (HDDs/SSDs) to the appropriate ports on the motherboard. Connect power cables from the PSU to the drives.
- Connect Peripherals: Connect front panel connectors (power switch, reset switch, USB, audio), case fans, and any other necessary cables.
5. Operating Instructions
Once the motherboard is installed and all components are connected, you can proceed with initial power-on and system configuration.
- Initial Power-On:
- Ensure all connections are secure.
- Connect the power cord to the power supply and turn on the PSU switch.
- Press the power button on your chassis.
- The system should power on, and you should see a display output.
- BIOS/UEFI Setup:
- During startup, repeatedly press the designated key (usually Del, F2, or F10) to enter the BIOS/UEFI setup utility.
- Configure boot order, system time, and other essential settings as required for your operating system installation.
- Save changes and exit the BIOS/UEFI.
- Operating System Installation:
- Insert your operating system installation media (USB drive or DVD).
- Boot from the installation media and follow the on-screen prompts to install your preferred operating system.
- Install all necessary drivers for the motherboard components (chipset, LAN, etc.) after the OS installation is complete.
- System Monitoring: Utilize system monitoring tools provided by your operating system or third-party software to keep track of temperatures, voltages, and fan speeds to ensure optimal performance.
6. Maintenance
Regular maintenance helps ensure the longevity and reliable performance of your EAMB-1130 motherboard and the entire system.
- Dust Removal:
- Periodically open the chassis and use compressed air to remove dust buildup from the motherboard, CPU cooler, and other components.
- Ensure fans are clean and free of obstructions to maintain proper airflow.
- Cable Management: Ensure internal cables are neatly routed and secured to prevent interference with airflow and accidental disconnections.
- BIOS/UEFI Updates: Check the manufacturer's website for BIOS/UEFI updates. Updates can provide improved compatibility, stability, and new features. Follow the update instructions carefully to avoid system damage.
- Driver Updates: Keep all system drivers (chipset, LAN, etc.) updated to the latest versions for optimal performance and security.
- Environmental Control: Operate the system in a clean, dry, and well-ventilated environment within recommended temperature ranges.
7. Troubleshooting
This section provides solutions to common issues you might encounter with your EAMB-1130 motherboard.
- No Power:
- Check if the power supply is connected and switched on.
- Verify that the 24-pin ATX and 8-pin CPU power cables are securely connected to the motherboard.
- Ensure the front panel power switch cable is correctly connected to the motherboard header.
- Test the power supply with another system or a PSU tester if possible.
- No Display Output:
- Ensure the monitor is connected to the correct video output port and is powered on.
- Reseat the RAM modules. Try booting with only one RAM module installed.
- Check if the CPU is properly seated and the CPU cooler is installed correctly.
- If using a dedicated graphics card, ensure it is properly seated in its PCI-E slot and has adequate power.
- System Freezes or Crashes:
- Check CPU and system temperatures. Overheating can cause instability.
- Run memory diagnostic tools to check for faulty RAM.
- Ensure all drivers are up to date.
- Check for loose power or data cables to storage devices.
- POST (Power-On Self-Test) Errors / Beep Codes:
- Consult the motherboard's specific beep code guide (if available) to diagnose the issue. Common beep codes indicate RAM, CPU, or graphics card problems.
- Reseat components one by one to identify the faulty part.
8. Warranty and Support
The EAMB-1130 motherboard comes with a commitment to quality and customer satisfaction.
- Warranty Policy: A 12-month warranty is provided for all products. This warranty covers manufacturing defects and allows for a full refund or replacement.
- Customer Service: For any issues encountered with the product, such as damaged or incorrect items, please contact customer service through the seller's page. Prompt assistance and resolution will be provided.
For further assistance, please refer to the seller's contact information or the official product support channels.