1. Introduction
Thank you for choosing the Outsunny 4-6 Person Camping Tent. This tunnel tent is designed for comfortable outdoor living, featuring two private bedrooms, a spacious living area, and an additional vestibule. It is ideal for family camping, festivals, hiking trips, and other outdoor adventures. This manual provides essential information for the safe and effective setup, use, and maintenance of your tent.

Image 1.1: The Outsunny 4-6 Person Camping Tent shown with its included carry bag, highlighting its portable design.
2. Safety Information
Please read and understand all safety warnings before setting up or using your tent. Failure to follow these instructions may result in injury or damage to the product.
- Fire Safety: Keep all flame and heat sources away from the tent fabric. The tent is made of flammable material and will burn if exposed to an open flame. Do not use candles, matches, or other open flames inside or near the tent.
- Ventilation: Ensure adequate ventilation at all times to prevent suffocation and carbon monoxide poisoning. Do not use fuel-burning devices inside the tent.
- Weather Conditions: While the tent is waterproof and wind-resistant, avoid pitching it in extreme weather conditions such as severe storms, high winds, or heavy snowfall. Always secure the tent properly with all stakes and guy ropes.
- Site Selection: Choose a level, clear area free of sharp objects, rocks, and debris. Avoid pitching under trees with dead branches or near potential flood zones.
- Children: Keep children away from the tent during setup and takedown. Adult supervision is required when children are inside or around the tent.
3. Package Contents
Before beginning assembly, verify that all components are present and in good condition. If any parts are missing or damaged, please contact customer support.
- Tent Body (1)
- Tent Poles (Quantity as per design)
- Guy Ropes (Set)
- Stakes (Set)
- Carry Bag (1)
- Instruction Manual (1)

Image 3.1: Overview of practical design features, including the carry bag for easy transport, a lamp hook for interior lighting, and a storage pocket for small items.
4. Setup Instructions
Setting up your Outsunny tent is designed to be straightforward, though the first time may take 20-30 minutes. Follow these steps for optimal results:
- Unpack and Lay Out: Remove the tent from its carry bag and lay it flat on your chosen campsite. Ensure the area is clear of sharp objects.
- Assemble Poles: Connect the tent pole sections. Identify the different pole types if applicable (e.g., main poles, vestibule poles).
- Insert Poles: Slide the assembled poles through the designated sleeves on the tent fabric.
- Raise Tent: Gently lift the tent and insert the ends of the poles into the grommets or pin-and-ring systems at the base of the tent. This will give the tent its basic shape.
- Secure Tent Base: Stake down all corners of the tent firmly into the ground.
- Attach Inner Tents: The two private bedrooms are suspended from rings on the inside of the outer shell. Attach these inner tents to the corresponding hooks or rings inside the main structure.
- Extend Vestibule: If applicable, extend the vestibule area and secure its poles and stakes.
- Attach Guy Ropes: Extend all guy ropes and stake them out at a 45-degree angle from the tent, ensuring they are taut. This provides additional stability against wind.
- Adjust Tension: Adjust the tension of the poles and guy ropes to ensure the tent fabric is taut and wrinkle-free, allowing for proper water runoff and wind resistance.
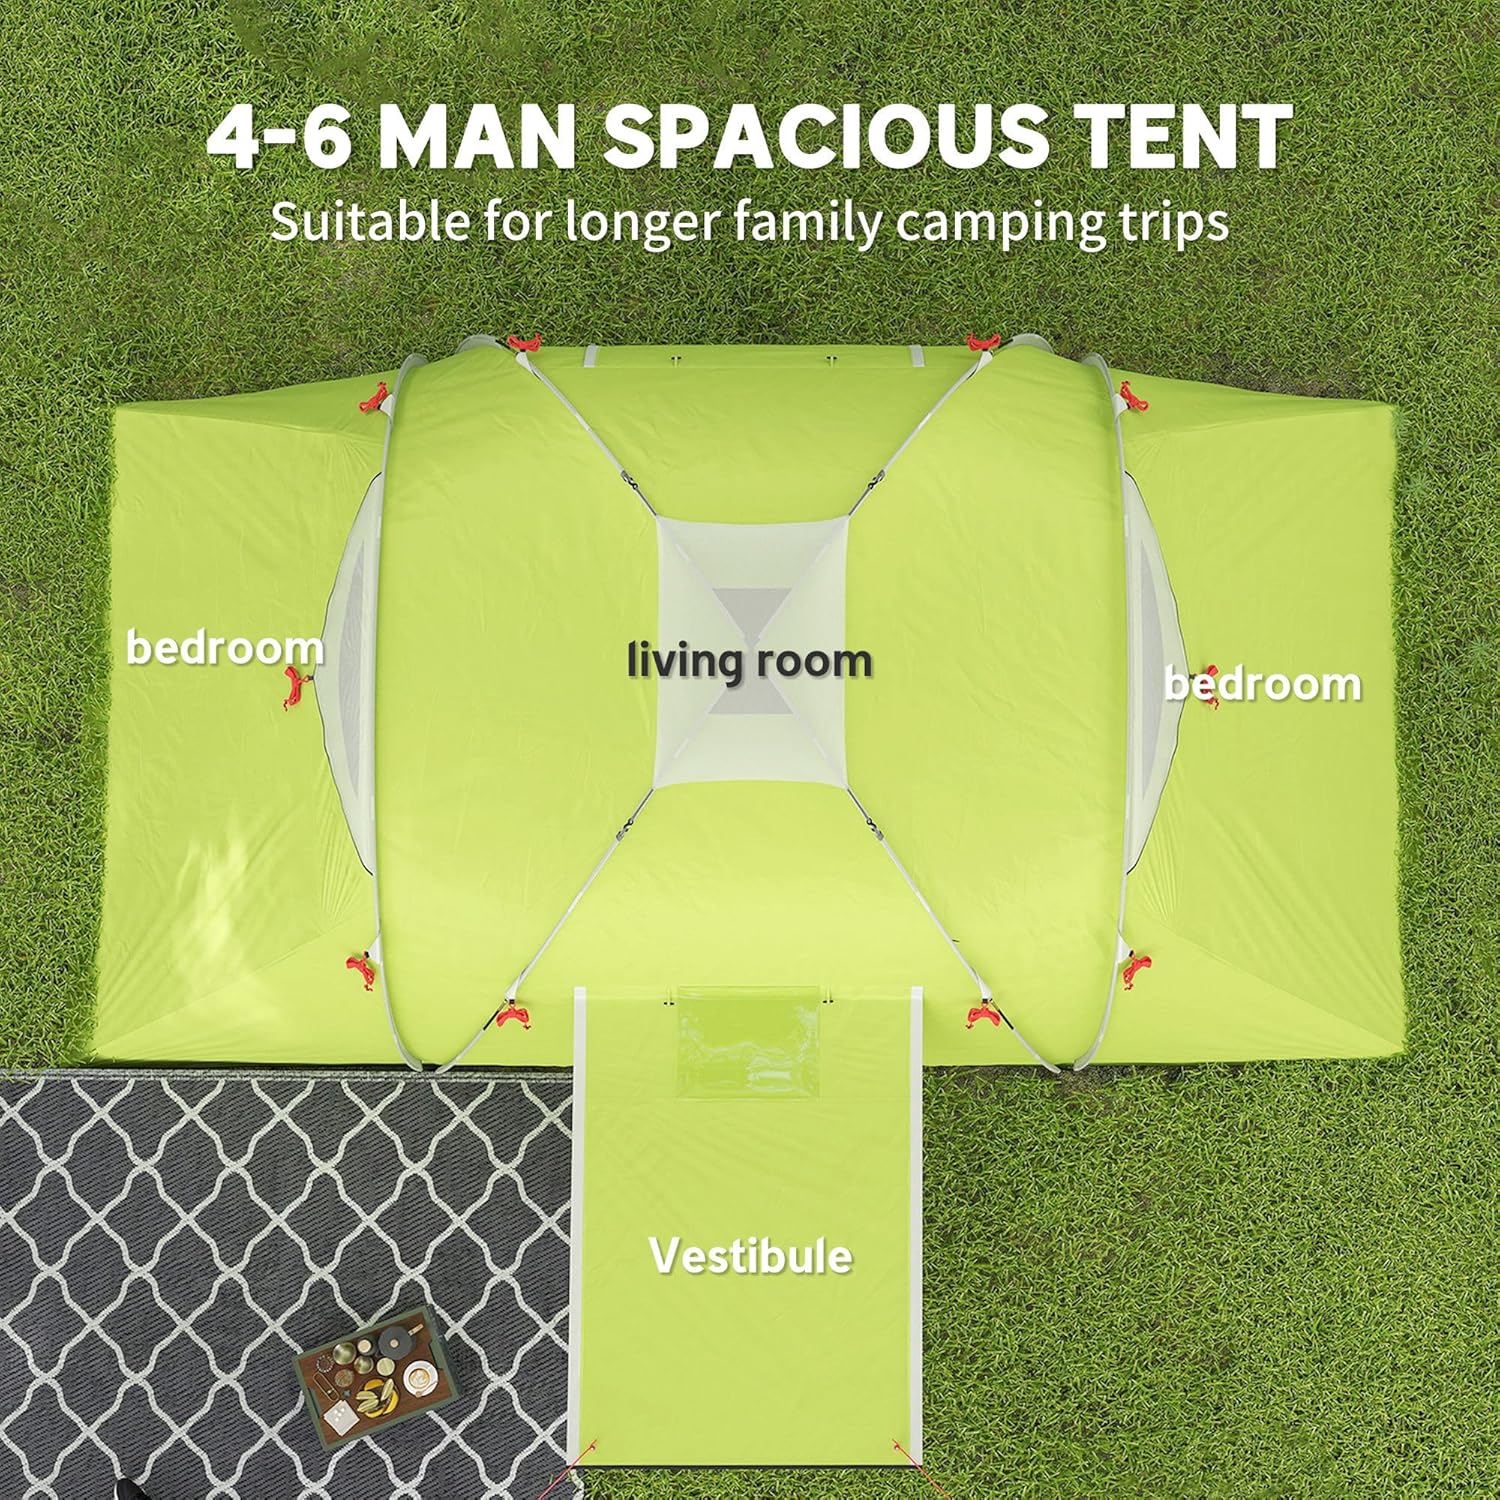
Image 4.1: An overhead diagram illustrating the spacious layout of the tent, featuring two distinct bedrooms, a central living room, and an extended vestibule area.
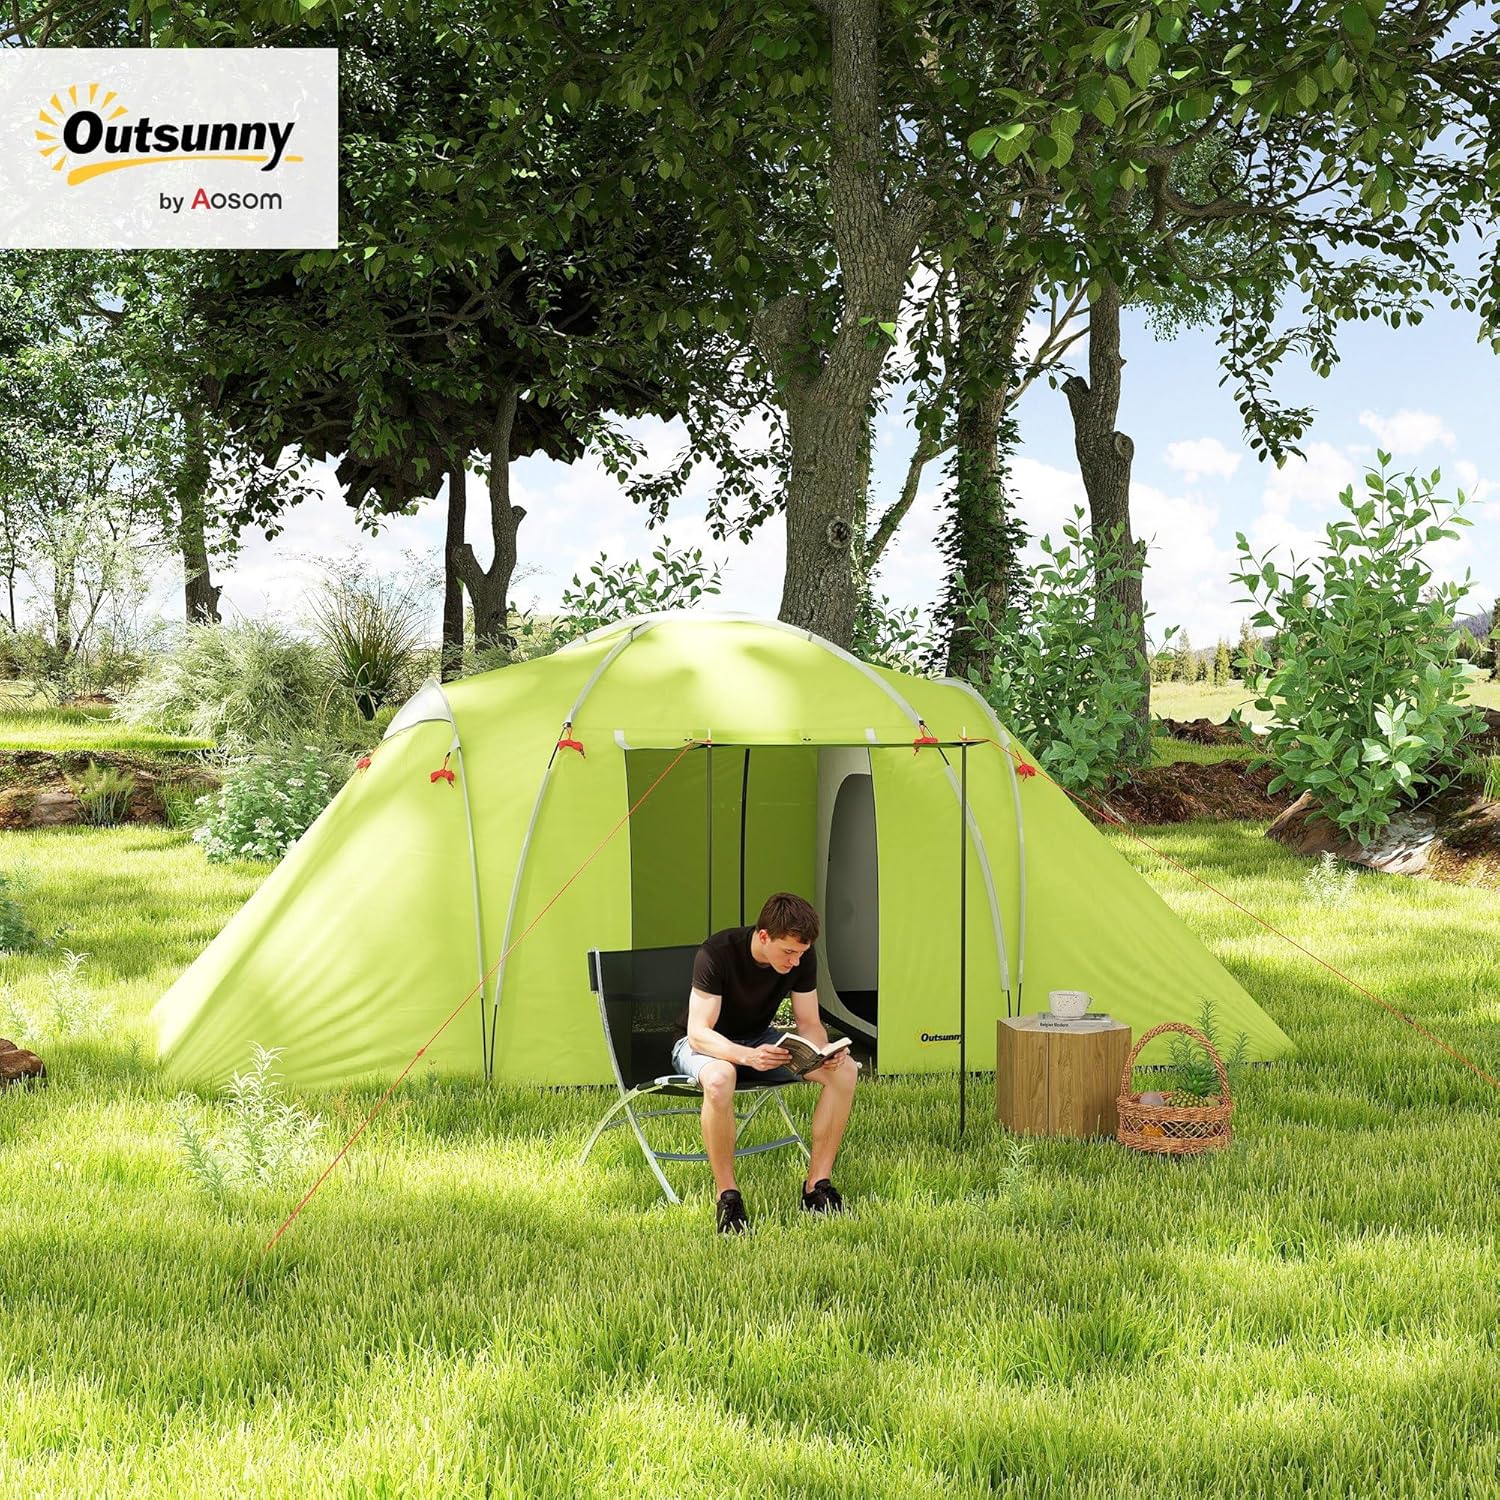
Image 4.2: The Outsunny tent fully pitched in a natural outdoor setting, demonstrating its size and appearance in use.
5. Operating and Usage
Your Outsunny tent is designed for comfort and functionality during your outdoor adventures.
5.1 Spacious Interior
The tent features two private bedrooms, each capable of fitting a queen-size inflatable mattress, and a large central living area. The vestibule provides additional covered space for gear storage or a sheltered entry.
5.2 Ventilation and Access
The tent is equipped with multiple entry points and a clear window to provide excellent airflow and natural light. Half-mesh doors on the bedrooms ensure ventilation while keeping insects out.

Image 5.1: Details of the tent's ventilation and access features, including a clear window for natural light, half-mesh doors for insect protection and airflow, and two main doors in the living area for easy entry and exit.
5.3 Convenient Features
- Lamp Hook: A hook is provided at the top of the living area for hanging a camping lamp or lantern (maximum weight capacity: 1 kg / 2.2 lbs).
- Storage Pockets: Internal storage pockets in the bedrooms offer convenient places to keep small personal items organized.
6. Maintenance
Proper care and maintenance will extend the life of your Outsunny tent.
- Cleaning: Clean the tent with a soft brush or sponge and mild soap (non-detergent) and lukewarm water. Do not use harsh chemicals, bleach, or washing machines, as this can damage the waterproof coating.
- Drying: Always ensure the tent is completely dry before packing it away. Packing a damp tent can lead to mildew, mold, and fabric degradation. If you must pack it wet, unpack and dry it thoroughly as soon as possible.
- Storage: Store the tent in its carry bag in a cool, dry place, away from direct sunlight and extreme temperatures.
- Seam Sealing: For prolonged heavy rain, consider applying a seam sealer to the tent's stitched seams for enhanced waterproofing.
- Gentle Handling: The tent fabric, while durable, should be treated gently to prevent tears or punctures. Avoid dragging the tent over rough surfaces.
7. Troubleshooting
Here are some common issues and their solutions:
| Problem | Possible Cause | Solution |
|---|---|---|
| Difficulty setting up | First-time setup, unfamiliarity with pole system. | Review the setup instructions carefully. Practice setting up the tent in a non-stressful environment before your trip. Ensure poles are fully assembled and inserted correctly. |
| Water leakage | Improper pitching, damaged fabric, unsealed seams. | Ensure the tent is pitched tautly to allow water runoff. Check for any tears or punctures and repair them. Consider applying seam sealer to all stitched seams. |
| Tent unstable in wind | Insufficient staking, loose guy ropes. | Ensure all stakes are firmly driven into the ground. Extend and tighten all guy ropes. Orient the tent with its narrowest end facing the prevailing wind if possible. |
| Condensation inside tent | Lack of ventilation, high humidity. | Increase ventilation by opening windows or doors (if weather permits). Ensure mesh panels are not obstructed. |
8. Specifications
| Feature | Detail |
|---|---|
| Model Number | A20-463V00YG |
| Overall Dimensions | 185" L x 90.6" W x 74.8" H (4.7 x 2.3 x 1.9 m) |
| Folded Dimensions | 25.6" L x 8.7" W x 7.9" H (65 x 22 x 20 cm) |
| Weight | 8.16 kg (17.99 lbs) |
| Occupancy | 4-6 Person |
| Material | 190T Polyester with PU2000mm coating, PE Groundsheets |
| Water Resistance | PU2000mm |
| Season Rating | 2 Season |
| Special Features | Quick Setup, Rainproof, Windproof, Lamp Hook, Storage Pockets |
| Included Components | Carry Bag, Guy Ropes, Stakes |

Image 8.1: A detailed diagram illustrating the key dimensions of the tent, including its overall length, width, and height, providing a clear understanding of its size.
9. Warranty and Support
For warranty information, product support, or to inquire about replacement parts, please contact the manufacturer, Aosom Canada, directly. Refer to your purchase documentation for specific warranty terms and contact details.
Manufacturer: Aosom Canada
Place of Business: Markham, Ontario, CA
Telephone: 1-416-792-6088