Introduction
This manual provides detailed instructions for the installation, operation, and maintenance of your GEMEK 360 Degree View 4 Channel Dash Cam. This device is designed to record video from multiple angles around and within your vehicle, enhancing safety and providing crucial evidence when needed.
What's in the Box
Please verify that all components are present before proceeding with installation.
- 1x Dash Cam
- 1x Rear Camera
- 1x 11.48ft Car Charger
- 1x Adjustable Suction Mount
- 1x 3M Adhesive Mount
- 1x Car Charge with Type C USB Cable
- 1x User Manual
- 1x Electrostatic Film for 3M Mount
- 1x 64GB SD Memory Card (pre-inserted)
- 1x 19.6ft Rear Camera Cable
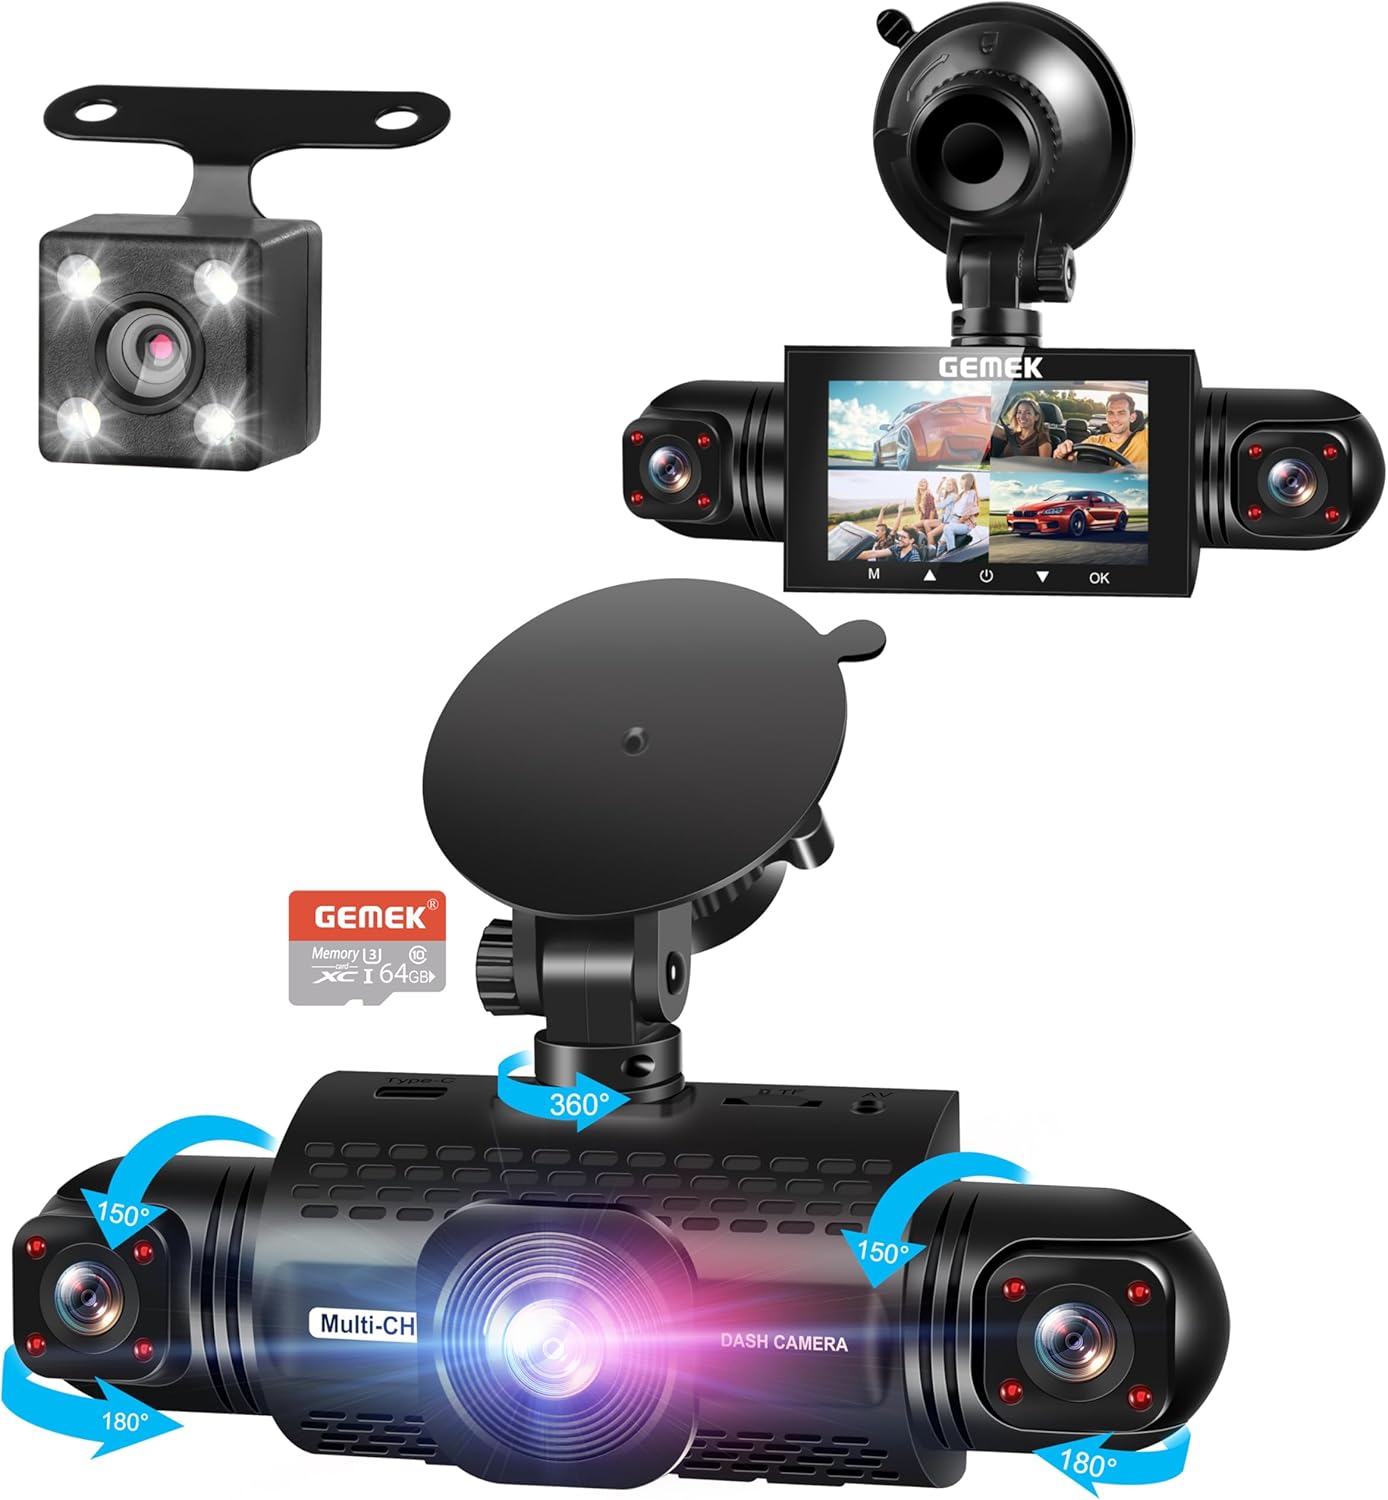
Image: All components included in the GEMEK Dash Cam package.
Setup
Follow these steps to properly install your dash cam.
- Prepare the Dash Cam: Remove all protective plastic covers from the camera lenses and the suction cup.
- Attach Suction Mount: Securely attach the adjustable suction mount to the main dash cam unit.
- Mount to Windshield: Clean the desired area on your windshield thoroughly. Press the suction cup firmly against the glass and twist the dial to lock it in place. Position the dash cam to ensure an unobstructed view of the road.
- Connect Power: Connect the car charger to the dash cam's Type-C USB port. Plug the other end of the car charger into your vehicle's 12V power outlet.
- Install Rear Camera (Optional): Connect the rear camera cable to the main unit. Carefully route the cable neatly along the headliner and interior panels to the rear of your vehicle. Mount the rear camera using the provided 3M adhesive mount or screws, typically near your license plate, for optimal rear view coverage.
- Insert TF Card: The 64GB TF card is pre-inserted into the device. If you are using a different memory card, ensure it is properly seated. If formatting the TF card with a computer, it must be formatted to FAT32. ExFAT format is not compatible with this car recorder.

Image: The dash cam securely mounted on the windshield.

Image: Rear camera mounted on the vehicle's exterior.
Installation Video Guide
Video: A detailed guide on how to install the GEMEK Dash Camera, including mounting and cable management.
Operating Instructions
Power On/Off
The dash cam will automatically power on and begin recording when your vehicle's ignition is turned on. It will power off automatically when the ignition is turned off. You can also manually power it on or off using the dedicated power button on the device.
360° All-Around Protection
The dash cam features four lenses that simultaneously record FHD 1080P video, covering the front, rear, left, and right sides of your vehicle. The front three lenses offer adjustable shooting angles, allowing you to capture more details as needed.

Image: Screen view showing simultaneous recording from four channels.
Video: Demonstration of the 4-channel recording capability, showing views from front, rear, and side cameras.
Super Night Vision
Equipped with 8 LED infrared lights and Wide Dynamic Range (WDR) technology, the dash cam automatically adjusts brightness for clear recording in low-light conditions. This feature prevents overexposure caused by headlights and enhances visibility, greatly improving nighttime driving safety.

Image: Visual comparison of standard vs. super night vision performance.
Loop Recording
The device records video in continuous 3-minute segments. When the TF card reaches its storage capacity, the oldest video files will be automatically overwritten to make space for new recordings, ensuring uninterrupted surveillance.

Image: Loop recording and G-sensor features explained.
G-Sensor & Emergency Lock
The built-in sensitivity G-sensor automatically detects sudden shakes or collisions. In such an event, the dash cam locks the current footage, preventing it from being overwritten during loop recording. These protected files are saved in a dedicated 'Event' folder for quick access.
24-Hour Parking Mode
When your vehicle is parked and turned off, the dash cam automatically switches to parking mode. It monitors the area around your car for motion or vibration. If an event is detected, the camera will automatically record a 1-minute video. For continuous 24-hour surveillance, the dash cam must be connected to a hardwire kit (not included) or an external battery.

Image: The dash cam's 24-hour parking monitoring capabilities.
Video: Overview of the 4-channel dash cam, highlighting the 24-hour parking mode and included 64GB SD card.
Maintenance
TF Card Management
The included 64GB TF card supports up to 256GB max. If formatting the TF card with a computer, ensure it is formatted to FAT32. ExFAT format is not compatible with this device. Regularly back up important footage and format the card periodically to maintain optimal performance and prevent data corruption.
Cleaning
Gently wipe the camera lenses and screen with a soft, dry microfiber cloth to remove dust or smudges. Avoid using abrasive cleaners or solvents, as these can damage the device's surfaces.
Temperature Resistance
The dash cam is built to withstand extreme temperatures, operating effectively in a range from -4°F to 140°F (-20°C to 60°C). This ensures reliable performance in various climates.

Image: The dash cam's ability to operate in a wide temperature range.
Troubleshooting
- Camera not powering on: Ensure the car charger is securely connected to both the dash cam and the vehicle's power outlet. Check the vehicle's 12V socket for power.
- Recording issues: Verify the TF card is properly inserted and formatted to FAT32. If the card is full, loop recording should overwrite old files, but a full card can sometimes cause issues. Consider formatting the card.
- Poor video quality: Clean the camera lenses. Ensure any protective films are removed. Check the resolution settings in the device menu.
- Parking mode not working: Ensure the dash cam is connected to a continuous power source (hardwire kit or external battery) for 24-hour monitoring.
Specifications
| Feature | Detail |
|---|---|
| Brand | GEMEK |
| Model Name | 360° View 4 Channel Dash Cam |
| Video Capture Resolution | 1296*1080p (FHD 1080P per channel) |
| Display Size | 3.0 inches IPS screen |
| Field Of View | 360 Degrees (multi-camera coverage) |
| Special Features | Super Night Vision (8 LED infrared, WDR), 24-Hour Parking Mode, G-Sensor, Loop Recording, Built-In Microphone, Built-In Speaker, Compact Design |
| Storage | Includes 64GB TF Card (supports up to 256GB max, FAT32 format required) |
| Mounting Type | Windshield Mount (Suction Mount, 3M Adhesive Mount) |
| Power Source | Car Charger (12V), Type-C USB Cable |
| Operating Temperature | -4°F to 140°F (-20°C to 60°C) |
Warranty and Support
For warranty information and technical support, please refer to the contact details provided in the product packaging or visit the official GEMEK website. Keep your purchase receipt for any warranty claims.


