CAMECHO 2G+64G
CAMECHO Android 13 Car Stereo User Manual
Model: 2G+64G for Chevrolet Chevy Sonic Aveo 2012-2015
1. Product Overview
This manual provides detailed instructions for the installation, operation, and maintenance of your CAMECHO Android 13 Car Stereo. This unit features a 9-inch touch screen, wireless CarPlay and Android Auto, GPS navigation, Bluetooth, WiFi, FM radio, and supports an AHD backup camera. It is designed for specific Chevrolet Chevy Sonic (2012-2015) and Aveo (2011-2015) models.
2. Compatibility
This car stereo is compatible with the following vehicle models:
- Chevrolet Chevy Sonic: 2012, 2013, 2014, 2015
- Chevrolet Chevy Aveo: 2011, 2012, 2013, 2014, 2015
Ensure your vehicle's dashboard matches the compatible configuration shown below. Incorrect center console or CD backplate types may prevent proper installation.

Image: Compatible and incompatible car models for installation. Verify your vehicle's dashboard and original radio unit against these examples.
3. What's in the Box
Please check the contents of your package against the list below:
- 1 x Android Head Unit
- 1 x AHD Backup Camera
- 1 x External Microphone
- 1 x Canbus Decoder
- 1 x GPS Antenna
- 1 x Radio Antenna
- 1 x Power Cable
- 1 x Rear Camera Input Cable
- 1 x RCA Cable Set
- 2 x USB Cables
- 1 x Original USB Cable
- 1 x Installation Tool Kit
- 1 x User Manual (this document)

Image: Complete packing list and dimensions of the head unit.
4. Setup and Installation
4.1 Tools Required
- Pry tool
- Screwdriver
- Wire strippers/crimpers (if custom wiring is needed)
4.2 Disassembly of Original Unit
- Use a pry tool to carefully open and remove the outer frame of the original radio.
- Unscrew the four screws securing the radio on both sides.
- Remove the original radio and disconnect all cables.
- Finally, remove the air vents on both sides from the original car frame.
4.3 Installation of New Unit
Important: If the wiring harness does not match your vehicle, please contact customer service for the correct wiring harness before proceeding.
- Install the air vents on both sides onto the new radio panel.
- Secure the new radio to the panel.
- Tighten the five screws.
- Connect the wires of the new radio to the original car harness.
- Attach the Canbus protocol box.
- Reinstall the new radio into the car dashboard, completing the installation.

Image: Disassembly and installation steps for the car stereo.
4.4 Canbus Connection and Steering Wheel Control Setup
Ensure the Canbus box is connected. Plug the 8-pin cable into the head unit's connector for steering wheel control functionality.

Image: Canbus and steering wheel control wiring diagram.
Note: After connecting the Canbus, you need to set the Protocol correctly for steering wheel controls to work. Follow these steps:
- Go to "Car Settings" > "Factory Setting".
- Enter password: 1234.
- Select "Protocol Settings".
- Choose "Raise - Chevrolet" for your car model.
4.5 Reversing Camera Installation
The reversing input must be plugged in even if the reversing camera is not used.
- Connect the positive pole of the power supply of the car's reversing light to the camera's positive wire.
- Connect the negative pole of the power supply of the car's reversing light to the camera's negative wire.
- The reversing trigger is controlled by the stereo, so a separate trigger wire connection is not required.

Image: Reversing camera wiring diagram.
Note: If the backup camera does not work, adjust the resolution via: Settings > Factory Settings > Password: 1234 > Video Source.
5. Operating Instructions
5.1 Wireless CarPlay & Android Auto
The unit supports wireless Apple CarPlay and Android Auto, allowing seamless integration with your smartphone for navigation, music, calls, and messages.

Image: Wireless Apple CarPlay and Android Auto interfaces.
Connecting Wireless Apple CarPlay:
- Connect the car radio Bluetooth (Bluetooth name: "Car BT0", Bluetooth PIN: 1234). Ensure "phone audio, music audio" is successfully connected.
- Click "SpeedPlay" on the head unit.
- Allow Contacts and Favorites Sync.
- Select "Use CarPlay with SpeedPlay".
- Wait for connection. The first connection may take longer.
Connecting Wireless Android Auto:
- Click "SpeedPlay" on the head unit.
- Connect your phone to the rear 4-pin USB port using the original data cable.
- Allow USB debugging on your phone.
- Wait for connection. The first connection may take longer.
5.2 GPS Navigation
The unit has a built-in GPS navigation system with a pre-loaded "Here Wego" offline map app. You can use both online and offline navigation.

Image: GPS Navigation interface and WiFi connection options.
5.3 WiFi Connection
Built-in Wi-Fi allows you to connect to a hotspot for online browsing, streaming media, and using online applications.
5.4 Bluetooth Hands-free and Music Streaming
Connect your phone via Bluetooth for hands-free calling and wireless music streaming, enhancing driving safety.

Image: Bluetooth hands-free calling and music streaming features.
5.5 FM/RDS Radio
The unit supports FM RDS radio, allowing you to preset up to 18 radio stations and receive news and traffic information.

Image: FM/RDS Radio interface.
5.6 Steering Wheel Control
After proper Canbus configuration, you can use your original steering wheel controls to manage music, calls, and navigation.

Image: Steering Wheel Control interface for programming functions.
5.7 Equalizer Adjustment
The built-in preset EQ allows you to choose from various EQ curves (e.g., Rock, Pop, Jazz) to customize your audio experience.
5.8 Multiple UI Themes
Customize the appearance of your multimedia system by selecting from multiple UI desktop themes.
5.9 Mirror Link
Cast your smartphone's screen to the car radio touchscreen for viewing content directly on the larger display.

Image: Mirror Link functionality.
6. AHD Backup Camera
The included AHD rear view camera provides a clear and sharp reverse image, enhancing safety during parking and reversing maneuvers. It features night vision and IP68 waterproof rating.
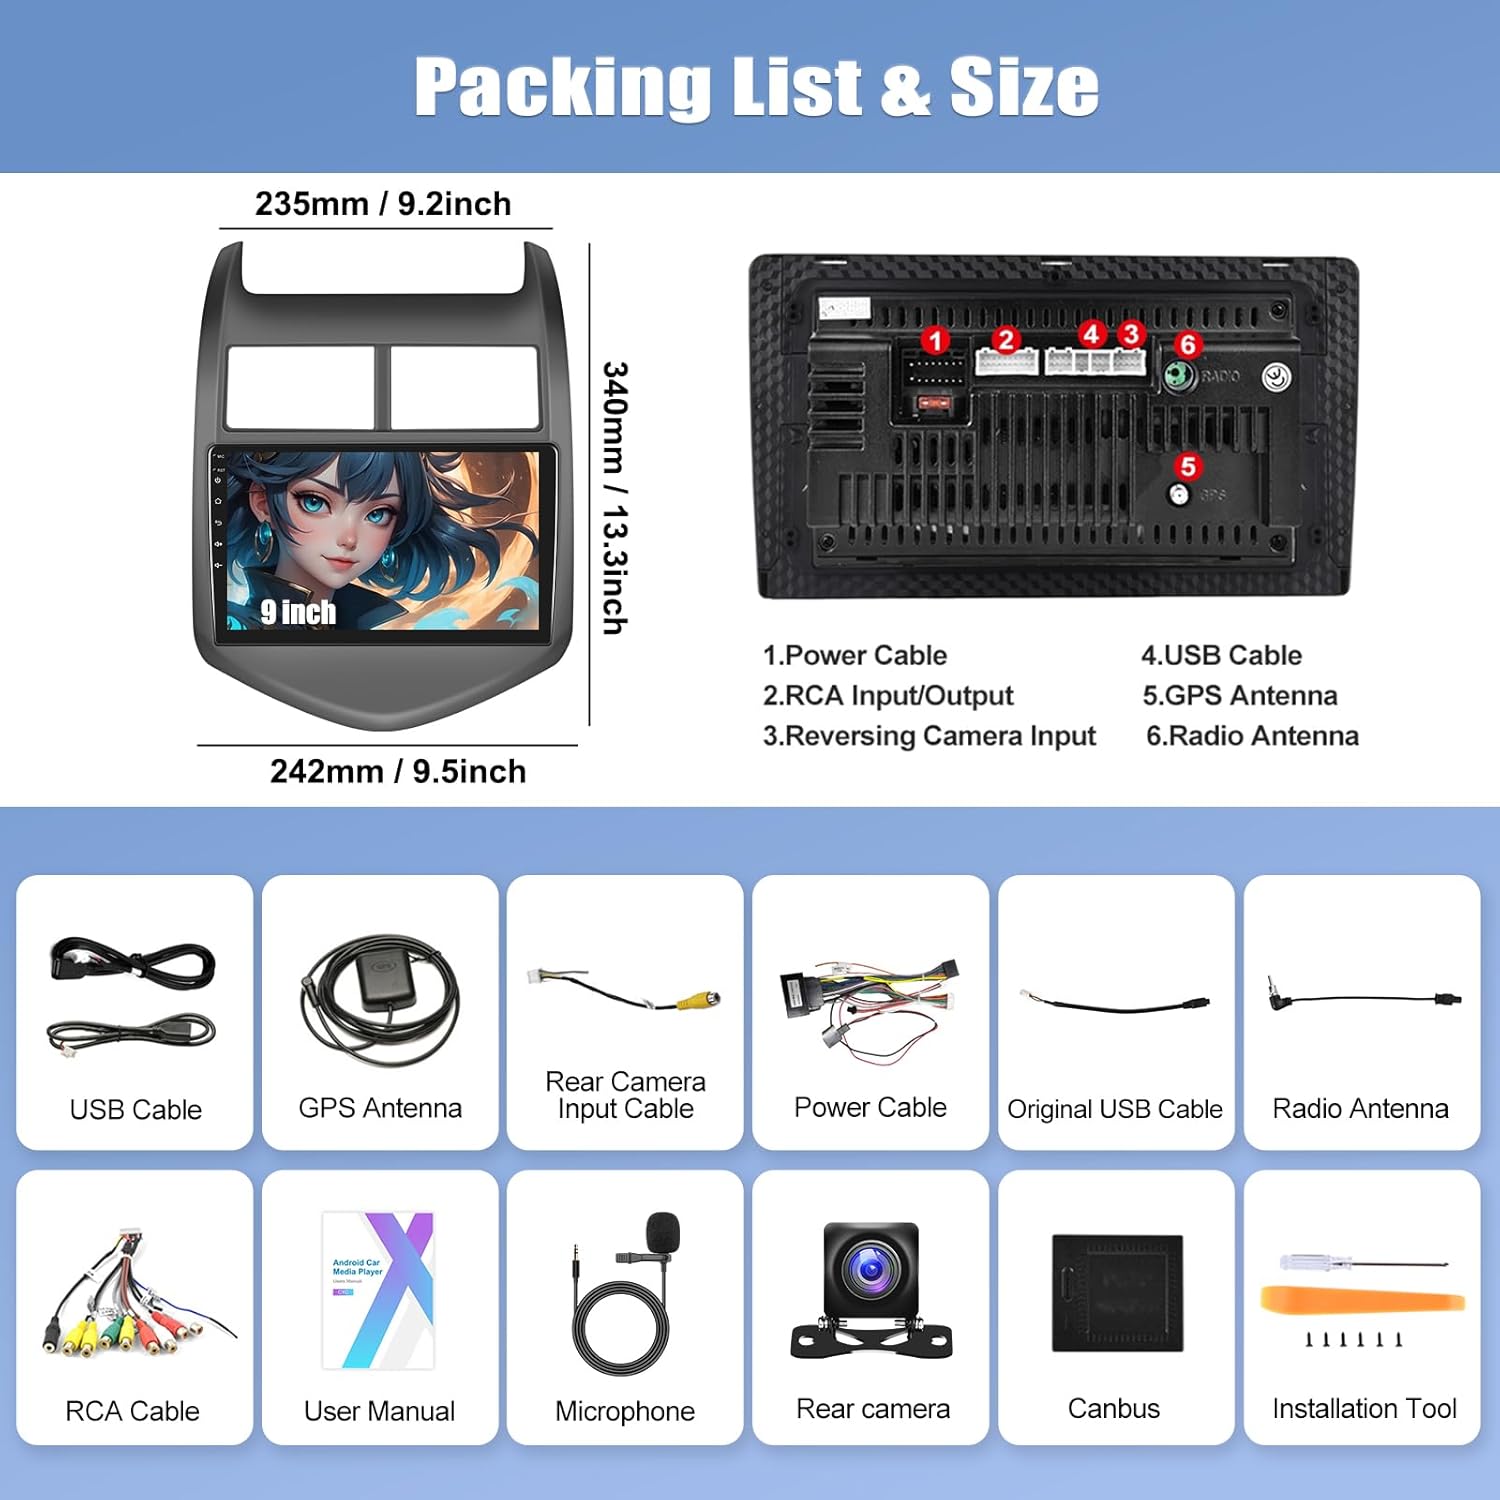
Image: AHD Reverse Camera features and view.
To activate the reverse image, shift your vehicle into reverse gear. The stereo will automatically display the camera feed.
7. Maintenance
To ensure the longevity and optimal performance of your car stereo, follow these maintenance guidelines:
- Cleaning: Use a soft, dry cloth to clean the screen and exterior. Avoid abrasive cleaners or solvents.
- Temperature: Avoid exposing the unit to extreme temperatures, both hot and cold, for extended periods.
- Software Updates: Periodically check for available software updates to ensure the system runs efficiently and has the latest features.
- Cable Connections: Ensure all cables are securely connected. Loose connections can lead to intermittent issues.
8. Troubleshooting
If you encounter issues with your car stereo, refer to the following common problems and solutions:
| Problem | Possible Cause | Solution |
|---|---|---|
| Unit does not power on | Loose power connection, blown fuse, vehicle battery issue. | Check power cable connections. Inspect vehicle fuses. Verify car battery voltage. |
| No sound output | Volume too low, mute activated, incorrect audio settings, loose speaker wires. | Increase volume. Check mute status. Verify audio output settings. Inspect speaker wire connections. |
| Bluetooth not connecting or no audio | Incorrect pairing, Bluetooth disabled, phone compatibility, software glitch. | Ensure Bluetooth is enabled on both devices. Re-pair the device. Check Bluetooth PIN (1234). Restart both devices. Verify "phone audio, music audio" is selected during pairing. |
| Steering wheel controls not working | Canbus not connected, incorrect protocol settings. | Ensure Canbus is properly connected. Follow instructions in Section 4.4 to set the correct protocol. |
| Backup camera not displaying image | Incorrect wiring, camera malfunction, video source setting. | Verify camera wiring (Section 4.5). Check camera power. Adjust video source settings (Settings > Factory Settings > 1234 > Video Source). |
| GPS signal issues | GPS antenna not properly installed or obstructed. | Ensure GPS antenna is securely connected and placed in an unobstructed location (e.g., dashboard). |
| Touch screen unresponsive | Software freeze, temporary glitch. | Restart the unit. If issue persists, contact support. |
9. Specifications
| Feature | Detail |
|---|---|
| Brand | CAMECHO |
| Model Number | 2G+64G |
| Operating System | Android 13 |
| RAM | 2GB |
| ROM (Internal Storage) | 64GB |
| Screen Size | 9 inches |
| Controller Type | Touch Screen |
| Connectivity Technology | Bluetooth, Wi-Fi, USB, RCA |
| Special Features | Wireless Apple CarPlay, Wireless Android Auto, GPS Navigation, FM RDS Radio, Mirror Link, Steering Wheel Control Support, EQ Adjustable |
| Audio Output Mode | Stereo |
| Output Power | 45 Watts |
| Video Encoding Support | H.264, H.265/HEVC, MPEG-4 |
| Compatible Devices | Chevrolet Chevy Aveo 2011-2015, Chevrolet Chevy Sonic 2012-2015 |
| Item Dimensions (D x W x H) | 2.8"D x 9.5"W x 13.4"H |
10. Warranty Information
This CAMECHO car stereo unit comes with a 1-Year Warranty from the date of purchase. This warranty covers manufacturing defects and malfunctions under normal use. It does not cover damage caused by improper installation, accident, misuse, abuse, unauthorized modifications, or natural disasters.
Please retain your proof of purchase for warranty claims.
11. Customer Support
For technical assistance, installation queries, or warranty claims, please contact CAMECHO customer support. We are committed to providing high-quality support to ensure your satisfaction.
Email: CAMECHOVIP@126.com
Please include your product model number and a detailed description of your issue when contacting support to facilitate a quicker resolution.

Image: CAMECHO Customer Support.