Introduction
This manual provides essential information for the safe and efficient operation of your SOECOPO 7000W Solar Power System Kit. Please read this manual thoroughly before installation and use, and retain it for future reference.
The SOECOPO 7000W Solar System Kit is designed as a complete off-grid energy solution, suitable for various applications including homes, RVs, boats, and campsites. It includes a high-efficiency solar panel, a smart charge controller, and a powerful inverter to provide reliable AC power.
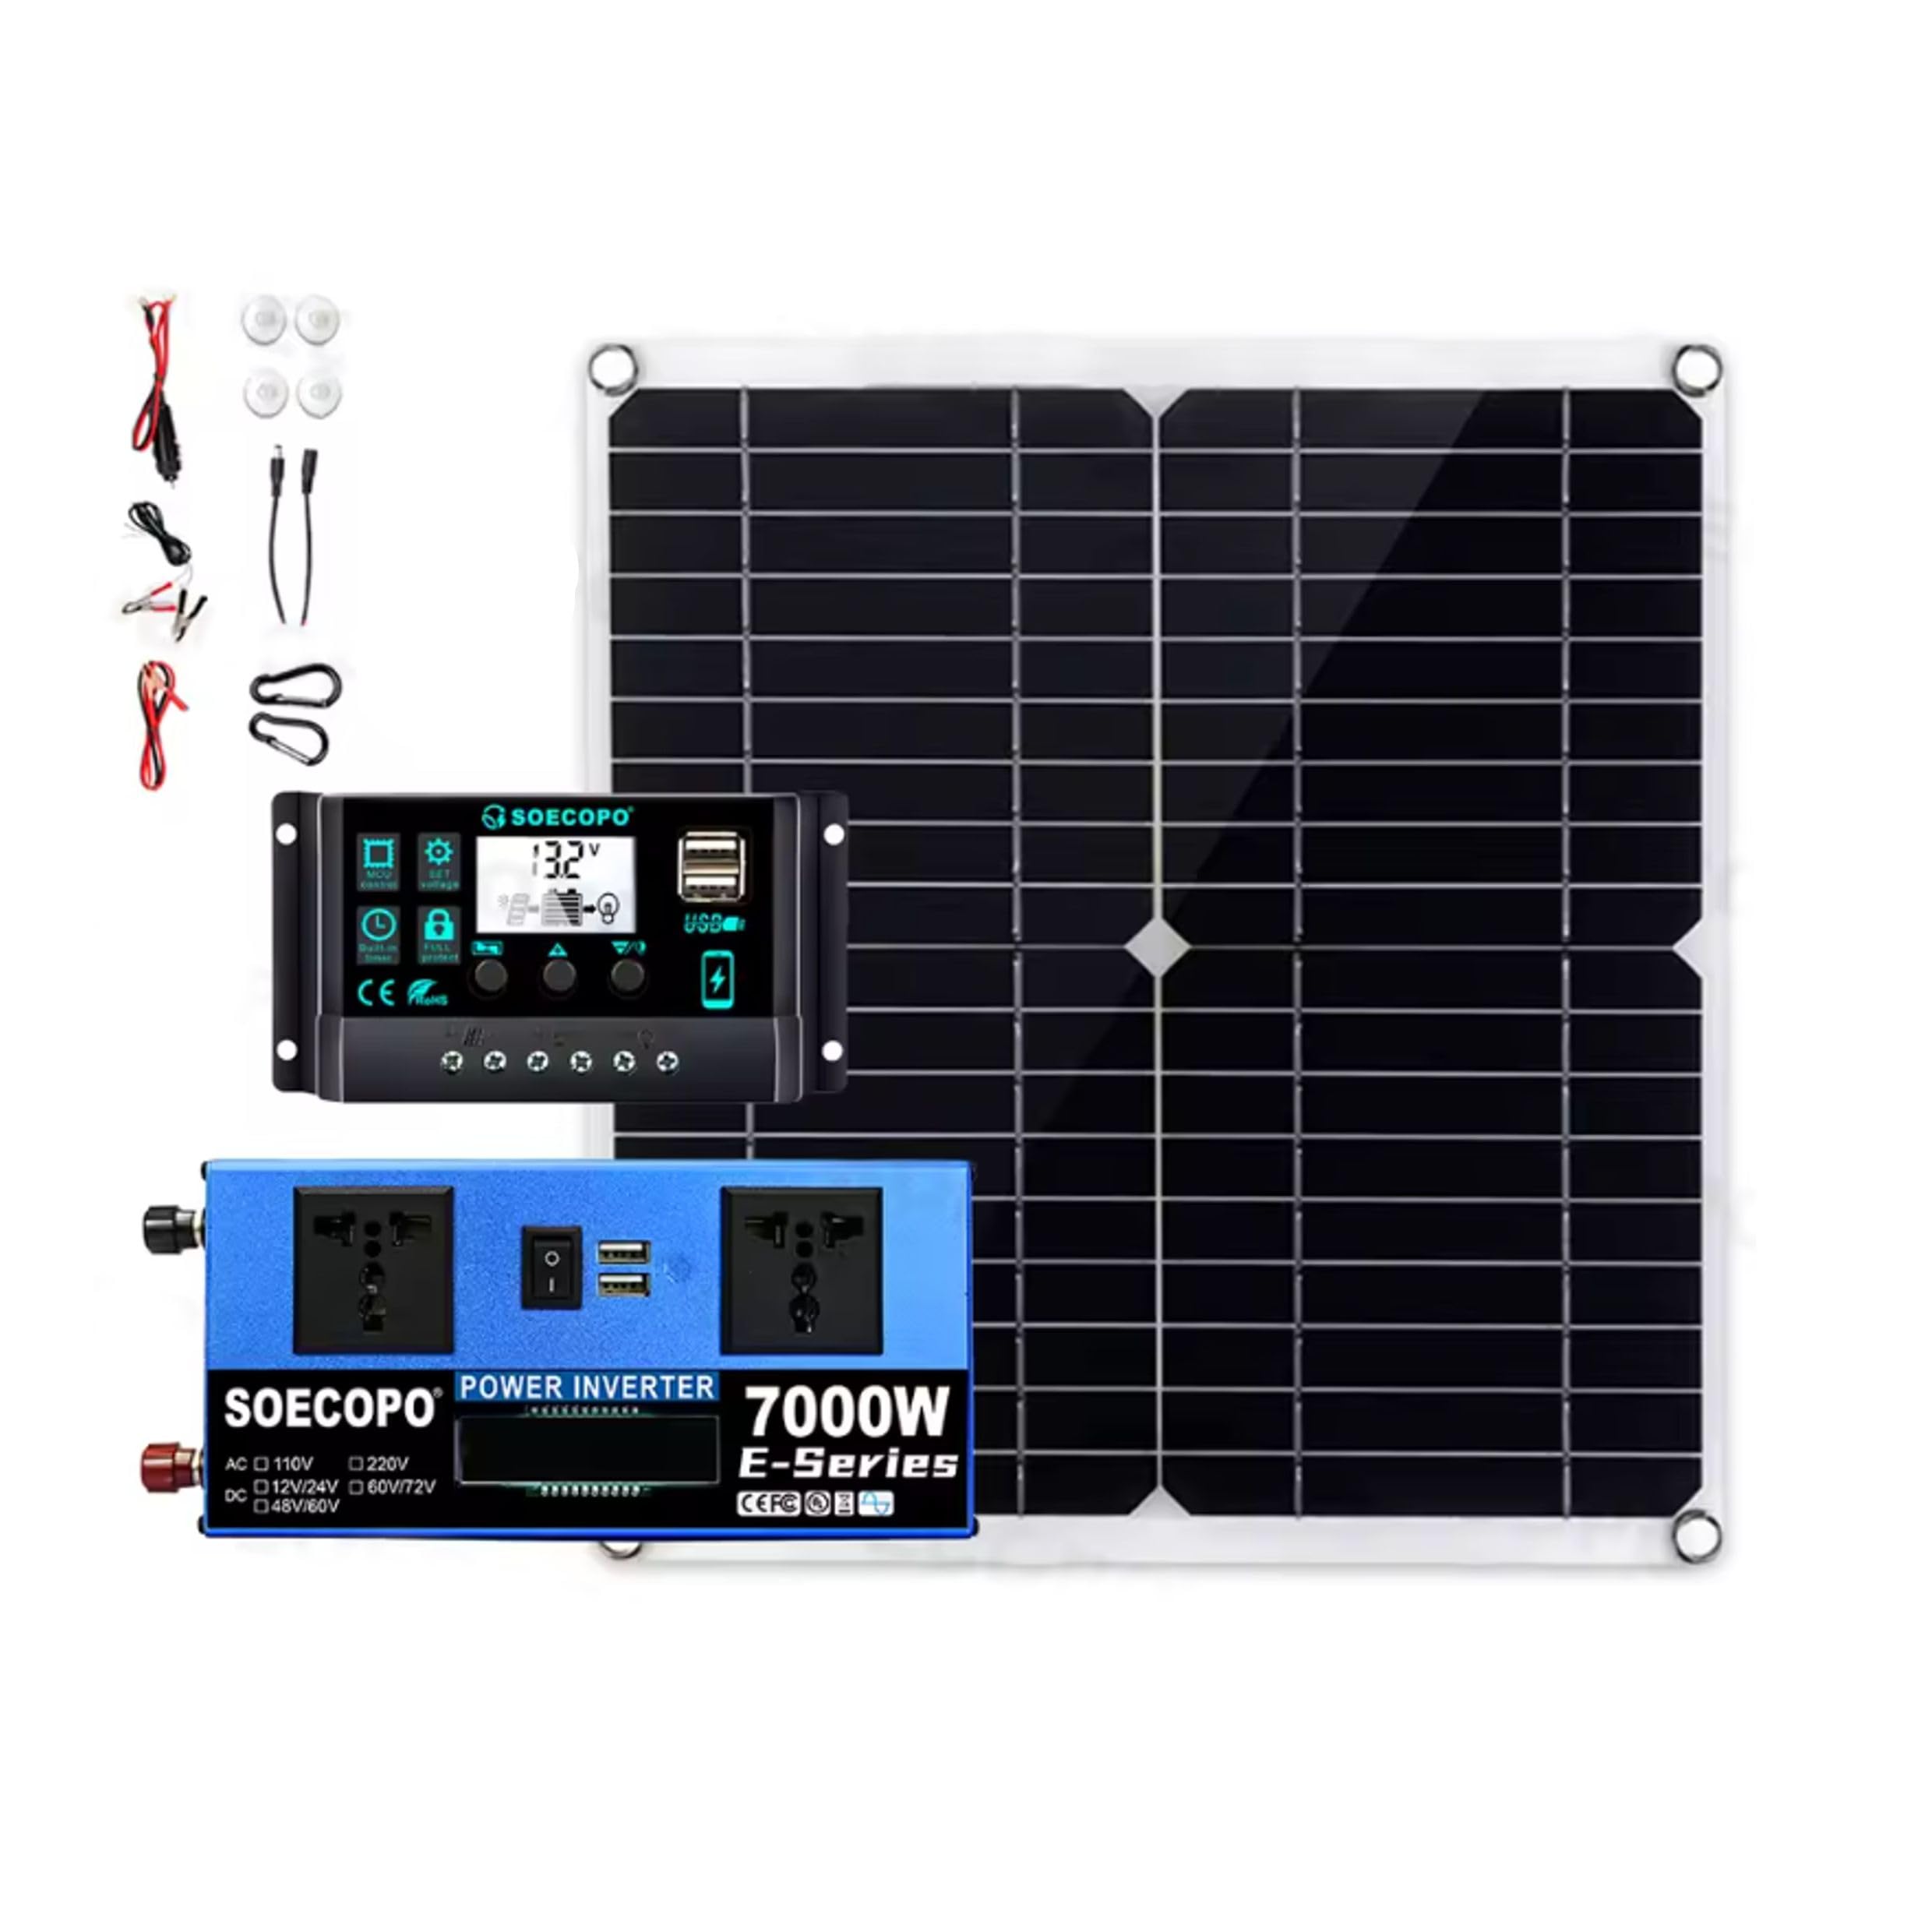
Image: SOECOPO 7000W Solar Power System Kit components, showing the solar panel, charge controller, and power inverter.
Safety Information
WARNING: Failure to follow these safety instructions may result in electric shock, fire, serious injury, or death. Always consult with a qualified electrician for installation if you are unsure.
- Do not attempt to disassemble, repair, or modify any component of the solar power system.
- Ensure all connections are secure and properly insulated to prevent short circuits.
- Always connect the charge controller to the battery before connecting the solar panel. Disconnect the solar panel before disconnecting the battery.
- Wear appropriate personal protective equipment (PPE) such as gloves and eye protection during installation and maintenance.
- Keep the system away from flammable materials, gases, and liquids.
- Do not expose the inverter to water or excessive moisture.
- Ensure adequate ventilation around the inverter and charge controller to prevent overheating.
- This system requires a compatible 12V/24V battery (not included). Ensure the battery is correctly rated for your application.
Package Contents
Please verify that all items listed below are present in your package:
- 1 × 300W Solar Panel
- 1 × SOECOPO 100A Charge Controller (Auto 12V/24V)
- 1 × 7000W Power Inverter (Dual Voltage 12V/24V to 110V/220V)
- 1 × Controller Alligator Clip Cable
- 1 × Inverter Alligator Clip Cable
- 2 × DC Output Cables
- 2 × Carabiners (for hanging panel)
- 4 × Suction Cups (for window mounting)
- 1 × Car Inverter Cable
- 1 × User Manual (this document)
Note: Batteries are not included with this kit. A compatible 12V or 24V battery is required for system operation.
Setup Instructions
Follow these steps for proper installation of your solar power system. Ensure all components are placed in a dry, well-ventilated area, away from direct sunlight for the controller and inverter.
- Prepare the Battery: Ensure your 12V or 24V battery (not included) is fully charged and in good condition. Place it in a secure, well-ventilated location.
- Connect Charge Controller to Battery: Using the Controller Alligator Clip Cable, connect the positive (+) terminal of the charge controller to the positive (+) terminal of your battery. Then, connect the negative (-) terminal of the charge controller to the negative (-) terminal of your battery. The charge controller display should illuminate, indicating it has detected the battery voltage.
- Position the Solar Panel: Place the 300W solar panel in a location that receives maximum direct sunlight throughout the day. Use the included carabiners or suction cups for mounting as appropriate.
- Connect Solar Panel to Charge Controller: Connect the DC output cables from the solar panel to the designated solar input terminals on the charge controller. Ensure correct polarity (positive to positive, negative to negative). The charge controller will begin charging the battery.
- Connect Inverter to Battery: Using the Inverter Alligator Clip Cable, connect the positive (+) terminal of the inverter to the positive (+) terminal of your battery. Connect the negative (-) terminal of the inverter to the negative (-) terminal of your battery.
- Power On Inverter: Turn on the power switch on the inverter. The LCD display on the inverter should illuminate, showing output voltage and other parameters.
- Connect Devices: You can now plug your AC devices into the AC sockets on the inverter, or USB devices into the USB ports. Do not exceed the inverter's rated power output.
Important: Always connect the battery to the charge controller first, then the solar panel. When disconnecting, reverse the order: disconnect the solar panel first, then the battery.
Operating Instructions
Charge Controller Operation
- The charge controller automatically detects 12V or 24V battery systems.
- The display shows real-time voltage and current, indicating charging status.
- It protects the battery from overcharge and over-discharge.
- Ensure the solar panel is positioned for optimal sunlight exposure for efficient charging.
Power Inverter Operation
- Once connected to the battery and powered on, the inverter converts DC battery power to AC power.
- The LCD display shows output voltage (110V or 220V, depending on model), battery voltage, and power consumption.
- Plug your AC appliances into the 2 AC sockets. For USB devices, use the 2 USB ports.
- Do not overload the inverter. The rated power is 700W, with a peak power of 7000W for short durations. Exceeding the rated power can damage the inverter and connected devices.
- If the inverter alarms or shuts down, check for overload, low battery voltage, or overheating.
Maintenance
Regular maintenance ensures the longevity and optimal performance of your solar power system.
- Solar Panel Cleaning: Periodically clean the surface of the solar panel with a soft, damp cloth to remove dust, dirt, and debris. A clean panel ensures maximum sunlight absorption.
- Connection Inspection: Regularly check all electrical connections (battery, controller, inverter, solar panel) to ensure they are tight and free from corrosion.
- Ventilation: Ensure that the ventilation openings on the charge controller and inverter are not blocked. Adequate airflow prevents overheating.
- Battery Health: Monitor your battery's health and charge level. Follow the manufacturer's recommendations for battery maintenance.
- Storage: If storing the system for an extended period, disconnect all components from the battery and store them in a dry, cool place.
Troubleshooting
| Problem | Possible Cause | Solution |
|---|---|---|
| No power output from inverter | Inverter not turned on; Low battery voltage; Overload; Loose connections. | Ensure inverter switch is ON; Charge battery; Reduce load; Check and tighten all battery connections. |
| Charge controller display off / not charging | Battery not connected or low voltage; Solar panel not connected or insufficient sunlight; Reversed polarity. | Connect battery first; Ensure sufficient sunlight and correct panel connection; Verify correct polarity. |
| Low power output from solar panel | Panel dirty; Insufficient sunlight; Shading; Damaged panel. | Clean panel surface; Reposition panel for direct sunlight; Remove obstructions; Inspect for damage. |
| Inverter beeping or shutting down | Overload; Low battery voltage; Overheating. | Reduce connected load; Charge battery; Ensure proper ventilation around inverter. |
Specifications
Solar Panel (300W)
- Power Output: 15W–300W (variable based on conditions)
- Output: DC 18V + USB 5V
- Size: 280 × 280 mm (approx. 11 x 11 inches)
- Weight: 230g
Charge Controller (100A)
- Voltage: Auto 12V/24V
- Current: 30A–100A
- Temperature Range: -35°C to +60°C
- Display: Real-time voltage & current
Power Inverter (7000W Peak)
- Rated Power: 700W
- Peak Power: 7000W
- Input: DC 12V/24V
- Output: AC 110V/220V (depending on model)
- Efficiency: >90%
- Outputs: 2 USB Ports + 2 AC Sockets
- Display: LCD
General System Information
- Product Dimensions: Approximately 11"L x 11"W x 0.98"H (for solar panel)
- Certifications: CE, FCC, RoHS, UL Certified
Warranty and Support
For warranty information and technical support, please refer to the contact details provided at the point of purchase or visit the official SOECOPO website. Keep your purchase receipt as proof of purchase for warranty claims.
If you encounter any issues not covered in this manual, please contact customer support for assistance.