1. Introduction
This manual provides essential information for the proper installation, operation, and maintenance of your new Cylinder Head Kit. This kit is designed for use with the Legend Force LF20212RTG 212cc Gas Rear Tine Tiller. Please read these instructions carefully before proceeding with any installation or maintenance to ensure safe and correct usage. Retain this manual for future reference.
2. Product Overview
The Cylinder Head Kit is a critical component of your engine, responsible for sealing the combustion chamber and housing the valves, rocker arms, and spark plug. This kit includes a complete cylinder head assembly and a gasket for proper sealing.
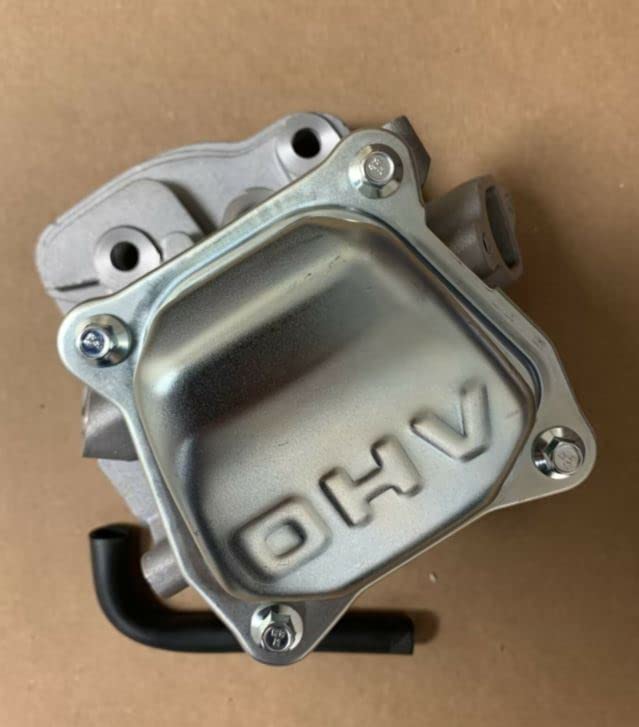
Figure 1: Complete Cylinder Head Kit. This image displays the top view of the cylinder head, showing the intake and exhaust ports, cooling fins, and the valve train assembly including rocker arms and valve springs.
2.1 Package Contents
- 1 x Complete Cylinder Head Assembly
- 1 x Cylinder Head Gasket
3. Specifications
| Brand | Generic |
| Manufacturer | BMotorParts |
| Model Number (Part Number) | RIV-Sep33232 |
| Compatibility | Legend Force LF20212RTG 212cc Gas Rear Tine Tiller |
| Fit Type | Universal Fit (for specified models) |
4. Setup and Installation
Warning: Engine repair and component replacement can be complex and require specialized tools and knowledge. If you are not confident in your mechanical abilities, it is highly recommended to seek assistance from a qualified service technician. Always disconnect the spark plug wire and fuel line before beginning any work on the engine.
4.1 Required Tools (Not Included)
- Socket wrench set
- Torque wrench
- Feeler gauges
- Gasket scraper or plastic razor blade
- Clean rags
- Engine oil
4.2 Installation Steps
- Preparation: Ensure the engine is cool. Disconnect the spark plug wire and drain the fuel tank. Remove any components obstructing access to the cylinder head (e.g., air filter, carburetor, exhaust manifold, valve cover).
- Remove Old Cylinder Head: Carefully unbolt and remove the old cylinder head. Keep track of all bolts and their locations.
- Clean Mating Surfaces: Thoroughly clean the cylinder block and new cylinder head mating surfaces. Remove all traces of old gasket material, carbon deposits, and debris. Ensure surfaces are smooth and free of nicks or scratches.
- Install New Gasket: Place the new cylinder head gasket onto the cylinder block, ensuring it is correctly oriented.
- Install New Cylinder Head: Carefully place the new cylinder head assembly onto the gasket and cylinder block. Insert the cylinder head bolts.
- Torque Bolts: Following the manufacturer's specifications for your specific engine model (refer to your tiller's service manual), tighten the cylinder head bolts in the correct sequence and to the specified torque values using a torque wrench. This is crucial for proper sealing and preventing damage.
- Adjust Valve Clearance: After torquing the cylinder head, adjust the valve clearances (lash) according to your engine's specifications. This typically involves setting the piston to Top Dead Center (TDC) on the compression stroke and using feeler gauges to set the gap between the rocker arm and valve stem.
- Reassemble Components: Reinstall the valve cover, exhaust manifold, carburetor, air filter, and any other components that were removed.
- Refill Fluids: Refill the engine with the appropriate type and amount of engine oil. Reconnect the fuel line and refill the fuel tank.
- Reconnect Spark Plug: Reconnect the spark plug wire.
5. Initial Operation and Break-in
After installing the new cylinder head, follow these steps for initial engine operation:
- Pre-Start Checks: Double-check all connections, ensuring bolts are tight and hoses are secure. Verify oil and fuel levels.
- First Start: Start the engine and allow it to idle for a few minutes. Listen for any unusual noises, leaks, or vibrations.
- Leak Inspection: While the engine is running, carefully inspect around the cylinder head for any oil, fuel, or exhaust leaks. Shut down immediately if any significant leaks are detected.
- Break-in Period: For the first few hours of operation, avoid putting the engine under heavy load. Allow the new components to seat properly. Refer to your tiller's original owner's manual for specific break-in procedures if available.
- Re-torque (Optional but Recommended): Some engine manufacturers recommend re-torquing cylinder head bolts after a few hours of operation, especially after a new gasket installation. Consult your tiller's service manual for this procedure.
6. Maintenance
Proper maintenance ensures the longevity and performance of your engine and its components, including the cylinder head kit.
- Regular Oil Changes: Follow your tiller's recommended oil change schedule. Clean engine oil is vital for lubricating the valve train components within the cylinder head.
- Valve Clearance Checks: Periodically check and adjust valve clearances as specified in your tiller's service manual. Incorrect valve clearance can lead to poor engine performance or damage.
- Spark Plug Inspection: Inspect and replace the spark plug according to the manufacturer's recommendations. A properly functioning spark plug is essential for efficient combustion.
- Cooling Fin Cleaning: Keep the cooling fins on the cylinder head clean and free of debris to ensure proper heat dissipation.
- Gasket Integrity: Periodically inspect for any signs of oil or exhaust leaks around the cylinder head gasket. Address any leaks promptly.
7. Troubleshooting Common Issues
If you encounter issues after installing the cylinder head kit, consider the following:
| Symptom | Possible Cause | Solution |
|---|---|---|
| Engine will not start or runs poorly | Incorrect valve clearance; Spark plug issue; Fuel delivery problem; Improperly torqued head bolts. | Check and adjust valve clearance. Inspect spark plug. Verify fuel supply. Re-check head bolt torque. |
| Oil leak around cylinder head | Improperly installed gasket; Insufficient head bolt torque; Damaged gasket. | Ensure gasket is correctly seated. Re-torque head bolts to specification. Replace gasket if damaged. |
| Excessive engine noise (tapping/ticking) | Incorrect valve clearance. | Adjust valve clearance according to engine specifications. |
| Loss of power or compression | Improperly seated valves; Damaged gasket; Incorrect valve timing. | Verify valve seating. Check gasket integrity. Ensure camshaft timing is correct. |
If troubleshooting steps do not resolve the issue, consult a qualified service technician.
8. Warranty and Support
For specific warranty information regarding this Cylinder Head Kit, please refer to the documentation provided at the time of purchase or contact the seller directly. Warranty terms typically cover manufacturing defects but may not cover damage resulting from improper installation, misuse, or neglect.
For technical support or inquiries, please contact the retailer or manufacturer (BMotorParts) through their official channels. When contacting support, please have your product model number (RIV-Sep33232) and purchase details readily available.


