Introduction
This manual provides detailed instructions for the setup, operation, and maintenance of your EVAWGIB RS232 Wired 1D/2D Barcode Scanner. This device is designed for efficient and accurate decoding of various 1D and 2D barcodes from both paper and digital screens, utilizing an intelligent image recognition algorithm. Its RS232 interface allows for direct connection to computers or integration into other devices.

Image Description: A clear view of the EVAWGIB handheld wired barcode scanner, featuring its ergonomic design and the attached RS232 serial connector cable.
Package Contents
Please verify that all items listed below are included in your package:
- Handheld Barcode Scanner
- RS232 Cable
- USB Cable (for 5V power supply)

Image Description: The image displays the EVAWGIB handheld barcode scanner, an RS232 serial cable, and a USB cable. A magnified inset shows the RS232 connector. Below these components, a screenshot of a "COM Configs" window is visible, detailing settings like Channel, Baudrate (9600), Paritybits (NONE), Databits (8), and Stopbits (1).
Product Features
- Versatile Decoding: Decodes common 1D and 2D codes, including Barcode, QR code, Data Matrix, PDF417, Codebar, Code 11, Code 39/Code 93, UPC/EAN, Code 128/EAN128, Interleaved 2 of 5, Matrix 2 of 5, MSI Code, Industrial 2 of 5, and GS1 Databar (RSS).
- RS232 Interface: Provides a reliable serial connection for direct integration with various devices and systems.
- Ease of Use: Requires no specialized knowledge of image recognition for operation.
- Ergonomic Design: Optimized for comfortable handling during intensive scanning tasks, enhancing operator efficiency.
- Adjustable Baud Rate: Allows for customization of the RS232 communication speed to match host system requirements.

Image Description: A hand is shown comfortably gripping the EVAWGIB barcode scanner, illustrating its ergonomic design intended for extended use.

Image Description: A product image of the EVAWGIB barcode scanner highlighting its key features: "RS232 SERIAL PORT", "SUPPORT 1D/2D QR", and "BAUD RATE ADJUSTABLE". A barcode and QR code are also visible on the image.
Specifications
| Operating Voltage | 5V |
| Operating Current | 135mA (scanning), 58mA (standby), 2mA (sleep) |
| Operating Temperature | 0℃ ~ 60℃ |
| Operating Humidity | 5% ~ 95% (Non-condensing) |
| Communication Interface | RS232 |
| Decoded 1D Codes | Codebar, Code 11, Code 39/Code 93, UPC/EAN, Code 128/EAN128, Interleaved 2 of 5, Matrix 2 of 5, MSI Code, Industrial 2 of 5, GS1 Databar(RSS) |
| Decoded 2D Codes | QR code, Data Matrix, PDF417 |
| Light Source | White LED |
| Scan Angles | Roll 360°, Skew ±65°, Pitch ±60° |
| Field of View | 28° (horizontal), 21.5° (vertical) |
Setup
Follow these steps to connect your barcode scanner:
- Connect the RS232 Cable: Plug the DB9 connector of the RS232 cable into the serial port of your host device (e.g., computer, POS system).
- Connect the USB Power Cable: Connect the USB end of the power cable to a 5V USB power source (e.g., a USB port on your computer or a USB power adapter). The scanner requires 5V for operation.
- Connect to Scanner: Plug the other end of both the RS232 cable and the USB power cable into the corresponding ports on the barcode scanner.
- Driver Installation (if necessary): For some operating systems or specific RS232 configurations, a serial port driver might be required. Refer to your operating system's documentation or contact support if the device is not recognized.
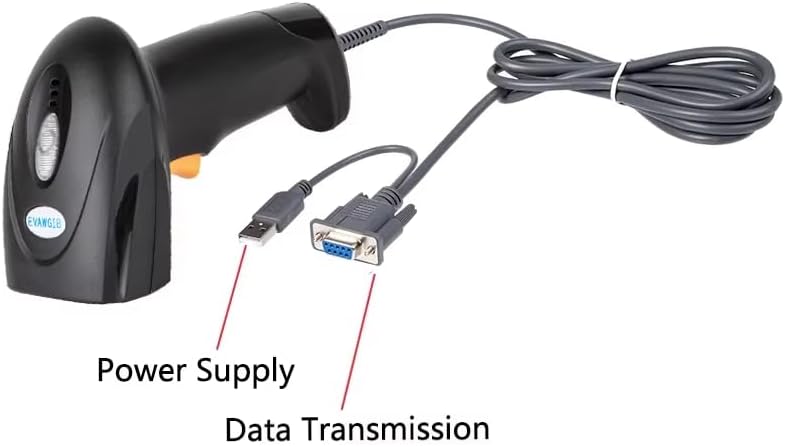
Image Description: This image illustrates the connection points on the barcode scanner. A USB cable is indicated as "Power Supply" and an RS232 cable is indicated as "Data Transmission", showing how to connect the scanner for both power and data.
Operating Instructions
To operate the EVAWGIB RS232 Wired 1D/2D Barcode Scanner:
- Power On: Ensure the scanner is properly connected to a 5V power source and your host device via the RS232 cable. The scanner should power on automatically.
- Aim and Scan: Hold the scanner with the scanning window facing the barcode or QR code. Press the trigger button to activate the scanning light.
- Successful Scan: A successful scan is typically indicated by an audible beep and/or a visual indicator (e.g., LED light change). The decoded data will be transmitted to your connected host device via the RS232 interface.
- Scanning Distance: Adjust the distance between the scanner and the barcode for optimal reading. The scanner can read codes from various distances depending on the code size and type.

Image Description: A hand is shown holding the EVAWGIB barcode scanner, with the red scanning light emitted from the device, indicating it is actively attempting to read a barcode.
Configuration
The scanner's RS232 communication parameters, such as baud rate, parity, databits, and stopbits, can be adjusted to match your host system's requirements. This is typically done by scanning specific configuration barcodes provided in the full product manual or by using a software utility.
Adjusting RS232 Parameters:
To change the RS232 settings, you will generally need to scan a sequence of configuration barcodes. An example of a configuration barcode string might look like this (this is a sample and may not be functional without the full manual):
01950123456789033102000400
Note: This is an example barcode string. Refer to the complete product manual for specific configuration barcodes to adjust settings like baud rate, parity, databits, and stopbits.
Common RS232 settings include:
- Baud Rate: Common values include 9600, 19200, 38400, 57600, 115200.
- Parity Bit: None, Odd, Even.
- Data Bits: 7 or 8.
- Stop Bits: 1 or 2.
Ensure these settings match the serial port configuration on your host device for proper communication.
Maintenance
To ensure the longevity and optimal performance of your barcode scanner:
- Cleaning: Regularly wipe the scanning window and the scanner's body with a soft, dry, lint-free cloth. For stubborn dirt, a slightly damp cloth with mild soap can be used, followed by drying. Avoid abrasive cleaners or solvents.
- Handling: Avoid dropping the scanner or subjecting it to strong impacts. Do not expose it to extreme temperatures or direct sunlight for extended periods.
- Cable Care: Do not bend or twist the cables excessively. Ensure cables are not pinched or placed under heavy objects to prevent damage.
Troubleshooting
If you encounter issues with your barcode scanner, refer to the following common problems and solutions:
- Scanner Not Powering On:
- Ensure the USB power cable is securely connected to a functional 5V power source.
- Verify the USB cable is properly connected to the scanner.
- Scanner Not Reading Barcodes:
- Check if the scanning light activates when the trigger is pressed. If not, ensure power is supplied.
- Ensure the barcode is clean, undamaged, and clearly visible.
- Adjust the distance and angle between the scanner and the barcode.
- Verify that the barcode type is supported by the scanner (refer to Specifications).
- No Data Transmission to Host Device:
- Confirm the RS232 cable is securely connected to both the scanner and the host device.
- Verify that the RS232 communication parameters (baud rate, parity, databits, stopbits) on the scanner match those configured on your host device's serial port.
- Check if the correct serial port driver is installed and the port is enabled on your host device.
- Test with a known good barcode and a simple serial terminal program on your computer to isolate the issue.
Warranty and Support
For warranty information or technical support, please refer to the documentation included with your purchase or contact the seller directly. Keep your purchase receipt as proof of purchase.