1. Introduction
This manual provides comprehensive instructions for the installation, operation, maintenance, and troubleshooting of the FICEMETOI XK-W1099 Dual Display Digital Temperature Humidity Controller. Please read this manual thoroughly before using the device to ensure proper function and safety.
2. Safety Information
- Ensure all wiring is performed by a qualified professional and conforms to local electrical codes.
- Disconnect power before performing any wiring or maintenance.
- Do not operate the device in environments with excessive moisture, dust, or corrosive gases.
- Verify the power supply voltage matches the device's specifications (DC 12V/24V or AC 110-220V).
- Keep the device away from strong electromagnetic interference.
- This device is not intended for life support applications where malfunction could result in injury or death.
3. Product Overview
The XK-W1099 is a digital temperature and humidity controller featuring dual displays for simultaneous monitoring. It is designed to regulate both temperature and humidity within a specified range, making it suitable for various applications such as incubators, greenhouses, and storage facilities.
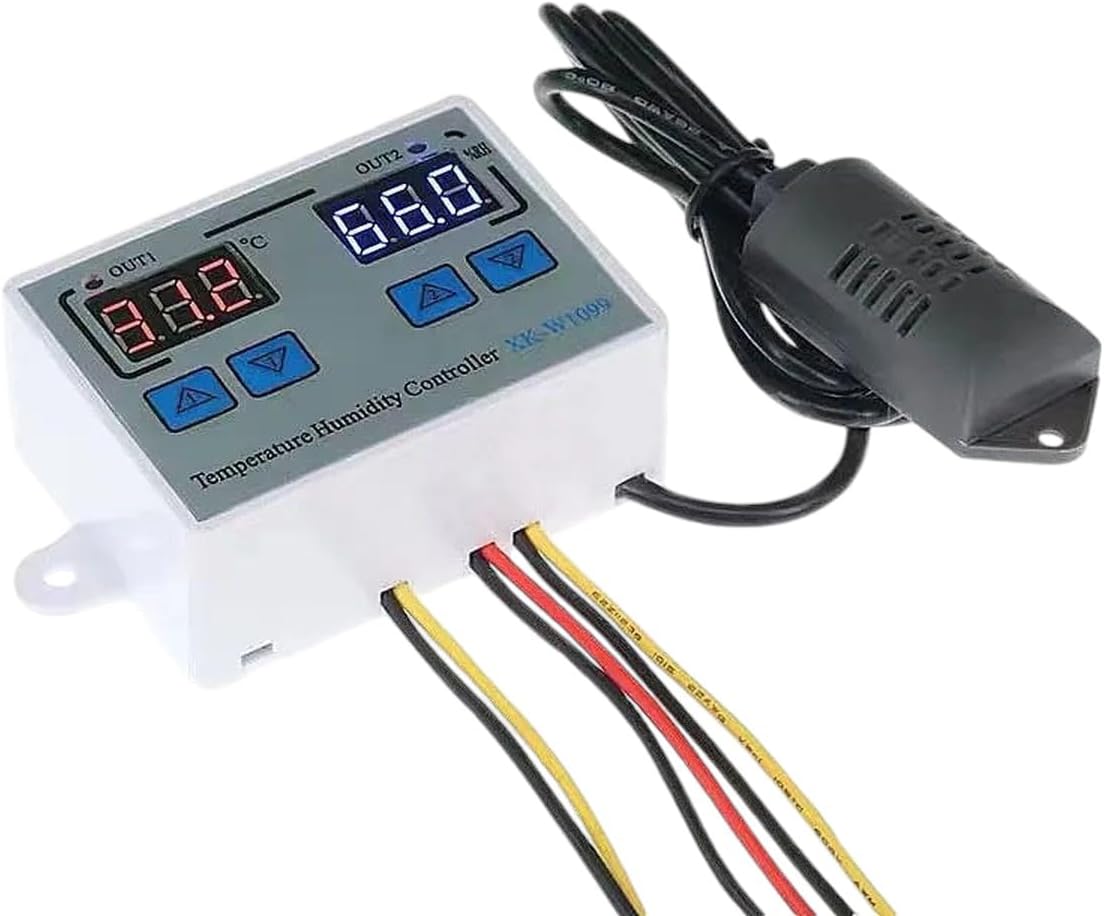
Image 3.1: The FICEMETOI XK-W1099 controller showing its dual digital displays, control buttons, wiring terminals, and the connected temperature/humidity sensor probe.
3.1. Main Components
- Dual Digital Displays: One for temperature (OUT1) and one for humidity (OUT2).
- Control Buttons: Up and Down arrows for setting parameters.
- Wiring Terminals: For power input and output connections to heating/cooling and humidifying/dehumidifying devices.
- Temperature/Humidity Sensor Probe: External probe for accurate environmental readings.
4. Features
- Simultaneous display of temperature and humidity.
- Wide range of temperature and humidity control.
- High measurement accuracy.
- Supports multiple voltage inputs: DC 12V, DC 24V, AC 110-220V.
- Simple and intuitive operation.
- Durable and reliable electronic components.
5. Specifications
| Parameter | Value |
|---|---|
| Model | XK-W1099 |
| Brand | FICEMETOI |
| Input Voltage | DC 12V / DC 24V / AC 110-220V (selectable) |
| Control Type | Temperature and Humidity |
| Display | Dual Digital Display |
| Measurement Range | Specific range not provided, refer to product labeling. |
| Control Accuracy | Specific accuracy not provided, refer to product labeling. |
6. Setup
6.1. Wiring Instructions
WARNING: Ensure power is disconnected before wiring. Incorrect wiring can damage the device or cause electrical hazards.
- Power Input: Connect the appropriate power supply (DC 12V, DC 24V, or AC 110-220V) to the designated power input terminals on the controller. Observe polarity for DC connections.
- Temperature/Humidity Sensor: Connect the sensor probe to the dedicated sensor input port. Ensure a secure connection.
- Output 1 (Temperature Control): Connect your heating or cooling device to the OUT1 terminals. The controller will activate/deactivate this output based on temperature settings.
- Output 2 (Humidity Control): Connect your humidifying or dehumidifying device to the OUT2 terminals. The controller will activate/deactivate this output based on humidity settings.
Refer to the wiring diagram printed on the device casing for specific terminal identification.
6.2. Mounting
Mount the controller in a location that is easily accessible for viewing and operation, away from direct heat sources, moisture, and vibrations. Ensure adequate ventilation around the unit.
7. Operating Instructions
7.1. Power On/Off
Once wired correctly, apply power to the controller. The dual digital displays will illuminate, showing the current temperature and humidity readings.
7.2. Setting Temperature Parameters
- Press and hold the 'SET' button (if available, or the 'Up' button for a few seconds) for the temperature display (OUT1) until the display flashes.
- Use the 'Up' and 'Down' arrow buttons to adjust the desired temperature set point.
- Press 'SET' again (or wait a few seconds) to confirm and save the setting.
- Repeat similar steps to set the temperature hysteresis (difference between turn-on and turn-off points) if applicable.
7.3. Setting Humidity Parameters
- Press and hold the 'SET' button (or the 'Up' button for a few seconds) for the humidity display (OUT2) until the display flashes.
- Use the 'Up' and 'Down' arrow buttons to adjust the desired humidity set point.
- Press 'SET' again (or wait a few seconds) to confirm and save the setting.
- Repeat similar steps to set the humidity hysteresis if applicable.
7.4. Display Interpretation
- The left display (OUT1) shows the current temperature.
- The right display (OUT2) shows the current humidity.
- Indicator lights (if present) will show when the temperature or humidity outputs are active.
8. Maintenance
8.1. Cleaning
Wipe the controller's exterior with a soft, dry cloth. Do not use abrasive cleaners or solvents. Ensure no liquid enters the device.
8.2. Sensor Care
Keep the temperature and humidity sensor probe clean and free from dust or debris. Avoid physical damage to the probe. If readings appear inaccurate, gently clean the sensor tip or consider replacement if damage is suspected.
8.3. Environmental Considerations
Regularly check the operating environment to ensure it remains within the specified conditions for the controller (temperature, humidity, absence of corrosive elements).
9. Troubleshooting
| Problem | Possible Cause | Solution |
|---|---|---|
| No display/No power | No power supply; Incorrect wiring; Blown fuse (internal/external). | Check power connections; Verify input voltage; Inspect wiring for faults; Check fuses. |
| Incorrect temperature/humidity readings | Sensor dirty or damaged; Sensor not properly connected; Environmental interference. | Clean sensor; Reconnect sensor securely; Relocate sensor away from direct drafts or heat sources; Replace sensor if damaged. |
| Output not activating/deactivating | Set point not reached; Hysteresis too wide; Output device faulty; Incorrect wiring. | Verify set points and hysteresis; Test output device independently; Check output wiring. |
| Display shows 'HHH' or 'LLL' | Sensor out of range or disconnected. | Check sensor connection; Ensure sensor is within its operating range; Replace sensor if faulty. |
10. Warranty and Support
FICEMETOI products are manufactured to high-quality standards. For warranty information, technical support, or service inquiries, please refer to the contact information provided at the point of purchase or visit the official FICEMETOI website. Please have your model number (XK-W1099) and purchase details ready when contacting support.