Introduction
This manual provides detailed instructions for the setup, operation, and maintenance of your TWSYOXPR HY450 Projector. Please read this manual thoroughly before using the product to ensure proper operation and to prevent damage.

Image 1: Front-side view of the TWSYOXPR HY450 Projector, showcasing its lens and ventilation.
Safety Information
Observe the following safety precautions to ensure safe and optimal use of your projector:
- Do not block ventilation openings. Ensure adequate airflow around the projector.
- Do not expose the projector to rain or moisture to prevent fire or electric shock.
- Avoid looking directly into the projector lens when the lamp is on.
- Use only the power adapter supplied with the projector.
- Place the projector on a stable, level surface.
- Unplug the projector during lightning storms or when unused for long periods.
Package Contents
Verify that all items are present in the package:
- TWSYOXPR HY450 Projector
- Power Adapter (EU plug)
- Remote Control
- User Manual
Product Overview
Familiarize yourself with the projector's components and ports.

Image 2: Overview of key features including 1080P native resolution, 900 ANSI lumens, Electronic Focus, Ultra Short Throw, Dual 5W Speakers, Auto Offset, Auto Horizontal Keystone, WiFi 6, and BT5.4.
Front Panel
- Projection Lens: Emits the image.
Rear Panel
- HDMI Port: Connects to HDMI-enabled devices (e.g., Blu-ray player, game console).
- USB Port: Connects to USB storage devices for media playback.
- Audio Out (3.5mm): Connects to external speakers or headphones.
- Power Input: Connects to the power adapter.
Side Panels
- Ventilation Openings: Ensure proper heat dissipation.
- Dual Speakers: Integrated audio output.
Setup
1. Placement
Position the projector on a stable, flat surface. The HY450 features an Ultra Short Throw ratio (0.6:1), allowing for a large screen experience even in compact spaces. Refer to the table below for recommended projection distances:
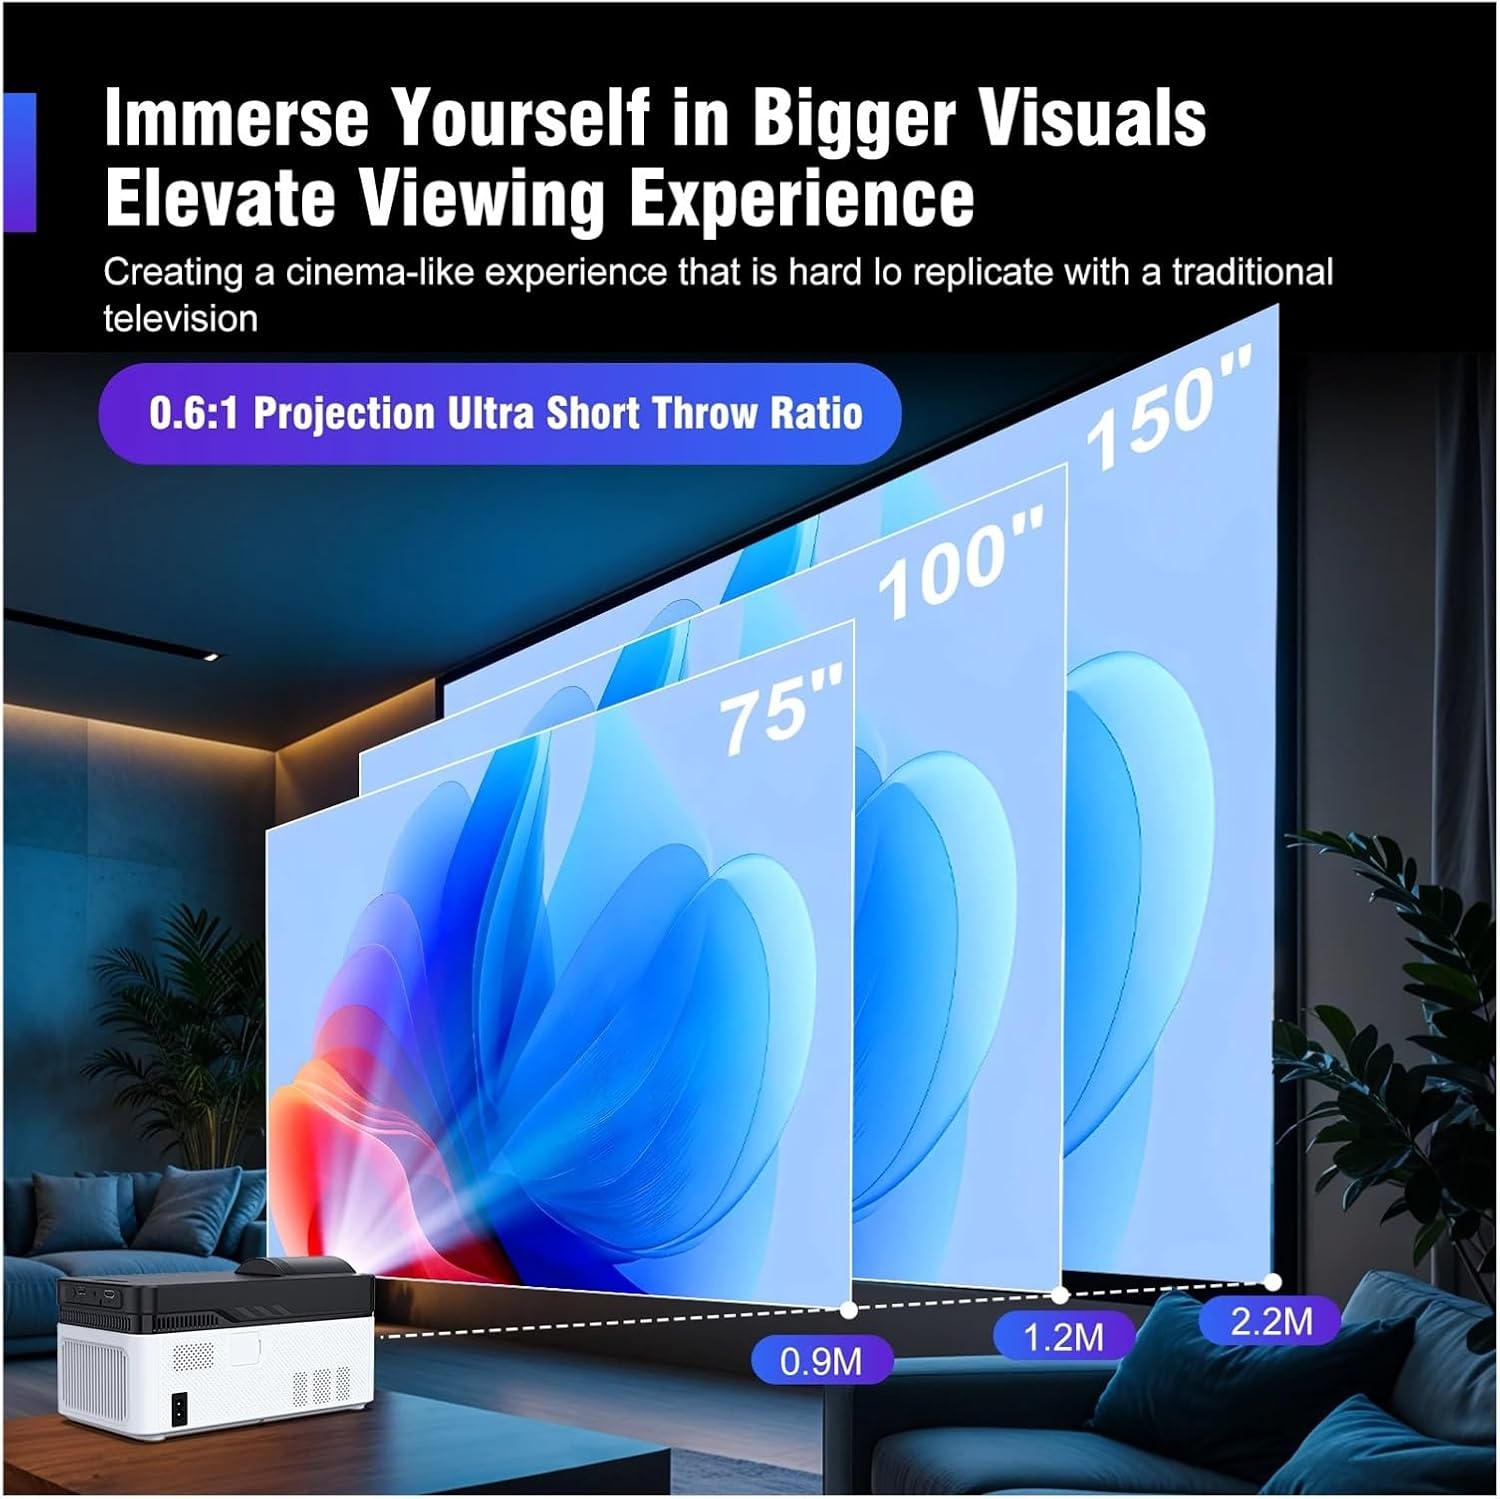
Image 3: Illustration of Ultra Short Throw capability, showing projection distances for 75", 100", and 150" screen sizes (0.9m, 1.2m, 2.2m respectively).
| Screen Size | Projection Distance |
|---|---|
| 75 inches | 0.9 meters |
| 100 inches | 1.2 meters |
| 150 inches | 2.2 meters |
2. Power Connection
Connect the supplied power adapter to the projector's power input port, then plug the adapter into a power outlet.
3. Initial Power On
Press the power button on the projector or the remote control to turn on the device. The projector will boot up and display the home screen.
4. Focus Adjustment (Electronic Focus)
The HY450 features automatic electronic focus. The projector will automatically adjust the image clarity. If manual adjustment is needed, use the remote control's focus buttons (if available) or navigate to the focus settings in the menu.
5. Keystone Correction (Automatic Correction & Auto Offset)
The projector supports automatic keystone correction and an advanced auto offset design. This automatically adjusts the image shape to be rectangular, even if the projector is not perfectly aligned with the screen. This feature simplifies setup and ensures a properly proportioned image.

Image 4: Illustration of Auto Offset Design, showing how the projector automatically adjusts the image position for optimal viewing compared to a non-auto offset design.
6. Connectivity
- HDMI: Connect your external devices (e.g., laptop, streaming stick) using an HDMI cable. Select the corresponding HDMI input source from the projector's menu.
- WiFi6: Navigate to the network settings to connect to your wireless network. WiFi6 provides fast and stable streaming.
- Bluetooth (BT5.4): Pair Bluetooth audio devices (e.g., headphones, external speakers) through the Bluetooth settings menu for enhanced sound.
Operating Instructions
1. Navigating the Menu
Use the remote control's arrow keys and OK button to navigate through the projector's on-screen menu. Access settings for picture, sound, network, and more.
2. Selecting Input Source
Press the "Source" button on the remote control to switch between available input sources (HDMI, USB, Screen Mirroring).
3. Media Playback via USB
Insert a USB drive into the USB port. The projector's media player will typically launch automatically, allowing you to browse and play supported video, audio, and image files.
4. Screen Mirroring/Casting
For wireless display from compatible smartphones or tablets, select the "Screen Mirroring" or "Cast" option from the projector's menu. Follow the on-screen instructions to connect your device.
5. Audio Output
The projector features built-in dual speakers. For external audio, connect headphones or speakers to the 3.5mm audio out port, or pair Bluetooth speakers via the Bluetooth settings.
Maintenance
1. Cleaning the Lens
Gently wipe the projector lens with a soft, lint-free cloth specifically designed for optical surfaces. Do not use abrasive cleaners or excessive force.
2. Cleaning the Projector Body
Use a soft, dry cloth to clean the exterior of the projector. For stubborn marks, a slightly damp cloth can be used, followed by a dry cloth. Avoid getting moisture into any openings.
3. Ventilation
Regularly check and clean the ventilation openings to prevent dust buildup, which can affect performance and lifespan. Use a soft brush or compressed air.
4. Storage
When not in use for extended periods, store the projector in a cool, dry, dust-free environment. Use the original packaging or a protective case if available.
Troubleshooting
- No Power: Ensure the power adapter is securely connected to both the projector and a working power outlet.
- No Image:
- Check the input source selection.
- Verify HDMI/USB cables are properly connected.
- Ensure the lens cap is removed.
- Blurry Image:
- Allow the automatic electronic focus to adjust.
- Check for obstructions in front of the lens.
- Distorted Image (Trapezoid):
- The automatic keystone correction should adjust this. If not, check projector placement.
- No Sound:
- Adjust the volume on the projector and the source device.
- Check if external audio devices are properly connected or paired via Bluetooth.
- Ensure the projector's internal speakers are not muted.
- Remote Control Not Working:
- Replace the batteries.
- Ensure there are no obstructions between the remote and the projector's IR receiver.
Specifications
| Feature | Specification |
|---|---|
| Brand: | TWSYOXPR |
| Model: | HY450 |
| ANSI Lumens: | 900 ANSI |
| Native Resolution: | 1080p (supports 8K input) |
| Projection Technology: | LCD |
| Light Source: | LED Lamp |
| Projection Size: | 20-300 inches |
| Projection Distance: | 0.55m - 2.1m |
| Ultra Short Throw Ratio: | 0.6:1 |
| Keystone Correction: | Automatic Correction, Auto Offset |
| Focus: | Electronic Focus (Automatic) |
| Wireless Connectivity: | WiFi6, Bluetooth 5.4 |
| Input/Output: | HDMI, USB, Audio Out (3.5mm) |
| Built-in Speaker: | Yes (Dual Speakers) |
| Screen Ratio: | 16:9 |
| Item Weight: | 2.8 kg |
| Power Plug: | EU plug (for this variant) |
Note: Specifications are subject to change without prior notice.
Warranty and Support
For warranty information and technical support, please refer to the warranty card included with your product or visit the official TWSYOXPR website. Keep your purchase receipt as proof of purchase.
Customer Service: For further assistance, please contact our customer support team via the contact information provided on our website or in your product packaging.