1. Introduction
This manual provides essential information for the safe and efficient operation of your SOGTICPS 100A MPPT Solar Charge Controller. Please read this manual thoroughly before installation and use to ensure optimal performance and longevity of the product.

Figure 1.1: Front view of the SOGTICPS MPPT Solar Charge Controller, featuring an LCD display and control buttons.
2. Safety Information
Always observe the following safety precautions to prevent personal injury or damage to the controller and other components:
- Ensure all wiring is correctly polarized and securely connected.
- Do not attempt to disassemble or repair the controller yourself. Contact qualified personnel.
- Install the controller in a well-ventilated area, away from flammable materials and direct sunlight.
- Avoid installing in locations where water or moisture can enter the controller.
- Wear appropriate personal protective equipment (PPE) during installation, including insulated gloves and eye protection.
- Disconnect all power sources (solar panels and battery) before performing any maintenance or wiring.
3. Product Features
The SOGTICPS MPPT Solar Charge Controller offers advanced features for efficient solar power management:
- Bi-peak MPPT Technology: Accurately tracks the maximum power point, ensuring efficient power generation even with partial shading or panel damage. Increases charging efficiency by approximately 25% compared to traditional PWM controllers, with overall efficiency up to 99.9% and circuit conversion efficiency up to 98%.
- Automatic Voltage Recognition: Automatically detects 12V, 24V, 36V, or 48V battery system voltages.
- Battery Compatibility: Compatible with GEL, SLD, FLD, LI (Lithium-ion), and User-defined battery types. Supports 0V charging for waking up sleeping Li-ion batteries.
- Real-time Monitoring: LCD display provides real-time system status, fault identification, and abnormal information for quick troubleshooting.
- Temperature Compensation: Adjusts charging and discharging parameters based on ambient temperature to extend battery life.
- Comprehensive Electronic Protection: Includes waterproof protection, reverse charging protection at night, over-temperature protection, input power limiting, PV short circuit, PV input reverse-connection, PV input high voltage, and load short circuit protection.
- Versatile Applications: Suitable for home photovoltaic systems, RVs, yachts, communication base stations, outdoor monitoring, and other electric equipment power supply needs.

Figure 3.1: An illustration of the controller's advanced MPPT technology, demonstrating high tracking and conversion efficiencies and compatibility with FLD, SLD, GEL, LI, and AGM battery types.

Figure 3.2: Visual representation of the comprehensive protection features integrated into the SOGTICPS MPPT controller, ensuring safe and stable system operation.
4. Setup and Installation
4.1 Physical Installation
The controller should be installed in a well-ventilated area, protected from direct sunlight, high temperatures, and moisture. Ensure adequate clearance around the unit for proper heat dissipation.

Figure 4.1: Physical dimensions of the SOGTICPS MPPT controller and a note on recommended installation environment: well-ventilated, away from direct sunlight, high temperature, and water.
4.2 Wiring Instructions
Follow the wiring diagram carefully. Connect components in the specified order to prevent damage.
- Connect the battery to the controller first. Ensure correct polarity.
- Connect the solar panels to the controller. Ensure correct polarity and that the open-circuit voltage does not exceed the controller's maximum input voltage (180VDC).
- Connect the DC load to the controller's load terminals (if applicable).
- If using an inverter, connect it directly to the battery bank, not through the controller's load terminals.

Figure 4.2: Detailed wiring diagram illustrating the connections between the solar panel, MPPT controller, battery bank, inverter, and various electrical loads.
5. Operating Instructions
5.1 LCD Display Overview
The backlit LCD screen provides real-time information about your solar power system. Familiarize yourself with the indicators:
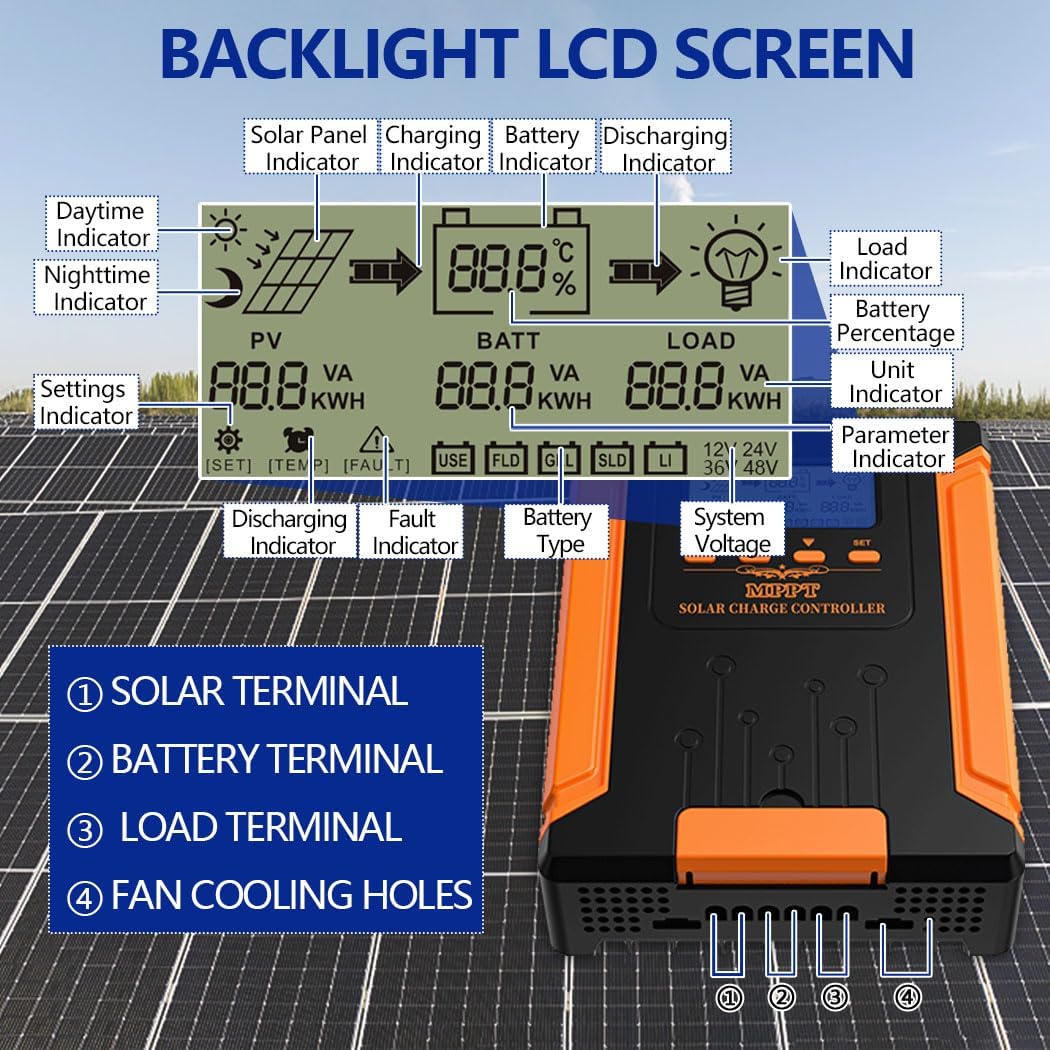
Figure 5.1: Close-up of the controller's LCD screen, explaining each indicator and terminal (Solar, Battery, Load, Fan Cooling Holes) for easy monitoring and setup.
The display shows parameters such as PV voltage, battery voltage, load status, charging/discharging current, and battery percentage. Use the ESC, UP, DOWN, and SET buttons to navigate menus and adjust settings.
5.2 Battery Type Selection
The controller automatically recognizes system voltage. However, you must select the correct battery type for optimal charging. Refer to the controller's menu for options like GEL, SLD, FLD, LI (Lithium), or User-defined. Incorrect battery type selection can damage your batteries.
6. Maintenance
Regular maintenance ensures the longevity and optimal performance of your solar charge controller:
- Periodically inspect all wiring connections for tightness and corrosion.
- Keep the controller clean and free from dust. Use a dry cloth for cleaning.
- Ensure the ventilation openings are not blocked to allow for proper heat dissipation.
- Monitor the LCD display for any fault indicators or abnormal readings.
7. Troubleshooting
The controller's LCD display provides real-time monitoring and fault identification. If an issue arises, check the display for error codes or abnormal readings. Common issues and general troubleshooting steps include:
- No Power/Display Off: Check battery connections and voltage. Ensure the battery is not completely discharged.
- No Charging: Verify solar panel connections and ensure sufficient sunlight. Check PV input voltage on the display.
- Load Not Working: Check load connections and ensure the load is not exceeding the controller's capacity. Verify load settings on the controller.
- Over-temperature Warning: Ensure the controller is in a well-ventilated area and not exposed to direct sunlight. Clear any obstructions from cooling fins.
For persistent issues or complex problems, refer to the detailed troubleshooting section in the full product manual (if available) or contact customer support.
8. Specifications
| Feature | Specification |
|---|---|
| Model Number | MPPT/110A |
| Product Dimensions | 12.3 x 8.8 x 4.1 inches (31.3 x 22.5 x 10.5 cm) |
| Item Weight | 6.8 pounds |
| Manufacturer | SOGTICPS |
| ASIN | B0F3D4QTDV |
| Batteries Required | Yes |
| Included Components | Solar Charger Controller |
| UPC | 704334809130 |
9. Warranty and Support
For warranty information or technical support, please contact SOGTICPS customer service through the retailer where the product was purchased or visit the official SOGTICPS website. Please have your model number (MPPT/110A) and purchase details ready when contacting support.