1. Introduction
This manual provides detailed instructions for the safe and efficient operation, maintenance, and troubleshooting of your Havato 10-Cup Grind and Brew Coffee Machine. Please read all instructions carefully before first use and retain this manual for future reference.
2. Safety Information
- Always unplug the coffee machine from the power outlet before cleaning or when not in use.
- Do not immerse the appliance, power cord, or plug in water or other liquids.
- Ensure the voltage indicated on the appliance matches your local power supply before connecting.
- Keep the appliance out of reach of children.
- Do not operate the appliance with a damaged cord or plug, or if it malfunctions or has been damaged in any manner.
- Avoid contact with hot surfaces. Use handles or knobs.
- Do not place the appliance on or near a hot gas or electric burner, or in a heated oven.
3. Product Overview & Components
Familiarize yourself with the various parts of your Havato coffee machine:

Figure 1: Havato 10-Cup Grind and Brew Coffee Machine with integrated grinder and glass carafe.
Key Components:
- Bean Hopper: Transparent container for whole coffee beans.
- Grind Regulator Knob: Adjusts the fineness of the coffee grind.
- Water Tank: Reservoir for water, located at the back/side.
- Control Panel: Features an LCD display and various function buttons.
- Filter Basket: Holds the permanent filter or paper filter.
- Glass Carafe: Collects brewed coffee, with cup markings.
- Warming Plate: Keeps brewed coffee warm.
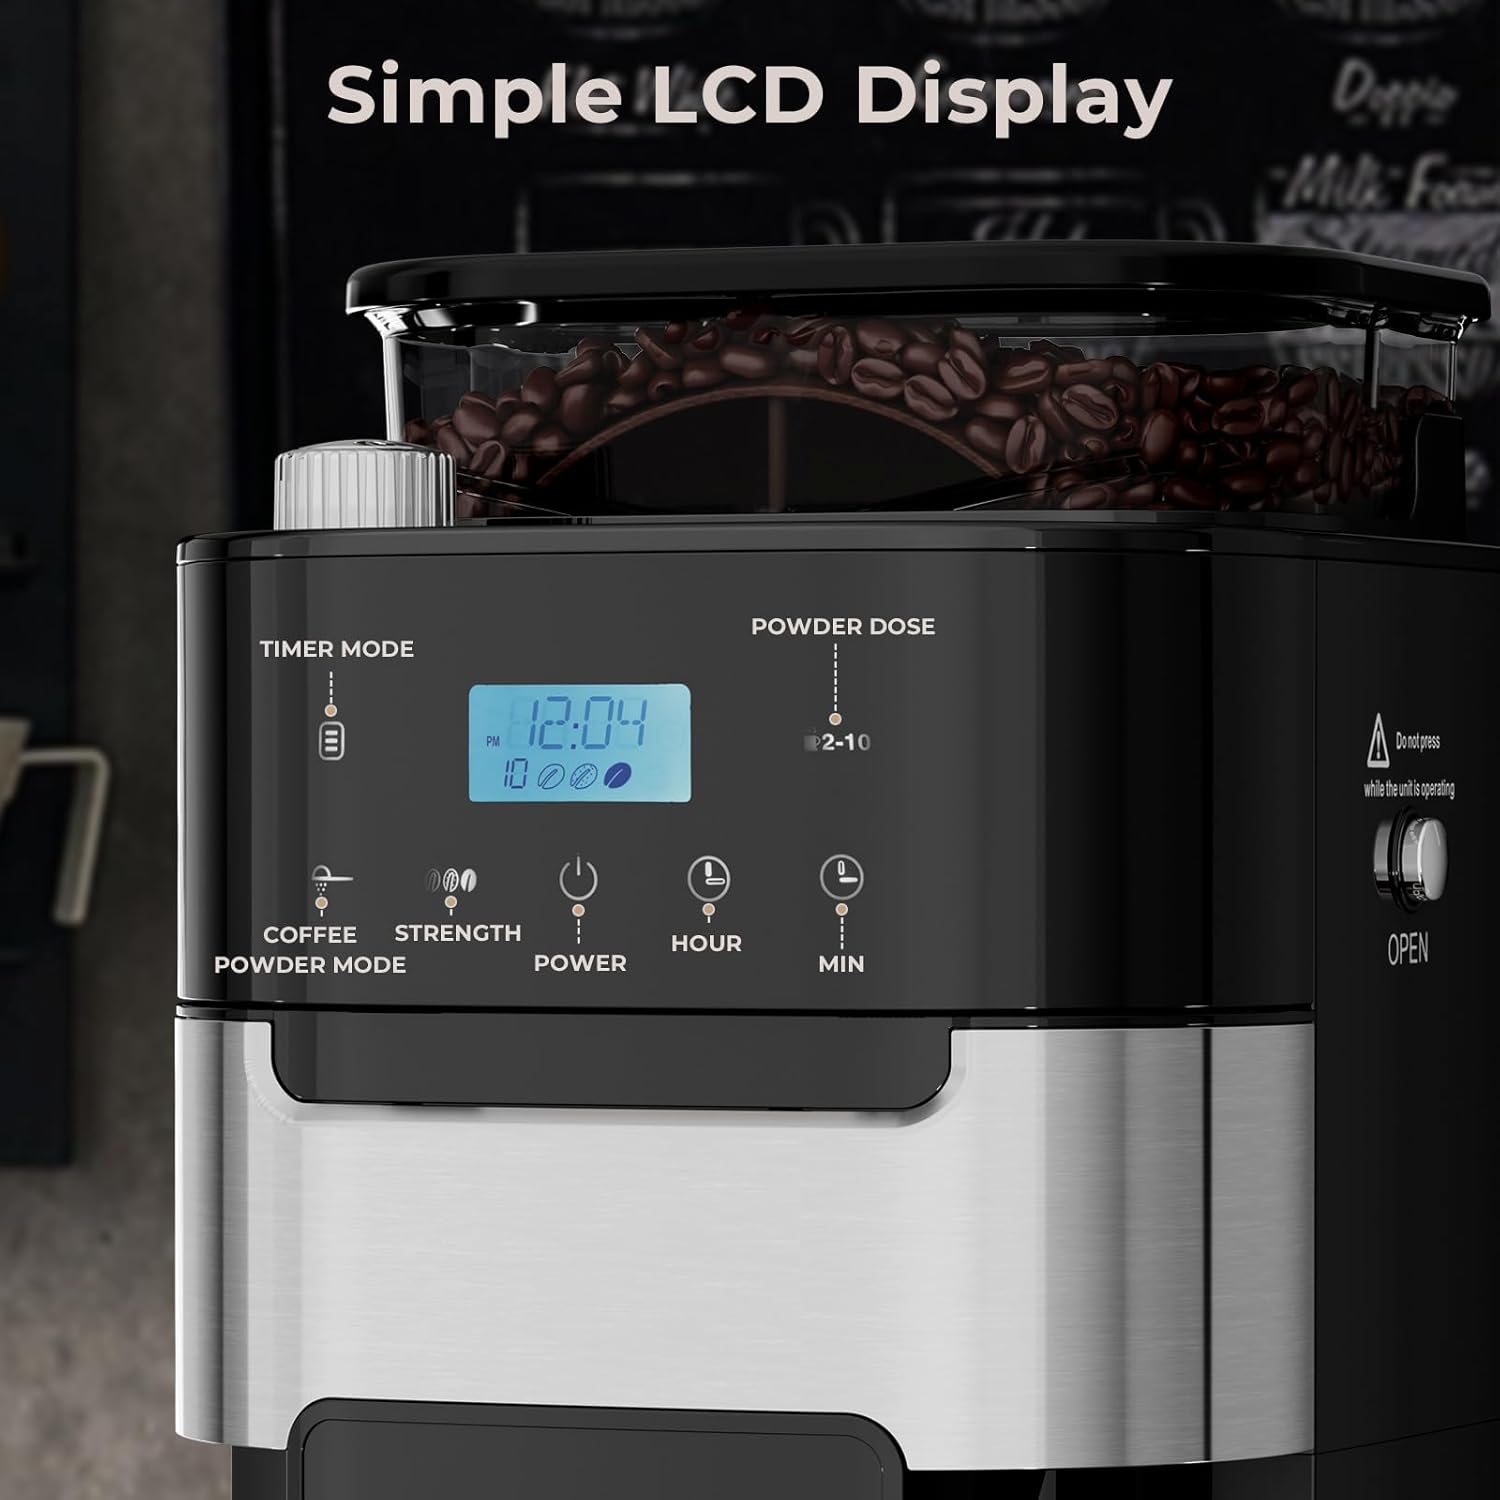
Figure 2: Close-up of the control panel with LCD display and function buttons.
4. Setup
4.1 Unpacking
- Carefully remove all packaging materials from the coffee machine.
- Inspect the appliance for any signs of damage. Do not use if damaged.
4.2 Initial Cleaning
- Wash the glass carafe, lid, permanent filter, and filter basket in warm, soapy water. Rinse thoroughly and dry.
- Wipe the exterior of the coffee machine with a damp cloth.
- Before brewing coffee for the first time, run two full cycles with only water to clean the internal components.
5. Operating Instructions
5.1 Adding Water
- Open the water tank lid.
- Fill the water tank with fresh, cold water up to the desired cup marking on the carafe. Ensure not to exceed the 'MAX' level.
- Close the water tank lid securely.

Figure 3: Filling the water tank to the desired level. The grind adjustment knob is also visible.
Video 1: Demonstrates how to control coffee flavor by adjusting water flow and grind settings.
5.2 Adding Coffee Beans or Grounds
- For whole beans: Open the bean hopper lid and add the desired amount of whole coffee beans. Do not exceed 200 grams. Close the lid.
- For pre-ground coffee: Ensure the permanent filter is in place. Open the filter basket and add the desired amount of pre-ground coffee directly into the filter. Close the filter basket.

Figure 4: Adding pre-ground coffee to the filter basket.

Figure 5: Coffee beans loaded into the integrated grinder hopper.
5.3 Adjusting Grind Size (for whole beans)
Use the grind regulator knob to select your preferred grind fineness. Options typically range from coarse to fine, influencing the coffee's extraction and taste.
Figure 6: Adjusting the grind fineness using the control knob.
Video 2: Demonstrates how to control coffee flavor by adjusting water flow and grind settings.
5.4 Selecting Brew Strength
Press the 'Strength' button on the control panel to cycle through the available brew strength options (e.g., Mild, Medium, Robust) until your desired strength is selected.

Figure 7: Selecting desired coffee strength: Mild, Medium, or Robust.
Video 3: Demonstrates how to control coffee flavor by adjusting water flow and grind settings.
5.5 Setting the Programmable Timer
- Press and hold the 'Timer' button to enter timer mode. The time on the display will flash.
- Use the 'Hour' and 'Min' buttons to set the desired brew start time. Long press for faster adjustment.
- Adjust the cup number, concentration, and coffee mode as desired.
- Press the 'Timer' button again to confirm. The timer indicator will turn red, and the clock icon will appear.
- The machine will automatically start brewing at the set time.
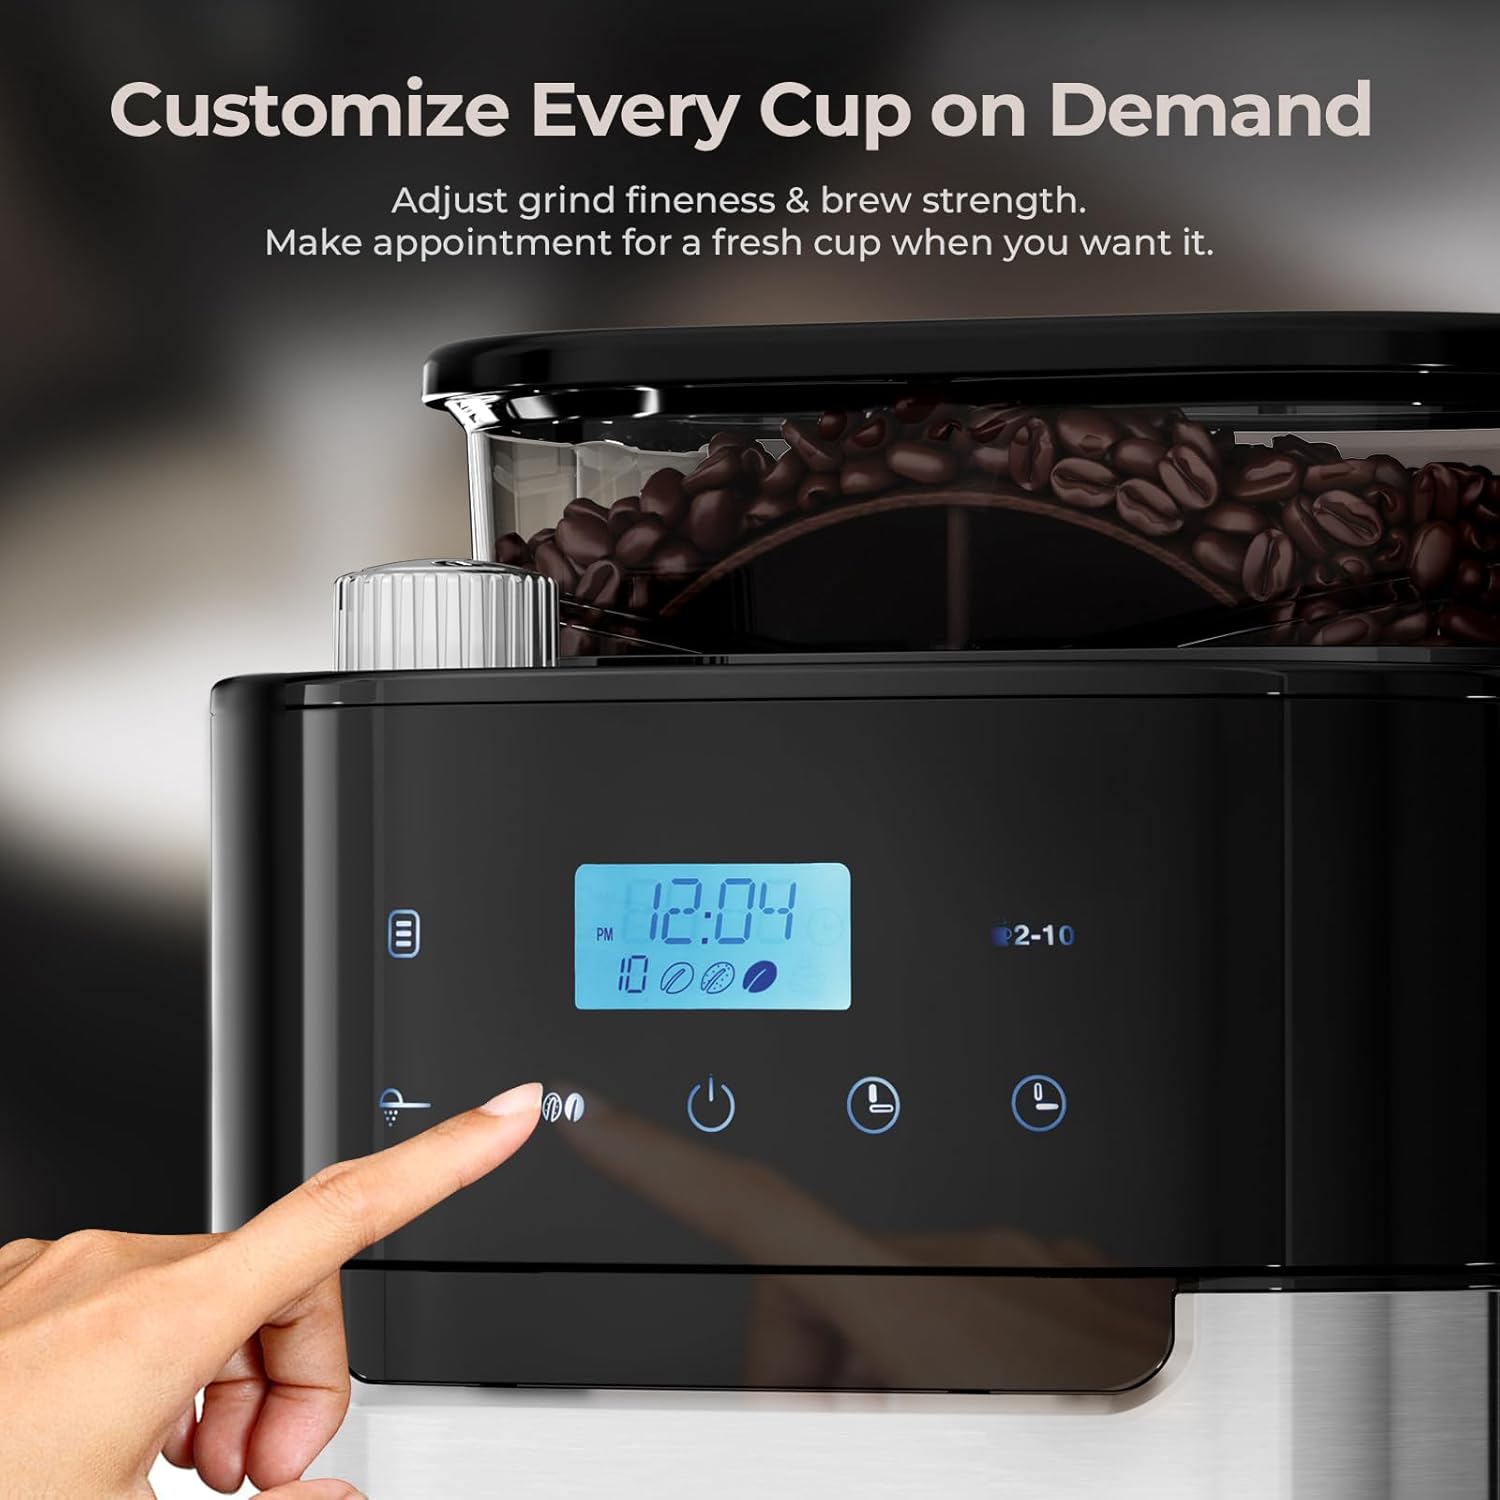
Figure 8: Setting the programmable timer for delayed brewing.
Video 4: Guide on how to set the timer mode for automatic brewing.
5.6 Starting the Brewing Process
After all settings are configured, press the 'Power' button to begin the brewing cycle. If using whole beans, the machine will first grind the beans, then proceed with brewing.
5.7 Keep Warm Function
The coffee machine automatically activates a 2-hour keep warm function after brewing is complete, maintaining the coffee at an optimal temperature of approximately 161°F (71.7°C).

Figure 9: The coffee maker's 2-hour keep warm function ensures coffee remains hot.
6. Maintenance
6.1 Regular Cleaning
- After each use, unplug the machine and allow it to cool.
- Remove the carafe, permanent filter, and filter basket. Wash them in warm, soapy water.
- Wipe the exterior of the machine with a damp cloth. Do not use abrasive cleaners.
- Clean the bean hopper and grinder components regularly to prevent oil buildup and ensure optimal performance.
6.2 Descaling
To maintain optimal performance and extend the lifespan of your coffee machine, descaling is recommended every 3 months, or more frequently in areas with hard water.
- Prepare a descaling solution (e.g., a mixture of white vinegar and water, or a commercial descaling agent) according to the product's instructions.
- Pour the descaling solution into the water tank.
- Place the empty carafe on the warming plate.
- Run a brewing cycle without coffee.
- After the cycle, discard the solution from the carafe.
- Rinse the water tank and carafe thoroughly with fresh water.
- Run two full cycles with fresh water only to rinse the machine completely.
Video 5: Guide for removing scale from the coffee machine (recommended every 3 months).
7. Troubleshooting
7.1 Common Issues and Solutions
| Problem | Possible Cause | Solution |
|---|---|---|
| Coffee tastes weak | Too much water, too little coffee, coarse grind, or mild strength setting. | Adjust water-to-coffee ratio, select finer grind, or choose a stronger brew setting. |
| Coffee tastes too strong | Too little water, too much coffee, fine grind, or robust strength setting. | Adjust water-to-coffee ratio, select coarser grind, or choose a milder brew setting. |
| Grinder is loud | Normal operation for integrated grinders. | This is typical for coffee grinders. Ensure the bean hopper lid is closed properly. |
| Water not flowing | Water tank empty, machine not powered on, or clogged water path (needs descaling). | Fill water tank, ensure power is on, or perform descaling procedure. |
| Coffee grounds in carafe | Filter not seated correctly, or grind is too fine for the filter. | Ensure filter is properly seated. Try a slightly coarser grind. |
8. Specifications
8.1 Technical Specifications
| Feature | Specification |
|---|---|
| Brand | Havato |
| Model Name | CM1025AO-UL |
| Coffee Maker Type | Drip Coffee Machine |
| Operation Mode | Fully Automatic |
| Capacity | 10 Cups (50oz Water Tank) |
| Coffee Input Type | Ground, Whole Bean |
| Special Features | Adjustable Brew Strength, Permanent Filter, Programmable, Removable Tank, Timer |
| Voltage | 120 Volts |
| Power Source | AC |
| Product Dimensions | 16.93"D x 8.66"W x 10.63"H |
| Item Weight | 9.57 pounds |
| Color | Black |
| Display Type | LCD |

Figure 10: Product dimensions for placement reference.
9. Warranty and Customer Support
For warranty information or customer support, please refer to the contact details provided with your purchase or visit the official Havato website. Keep your proof of purchase for any warranty claims.