Important Safety Instructions
Please read all instructions carefully before operating the appliance. Retain this manual for future reference.
- Ensure the power supply matches the appliance's voltage (110V) and frequency (60Hz).
- Do not immerse the appliance, cord, or plug in water or other liquids.
- Always unplug the appliance from the power outlet before cleaning or when not in use.
- Keep hands and face away from steam nozzles during operation to prevent burns.
- Do not operate the appliance with a damaged cord or plug, or after the appliance malfunctions or has been damaged in any manner.
- Use only manufacturer-recommended accessories.
- This appliance is intended for commercial and residential use as specified.
- Automatic pressure relief protection is integrated. If pressure is too high, the faucet automatically relieves pressure.
- The appliance generates hot water and steam. Exercise caution.
Product Overview
Components
- Main Unit (Stainless Steel Housing)
- LED Display and Control Panel
- Steam Nozzles (360-degree rotatable)
- Water Inlet Pipe
- Water Receiving Box (Drip Tray)
- Anti-scald Handles
- Pressure Gauge
- Temperature Sensor
Key Features
- 4-in-1 Functionality: Heats beverages, extracts tea, brews milk, and boils water.
- Fast Heating: 2000W power for rapid heating. Heats 0.1 gallon from 59°F to 122°F in approximately 20 seconds.
- Large Capacity: 12L water capacity, providing sufficient steam and faster water output.
- Automatic Pressure Relief: Ensures safety by automatically releasing pressure when it becomes too high.
- Durable Construction: Made of high-quality foam insulation and 304 stainless steel for heat retention, energy saving, and ease of cleaning.
- 360° Rotatable Valves: Both water and steam valves can be rotated for convenience.
- Double Temperature Display: Real-time display of water and cup temperature on an intelligent LCD screen.
- Steam Pressure Gauge: Shows real-time pressure.

Figure 1: Front view of the Commercial Milk Frother, showing the control panel, steam nozzles, and drip tray, with prepared coffee and milk beverages.
Setup
1. Unpacking
- Carefully remove all packaging materials.
- Inspect the appliance for any damage. If damaged, do not operate and contact customer support.
- Ensure all components listed in the 'Packing list' are present: Commercial steam milk frother (1), Water inlet pipe (1), Water receiving box (1).
2. Placement
- Place the appliance on a stable, level, heat-resistant surface.
- Ensure adequate ventilation around the unit.
- Keep the appliance away from walls and other objects to allow for proper heat dissipation.

Figure 2: Side view of the Commercial Milk Frother, illustrating its dimensions (64cm/25.2in height, 28cm/11in depth, 26cm/10in width) and key electrical specifications (110V, 2000W, 60Hz).
3. Water Connection
- Connect the provided water inlet pipe to the appliance's water inlet port.
- Connect the other end of the water inlet pipe to a clean, potable water source. Ensure connections are secure to prevent leaks.
- Place the water receiving box (drip tray) under the steam nozzles.
4. Power Connection
- Plug the power cord into a grounded 110V, 60Hz electrical outlet.
- Ensure the outlet can support a 2000W appliance.
Operating Instructions
1. Powering On
- Press the 'SWITCH' button on the control panel to turn on the appliance.
- The LED display will illuminate, showing real-time temperature and pressure status.

Figure 3: Close-up of the LED LCD screen and control panel, displaying real-time temperature, pressure gauge, and clearly labeled function buttons for easy operation.
2. Adjusting Settings
- Use the 'RESERVE' and 'SET' buttons, along with the up/down arrows, to adjust desired settings such as temperature or timer, if applicable. Refer to the on-screen prompts.
- The steam pressure gauge provides a clear indication of the internal pressure.
3. Frothing Milk
- Fill a frothing pitcher with cold milk.
- Position the steam nozzle into the milk, just below the surface.
- Turn the steam valve to release steam. Adjust the nozzle depth and angle to create desired milk foam.
- The temperature sensor can detect the temperature of the drink in the cup, assisting in achieving optimal frothing temperature.
- Once frothing is complete, turn off the steam valve and wipe the nozzle immediately with a damp cloth.

Figure 4: The temperature sensor, located on the steam wand, is designed to detect the temperature of the beverage in the cup for precise heating and frothing.
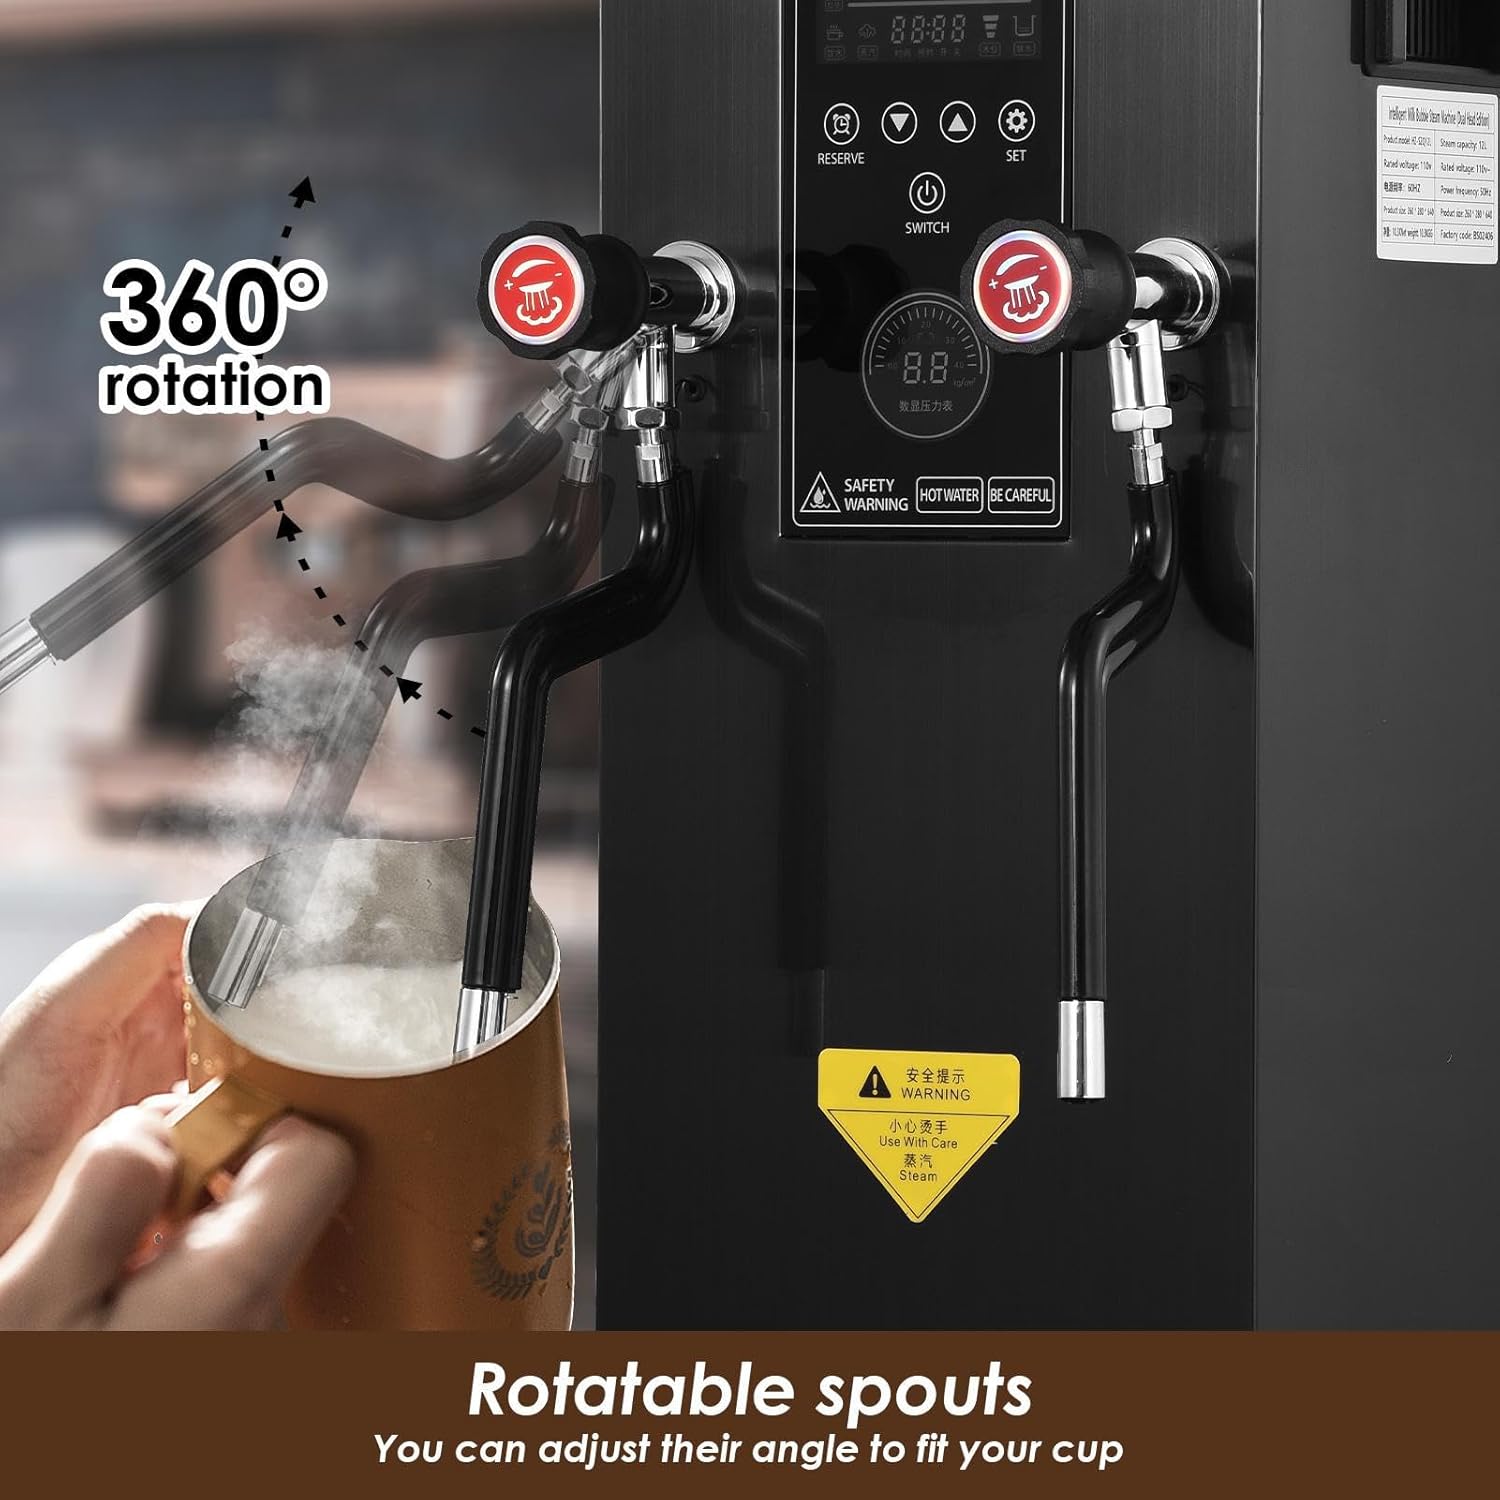
Figure 5: The steam and hot water spouts feature 360-degree rotation, allowing users to adjust their angle to fit various cup sizes and positions.
4. Dispensing Hot Water/Steam
- Position a cup or container under the desired spout.
- Turn the corresponding valve to dispense hot water or steam.
- Turn off the valve when the desired amount is dispensed.

Figure 6: Illustration of the automatic pressure relief safety feature. The top image shows the correct operation with pressure relief, while the bottom image indicates a potential safety issue if pressure is not properly managed.
Maintenance and Cleaning
Regular cleaning ensures optimal performance and longevity of your appliance.
1. Daily Cleaning
- Steam Nozzles: Immediately after each use, wipe the steam nozzles with a clean, damp cloth to remove any milk residue. Briefly open the steam valve to clear any internal blockages.
- Drip Tray: Empty and clean the water receiving box (drip tray) daily. Wash with warm, soapy water and rinse thoroughly.
- Exterior: Wipe the exterior of the appliance with a soft, damp cloth. Do not use abrasive cleaners or scouring pads.
2. Descaling
- Depending on water hardness and usage, descaling may be required periodically to remove mineral buildup.
- Use a commercial descaling solution suitable for coffee machines, following the manufacturer's instructions.
- Alternatively, a solution of white vinegar and water (1:1 ratio) can be used.
- Run the descaling solution through the hot water and steam systems.
- After descaling, flush the system thoroughly with several cycles of clean water to remove any descaling residue.
Troubleshooting
| Problem | Possible Cause | Solution |
|---|---|---|
| No power | Appliance not plugged in; Power outlet malfunction; Circuit breaker tripped. | Ensure plug is securely inserted; Test outlet with another appliance; Reset circuit breaker. |
| No steam/hot water | Water tank empty; Steam nozzle clogged; Appliance not heated to operating temperature. | Ensure water supply is connected and flowing; Clean steam nozzle; Allow appliance to preheat. |
| Weak steam pressure | Mineral buildup in system; Low water level. | Perform descaling procedure; Check water supply. |
| Water leakage | Loose water inlet connection; Damaged seal. | Tighten water inlet pipe connections; Contact customer support for seal replacement. |
| Display not working | Power issue; Internal malfunction. | Check power supply; Unplug and replug; Contact customer support. |
Specifications
| Feature | Specification |
|---|---|
| Model | QOE43Y6QUK75SJAF |
| Voltage | 110V |
| Power | 2000W |
| Frequency | 60Hz |
| Material | Stainless Steel |
| Water Output | 12L/H |
| Product Size (L*W*H) | 26cm * 28cm * 64cm (10.23in * 11in * 25.19in) |
| Item Weight | 32.3 pounds |
| Color | Black |
Warranty and Support
Warranty Information
This product comes with a standard manufacturer's warranty. Please refer to the warranty card included in your packaging or contact the seller for specific warranty terms and conditions. Keep your proof of purchase for warranty claims.
Customer Support
For technical assistance, troubleshooting beyond this manual, or warranty inquiries, please contact the seller or manufacturer directly. Provide your model number (QOE43Y6QUK75SJAF) and purchase date when seeking support.