ASURE 13.1inch 2-Din
ASURE 13.1-inch 2K HD Car Stereo GPS Navigation Unit
Model: 13.1inch 2-Din
For Ford Transit Custom (2017-2022)
1. Safety Information
Read all instructions carefully before installation and operation. Improper installation can lead to vehicle damage or personal injury. Ensure the vehicle's power is disconnected before beginning installation. Professional installation is recommended.
- Do not operate the unit in a manner that distracts you from driving.
- Ensure all wiring is properly insulated to prevent short circuits.
- This unit does not support the factory backup camera. An aftermarket backup camera is included and recommended for safe reversing.
2. Product Overview
The ASURE 13.1-inch Car Stereo GPS Navigation Unit is designed to enhance your driving experience with advanced features and a high-resolution display.
Key Features:
- 13.1-inch 2K HD Touchscreen: Vibrant 1920x1280 resolution with ultra-responsive capacitive touch.
- Wireless CarPlay & Android Auto: Seamless phone integration for navigation, calls, and music.
- High Performance: Powered by an 8-core CPU with 4GB RAM and 64GB ROM for fast boot-up and smooth operation.
- DSP Sound Engine: Built-in Digital Signal Processor for customizable audio with rich bass and crisp highs.
- Integrated GPS Navigation: Supports worldwide maps.
- Connectivity: Bluetooth 5.0, USB, Dual-band Wi-Fi (2.4GHz & 5GHz).
- Backup Camera Support: Includes an HD backup camera for clear reverse vision.

3. Package Contents
Verify that all items are present in the package:
- 1x 13.1 inch Car In-Dash Head Unit Host
- 1x Installation Panel
- 1x Wiring Harness Adapter Kit
- 1x Can-Bus Box
- 1x GPS Antenna
- 1x Wi-Fi/BT Antenna
- 1x Microphone
- 2x USB Cables
- 1x Audio Video Input/Output Cables
- 1x HD Reversing Camera
- 1x User Manual
- Mounting Screws and Tools

4. Installation
This unit is designed for a plug-and-play installation for Ford Transit Custom models (2017-2022) without MyFord Touch. Professional installation is recommended if you are unfamiliar with car audio systems.
4.1 Pre-Installation Check:
- Ensure the vehicle's ignition is off and the battery is disconnected.
- Confirm all package contents are present.
- Note: The factory plug is located behind the OEM screen. If your factory radio is a 1-Din type, contact support for suitable models.
- This stereo does not support the factory backup camera. Use the included HD reversing camera.
4.2 Mounting the Head Unit:
- Attach the screen base to the head unit. You can choose from three installation positions (top, middle, bottom) to adjust the screen height.
- Secure the screen and adapter frame together using the provided four screws.
- If your dedicated frame is 10.1", first install the screen base, then install the 9" to 10.1" frame adapter, and finally, install your 10.1" dedicated adapter frame.

4.3 Wiring Connections:
- Connect the main wiring harness to the vehicle's factory radio plug.
- Connect the CAN-BUS box (if applicable for your vehicle's features like steering wheel controls).
- Connect the GPS antenna, Wi-Fi/BT antenna, and microphone.
- Connect the included HD reversing camera. Refer to the wiring diagram for the rear view camera:
- Black power plug to the red socket.
- To the Negative (-) of your car's Reversing Lamp Power.
- The two Red wires, to the Positive (+) of your car's Reversing Lamp Power.
- The RCA female to the RCA male.
- The RCA male to the RCA female.
- To your head unit's "REVERSE" wire of reversing camera input trigger. NOTE: no need to connect this wire if your radio comes with CAN-BUS box/decoder.
- To your radio's rear 10-Pin socket.

4.4 CAN-BUS Setup:
After powering up the radio, you need to set CAN-BUS correctly to get your steering wheel controls to work. The procedure is as follows:
- Click "Settings" in the main menu.
- Go to "Factory" and input password 3368.
- Click "Car Model".
- Select "XP->Ford->Mondeo->XP" for Ford Transit Custom models.
- If there is an OEM amplifier in your car, choose the appropriate option.
Wrong or missing CAN-BUS setups can lead to non-functional steering wheel controls. Ensure the CAN-BUS box is connected to the rear power plug beforehand.
5. Initial Setup and Configuration
5.1 Connecting to Wi-Fi:
To access online features like app downloads and streaming, connect your unit to a Wi-Fi network (e.g., mobile hotspot).
- Go to "Settings" > "WLAN".
- Turn on Wi-Fi and select your desired network.
- Enter the password and connect.

5.2 Bluetooth Pairing:
Pair your smartphone via Bluetooth for hands-free calling and audio streaming.
- Go to the Bluetooth app on the head unit.
- Enable Bluetooth on your smartphone and search for available devices.
- Select the head unit (e.g., "Silverado" as renamed in one video) and enter the PIN (default is usually 0000 or 1234).
- Confirm pairing on both devices.
5.3 Date and Time Settings:
To ensure accurate time display:
- Go to "Settings" > "System" > "Date & Time".
- Manually set the date and time if not automatically updated via network.
6. Operating Instructions
6.1 Home Screen and Apps:
The home screen provides quick access to frequently used functions. Swipe to access additional apps. You can customize the home screen with widgets and app shortcuts.
6.2 Wireless CarPlay & Android Auto:
Connect your smartphone wirelessly for an integrated experience.
- Ensure Bluetooth is paired and Wi-Fi is enabled on both devices.
- Open the CarPlay or Android Auto app on the head unit.
- Follow on-screen prompts to connect your phone.

6.3 Radio Broadcasting:
Access FM/AM radio stations.
- Tap the "Radio" icon on the home screen.
- Use the on-screen controls to scan for stations or manually input frequencies.
6.4 Music and Video Playback:
Play music and videos from various sources.
- Music: Use the "Music" app to play audio files from internal storage, USB, or streaming services via connected smartphone.
- Video: Use the "Video" app to play video files from internal storage or USB. Supports Ultra HD video playback.

6.5 Bluetooth Car Phone:
Make and receive calls directly from the head unit after pairing your phone.
- Tap the "Phone" icon.
- Use the dial pad or access your phone's contacts (after syncing) to make calls.
6.6 DSP Sound Engine / Equalizer:
Customize your audio experience.
- Tap the "EQ" icon.
- Adjust the equalizer settings (bass, treble, etc.) or select from preset sound modes.
- Utilize the DSP (Digital Signal Processor) for advanced sound tuning.
6.7 A/C Control Menu:
If supported by your vehicle's CAN-BUS system, you can control the A/C directly from the head unit's screen.
- Access the A/C control menu (usually an icon on the home screen or a dedicated button).
- Adjust temperature, fan speed, and other climate settings.
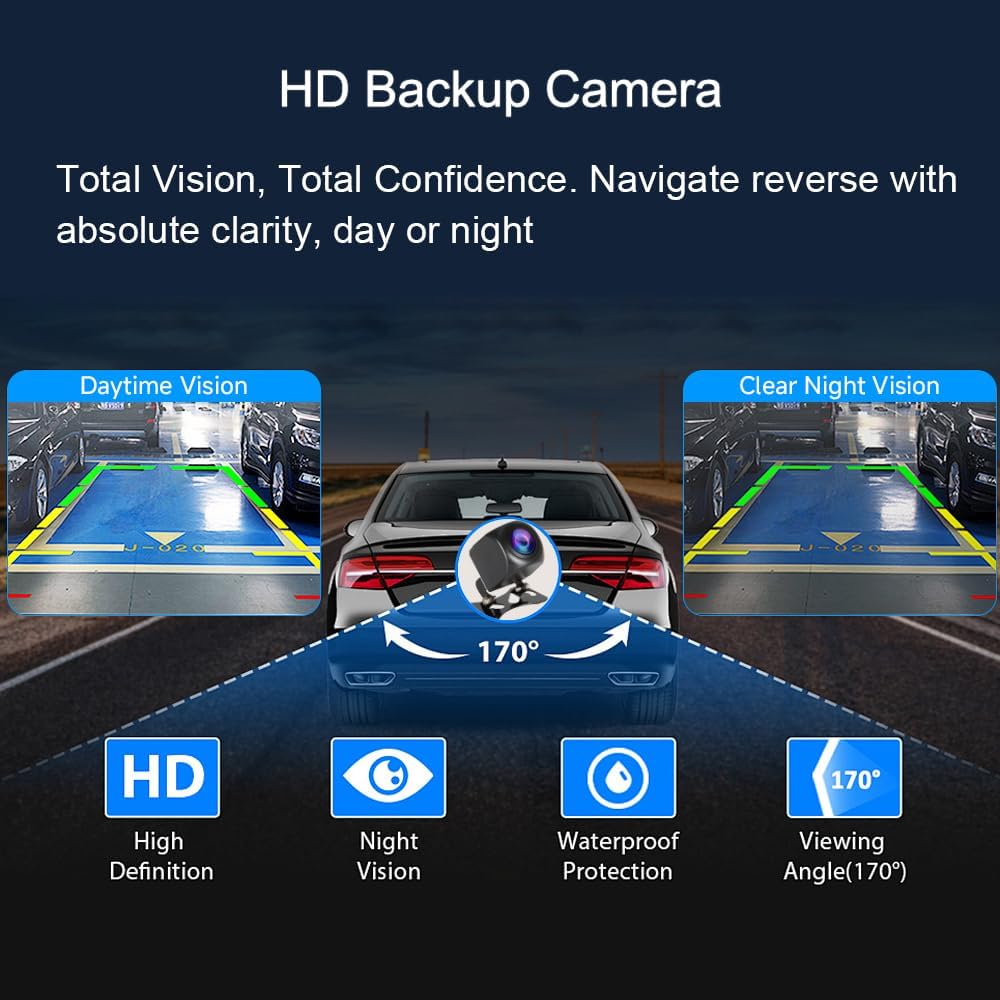
6.8 Backup Camera:
The included HD backup camera provides clear rear vision when reversing.
- The display automatically switches to the camera view when the vehicle is in reverse gear.
- Features include clear night vision, waterproof protection, and a 170° viewing angle.
6.9 Dual Wi-Fi Band Connecting:
The unit supports both 2.4GHz and 5GHz Wi-Fi bands for seamless streaming and browsing.
- Connect to the appropriate Wi-Fi band based on your network's capabilities for optimal performance.
6.10 Steering Wheel Control (SWC):
Program and customize your original car steering wheel control buttons for convenient operation.
- Ensure the CAN-BUS box is correctly configured (refer to Section 4.4).
- Go to "Settings" > "SWC" (Steering Wheel Control) to program the buttons.
7. Maintenance
- Clean the screen with a soft, lint-free cloth. Do not use abrasive cleaners.
- Keep the unit free from dust and moisture.
- Regularly check wiring connections for security.
8. Troubleshooting
8.1 Screen Not Waking Up / Black Screen on Startup:
If the screen remains black on startup and only wakes up when touched, you may need to adjust the "Stay Awake" setting.
- Go to "Settings" > "System" > "Developer Options".
- Enter the password 3368.
- Toggle "Stay Awake" (Screen will never sleep while charging) to ON.
8.2 Incorrect Clock / Date and Time:
If the date and time are incorrect:
- Go to "Settings" > "System" > "Date & Time".
- Manually reset the date and time or ensure "Use network-provided time" is enabled and connected to Wi-Fi.
8.3 Custom Boot Logo:
To set a custom boot logo:
- The image resolution must be 1920x1200 pixels.
- The image format must be in BMP.
- The USB drive folder containing the image must be named "mycar".
- Insert the USB drive into the head unit.
- Go to "Settings" > "Factory" (password 3368) > "Boot Screen Logo".
- Select your desired image from the USB drive and press and hold to set it as the boot logo.
8.4 Changing Home Launcher Theme:
If you wish to change the default home screen theme:
- Go to "Settings" > "Factory" (password 3368).
- Find "Home Launcher Selection".
- Select a different UI (e.g., UI28 is a common default). Note that some themes may not be fully customizable.
9. Specifications
| Feature | Detail |
|---|---|
| Item Weight | 5.94 pounds |
| Product Dimensions | 9.4 x 5.7 x 1.6 inches |
| Display Size | 13.1 Inches |
| Display Resolution | 1920x1280 (2K HD) |
| Operating System | Android 15 |
| CPU | 8-core |
| RAM | 4GB |
| ROM | 64GB |
| Connectivity Technology | Bluetooth 5.0, USB, Dual-band Wi-Fi (2.4GHz & 5GHz) |
| Special Features | Bluetooth, Touchscreen, Wireless Apple CarPlay, Wireless Android Auto, GPS Navigation, DSP Sound Engine |
| Map Type | Worldwide |
| Mounting Type | Dashboard Mount |
| Vehicle Service Type | Car (Ford Transit Custom 2017-2022) |
10. Warranty and Support
Your ASURE 13.1-inch Car Stereo comes with the following warranty:
- 30 Days: Free return and replacement.
- 1 Year: Repair service.
For technical support or warranty claims, please contact ASURE customer service through your retailer or the official ASURE website.