Seizeen RSS-02
Seizeen 6x4.4ft Resin Shed with Floor Instruction Manual
Model: RSS-02 | Brand: Seizeen
1. Introduction
This manual provides detailed instructions for the assembly, operation, and maintenance of your Seizeen 6x4.4ft Resin Shed with Floor (Model RSS-02). Please read this manual thoroughly before beginning assembly or use to ensure safe and correct installation and to maximize the lifespan of your product.
The Seizeen Resin Shed is designed for outdoor storage, offering a durable and weather-resistant solution for various items such as garden tools, lawn equipment, bicycles, and patio furniture. Its robust construction and user-friendly features aim to provide a secure and organized storage space.

Figure 1.1: Exterior view of the Seizeen 6x4.4ft Resin Shed. This image shows the shed's overall design, including its gray resin panels, white trim, double doors, and a side window, situated in an outdoor setting.
2. Safety Information
Please observe the following safety precautions during assembly and use of the shed:
- Assembly: It is recommended that two people work together for assembly due to the size and weight of components. Wear appropriate safety gear, such as gloves, during assembly.
- Site Preparation: Ensure the shed is assembled on a flat, level, and stable surface to prevent structural instability.
- Package Handling: The product will be shipped in two separate packages, which may arrive at different times. Handle packages with care due to potential weight.
- Ventilation: Ensure vents remain unobstructed to promote airflow and prevent dampness inside the shed.
- Weight Capacity: Do not exceed the roof's weight capacity of 17 PSF (Pounds per Square Foot) to prevent damage.
- Children and Pets: Keep children and pets away from the assembly area. Do not allow children to play inside the shed unsupervised.
- Tools: Use appropriate tools for assembly. A drill and driver are recommended for efficiency, as some holes may require drilling.
3. Package Contents
Before beginning assembly, verify that all components are present and undamaged. Refer to the detailed parts list provided in the separate installation guide. The product is shipped in two packages.
- Labeled resin panels (walls, roof, doors)
- PVC flooring sections
- Frame components (Alloy Steel)
- Lockable door hardware (latch, padlock)
- Window panel
- Ventilation grilles
- Fasteners and connectors
- Two pairs of assembly gloves
- Step-by-step installation guide

Figure 3.1: Illustration showing the shed being delivered in two separate packages, labeled "BOX-1" and "BOX-2". These packages may arrive at different times.
4. Setup and Assembly
Follow the detailed step-by-step installation guide included with your product. The following points provide general guidance:
- Preparation:
- Choose a flat, level, and stable location for the shed.
- Unpack all components and verify against the parts list. Keep labeled parts organized.
- Ensure you have necessary tools: drill, driver, rubber mallet (optional, for gentle tapping), and the provided gloves.
- Base Assembly:
- Assemble the base frame according to the instructions.
- Install the PVC flooring sections onto the base. The flooring provides an additional barrier against moisture and dirt.
- Wall Panel Installation:
- Attach the wall panels to the base frame. Ensure panels are correctly oriented as per the guide.
- Some panels may require light bending or gentle tapping with a rubber mallet to fit snugly. Avoid excessive force to prevent damage.
- Secure panels using the provided fasteners. Be prepared to drill pilot holes if necessary, as indicated in the manual.
- Roof Assembly:
- Assemble the roof structure and attach it to the wall panels. The sloped roof design aids in water drainage.
- Install the built-in vents in the designated locations to ensure proper air circulation.
- Door and Window Installation:
- Install the double doors and the side window.
- Attach the lockable door hardware, including the latch and padlock, for security.
- Final Checks:
- Ensure all screws and fasteners are tightened securely.
- Check that doors open and close smoothly and the lock mechanism functions correctly.

Figure 4.1: Diagram illustrating the shed's dimensions (71.3"W x 52.8"D x 82.7"H) and key assembly tips, including the recommendation for two people and the provision of gloves.
5. Operating Instructions
Your Seizeen Resin Shed is designed for versatile outdoor storage. Follow these guidelines for optimal use:
- Storage Capacity: The shed offers approximately 137.7 cubic feet of storage space. Organize items efficiently to maximize usable area.
- Security: Utilize the lockable doors to secure your stored items. Always ensure the doors are properly latched and locked when not in use.
- Ventilation: The built-in vents promote air circulation. Avoid blocking these vents to prevent moisture buildup and maintain a fresh interior environment.
- Natural Light: The side window allows natural light into the shed, reducing the need for artificial lighting during the day.
- Floor Protection: The integrated PVC floor provides a barrier against ground moisture and dirt, keeping your belongings clean and dry.

Figure 5.1: Interior view of the shed demonstrating its spacious storage capacity, holding items like a lawnmower, tools on shelves, and other equipment. This image highlights its multi-purpose use as a tool room, pet home, utility room, or garbage chamber.

Figure 5.2: Detailed view of key shed features, including smooth eaves for water runoff, a secure door lock design with a padlock, a fixed door latch for stability, and built-in vents for air circulation.
6. Maintenance
The Seizeen Resin Shed is designed for low maintenance. Regular care will ensure its longevity and appearance:
- Cleaning: Clean the exterior surfaces periodically with mild soap and water. Avoid abrasive cleaners or harsh chemicals that could damage the resin material.
- Ventilation: Regularly check that the vents are clear of debris (leaves, dirt, etc.) to maintain proper airflow.
- Drainage: Ensure the area around the shed is clear to allow for proper water drainage from the sloped roof.
- Inspection: Periodically inspect all fasteners and connections to ensure they remain tight. Re-tighten if necessary.
- Weather Resistance: The thermoplastic synthetic resin is corrosion, water, and UV-resistant. No special treatments are required for weather protection.

Figure 6.1: Visual representation of the shed's waterproof and UV-resistant features. The image shows the shed under both sunny and rainy conditions, highlighting its durability against various weather elements.
7. Troubleshooting
| Problem | Possible Cause | Solution |
|---|---|---|
| Difficulty aligning panels during assembly. | Panels may require precise alignment or gentle force. | Ensure the base is perfectly level. Lightly bend slots or gently tap panels with a rubber mallet to achieve a snug fit. Work with a second person for better alignment. |
| Parts labels do not match the instruction manual. | Inconsistencies in labeling across production batches. | Refer to the visual diagrams in the instruction manual to identify parts by shape and size rather than relying solely on labels. If confusion persists, contact customer support. |
| Shed feels unstable after assembly. | Uneven ground or loose fasteners. | Verify that the shed is placed on a completely flat and level surface. Check and tighten all screws and connections. |
| Water accumulation inside the shed. | Blocked vents or improper sealing. | Ensure vents are clear. Check for any gaps in panel connections or around the window/doors and seal if necessary. Confirm the shed is on level ground to prevent water pooling at the base. |
8. Specifications
- Brand: Seizeen
- Model: RSS-02
- Color: Gray
- Material: Thermoplastic Synthetic Resin (panels), Alloy Steel (frame), PVC (floor)
- Product Dimensions (External): 71.3" W x 52.8" D x 82.7" H (181.1 cm W x 134.1 cm D x 210.1 cm H)
- Storage Capacity: Approximately 137.7 cu.ft
- Item Weight: 128 Pounds (58 kg)
- Roof Weight Capacity: 17 PSF
- Water Resistance Level: Waterproof
- Assembly Required: Yes (2 people recommended)
- Door Style: Double Hinged, Lockable
- Features: Integrated PVC floor, side window, built-in vents, UV resistant.
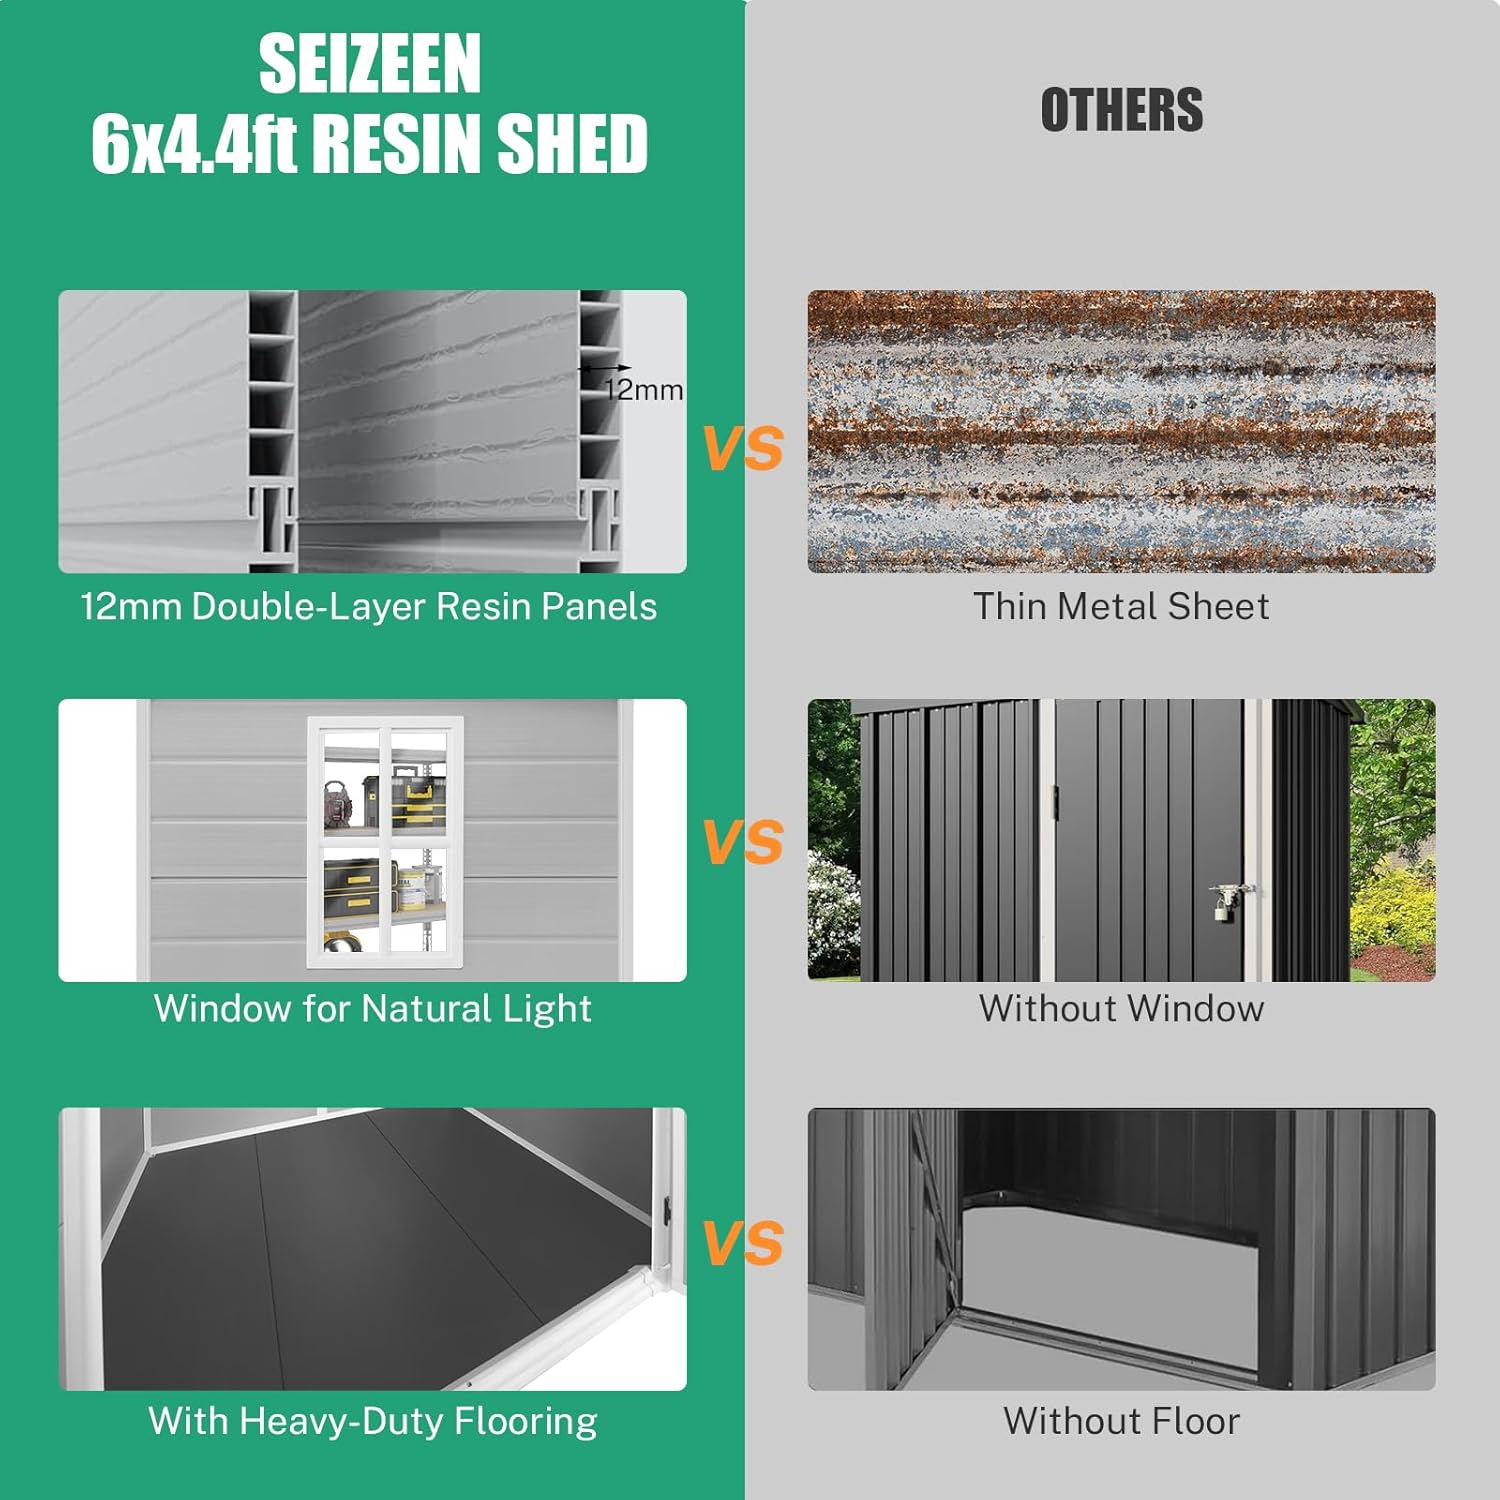
Figure 8.1: Feature comparison highlighting the Seizeen 6x4.4ft Resin Shed's advantages: 12mm double-layer resin panels, a window for natural light, and heavy-duty flooring, contrasting with thinner metal sheets, sheds without windows, and sheds without floors.
9. Warranty and Support
For warranty information, missing parts, or technical assistance, please contact Seizeen customer support. Refer to your purchase documentation or the Seizeen official website for specific warranty terms and contact details.
Contact Information:
- Website: Visit the Seizeen Store on Amazon
- Email/Phone: Please refer to the contact details provided with your purchase receipt or on the official Seizeen website.
Ask a question about this manual
Ask about setup, troubleshooting, compatibility, parts, safety, or missing instructions. Manuals+ will review the question and use this page’s manual context to help answer it.