1. Introduction
This manual provides detailed instructions for the installation, operation, maintenance, and troubleshooting of your Wisoqu H511 Gaming Motherboard. This motherboard is designed to support 10th and 11th Generation Intel Core i3, i5, i7, i9, and Celeron series processors with an LGA 1200 socket, featuring dual-channel DDR4 memory support and various expansion options for a robust computing experience.
2. Safety Information
- Always disconnect the power supply from your computer before installing or removing any components.
- Wear an anti-static wrist strap or frequently touch a grounded metal object to discharge static electricity, which can damage sensitive electronic components.
- Handle the motherboard by its edges to avoid touching components or circuits.
- Keep the motherboard and other components away from moisture and extreme temperatures.
- Ensure proper ventilation within your computer case to prevent overheating.
- Do not attempt to repair the motherboard yourself. Refer to qualified service personnel.
3. Package Contents
Verify that all items are present in your package. If any items are missing or damaged, contact your retailer.
- Wisoqu H511 Gaming Motherboard
- SATA Data Cables
- I/O Shield
- User Manual (this document)
- Driver CD/USB (may vary by package)
4. Product Overview
The Wisoqu H511 Gaming Motherboard features a robust design for 10th and 11th Gen Intel processors. Key features include:
- CPU Compatibility: Supports 10th and 11th Gen Intel Core i3, i5, i7, i9, and Celeron processors (LGA 1200 socket).
- Memory: Dual-channel DDR4 memory slots, supporting up to 64GB at speeds up to 3200 MHz.
- Storage: 3 Serial ATA 3.0 ports and 2 NVME-M.2 interfaces for high-speed storage.
- Expansion: 1 PCI Express x16 slot for graphics cards and 1 PCI Express x1 slot for other expansion cards.
- Connectivity: Integrated LAN, multiple USB ports (USB 3.0 and USB 2.0), and a dedicated WiFi interface.
- Video Output: HD Multimedia Interfaces (HDMI, DP) for integrated graphics output (requires CPU with integrated graphics).

Figure 4.1: Front view of the Wisoqu H511 Gaming Motherboard, showcasing the LGA 1200 socket, DDR4 slots, and various connectors.

Figure 4.2: Overview of the Wisoqu H511 Motherboard highlighting key ports and components such as USB 3.0, HD Multimedia Interfaces, DP, USB 2.0, and Audio ports.

Figure 4.3: Close-up view of the LGA 1200 CPU socket, where the processor is installed.
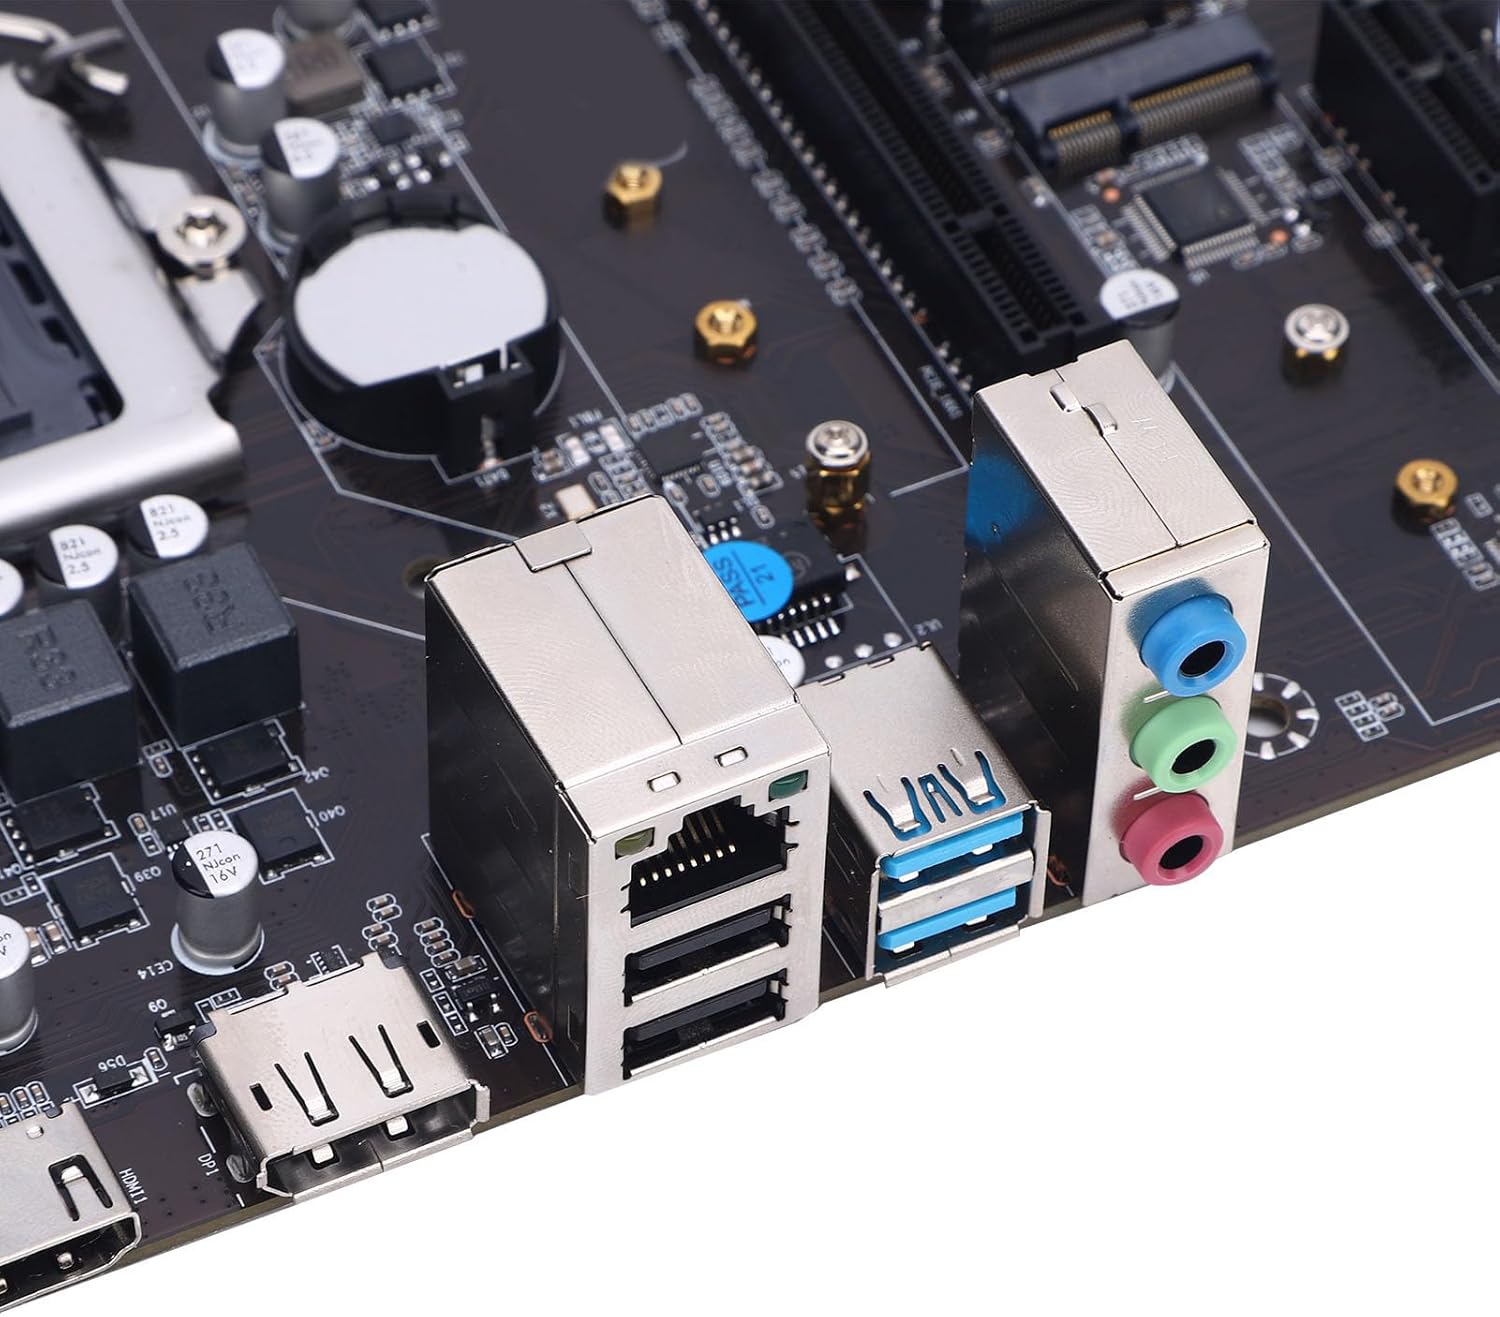
Figure 4.4: Detailed view of the rear I/O panel, showing LAN, USB, and audio ports.
5. Setup and Installation
Follow these steps carefully to install your Wisoqu H511 Gaming Motherboard and its components.
5.1 CPU Installation
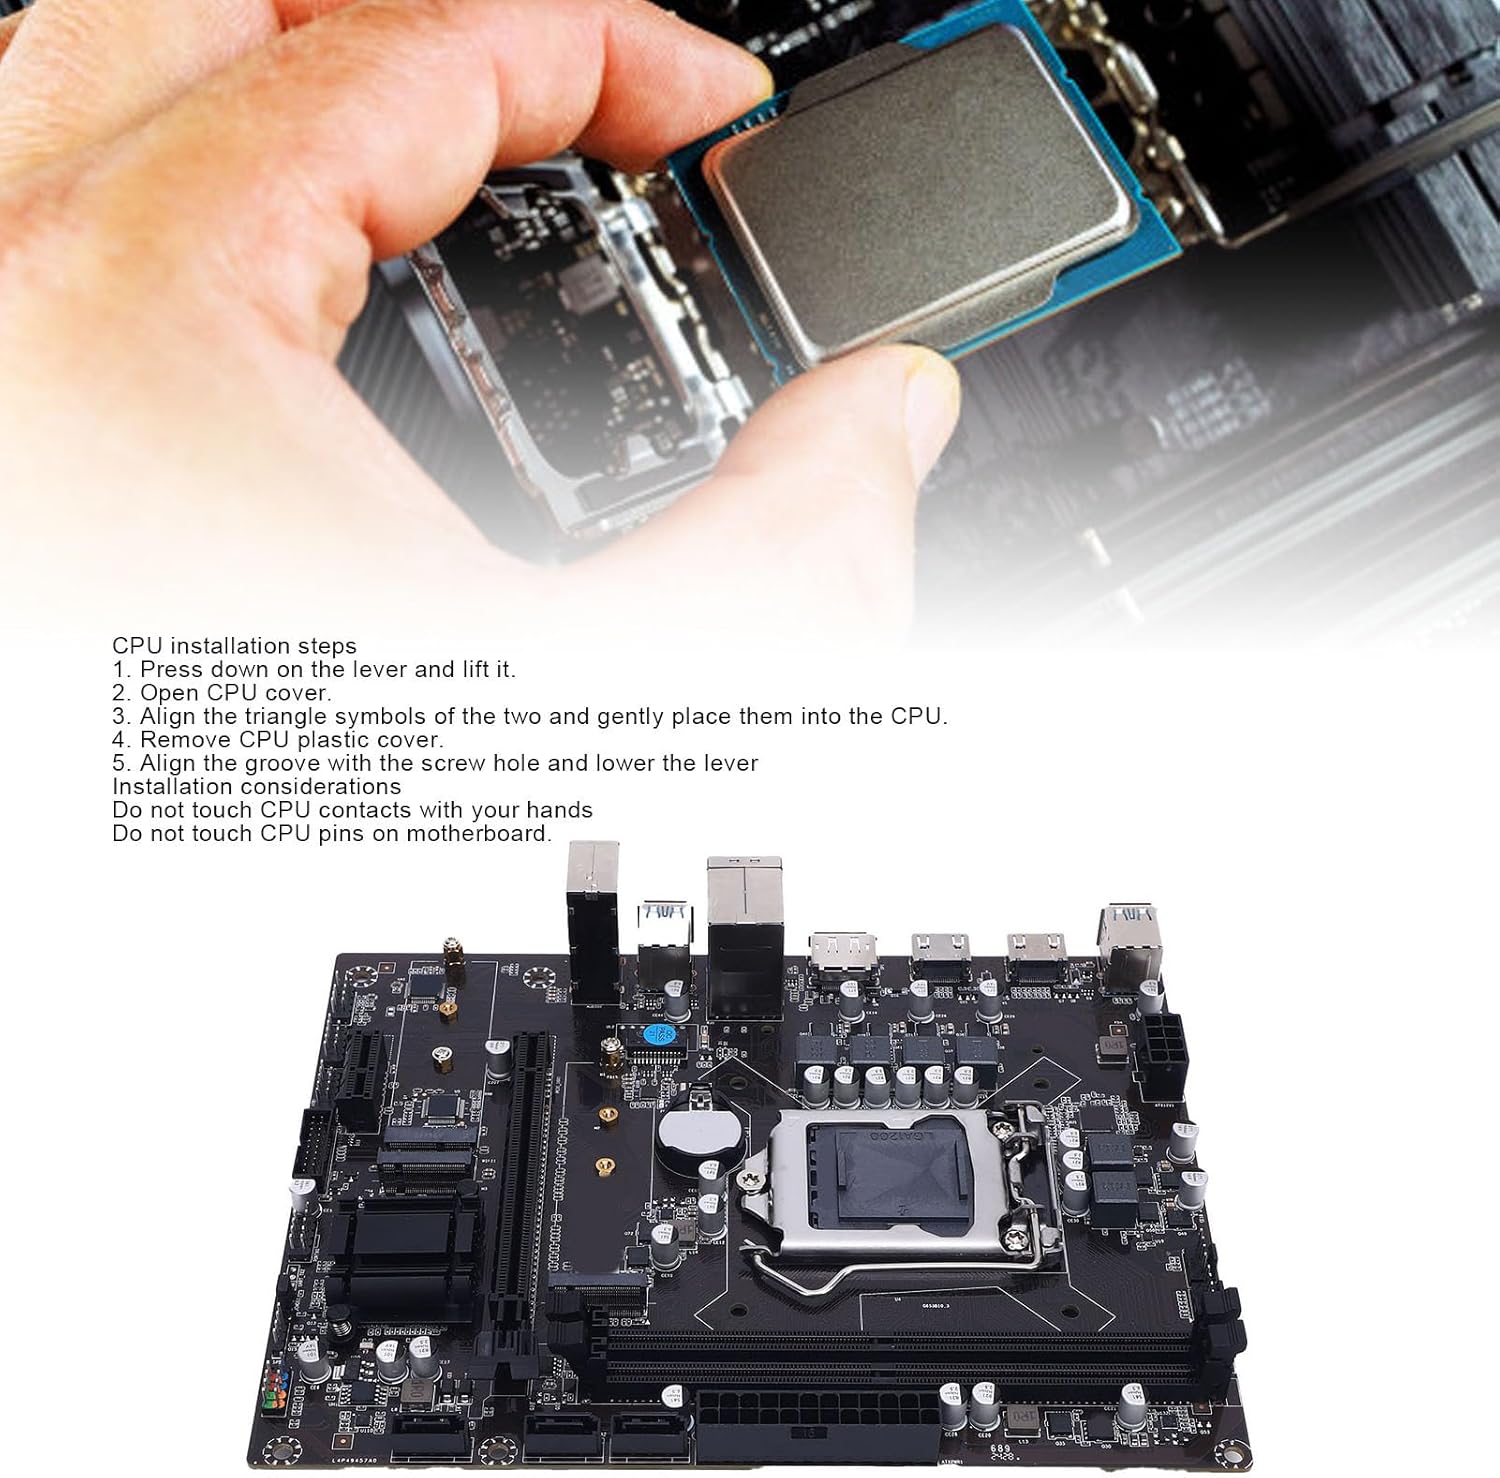
Figure 5.1: Illustrates the process of installing a CPU into the LGA 1200 socket.
- Open CPU Socket: Press down on the lever located next to the CPU socket and gently lift it to open the socket cover.
- Remove Plastic Cover: Carefully remove the plastic protective cover from the CPU socket.
- Align CPU: Align the triangle symbols on the CPU and the socket. Gently place the CPU into the socket, ensuring it sits flush without force.
- Close Socket: Lower the metal cover and then press down the lever to secure the CPU in place.
Important Considerations:
- Do not touch the CPU contacts with your hands.
- Do not touch the CPU pins on the motherboard socket.
- Apply thermal paste to the CPU surface before installing the CPU cooler.
5.2 RAM Installation
- Open the clips at both ends of the DDR4 memory slots.
- Align the notch on the RAM module with the key in the memory slot.
- Press down firmly on both ends of the RAM module until the clips snap into place.
5.3 Storage Device Installation (SATA & M.2)
SATA Drives:
- Connect one end of the SATA data cable to a SATA 3.0 port on the motherboard.
- Connect the other end of the SATA data cable to your SSD or HDD.
- Connect a SATA power cable from your power supply unit (PSU) to the drive.
NVMe M.2 Drives:
- Locate the NVME-M.2 interface slots on the motherboard.
- Remove the M.2 standoff screw.
- Insert the M.2 drive into the slot at a slight angle.
- Gently push down the M.2 drive and secure it with the standoff screw.
5.4 Power Connections
- Connect the 24-pin ATX main power connector from your PSU to the corresponding port on the motherboard.
- Connect the 8-pin (or 4-pin) ATX 12V CPU power connector from your PSU to the port near the CPU socket.
5.5 Graphics Card and Expansion Cards
- Insert your PCI Express x16 graphics card into the primary PCIe x16 slot. Ensure it is seated firmly and secured with the case latch or screw.
- Connect any necessary PCIe power cables from your PSU to the graphics card.
- Install any other PCI Express x1 expansion cards into the available slots as needed.
5.6 Front Panel Connectors
Connect the front panel cables from your computer case (power button, reset button, HDD LED, power LED, front USB, front audio) to the corresponding headers on the motherboard. Refer to the motherboard diagram for exact pin locations.
6. Operating Instructions
6.1 First Boot and BIOS Setup
- After assembling all components, connect your monitor, keyboard, and mouse.
- Power on your computer. Immediately press the DEL or F2 key (common BIOS entry keys) repeatedly to enter the BIOS/UEFI setup utility.
- In the BIOS, verify that all installed components (CPU, RAM, storage drives) are detected correctly.
- Set the boot order to prioritize your operating system installation media (USB drive or DVD).
- Save changes and exit the BIOS. The system will restart.
6.2 Operating System Installation
Follow the on-screen instructions to install your preferred operating system (e.g., Windows, Linux). Ensure you install the OS on your primary storage drive.
6.3 Driver Installation
After installing the operating system, install the necessary drivers for your motherboard components. These typically include chipset drivers, LAN drivers, audio drivers, and any specific drivers for integrated WiFi (if applicable). Drivers can usually be found on the manufacturer's website or on the provided driver CD/USB.
7. Maintenance
7.1 Cleaning
- Regularly clean the interior of your computer case to prevent dust buildup, which can lead to overheating.
- Use compressed air to remove dust from heatsinks, fans, and motherboard components.
- Ensure the computer is powered off and unplugged before cleaning.
7.2 BIOS/UEFI Updates
Periodically check the Wisoqu support website for updated BIOS/UEFI versions. BIOS updates can improve system stability, compatibility, and performance. Follow the instructions provided by Wisoqu carefully when performing a BIOS update to avoid system damage.
7.3 Driver Updates
Keep your system drivers updated to ensure optimal performance and compatibility with new hardware or software. You can usually find the latest drivers on the Wisoqu website or the component manufacturers' websites (e.g., Intel for chipset drivers).
8. Troubleshooting
This section provides solutions to common issues you might encounter.
8.1 No Power / System Does Not Boot
- Ensure all power cables (24-pin ATX, 8-pin CPU) are securely connected to the motherboard and PSU.
- Check that the PSU is switched on and connected to a working power outlet.
- Verify that the front panel power button cable is correctly connected to the motherboard header.
- Try booting with only essential components (CPU, one RAM stick, graphics card if no integrated graphics) to isolate the issue.
8.2 No Display Output
- Ensure your monitor is connected to the correct video output port (either on the graphics card or the motherboard's integrated graphics ports).
- If using integrated graphics, ensure your CPU supports it.
- Reseat the graphics card and check its power connections.
- Try a different display cable or monitor.
8.3 System Instability / Crashes
- Check RAM modules are properly seated. Test with one RAM stick at a time.
- Ensure CPU cooler is properly installed and thermal paste is applied. Monitor CPU temperatures.
- Update motherboard chipset drivers and graphics card drivers.
- Check for BIOS updates.
8.4 WiFi Connectivity Issues
- Ensure the WiFi module (if external) is correctly installed in the dedicated WiFi interface slot.
- Install the correct WiFi drivers for your operating system.
- Check if the WiFi antenna(s) are securely connected.
- Verify that WiFi is enabled in the operating system and BIOS/UEFI settings.
- If experiencing persistent issues, consider using a wired LAN connection or an alternative WiFi adapter.
8.5 Missing Parts / Used Appearance
If your product arrived with missing parts, an unsealed box, or appears used, immediately contact your retailer or the seller for assistance. Do not attempt to use or install the product if it seems tampered with or incomplete.
9. Specifications
| Feature | Description |
|---|---|
| Brand | Wisoqu |
| Model Name | H511 (Wisoquf4m67wrhin) |
| CPU Socket | LGA 1200 |
| Compatible Processors | Intel Core i3/i5/i7/i9 (10th & 11th Gen), Intel Celeron (10th & 11th Gen) |
| Chipset Type | Intel |
| RAM Memory Technology | DDR4 |
| Memory Slots | 2 x 288-pin DDR4 (Dual Channel) |
| Max Memory Capacity | 64 GB |
| Memory Clock Speed | Up to 3200 MHz (D3200/2933/2800/2666/2400/2133 MHz) |
| Graphics Card Interface | PCI Express x16 |
| Expansion Slots | 1 x PCI Express x16, 1 x PCI Express x1 |
| Storage Interfaces | 3 x Serial ATA 3.0 ports, 2 x NVME-M.2 interfaces |
| Network | Integrated LAN, 1 x WiFi interface |
| USB Ports | Total 6 USB ports (various USB 3.0 and USB 2.0) |
| Video Output | HD Multimedia Interfaces (requires CPU with integrated graphics) |
| Main Power Connector | 24-Pin |
| Form Factor | ATX |
10. Warranty Information
Wisoqu products are covered by a standard manufacturer's warranty. The specific terms and duration of the warranty may vary by region and retailer. Please retain your proof of purchase for warranty claims. For detailed warranty information, refer to the warranty card included with your product or visit the official Wisoqu website.
Extended protection plans may be available for purchase separately through your retailer.
11. Technical Support
If you encounter issues that cannot be resolved using the troubleshooting guide, please visit the official Wisoqu support website for FAQs, driver downloads, and further assistance. You may also contact your retailer for support.
Wisoqu Official Website: Wisoqu Store on Amazon (for product information and potential support links)