Wisoqu H81
Wisoqu H81 Gaming Motherboard User Manual
Model: H81 (Wisoquwxf8a127od)
1. Introduction
This manual provides detailed instructions for the installation, operation, and maintenance of your Wisoqu H81 Gaming Motherboard. The H81 motherboard is designed to support Intel 4th generation Core i3, i5, i7, E3 V3, Celeron G, and G series 22nm CPU processors with an LGA 1150 socket. It features DDR3 memory support, an M.2 interface, and integrated LAN and audio capabilities.
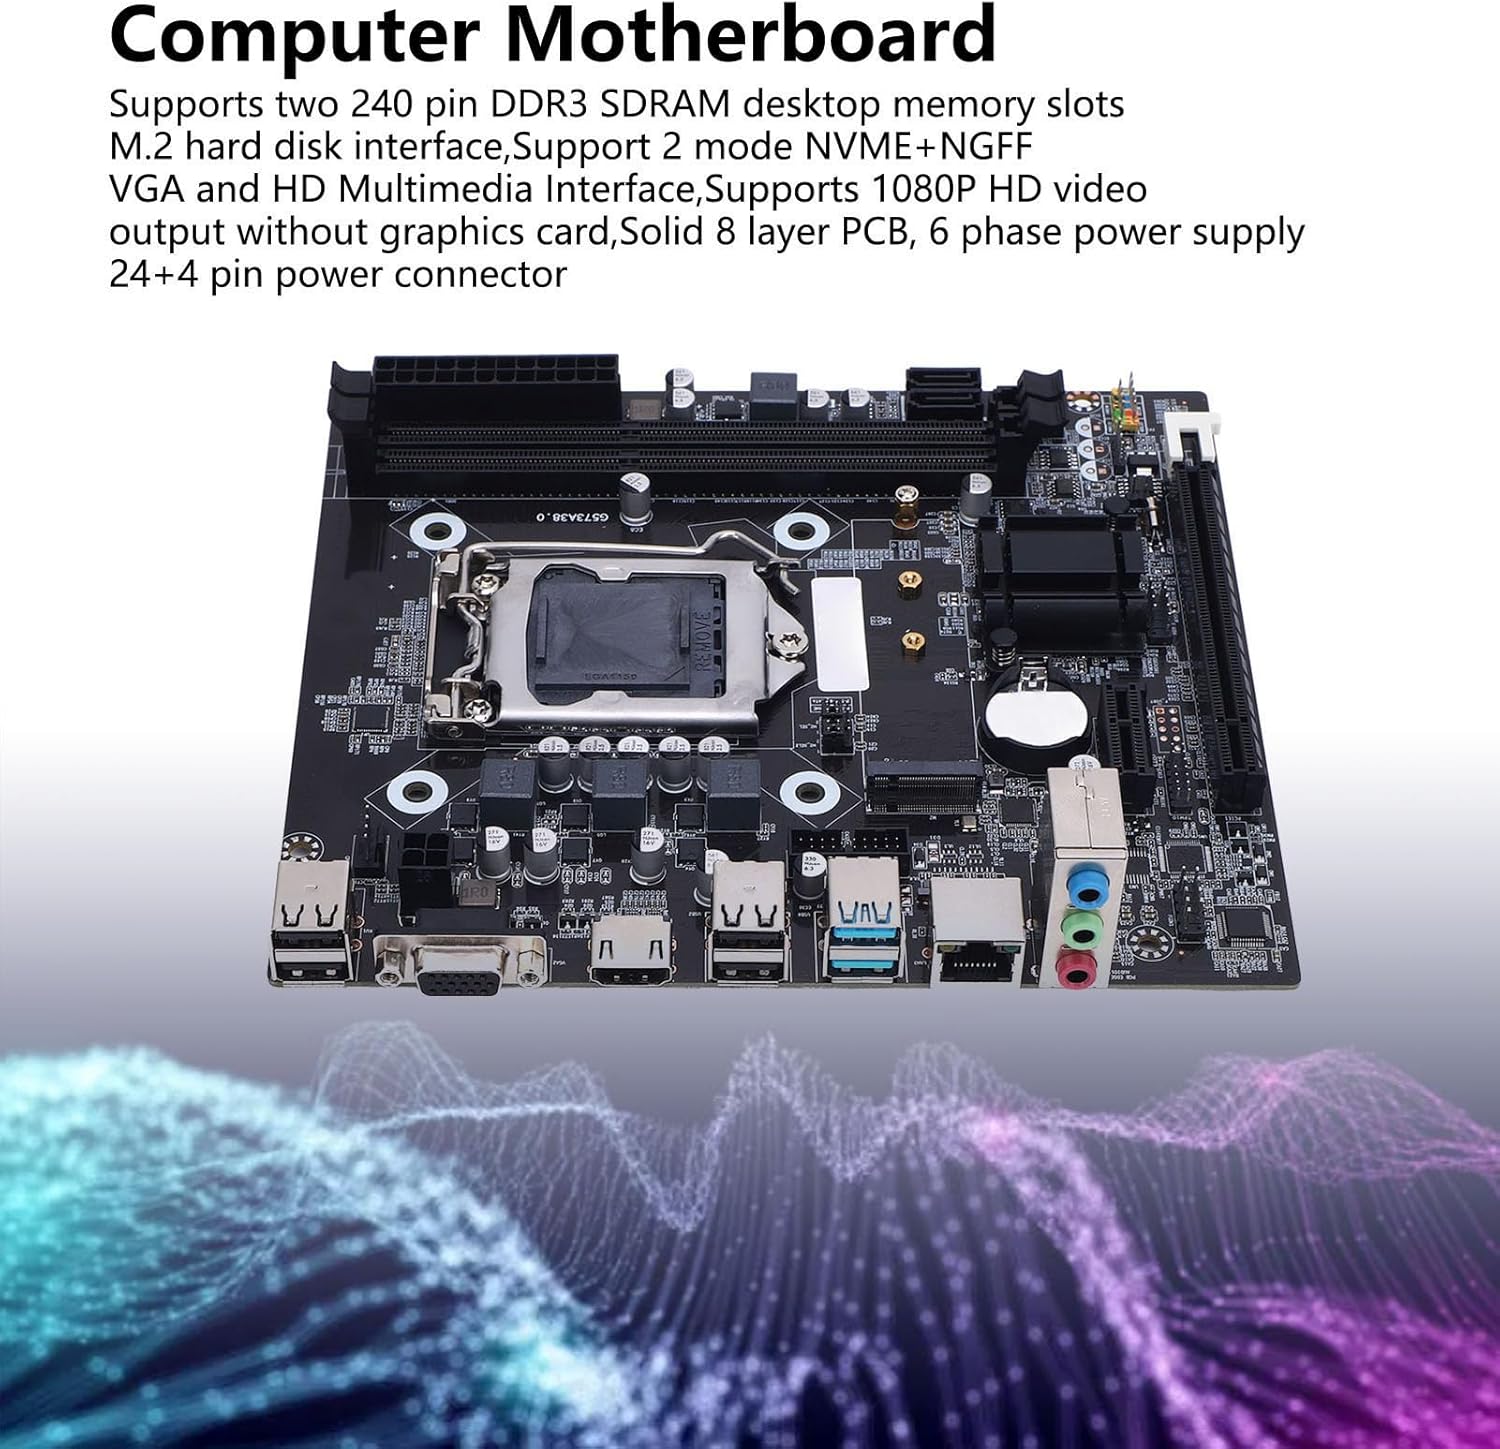
Figure 1.1: Wisoqu H81 Motherboard highlighting key features such as DDR3 memory slots, M.2 interface, VGA, HD Multimedia Interface, 8-layer PCB, and 6-phase power supply.
Key Features:
- LGA 1150 Socket: Supports Intel Core i3/i5/i7 4th generation, E3 V3, Celeron G, and G series 22nm CPUs.
- DDR3 Memory: Two 240-pin DDR3 SDRAM slots, supporting up to 16GB in dual-channel architecture (1066/1333/1600 MHz).
- M.2 Interface: High-speed M.2 interface with jumper support for NVMe and NGFF modes.
- Storage Options: 1x Serial ATA 3.0 (6GB/s) port and 2x Serial ATA 2.0 (3GB/s) ports.
- Expansion Slots: 1x PCI Express x16 slot and 1x PCI Express x1 slot.
- Integrated Graphics Output: VGA and HD Multimedia Interface for 1080P video output (requires CPU with integrated graphics).
- High Performance Design: 8-layer PCB, 6-phase power design, and solid capacitors for enhanced stability and lifespan.
2. Setup and Installation
Before beginning installation, ensure your system is powered off and disconnected from the power source. Handle the motherboard by its edges to avoid static discharge.
2.1. CPU Installation
Follow these steps carefully to install your LGA 1150 CPU onto the motherboard.
- Open CPU Socket: Gently press down on the lever next to the CPU socket and lift it to open the CPU cover.
- Align CPU: Carefully align the triangular symbol on your CPU with the corresponding triangle on the CPU socket. Place the CPU into the socket without forcing it.
- Remove Plastic Cover: Once the CPU is seated, remove the protective plastic cover from the socket.
- Secure CPU: Align the groove with the screw hole and lower the lever to secure the CPU in place.
Important: Do not touch the CPU contacts or the CPU pins on the motherboard with your hands. Ensure proper alignment to prevent damage.

Figure 2.1: Visual guide for CPU installation, detailing steps from opening the socket to securing the processor.
2.2. Memory (RAM) Installation
The motherboard supports two 240-pin DDR3 SDRAM modules. For optimal performance, install memory modules in pairs for dual-channel operation.
- Open Clips: Push open the retention clips at both ends of the DDR3 memory slot.
- Align Module: Align the notch on the DDR3 memory module with the key in the memory slot.
- Insert Module: Press down firmly on both ends of the memory module until the retention clips snap into place.

Figure 2.2: The two 240-pin DDR3 SDRAM memory slots on the H81 motherboard.
2.3. Storage Device Installation (M.2 and SATA)
The motherboard provides an M.2 slot and SATA ports for storage devices.
- M.2 Drive: Insert the M.2 NVMe or NGFF drive into the M.2 slot at an angle, then gently push it down and secure it with the provided screw. Ensure jumpers are set correctly for NVMe/NGFF mode if applicable.
- SATA Drives: Connect your SATA 3.0 (6GB/s) or SATA 2.0 (3GB/s) drives to the corresponding ports using SATA data cables. Connect power from your power supply to the SATA drives.

Figure 2.3: The high-speed M.2 interface on the H81 motherboard, supporting NVMe and NGFF drives.
2.4. Power Connections
Connect the main 24-pin ATX power connector and the 4-pin ATX 12V power connector from your power supply to the respective ports on the motherboard.
2.5. Peripheral Connections
Connect your case's front panel connectors (power button, reset button, USB ports, audio jacks) to the corresponding headers on the motherboard. Refer to your case manual for specific pin assignments.
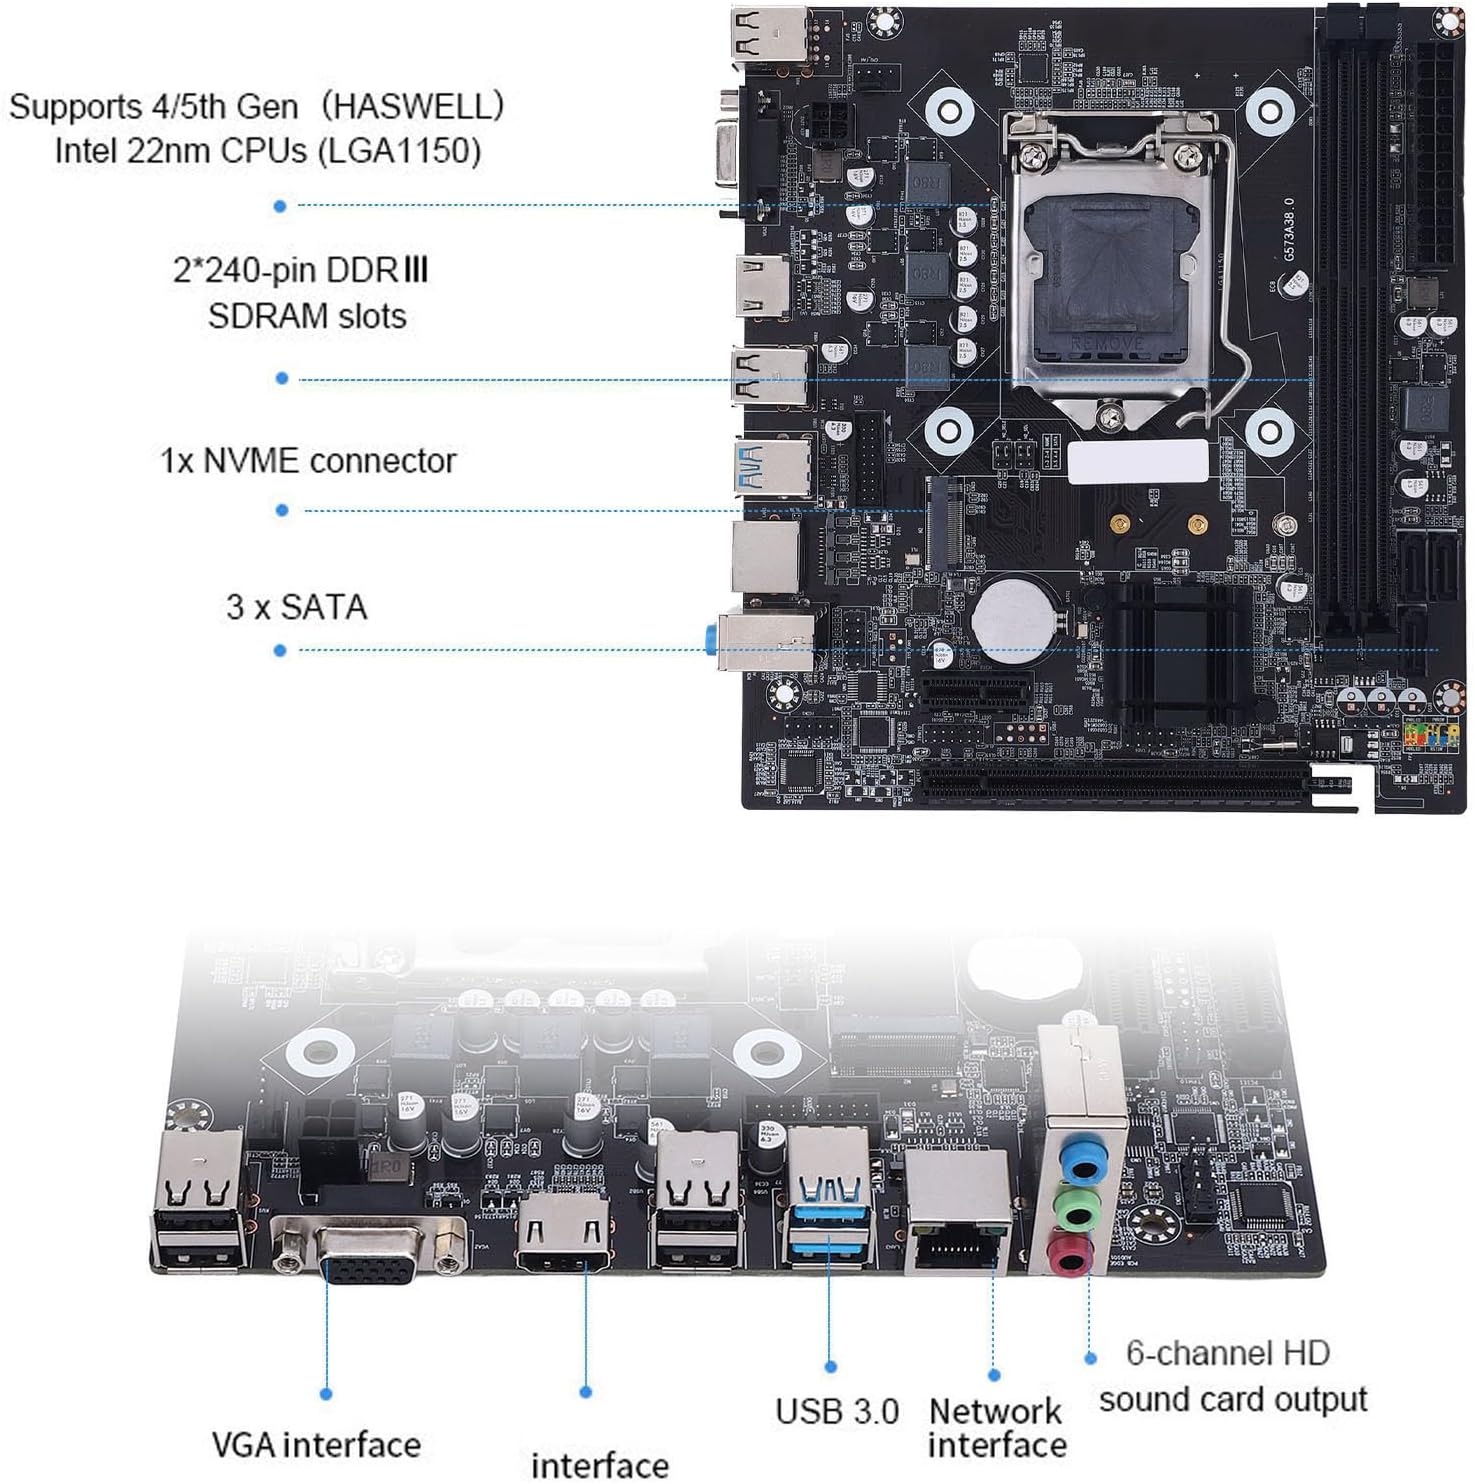
Figure 2.4: Overview of the motherboard's layout, including 240-pin DDR3 slots, NVMe connector, SATA ports, and I/O interfaces.
3. Operating Instructions
3.1. First Boot and BIOS Setup
After assembling your system, connect a monitor, keyboard, and mouse. Power on the system. During startup, press the designated key (usually DEL or F2) to enter the BIOS/UEFI setup utility. Here you can configure boot order, system time, and other hardware settings.
3.2. Integrated Graphics Output
The H81 motherboard features VGA and HD Multimedia Interface ports for video output. To utilize these, your installed CPU must have integrated graphics. Connect your display to either the VGA or HD Multimedia Interface port on the motherboard's I/O panel.
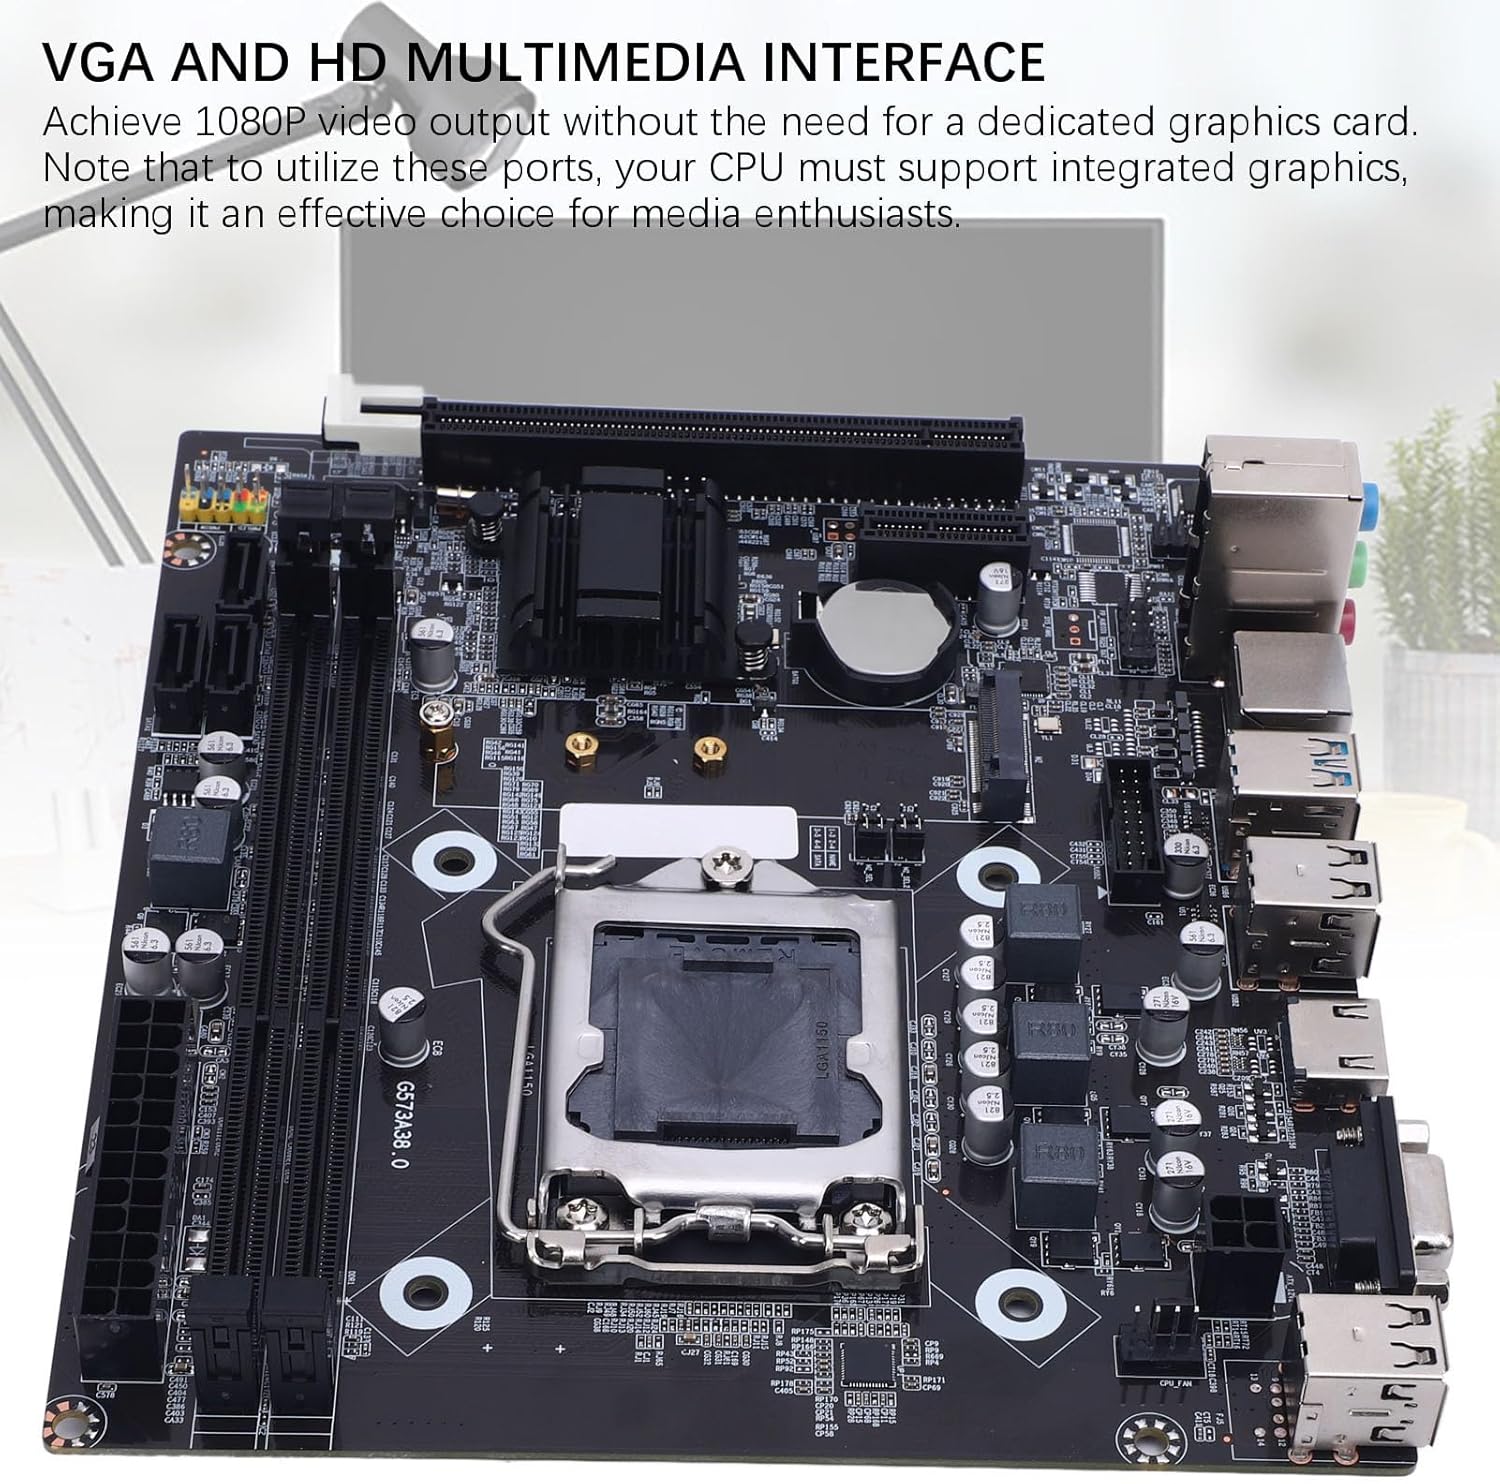
Figure 3.1: The VGA and HD Multimedia Interface ports on the H81 motherboard, enabling 1080P video output with compatible CPUs.
4. Maintenance
Proper maintenance ensures the longevity and stable operation of your motherboard.
- Dust Removal: Regularly clean dust from inside your computer case using compressed air. Pay attention to heatsinks and fan areas. Ensure the system is powered off and unplugged before cleaning.
- BIOS Updates: Periodically check the manufacturer's website for BIOS updates. BIOS updates can improve compatibility, stability, and performance. Follow the update instructions carefully to avoid system damage.
- Environmental Conditions: Operate the motherboard in a well-ventilated area, away from direct sunlight, excessive heat, and moisture.
5. Troubleshooting
This section addresses common issues you might encounter.
- No Power/No Boot:
- Check all power connections (24-pin ATX, 4-pin ATX 12V) are securely seated.
- Ensure the power supply is switched on and functioning correctly.
- Verify the front panel power button connector is correctly attached to the motherboard header.
- No Display:
- Ensure the monitor is connected to the correct video output (VGA or HD Multimedia Interface on the motherboard, or a dedicated graphics card if installed).
- Confirm your CPU has integrated graphics if using motherboard video outputs.
- Reseat memory modules. Incorrectly seated RAM is a common cause of no display.
- If using a dedicated graphics card, ensure it is properly seated and has power.
- Component Not Detected (e.g., HDD, SSD, RAM):
- Check all data and power cables for the component.
- Reseat the component (e.g., RAM, M.2 SSD).
- Verify BIOS settings for storage devices (SATA mode, M.2 detection).
- System Instability/Crashes:
- Ensure all components are properly cooled. Check CPU cooler and case fan operation.
- Verify memory compatibility and stability. Run memory diagnostic tools.
- Check for loose connections or improperly seated components.
6. Specifications
Detailed technical specifications for the Wisoqu H81 Gaming Motherboard.
| Feature | Specification |
|---|---|
| Model | H81 (Wisoquwxf8a127od) |
| Material | PCB |
| CPU Socket | LGA 1150 |
| CPU Support | Intel Core i3/i5/i7 4th generation, E3 V3 series, Celeron G series, G series 22nm CPU processors |
| Memory Slots | 2 x 240-pin DDR3 SDRAM slots |
| Max Memory Support | 16GB (2 channel DDR3 1066/1333/1600 MHz) |
| Storage Ports | 1 x Serial ATA 3.0 (6GB/s), 2 x Serial ATA 2.0 (3GB/s) |
| M.2 Interface | 1 x M.2 slot (NVMe+NGFF compatible) |
| Integrated LAN | Realtek Onboard 10/100 Mbps LAN |
| Expansion Slots | 1 x PCI Express x16, 1 x PCI Express x1 |
| Integrated Sound Card | Realtek ALC 6 channel HD sound codec |
| I/O Ports | 4 x USB 2.0, 2 x USB 3.0, 1 x VGA, 1 x HD Multimedia Interface, 1 x RJ45, 1 x 3-in-1 sound port |
| Power Ports | 1 x 24-pin ATX, 1 x 4-pin ATX 12V |
| Form Factor | M-ATX (17 x 19 cm / 6.7 x 7.5 inches) |
| Item Weight | 1.01 pounds |
| Package Dimensions | 10.24 x 7.87 x 1.97 inches |
7. Warranty and Support
For warranty information and technical support, please refer to the documentation included with your purchase or visit the official Wisoqu website. Keep your proof of purchase for warranty claims.
For further assistance, you may contact Wisoqu customer service through their official channels.
Ask a question about this manual
Ask about setup, troubleshooting, compatibility, parts, safety, or missing instructions. Manuals+ will review the question and use this page’s manual context to help answer it.