1. Introduction
This manual provides comprehensive instructions for the safe and effective use, maintenance, and troubleshooting of your Thunder A380-4 Electronic Personal Massager. Please read this manual thoroughly before operating the device and retain it for future reference.
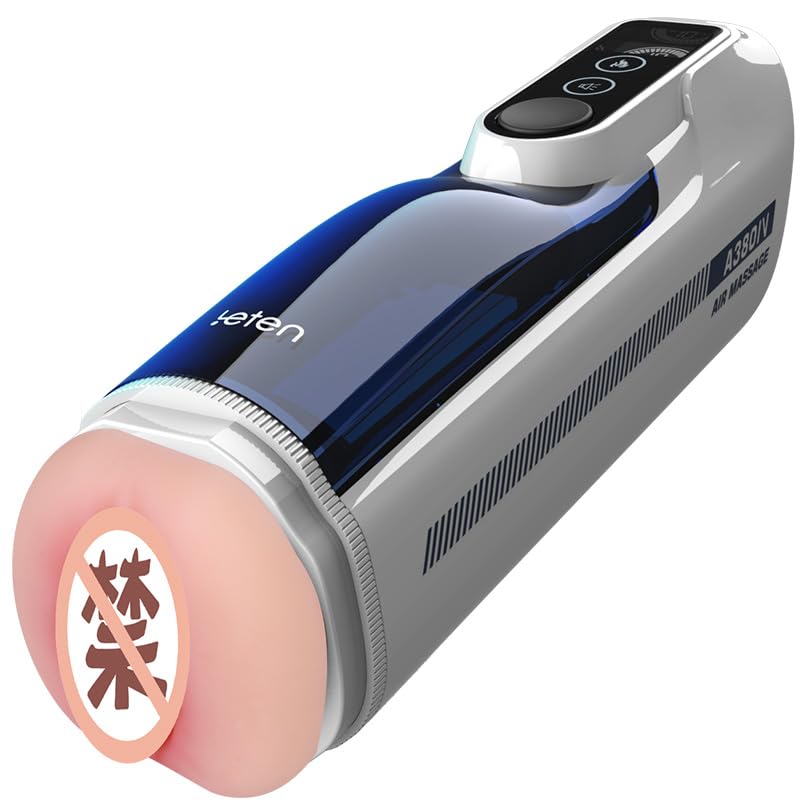
Figure 1.1: The Thunder A380-4 device, showcasing its white and navy blue design.
2. Important Safety Information
To ensure safe operation and prevent injury or damage, please observe the following precautions:
- Do not immerse the electronic components of the device in water.
- Keep the device out of reach of children.
- Discontinue use immediately if you experience any discomfort or pain.
- Consult a healthcare professional if you have any pre-existing medical conditions before using this device.
- Statements regarding dietary supplements have not been evaluated by the FDA and are not intended to diagnose, treat, cure, or prevent any disease or health condition.
- Use only the provided charging cable and adapter.
- Store the device in a cool, dry place away from direct sunlight and extreme temperatures.
3. Package Contents
Verify that all items are present in the package:
- Thunder A380-4 Electronic Personal Massager Unit
- USB Charging Cable
- User Manual

Figure 3.1: The Thunder A380-4 device displayed alongside its retail packaging.
4. Product Overview
The Thunder A380-4 is an electronic personal massager featuring a white and navy blue exterior with a digital control interface. It is designed for comfortable handling and offers multiple intensity settings and customizable modes.
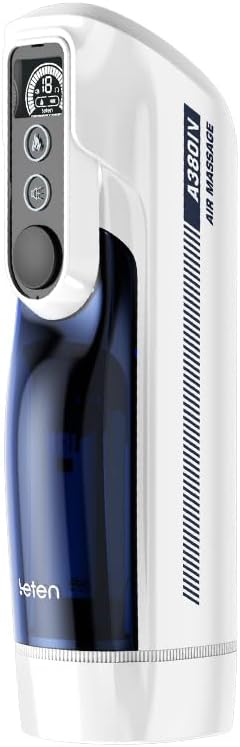
Figure 4.1: A detailed front view of the Thunder A380-4, highlighting the digital display and control buttons.
4.1 Key Features
- Digital Control Interface: Intuitive operation with an LED display.
- Multiple Settings: Adjustable intensity and pattern modes.
- Rechargeable: Cordless operation for convenience.
- Ergonomic Design: Comfortable grip for ease of use.

Figure 4.2: An illustration of the internal mechanism of the A380-4, demonstrating its operational structure.
5. Setup
5.1 Charging the Device
Before first use, fully charge the device. The device features a rechargeable battery for cordless operation.
- Locate the charging port on the device.
- Connect the provided USB charging cable to the device and a compatible USB power source (e.g., wall adapter, computer USB port).
- The digital display will indicate the charging status. A full charge typically takes approximately [Insert Charging Time, if known, otherwise omit].
- Once fully charged, disconnect the charging cable.
5.2 Initial Preparation
Before the first use, clean the device according to the 'Maintenance and Care' section to ensure hygiene.
6. Operating Instructions
6.1 Power On/Off
- To power on the device, press and hold the power button (usually indicated by a power symbol) on the control panel.
- The digital display will illuminate, indicating the device is active.
- To power off, press and hold the power button again until the display turns off.
6.2 Adjusting Settings
The device features a digital interface for adjusting various settings:

Figure 6.1: A detailed view of the device's digital interface, including power, mode, and intensity buttons.
- Intensity Control: Use the '+' and '-' buttons to increase or decrease the intensity level. The current level will be shown on the digital display.
- Mode Selection: Press the 'Mode' button (or similar icon) to cycle through available operational modes or patterns. Each press will switch to a different mode, which will be indicated on the display.
- Air Pressure/Temperature Control: If applicable, use dedicated buttons to activate or adjust air pressure or temperature settings. Refer to the display for current status.

Figure 6.2: The digital display indicating current operational settings and battery level.
6.3 Usage
Position the device as desired and adjust settings to your preference. The ergonomic design ensures a comfortable grip during use.
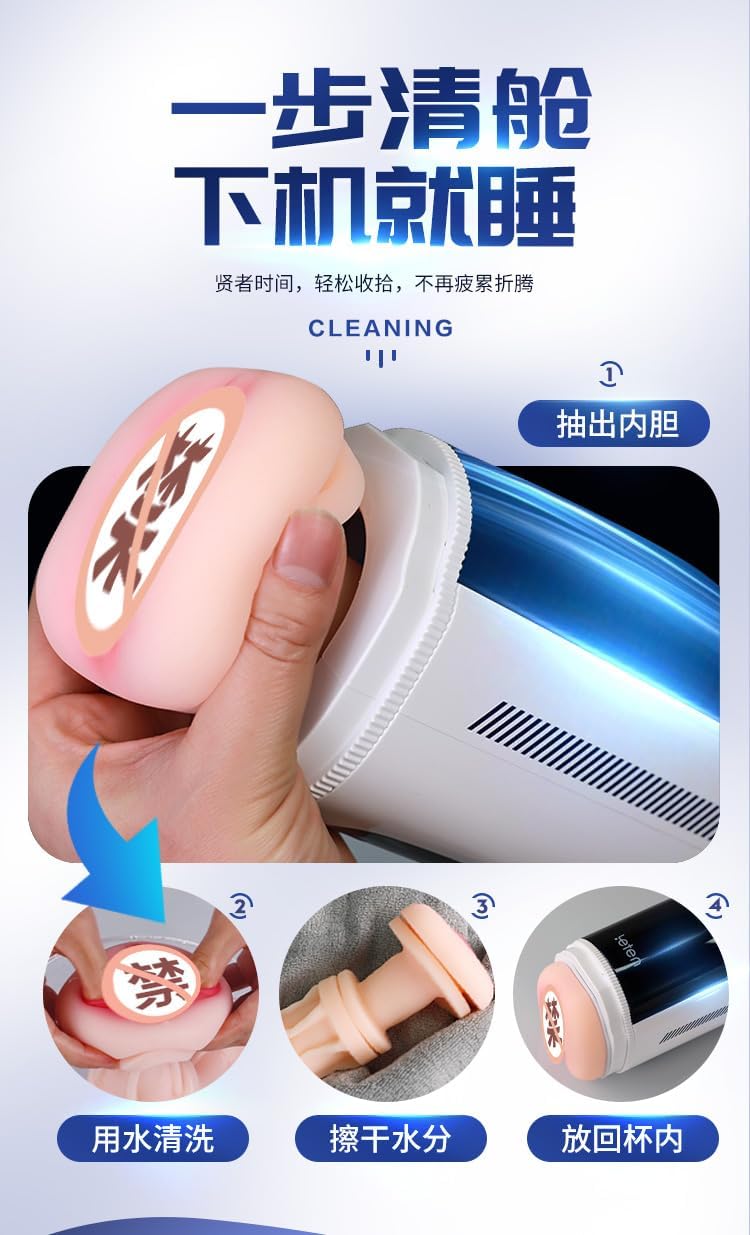
Figure 6.3: An animated diagram depicting the internal piston movement and rotation features of the device.
7. Maintenance and Care
7.1 Cleaning
Proper cleaning after each use is essential for hygiene and device longevity.
- Ensure the device is powered off and disconnected from any charging source.
- Carefully remove the inner sleeve from the main unit.
- Wash the inner sleeve thoroughly with mild soap and warm water.
- Rinse the sleeve completely to remove all soap residue.
- Allow the inner sleeve to air dry completely before reinserting it into the main unit.
- Wipe the exterior of the main unit with a damp cloth. Do not use abrasive cleaners or immerse the main unit in water.

Figure 7.1: Visual instructions demonstrating the cleaning process, including removal of the inner sleeve, washing, drying, and reinsertion.
7.2 Storage
Store the device in a cool, dry place, away from direct sunlight and extreme temperatures. Ensure it is clean and fully dry before storage.
8. Troubleshooting
If you encounter any issues with your device, refer to the table below for common problems and solutions:
| Problem | Possible Cause | Solution |
|---|---|---|
| Device does not power on. | Low battery or no charge. | Charge the device fully using the provided USB cable. |
| Device stops working during use. | Battery depleted. | Recharge the device. |
| Controls are unresponsive. | Temporary software glitch. | Power off the device, wait a few seconds, then power it back on. |
| Reduced performance. | Device requires cleaning. | Clean the device thoroughly as per the 'Maintenance and Care' section. |
9. Specifications
| Feature | Detail |
|---|---|
| Product Dimensions | 3.46 x 12.68 x 4.13 inches; 3.31 Pounds |
| Batteries | 1 12V battery required (included) |
| Manufacturer | Leten |
| ASIN | B0F3864Z9P |
| Color | Black/Blue |
| Material | ABS Plastic |
| Brand | Generic |
| Model Name | Thunder Cannon King Luxury Edition (A380-4) |
| Style | Electronic |
10. Warranty and Support
This product comes with a standard manufacturer's warranty. For specific warranty details, please refer to the packaging or contact the retailer where the product was purchased. For technical support or further assistance, please contact the manufacturer's customer service.


