Introduction
This manual provides detailed instructions for the setup, operation, and maintenance of your Bofypoo 4K Digital Camera (Model DC103). Please read this manual thoroughly before using the camera to ensure proper function and to maximize your photography and videography experience. Keep this manual for future reference.
The Bofypoo DC103 is a versatile 4K digital camera designed for photography and vlogging, featuring 64MP ultra-clear photos, 4K Ultra HD videos, autofocus, a 3.0-inch 180° flip screen, built-in WiFi, and 16X digital zoom. It is suitable for beginners, teens, and content creators.
What's in the Box
Please check the contents of your package to ensure all items are present:
- 1x Bofypoo 4K Digital Camera with WiFi
- 1x 32GB Memory Card
- 2x Rechargeable Lithium Ion Batteries
- 1x Type-C USB Cable
- 1x Lens Cap
- 1x LCD Screen Cleaning Cloth
- 1x Camera Wrist Strap
- 1x Long Strap
- 1x Camera Bag
- 1x User's Manual (this document)
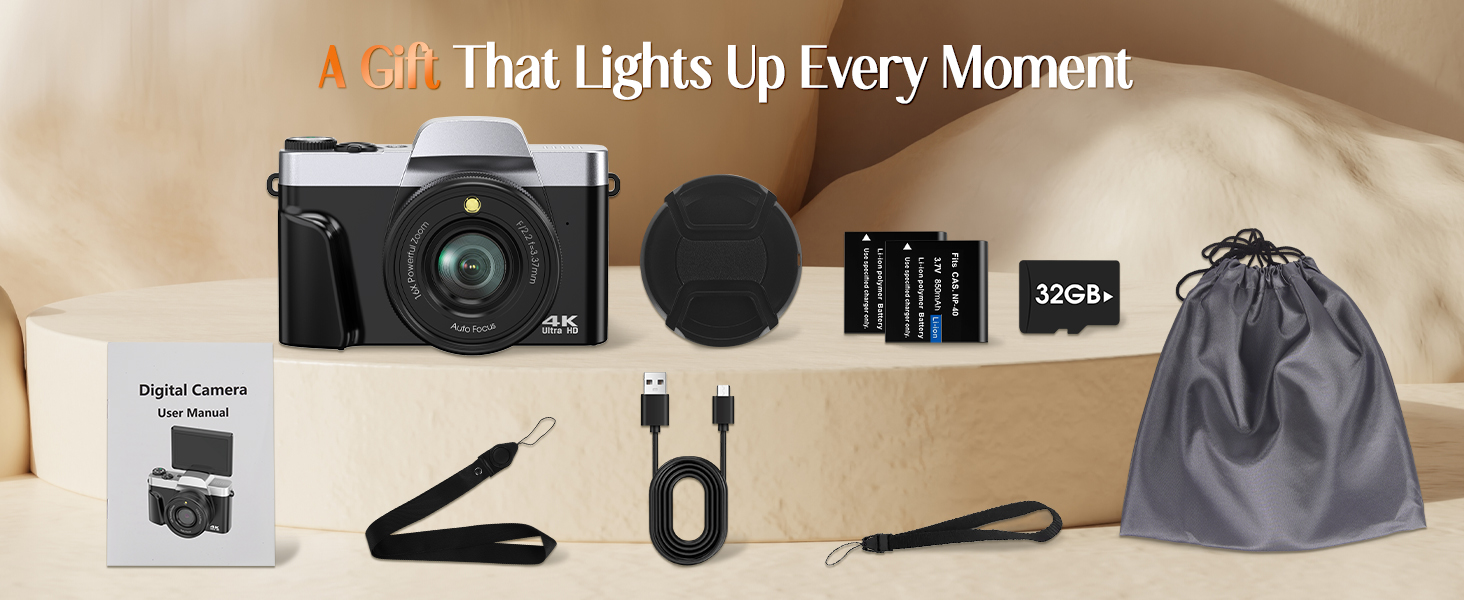
Image: All items included in the Bofypoo 4K Digital Camera package.
Product Overview
Familiarize yourself with the camera's components and controls.

Image: Front view of the Bofypoo 4K Digital Camera, highlighting its compact design and flip screen capability.
Camera Components
- Lens: Main optical component for capturing images.
- Built-in Flash: Provides illumination in low-light conditions.
- 3.0-inch 180° Flip Screen: Rotatable LCD display for viewing and navigating menus, ideal for selfies and vlogging.
- Mode Dial: Allows quick selection between various shooting modes (Photo, Video, Slow Motion, Time-lapse, Night, Landscapes, Portrait, Effect, Setup).
- Shutter Button: Press to capture photos or start/stop video recording.
- Zoom Lever (W/T): Controls the 16X digital zoom.
- Power Button: Turns the camera on/off.
- Navigation Buttons (DISP, OK, Menu): For menu navigation and setting adjustments.
- Battery Compartment: Located at the bottom, for inserting rechargeable batteries.
- SD Card Slot: For inserting the memory card.
- USB-C Port: For charging and data transfer.
- Tripod Mount: Standard 1/4 inch thread for attaching to tripods.
Setup
1. Charging the Batteries
The camera comes with two rechargeable Lithium Ion batteries. Ensure they are fully charged before first use.
- Insert a battery into the camera's battery compartment.
- Connect the camera to a power source (USB wall adapter or computer) using the provided Type-C USB cable.
- The charging indicator light will show the charging status. It typically turns off or changes color when fully charged.
- A full charge takes approximately 2-3 hours.
2. Inserting the SD Card
A 32GB SD card is included. The camera supports up to 256GB SD cards.
- Locate the SD card slot on the side or bottom of the camera.
- Insert the SD card with the metal contacts facing the front of the camera until it clicks into place.
- To remove, gently press the card until it pops out.
3. Initial Power On and Date/Time Setting
- Press and hold the Power button to turn on the camera.
- Upon first use, you may be prompted to set the date and time. Use the navigation buttons to adjust the values and the OK button to confirm.
Operating the Camera
Basic Photography and Videography

Image: The digital dial for quick mode selection.
- Select Mode: Rotate the mode dial to select either Photo mode or Video mode.
- Framing: Use the 3.0-inch flip screen to compose your shot. You can rotate the screen 180° for selfies or vlogging.
- Zoom: Use the W/T (Wide/Telephoto) lever to adjust the 16X digital zoom.
- Capture:
- For photos, press the Shutter button fully to capture an image.
- For videos, press the Shutter button once to start recording, and press it again to stop.

Image: Starting video recording on the Bofypoo 4K Digital Camera.
Advanced Features
Autofocus and Image Quality
The camera features an autofocus system to ensure sharp images. It captures up to 64MP photos and 4K Ultra HD videos.

Image: Demonstrating the 64MP photo capability and fast autofocus.
Flash Modes
The built-in flash can be set to ON, OFF, or AUTO mode to provide appropriate lighting.

Image: Illustration of flash modes (ON/OFF) for different lighting conditions.
WiFi Connectivity and Remote Control
Connect your camera to a smartphone or tablet via WiFi using the "Viipulse" app (available for Android and iOS).
- Turn on the camera's WiFi function via the settings menu.
- On your smart device, connect to the camera's WiFi network (SSID and password displayed on the camera screen).
- Open the "Viipulse" app. You can now remotely control the camera, preview shots, and transfer photos/videos to your device.

Image: Using WiFi for remote control and instant transfer of photos.
Creative Shooting Modes and Filters
The camera offers various modes and effects to enhance your content:
- Anti-Shake: Digital image stabilization for clearer handheld shots.
- Slow Motion: Records video at a higher frame rate for slow-motion playback.
- Time-lapse: Captures a series of photos over time and combines them into a video.
- Continuous Shooting: Takes multiple photos in quick succession.
- Video Pause: Pause and resume video recording within a single file.
- Face Detection & Smile Capture: Automatically detects faces and can trigger the shutter when a smile is detected.
- Beauty Filters: Apply effects to enhance portraits.
- Self-Timer: Options for 2, 5, or 10-second delays before taking a photo.
- Built-in Filters: Apply various color and mood filters directly to your photos.
- Exposure Compensation: Adjust the brightness of your images.

Image: Demonstrating 16X digital zoom and various built-in filters.

Image: Anti-Shake feature for clearer handheld shooting.
Webcam Mode
The camera can function as a webcam for live streaming, online classes, or video chats.
- Connect the camera to your computer using the USB-C cable.
- Select "Webcam Mode" on the camera's screen if prompted.
- Your computer should recognize the camera as a webcam, allowing you to select it in video conferencing applications.

Image: The camera functioning as a webcam for video conferencing.
Transferring Photos and Videos
You have multiple options for transferring your media files:
- Via WiFi (using Viipulse app): As described in the WiFi section, transfer files wirelessly to your smartphone or tablet.
- Via USB Cable: Connect the camera to your computer using the USB-C cable. The camera will appear as a removable disk, allowing you to copy files directly.
- Via SD Card Reader: Remove the SD card from the camera and insert it into an external SD card reader connected to your computer.

Image: Three methods for downloading photos from the camera.
Maintenance
Cleaning
- Camera Body: Use a soft, dry cloth to wipe the camera body. For stubborn dirt, slightly dampen the cloth with water. Avoid harsh chemicals.
- Lens: Use the provided LCD screen cleaning cloth or a specialized lens cleaning cloth. Gently wipe in a circular motion from the center outwards. Do not use abrasive materials.
- Screen: Use the provided LCD screen cleaning cloth to gently wipe the screen.
Storage
- When not in use for extended periods, remove the batteries to prevent leakage.
- Store the camera in a cool, dry place, away from direct sunlight, high temperatures, and humidity.
- Use the included camera bag for protection during storage and travel.
Troubleshooting
If you encounter issues with your camera, refer to the following common problems and solutions:
| Problem | Possible Cause | Solution |
|---|---|---|
| Camera does not turn on. | Low or dead battery; Battery inserted incorrectly. | Charge the batteries fully; Reinsert the battery correctly. |
| Cannot take photos/videos. | SD card full; SD card not inserted; SD card error; Incorrect mode. | Delete unnecessary files or use a new SD card; Insert SD card correctly; Format SD card (backup data first); Ensure correct mode (Photo/Video) is selected. |
| Images are blurry. | Autofocus failed; Camera shake; Dirty lens. | Ensure subject is within focus range; Use anti-shake feature or tripod; Clean the lens. |
| WiFi connection issues. | Incorrect password; App not installed; Distance too far. | Verify WiFi password; Download "Viipulse" app; Stay within close proximity to the camera. |
| Camera freezes or malfunctions. | Software glitch; Low battery. | Remove and reinsert battery to reset; Ensure battery is charged. |
If the problem persists after trying these solutions, please contact customer support.
Specifications
Detailed technical specifications for the Bofypoo DC103 Digital Camera:
| Feature | Specification |
|---|---|
| Model Name | DC103 |
| Photo Sensor Resolution | 64 MP |
| Video Resolution | 4K (4320p) |
| Display Type | 3.0-inch IPS LCD, 180° Flip Screen |
| Digital Zoom | 16X |
| Image Stabilization | Digital |
| Autofocus Technology | Face Detection |
| Connectivity | USB, Wi-Fi |
| Supported File Formats | JPG (Photos), AVI (Videos) |
| Memory Storage Capacity | 32 GB (included), supports up to 256 GB |
| Battery Type | Lithium Ion (2 included) |
| Compatible Mountings | Standard 1/4 Inch Tripod |
| Material | Aluminum Plastic Metal |
| Self Timer | 2 seconds, 5 seconds, 10 seconds |
| Flash Modes | Fill Flash, Built-In |
| White Balance Settings | Auto, Cloudy, Daylight, Fluorescent, Tungsten |
Customer Support
For any questions, technical assistance, or warranty inquiries, please contact Bofypoo customer support. We offer 24/7 customer support to ensure a satisfying experience.
Please refer to the contact information provided on the product packaging or the official Bofypoo website for the most up-to-date support channels.


