1. Introduction
The Jumplushion XK-W1099 is an intelligent digital temperature and humidity controller designed for precise environmental management. Featuring an intelligent LCD display, it provides real-time readings for both temperature and humidity, enabling convenient monitoring and control. This dual-purpose controller offers a wide temperature measurement range of 0 to 100°C and a humidity measurement range of 0 to 100% RH. With a high load capacity of up to 10A, it ensures stable performance for various applications. Its compact and lightweight design, coupled with an ABS flame-retardant plastic shell, ensures durability and ease of installation.
2. Safety Information
- Read all instructions carefully before installation and operation.
- Ensure the power supply voltage matches the controller's specifications (24V for this model). Incorrect voltage can cause damage or fire.
- All wiring should be performed by a qualified electrician to prevent electrical shock or damage.
- Do not operate the device in environments with excessive moisture, dust, or corrosive gases.
- Disconnect power before performing any wiring or maintenance.
- Keep the device away from children.
3. Product Overview
3.1. Features
- Intelligent LCD display for real-time temperature and humidity readings.
- Dual-purpose control for both temperature and humidity.
- Wide temperature measurement range: 0 to 100°C.
- Humidity measurement range: 0 to 100% RH.
- High load capacity: 10A output, suitable for various heating/cooling and humidifying/dehumidifying equipment.
- Compact and lightweight design for easy installation.
- Durable ABS flame-retardant plastic shell.
3.2. Components
The XK-W1099 controller consists of the main control unit with an LCD display and control buttons, and an external temperature and humidity sensor probe.

Figure 1: XK-W1099 Controller with Sensor and Wiring. This image shows the main controller unit, the external temperature and humidity sensor connected by a black cable, and the various colored wires for power input and output connections.

Figure 2: Front View of XK-W1099 Controller. This image highlights the dual LCD displays for temperature (OUT1) and humidity (OUT2), along with their respective up and down control buttons.
4. Specifications
| Parameter | Value |
|---|---|
| Model | XK-W1099 |
| Power Supply | 24V DC (as per current product variant) |
| Temperature Measurement Range | 0°C to 100°C |
| Temperature Control Accuracy | 0.1°C |
| Humidity Measurement Range | 0% to 100% RH |
| Output Load Capacity | Max 10A (Resistive Load) |
| Dimensions | 100.8 x 54.9 x 31.2 mm (approx. 3.97 x 2.16 x 1.23 inches) |
| Weight | 91.5g (approx. 3.23 ounces) |
| Shell Material | ABS Flame Retardant Plastic |

Figure 3: Back View of XK-W1099 Controller. This image displays the product label on the back of the controller, detailing model number, power requirements, temperature and humidity ranges, and output capacity.
5. Setup and Wiring
Proper wiring is crucial for the safe and correct operation of the XK-W1099 controller. Refer to the wiring diagram and ensure all connections are secure.
5.1. Wiring Diagram
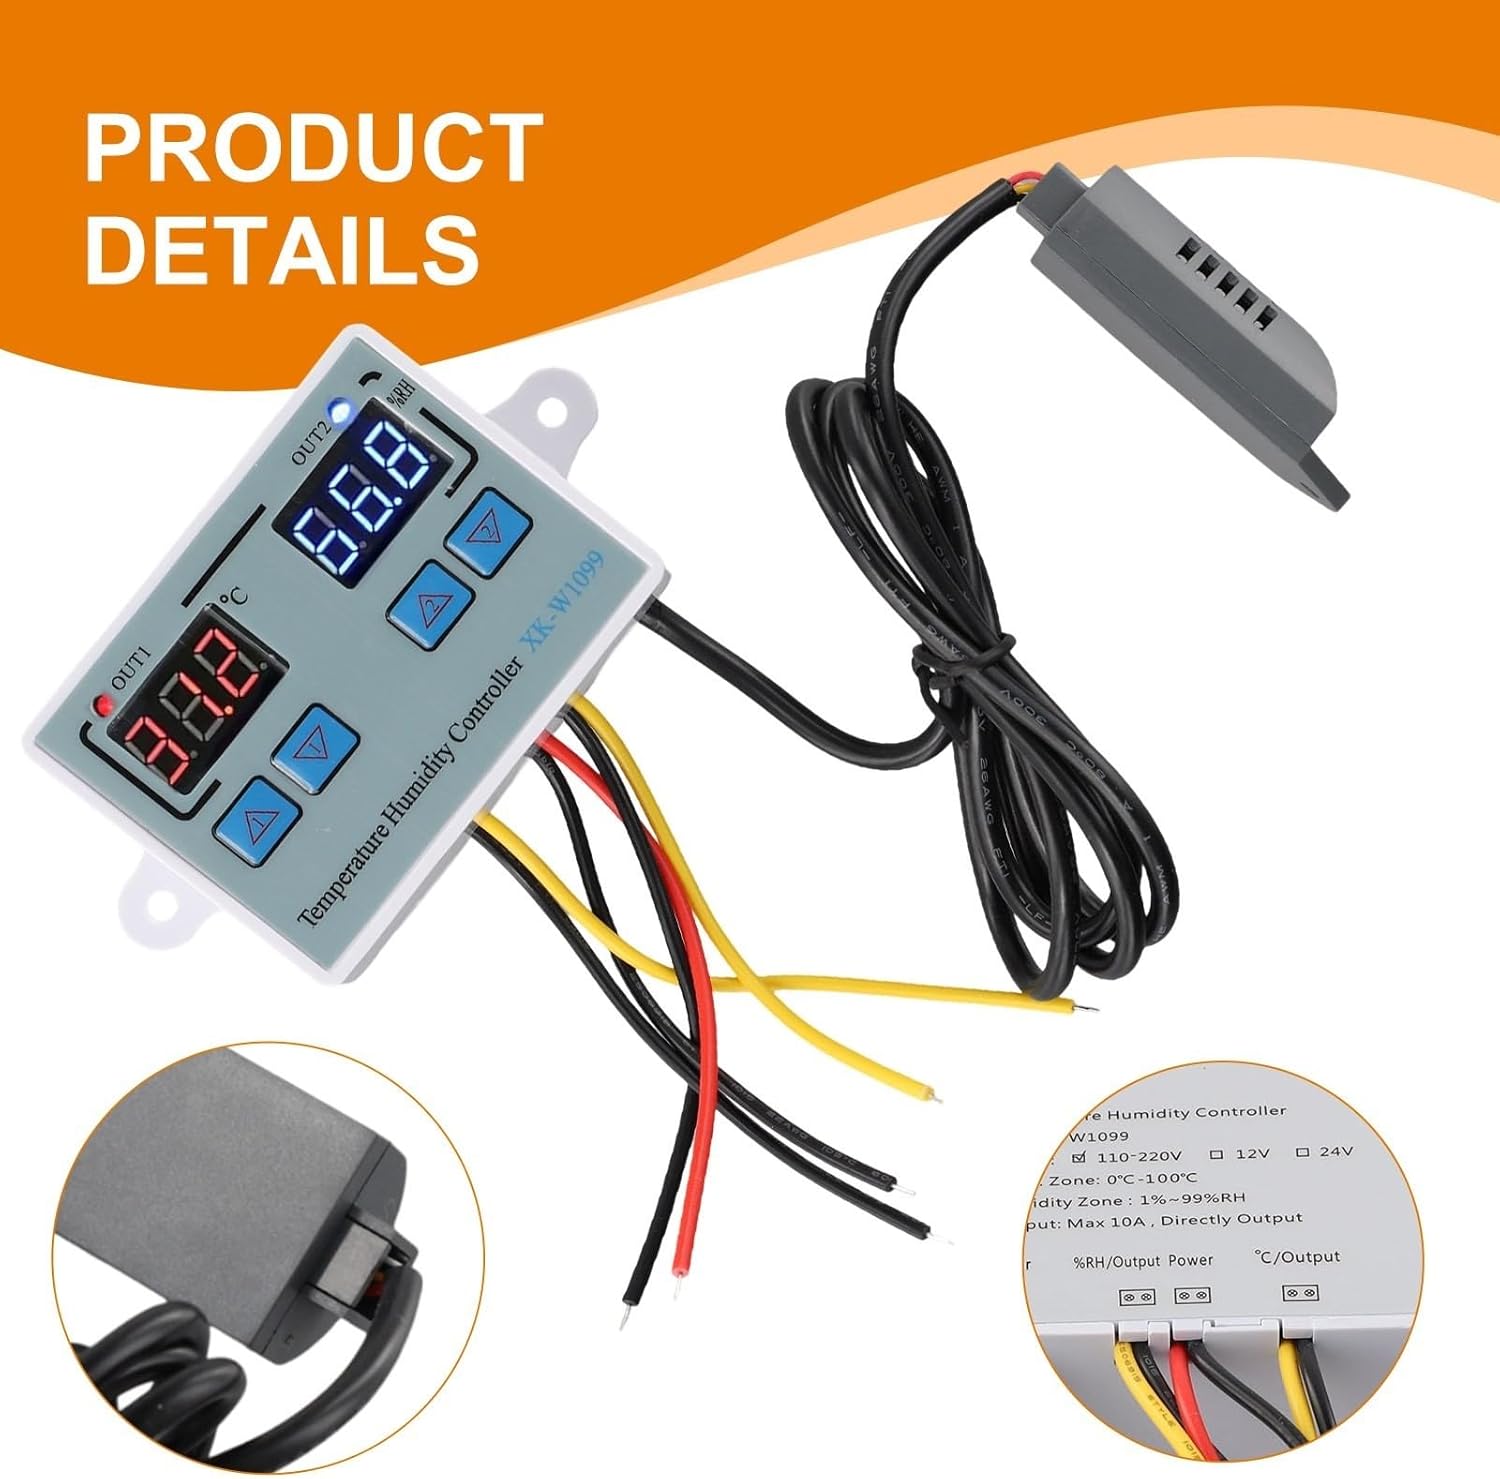
Figure 4: Wiring Diagram. This diagram illustrates the connections for the power input, the temperature/humidity sensor, and the two output relays (OUT1 for temperature, OUT2 for humidity) to external loads.
5.2. Connection Steps
- Power Supply: Connect the 24V DC power supply to the designated power input terminals. Ensure correct polarity.
- Sensor Connection: Plug the temperature and humidity sensor probe into its dedicated port on the controller.
- Temperature Output (OUT1): Connect your heating or cooling device to the OUT1 terminals. The controller will switch this output based on temperature settings.
- Humidity Output (OUT2): Connect your humidifying or dehumidifying device to the OUT2 terminals. The controller will switch this output based on humidity settings.
- Verify Connections: Double-check all wiring for correctness and security before applying power.
6. Operating Instructions
The XK-W1099 features two independent control sections: one for temperature (OUT1) and one for humidity (OUT2). Each section has its own display and adjustment buttons.
6.1. Power On/Off
- To power on, connect the controller to the specified 24V DC power supply. The LCD displays will illuminate.
- To power off, disconnect the power supply.
6.2. Setting Temperature (OUT1)
- The left display (OUT1) shows the current temperature.
- Press the Up or Down button below the OUT1 display to enter temperature setting mode. The display will flash.
- Use the Up and Down buttons to adjust the desired target temperature.
- After setting, wait a few seconds for the display to stop flashing and save the setting automatically.
- The controller will activate/deactivate OUT1 based on the set temperature and its internal hysteresis (temperature difference for switching).
6.3. Setting Humidity (OUT2)
- The right display (OUT2) shows the current humidity.
- Press the Up or Down button below the OUT2 display to enter humidity setting mode. The display will flash.
- Use the Up and Down buttons to adjust the desired target humidity.
- After setting, wait a few seconds for the display to stop flashing and save the setting automatically.
- The controller will activate/deactivate OUT2 based on the set humidity and its internal hysteresis.
Note: Specific advanced settings like heating/cooling mode, humidifying/dehumidifying mode, and hysteresis adjustment may be available through long-press combinations or a dedicated menu. Refer to the manufacturer's full documentation for detailed advanced programming.
7. Maintenance
- Cleaning: Disconnect power before cleaning. Wipe the controller's surface with a soft, dry cloth. Do not use abrasive cleaners or solvents.
- Sensor Care: Keep the sensor probe clean and free from dust or debris to ensure accurate readings. Avoid submerging the sensor in liquids.
- Environmental Conditions: Ensure the controller is operated within its specified environmental conditions (temperature, humidity, absence of corrosive gases).
- Wiring Inspection: Periodically check all wiring connections for tightness and signs of wear or damage.
8. Troubleshooting
| Problem | Possible Cause | Solution |
|---|---|---|
| Controller does not power on. | No power supply; incorrect voltage; loose wiring. | Check power connection and voltage. Ensure wiring is secure. |
| Inaccurate temperature/humidity readings. | Sensor dirty or damaged; sensor not properly connected. | Clean the sensor. Ensure the sensor is securely plugged in. Replace sensor if damaged. |
| Output (OUT1/OUT2) not switching. | Settings incorrect; load device faulty; wiring issue. | Verify set temperature/humidity. Check wiring to the load device. Test the load device independently. |
| Display shows "HHH" or "LLL". | Sensor error (out of range or disconnected). | Check sensor connection. Ensure sensor is within operating range. Replace sensor if faulty. |
9. Warranty and Support
This product comes with a standard manufacturer's warranty against defects in materials and workmanship. For specific warranty terms, duration, and to obtain technical support, please refer to the documentation provided with your purchase or contact Jumplushion customer service directly. Please have your model number (XK-W1099) and purchase information ready when contacting support.
For further assistance, you may visit the Jumplushion Store on Amazon.