Salutrobusto B0F32TD6HN
Salutrobusto Massage Office Chair with Heat and 8 Vibration Points (Model B0F32TD6HN) User Manual
Your guide to assembly, operation, and maintenance.
1. Introduction
Thank you for choosing the Salutrobusto Massage Office Chair. This executive office chair is designed to provide comfort and support with integrated massage and heating functions, an adjustable headrest, and a retractable footrest. This manual provides essential information for safe assembly, operation, maintenance, and troubleshooting.

Image 1.1: The Salutrobusto Massage Office Chair, showcasing its design and integrated massage and heat points.
2. Safety Information
- Read all instructions before assembly and use.
- Do not exceed the maximum weight capacity of 400 pounds.
- Ensure all bolts and screws are securely tightened before use. Periodically check and re-tighten as necessary.
- Keep children and pets away from the chair during assembly.
- Use the chair on a level surface to prevent tipping.
- For electrical components (massage/heat), ensure the power cord is not pinched or damaged. Do not operate if the cord is damaged.
- Unplug the chair from the power source when not in use or before cleaning.
- Do not immerse electrical components in water.
- Avoid placing heavy objects on the chair's backrest or armrests when reclining.
3. Package Contents
Verify that all components are present before beginning assembly. If any parts are missing or damaged, contact customer support.
- Backrest
- Seat Cushion with Footrest
- Armrests (Left and Right)
- Base (5-star)
- Casters (5 pieces)
- Gas Lift Cylinder
- Mechanism Plate
- Headrest
- Massage/Heat Remote Control and Power Adapter
- Hardware Pack (screws, washers, Allen wrench)
4. Setup and Assembly
Follow these steps carefully for proper assembly. It is recommended to assemble the chair on a soft, clean surface to prevent damage.
- Attach Casters to Base: Insert each caster into the holes at the end of the 5-star base until securely seated.
- Insert Gas Lift: Place the gas lift cylinder into the center hole of the 5-star base. Place the gas lift cover over the cylinder.
- Attach Mechanism Plate to Seat: Align the mechanism plate with the pre-drilled holes on the underside of the seat cushion. Ensure the front of the mechanism faces the front of the seat. Secure with screws and washers using the Allen wrench.
- Attach Armrests to Seat: Attach the armrests to the sides of the seat cushion using the provided screws. Do not fully tighten yet.
- Attach Backrest to Seat and Armrests: Align the backrest with the seat and armrests. Secure the backrest to the seat and armrests using the remaining screws. Once all screws are in place, fully tighten all armrest and backrest screws.
- Attach Headrest: Insert the headrest into the designated slots at the top of the backrest.
- Connect Electrical Components: Connect the massage and heat cables from the seat and backrest to the remote control. Connect the power adapter to the remote control and then to a power outlet.
- Place Seat Assembly on Gas Lift: Carefully place the assembled seat onto the gas lift cylinder, ensuring it is centered and stable.
5. Operating Instructions
5.1. Massage and Heating Functions
The chair features an 8-point vibration massage system and an independent heating function, controlled by a wired remote.

Image 5.1: Overview of massage and heating features and controls.
- Power: Press the 'Power' button on the remote to turn the massage and heat functions on/off.
- Massage Points: The chair has 8 vibration points targeting the back, waist, and legs.
- Massage Modes: Select from 5 different massage modes (e.g., Pulse, Press, Wave, Auto) using the 'Mode' button.
- Massage Areas: Choose specific massage areas (e.g., Back, Lumbar, Thigh, Leg) using the corresponding buttons on the remote.
- Strength: Adjust the vibration intensity between High and Low using the 'Strength' button.
- Heat Function: Activate the independent heating function for the lumbar area by pressing the 'Heat' button.
- Timer: Set the operating time for 15, 30, or 60 minutes using the 'Time' button. The massage and heat will automatically turn off after the selected duration.
5.2. Adjustable Headrest
The headrest can be adjusted vertically to provide optimal neck support.

Image 5.2: The adjustable headrest mechanism.
- To adjust, grasp the headrest and gently pull it up or push it down to your desired height. It will lock into place.
5.3. Reclining Function and Footrest
The backrest can recline from 90° to 135°, and a retractable footrest is integrated for extended comfort.

Image 5.3: Chair in various reclining positions with footrest extended.
- Recline: Pull the recline lever (typically on the right side under the seat) upwards, lean back to your desired angle, and release the lever to lock.
- Footrest: To extend the footrest, pull it outwards from under the seat. To retract, push it back in until it is fully stored.
5.4. Height Adjustment
Adjust the seat height using the gas lift mechanism.
- To Raise: While seated, lift the height adjustment lever (typically on the right side under the seat) and slightly lift your weight off the seat. The seat will rise. Release the lever at the desired height.
- To Lower: While seated, lift the height adjustment lever. The seat will lower under your weight. Release the lever at the desired height.
5.5. Swivel and Casters
- The chair features a 360° swivel function for full rotational movement.
- The smooth-rolling casters allow for easy movement across various floor surfaces.
5.6. Linkage Armrests
The armrests are designed to move in conjunction with the backrest when reclining, providing continuous arm support.

Image 5.4: Linkage armrests in different positions.
6. Maintenance
- Cleaning: Wipe the chair's surface with a soft, damp cloth. For stubborn stains, use a mild soap solution and dry thoroughly. Avoid harsh chemicals or abrasive cleaners.
- Inspection: Periodically check all bolts and screws for tightness and re-tighten as needed. Inspect the casters for any debris that might hinder movement.
- Electrical Components: Ensure the power cord and remote control are free from damage. Do not attempt to repair electrical components yourself.
- Storage: If storing the chair for an extended period, ensure it is clean and dry. Store in a cool, dry place away from direct sunlight.
7. Troubleshooting
| Problem | Possible Cause | Solution |
|---|---|---|
| Chair is unstable or wobbly. | Loose screws or uneven assembly. | Check and tighten all assembly screws, especially those connecting the seat, backrest, and armrests. Ensure the chair is on a level surface. |
| Squeaking noise during movement. | Loose connections or friction between parts. | Tighten all screws. Apply a small amount of silicone lubricant to moving parts or joints if the noise persists. |
| Massage/Heat function not working. | Power connection issue, remote control malfunction. | Ensure the power adapter is securely plugged into the chair and a working electrical outlet. Check the remote control cable for damage. If issues persist, contact customer support. |
| Seat height adjustment not working. | Gas lift cylinder malfunction or lever issue. | Ensure the lever is fully engaged. If the gas lift is faulty, it may need replacement. Contact customer support. |
| Footrest does not extend or retract smoothly. | Obstruction or mechanism issue. | Check for any obstructions. Ensure the mechanism is clean. If damaged, contact customer support. |
8. Specifications
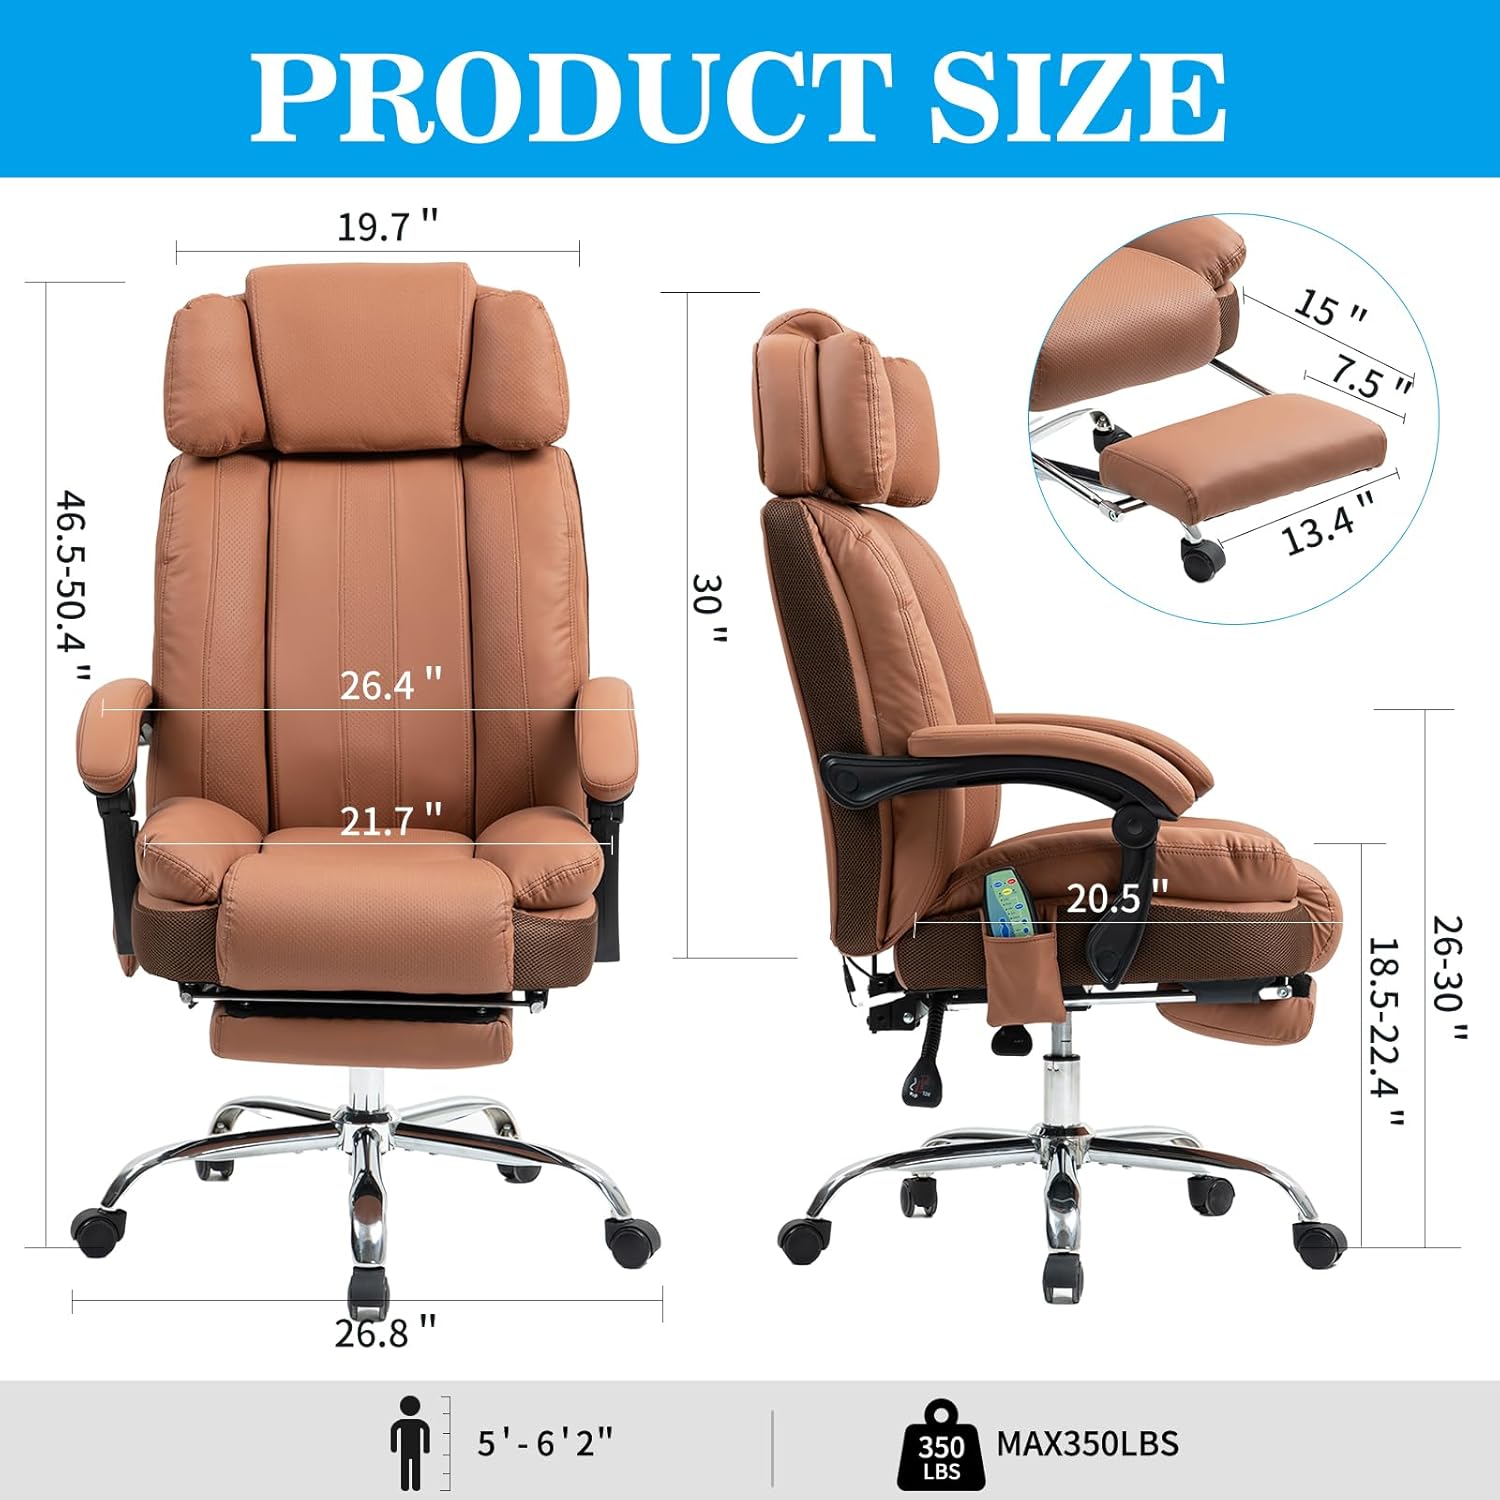
Image 8.1: Detailed product dimensions.
| Feature | Detail |
|---|---|
| Brand | Salutrobusto |
| Model Number | B0F32TD6HN |
| Color | Brown |
| Product Dimensions (D x W x H) | 27"D x 27"W x 40"H |
| Item Weight | 60 pounds |
| Weight Capacity | Up to 400 pounds |
| Back Style | Solid Back |
| Reclining Position Count | 3 (90°-135° range) |
| Massage Points | 8 Vibration Points |
| Heating Function | Independent Heat (Lumbar area) |
| UPC | 768825900232 |
9. Warranty and Support
Salutrobusto is committed to providing quality products and excellent customer service.
- Warranty: This product comes with a 12-month parts replacement policy from the date of purchase. This warranty covers manufacturing defects and component failures under normal use. It does not cover damage due to misuse, accidents, or unauthorized modifications.
- Customer Support: Our dedicated customer service team is available 24/7 to assist you with any questions, concerns, or issues you may encounter. Please have your model number (B0F32TD6HN) and purchase information ready when contacting support.
- Contact Information: For support, please refer to the contact details provided on your purchase receipt or the Salutrobusto official website.
Ask a question about this manual
Ask about setup, troubleshooting, compatibility, parts, safety, or missing instructions. Manuals+ will review the question and use this page’s manual context to help answer it.