1. Introduction
Thank you for purchasing the Panasonic NN-GD39QSEPG Microwave Oven. This appliance combines microwave, grill, and combined cooking functions, along with a versatile Steam+ tray, to offer a wide range of cooking possibilities. This manual provides essential information for the safe and efficient use of your new microwave oven. Please read these instructions carefully before use and keep them for future reference.
2. Safety Information
WARNING: To reduce the risk of fire, electric shock, injury to persons, or exposure to excessive microwave energy, observe the following basic precautions:
- Read all instructions before using the appliance.
- Do not attempt to operate this oven with the door open as this can result in harmful exposure to microwave energy.
- Do not place any object between the oven front face and the door or allow soil or cleaner residue to accumulate on sealing surfaces.
- Do not operate the oven if it is damaged. It is particularly important that the oven door closes properly and that there is no damage to the: (1) door (bent), (2) hinges and latches (broken or loosened), (3) door seals and sealing surfaces.
- The oven should not be adjusted or repaired by anyone except properly qualified service personnel.
- Ensure the appliance is properly grounded.
- Do not heat liquids or other foods in sealed containers as they are liable to explode.
- Only use utensils suitable for microwave ovens.
- Clean the oven regularly and remove any food deposits.
- Do not use harsh abrasive cleaners or sharp metal scrapers to clean the oven door glass since they can scratch the surface, which may result in shattering of the glass.
3. Product Overview
The Panasonic NN-GD39QSEPG is a versatile 29-liter microwave oven designed for efficient cooking. It features a 1000W microwave, a 1000W grill, and combined cooking options, along with an innovative Steam+ tray for healthy and varied meal preparation.
Key Features:
- Versatile Steam+ Tray: Allows for pan cooking, slow cooking, steaming, and grilling.
- 1000W Grill: Integrated heating system with three power levels for crispy results.
- Combined Cooking: Utilizes both microwave and grill power for faster, oven-baked results without preheating.
- 18 Automatic Programs: Pre-set settings for various dishes including Auto Reheat, Auto Defrost, Fresh Vegetables, and Frozen Pizza.
- Automatic Defrost: Preserves food texture and flavor during defrosting.
- Slim and Compact Design: 29L capacity with a 330mm wide interior, suitable for large dishes.
- Inverter Technology: Ensures uniform heating and defrosting.
Components:
- Microwave Oven Unit
- Glass Turntable
- Turntable Ring
- Grill Rack
- Steam+ Tray (consisting of a stainless steel lid, a heat-resistant steam tray, and an aluminum pan)

Image 3.1: Overview of the Panasonic NN-GD39QSEPG microwave oven, showing its compact exterior, spacious 29L interior with a 288mm turntable, and included accessories like the grill rack and Steam+ tray. Dimensions are indicated in millimeters.
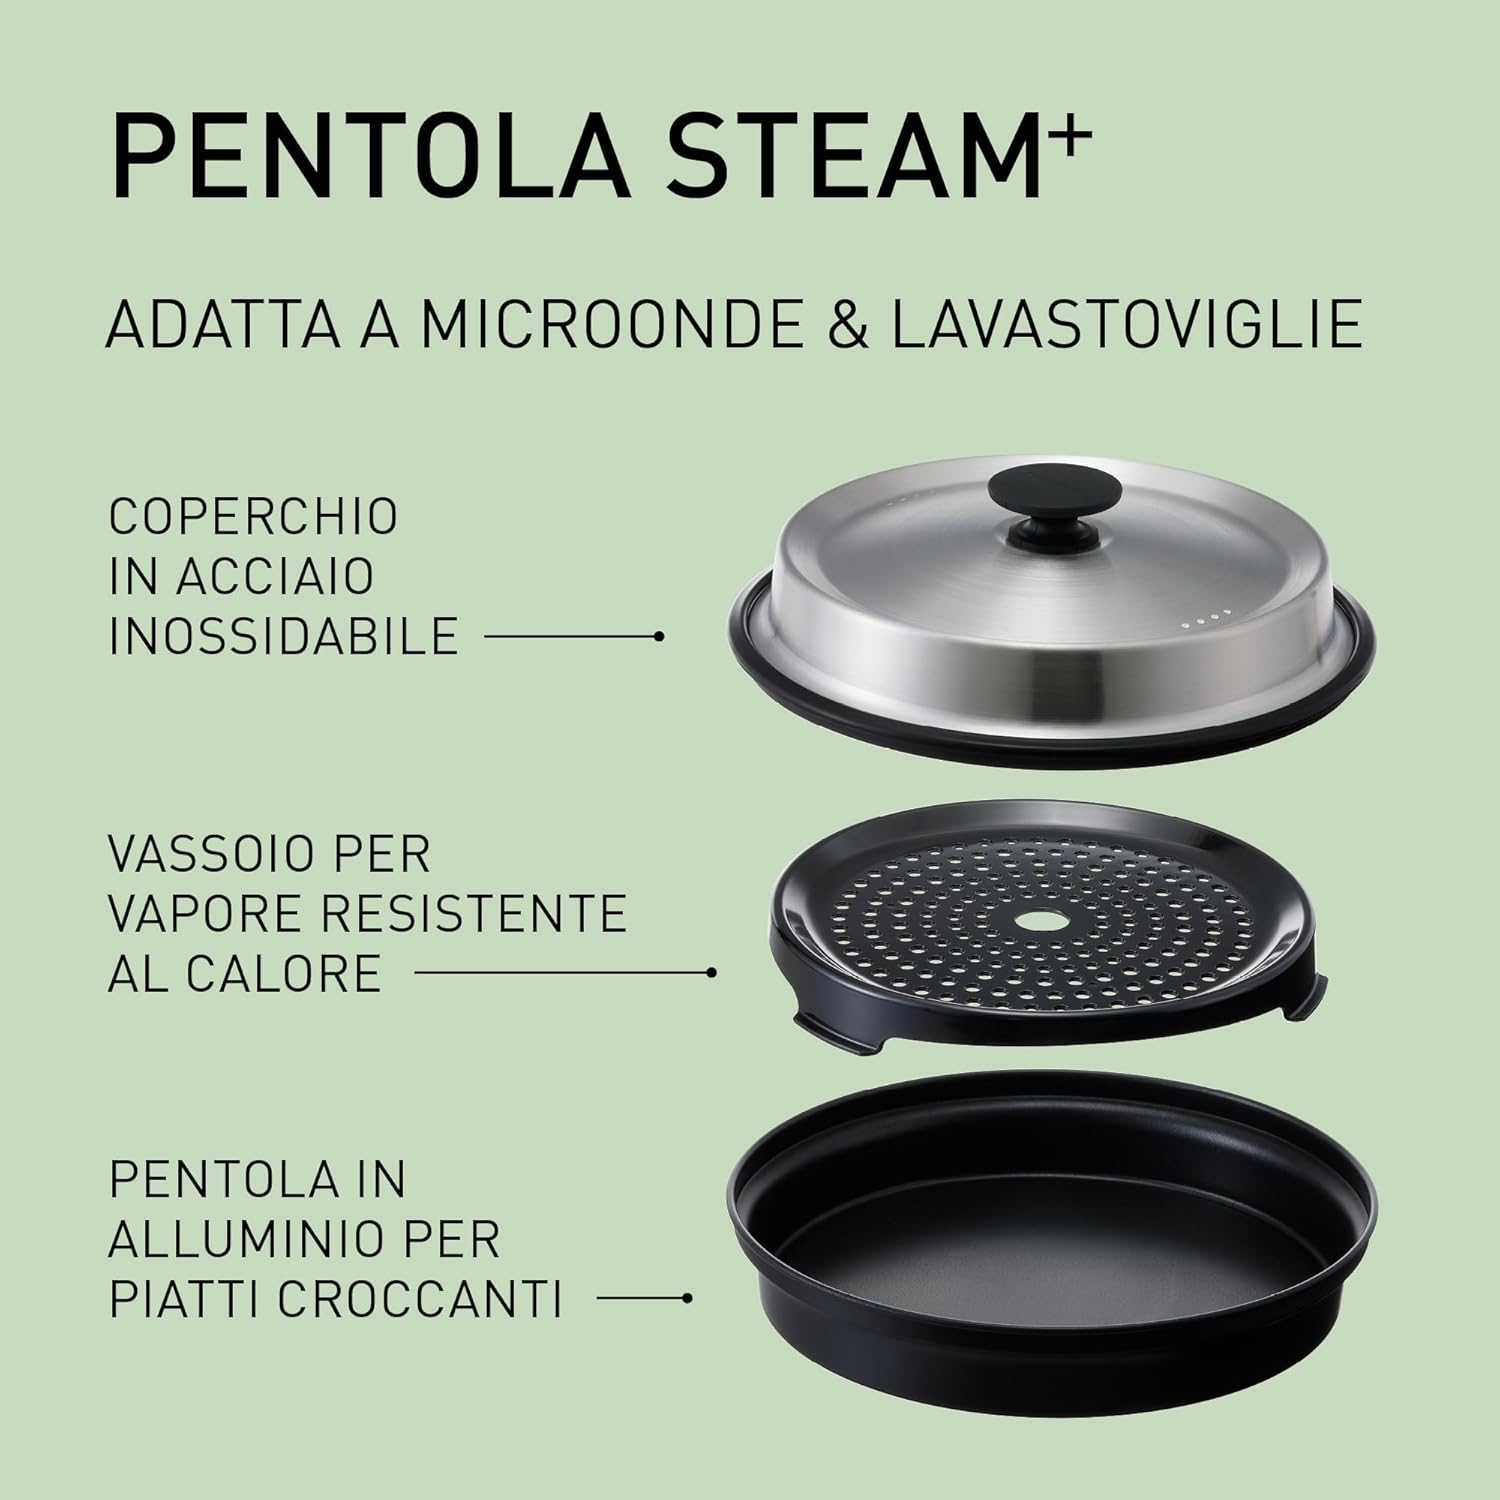
Image 3.2: Detailed view of the Steam+ Pot components, including the stainless steel lid, the heat-resistant steam tray, and the aluminum pan, highlighting its microwave and dishwasher compatibility.
4. Setup
4.1 Unpacking
Carefully remove the microwave oven and all packing materials from the carton. Check the oven for any damage, such as dents or a misaligned door. Do not operate the oven if it is damaged. Contact your retailer for assistance.
4.2 Placement
- Place the oven on a flat, stable surface that can support its weight.
- Ensure adequate ventilation. Leave a minimum of 20 cm (8 inches) of space above the oven, 10 cm (4 inches) at the rear, and 5 cm (2 inches) on each side for proper airflow.
- Do not block any ventilation openings.
- Keep the oven away from heat sources, steam, or splashing liquids.
- Do not place the oven near a radio or TV, as it may cause interference.
4.3 Electrical Connection
Plug the power cord into a standard 230V AC, 50Hz grounded electrical outlet. Ensure the outlet is easily accessible.
4.4 Initial Cleaning
Before first use, wipe the interior and exterior of the oven with a soft, damp cloth. Wash the turntable, turntable ring, grill rack, and Steam+ tray with warm, soapy water, then rinse and dry thoroughly.
5. Operating Instructions
The control panel features a dial for setting time and selecting programs, along with various buttons for specific functions.
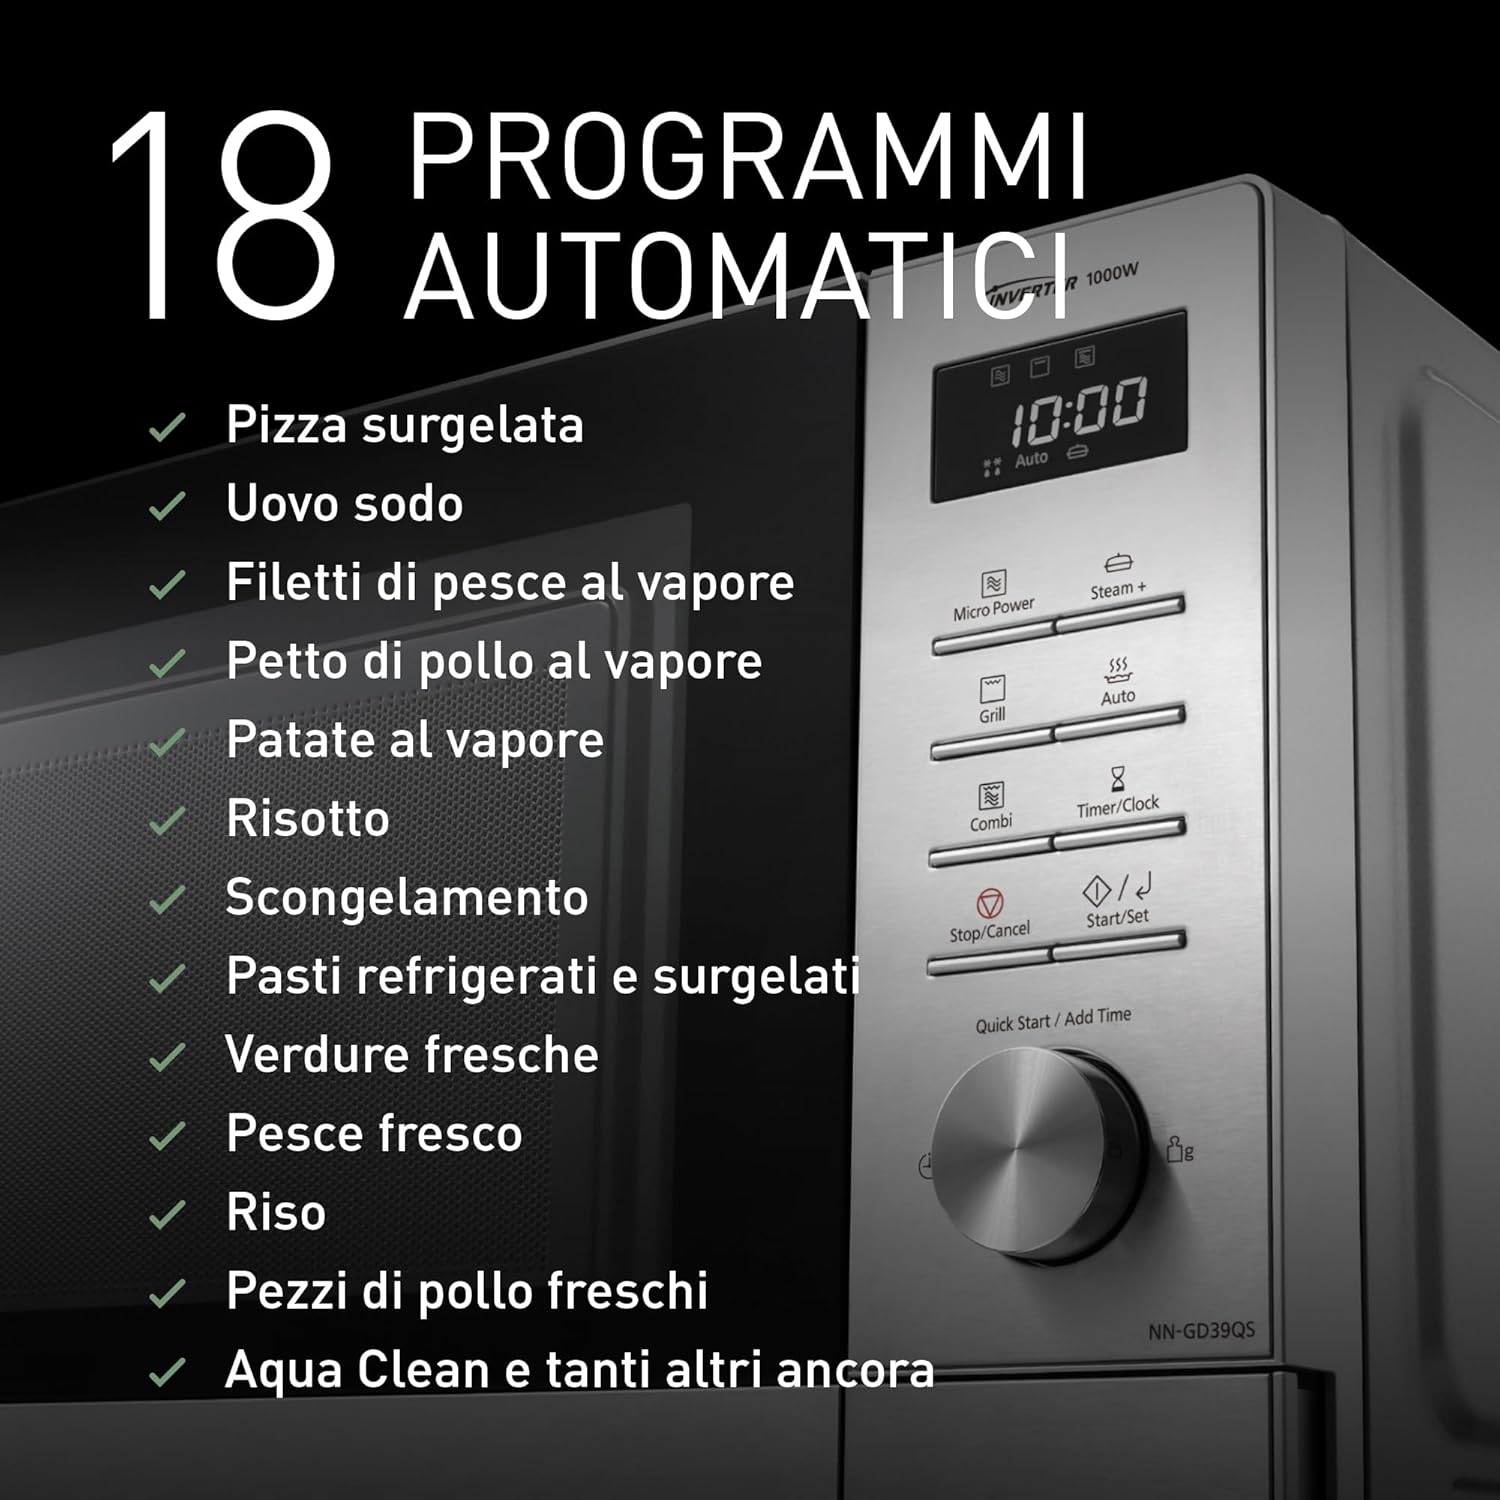
Image 5.1: The control panel of the microwave, illustrating the display and buttons, with a list of 18 automatic programs such as Frozen Pizza, Hard-boiled Egg, Steamed Fish Fillets, Steamed Chicken Breast, Steamed Potatoes, Risotto, Defrost, Refrigerated and Frozen Meals, Fresh Vegetables, Fresh Fish, Rice, Fresh Chicken Pieces, and Aqua Clean.
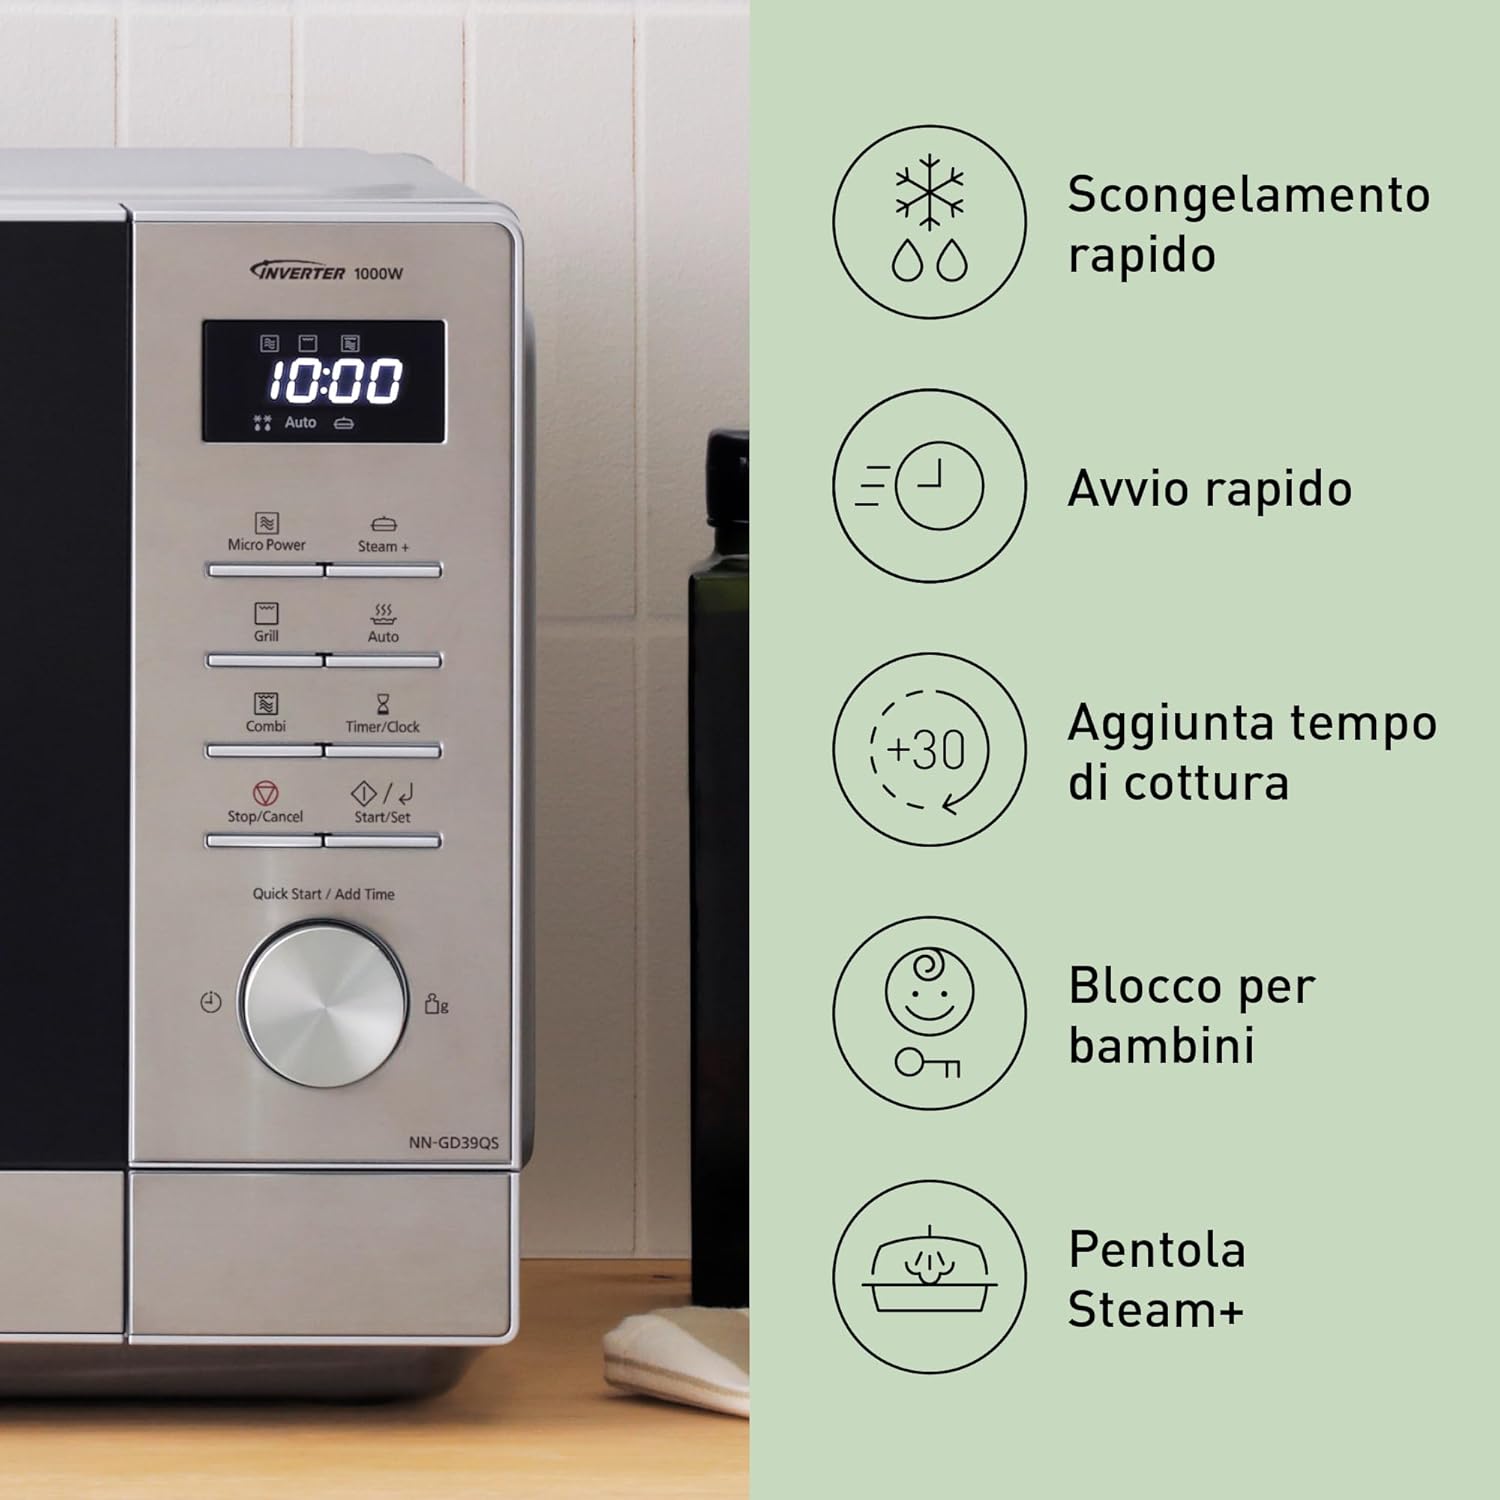
Image 5.2: Close-up of the microwave control panel, indicating key functions such as quick defrost, quick start, adding cooking time, child lock, and the Steam+ pot feature.
5.1 Basic Microwave Cooking
- Place food in a microwave-safe container on the glass turntable.
- Press the Micro Power button.
- Rotate the dial to select the desired power level (e.g., 1000W, 800W, 600W, 440W, 300W, 160W, 100W).
- Rotate the dial again to set the cooking time.
- Press Start/Set to begin cooking.

Image 5.3: Illustration of the microwave's 1000W power and 7 power levels (1000W, 800W, 600W, 440W, 300W, 160W, 100W), emphasizing the Inverter technology for uniform heating and defrosting compared to conventional microwaves.
5.2 Grill Cooking
- Place food on the grill rack in a heat-resistant dish.
- Press the Grill button.
- Rotate the dial to select one of the three grill power levels (e.g., 1000W, 850W, 700W).
- Rotate the dial again to set the cooking time.
- Press Start/Set to begin grilling.
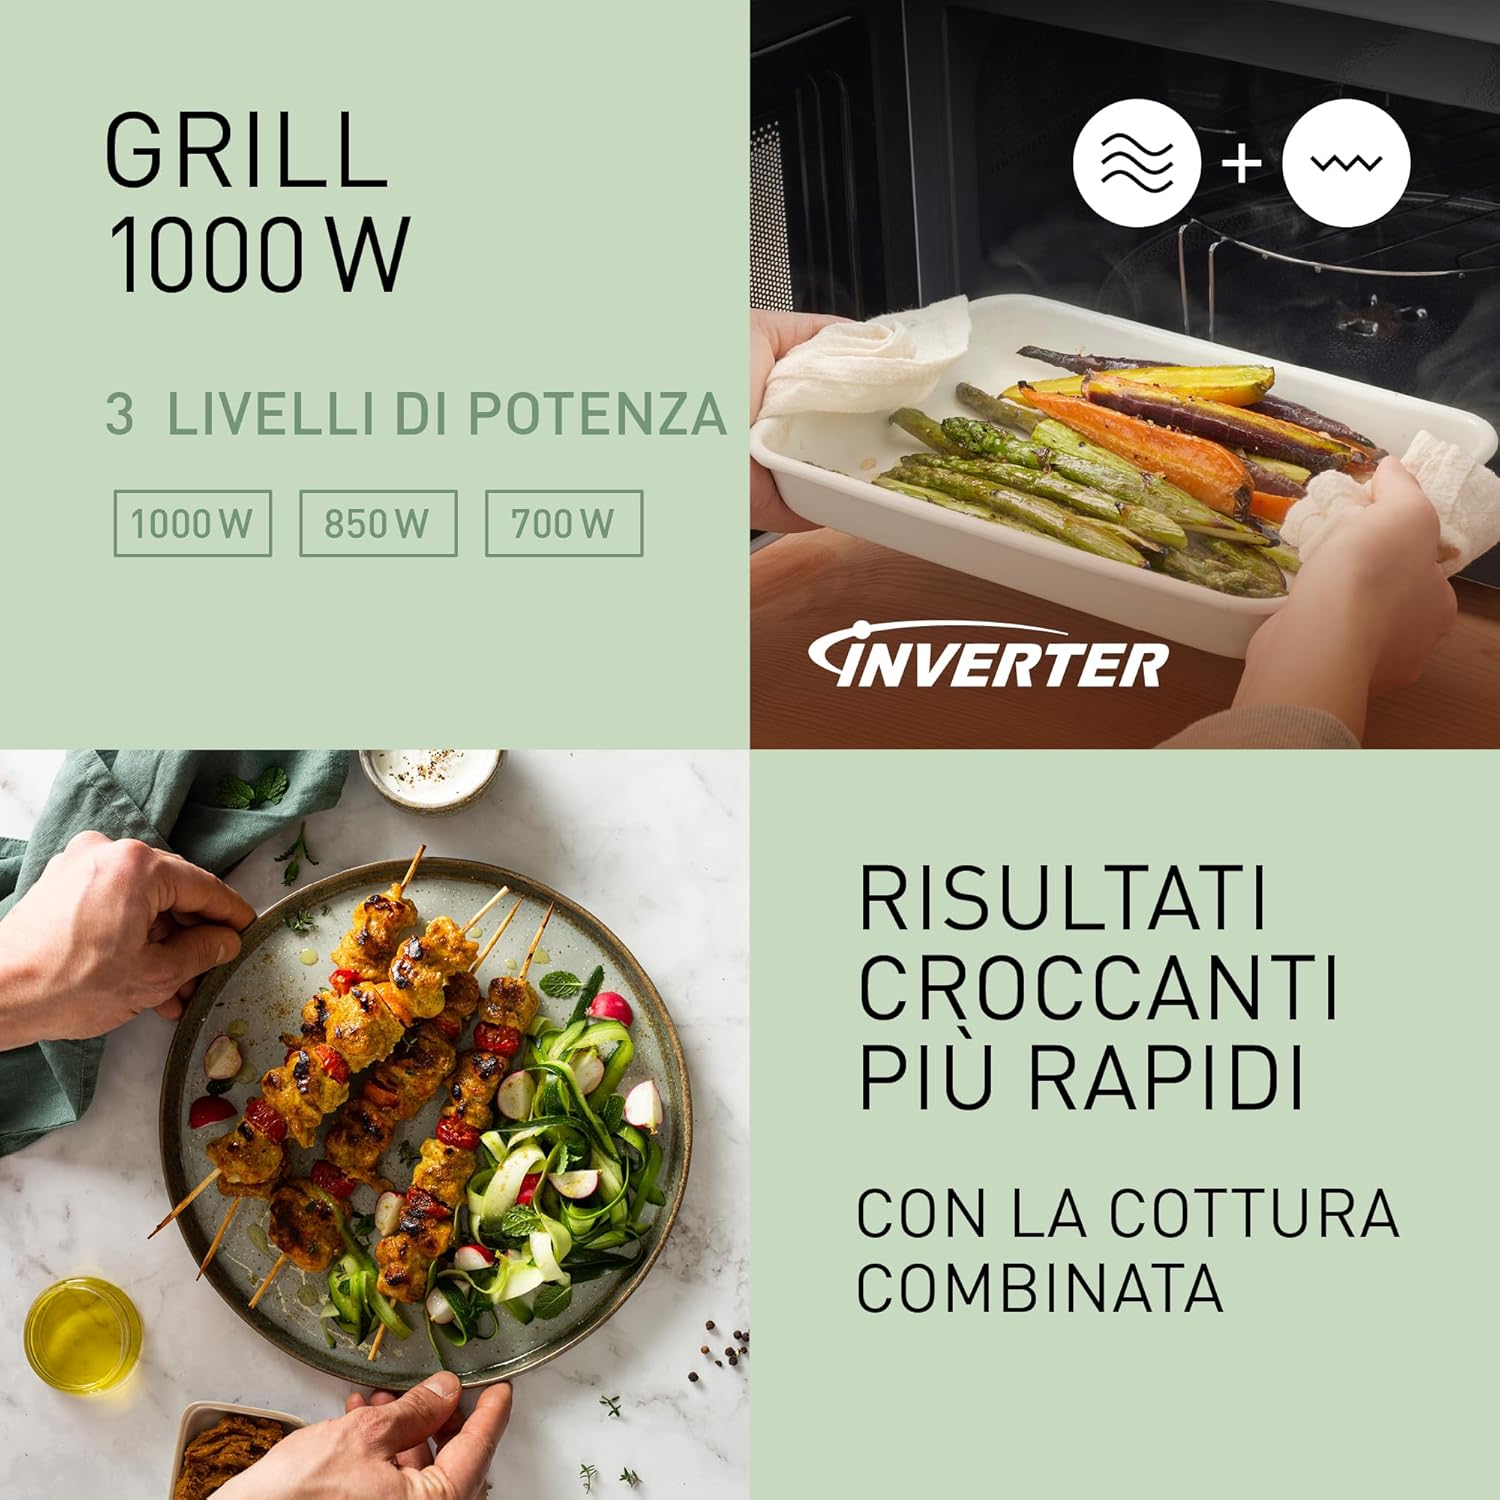
Image 5.4: Displaying the 1000W grill function with 3 power levels (1000W, 850W, 700W) and the benefit of combined cooking for faster, crispier results, shown with grilled vegetables and skewers.
5.3 Combined Cooking
- Place food in a suitable dish.
- Press the Combi button.
- Rotate the dial to select the desired combined cooking mode (e.g., Grill + Microwave).
- Rotate the dial again to set the cooking time.
- Press Start/Set to begin.
5.4 Automatic Programs
The oven features 18 automatic programs for various food types. Refer to the internal label or the full manual for specific program details.
- Press the Auto button.
- Rotate the dial to select the desired automatic program (e.g., Frozen Pizza, Auto Defrost, Fresh Vegetables).
- Press Start/Set. The oven will automatically set the cooking time and power level.
5.5 Automatic Defrost
- Place the frozen food in a microwave-safe dish.
- Press the Auto Defrost button (part of the 18 automatic programs).
- Rotate the dial to select the food type and weight.
- Press Start/Set.
5.6 Using the Steam+ Tray
The Steam+ tray is designed for steaming, slow cooking, pan cooking, and grilling. Always ensure sufficient water is added for steaming functions to prevent damage.
- For steaming, place water in the aluminum pan, then place food on the heat-resistant steam tray, and cover with the stainless steel lid.
- For pan cooking or slow cooking, use the aluminum pan directly.
- Refer to the specific recipes or automatic programs designed for the Steam+ tray.

Image 5.5: The Steam+ Pot in use, showing cooked fish with herbs, illustrating its application for healthy and flavorful meals.
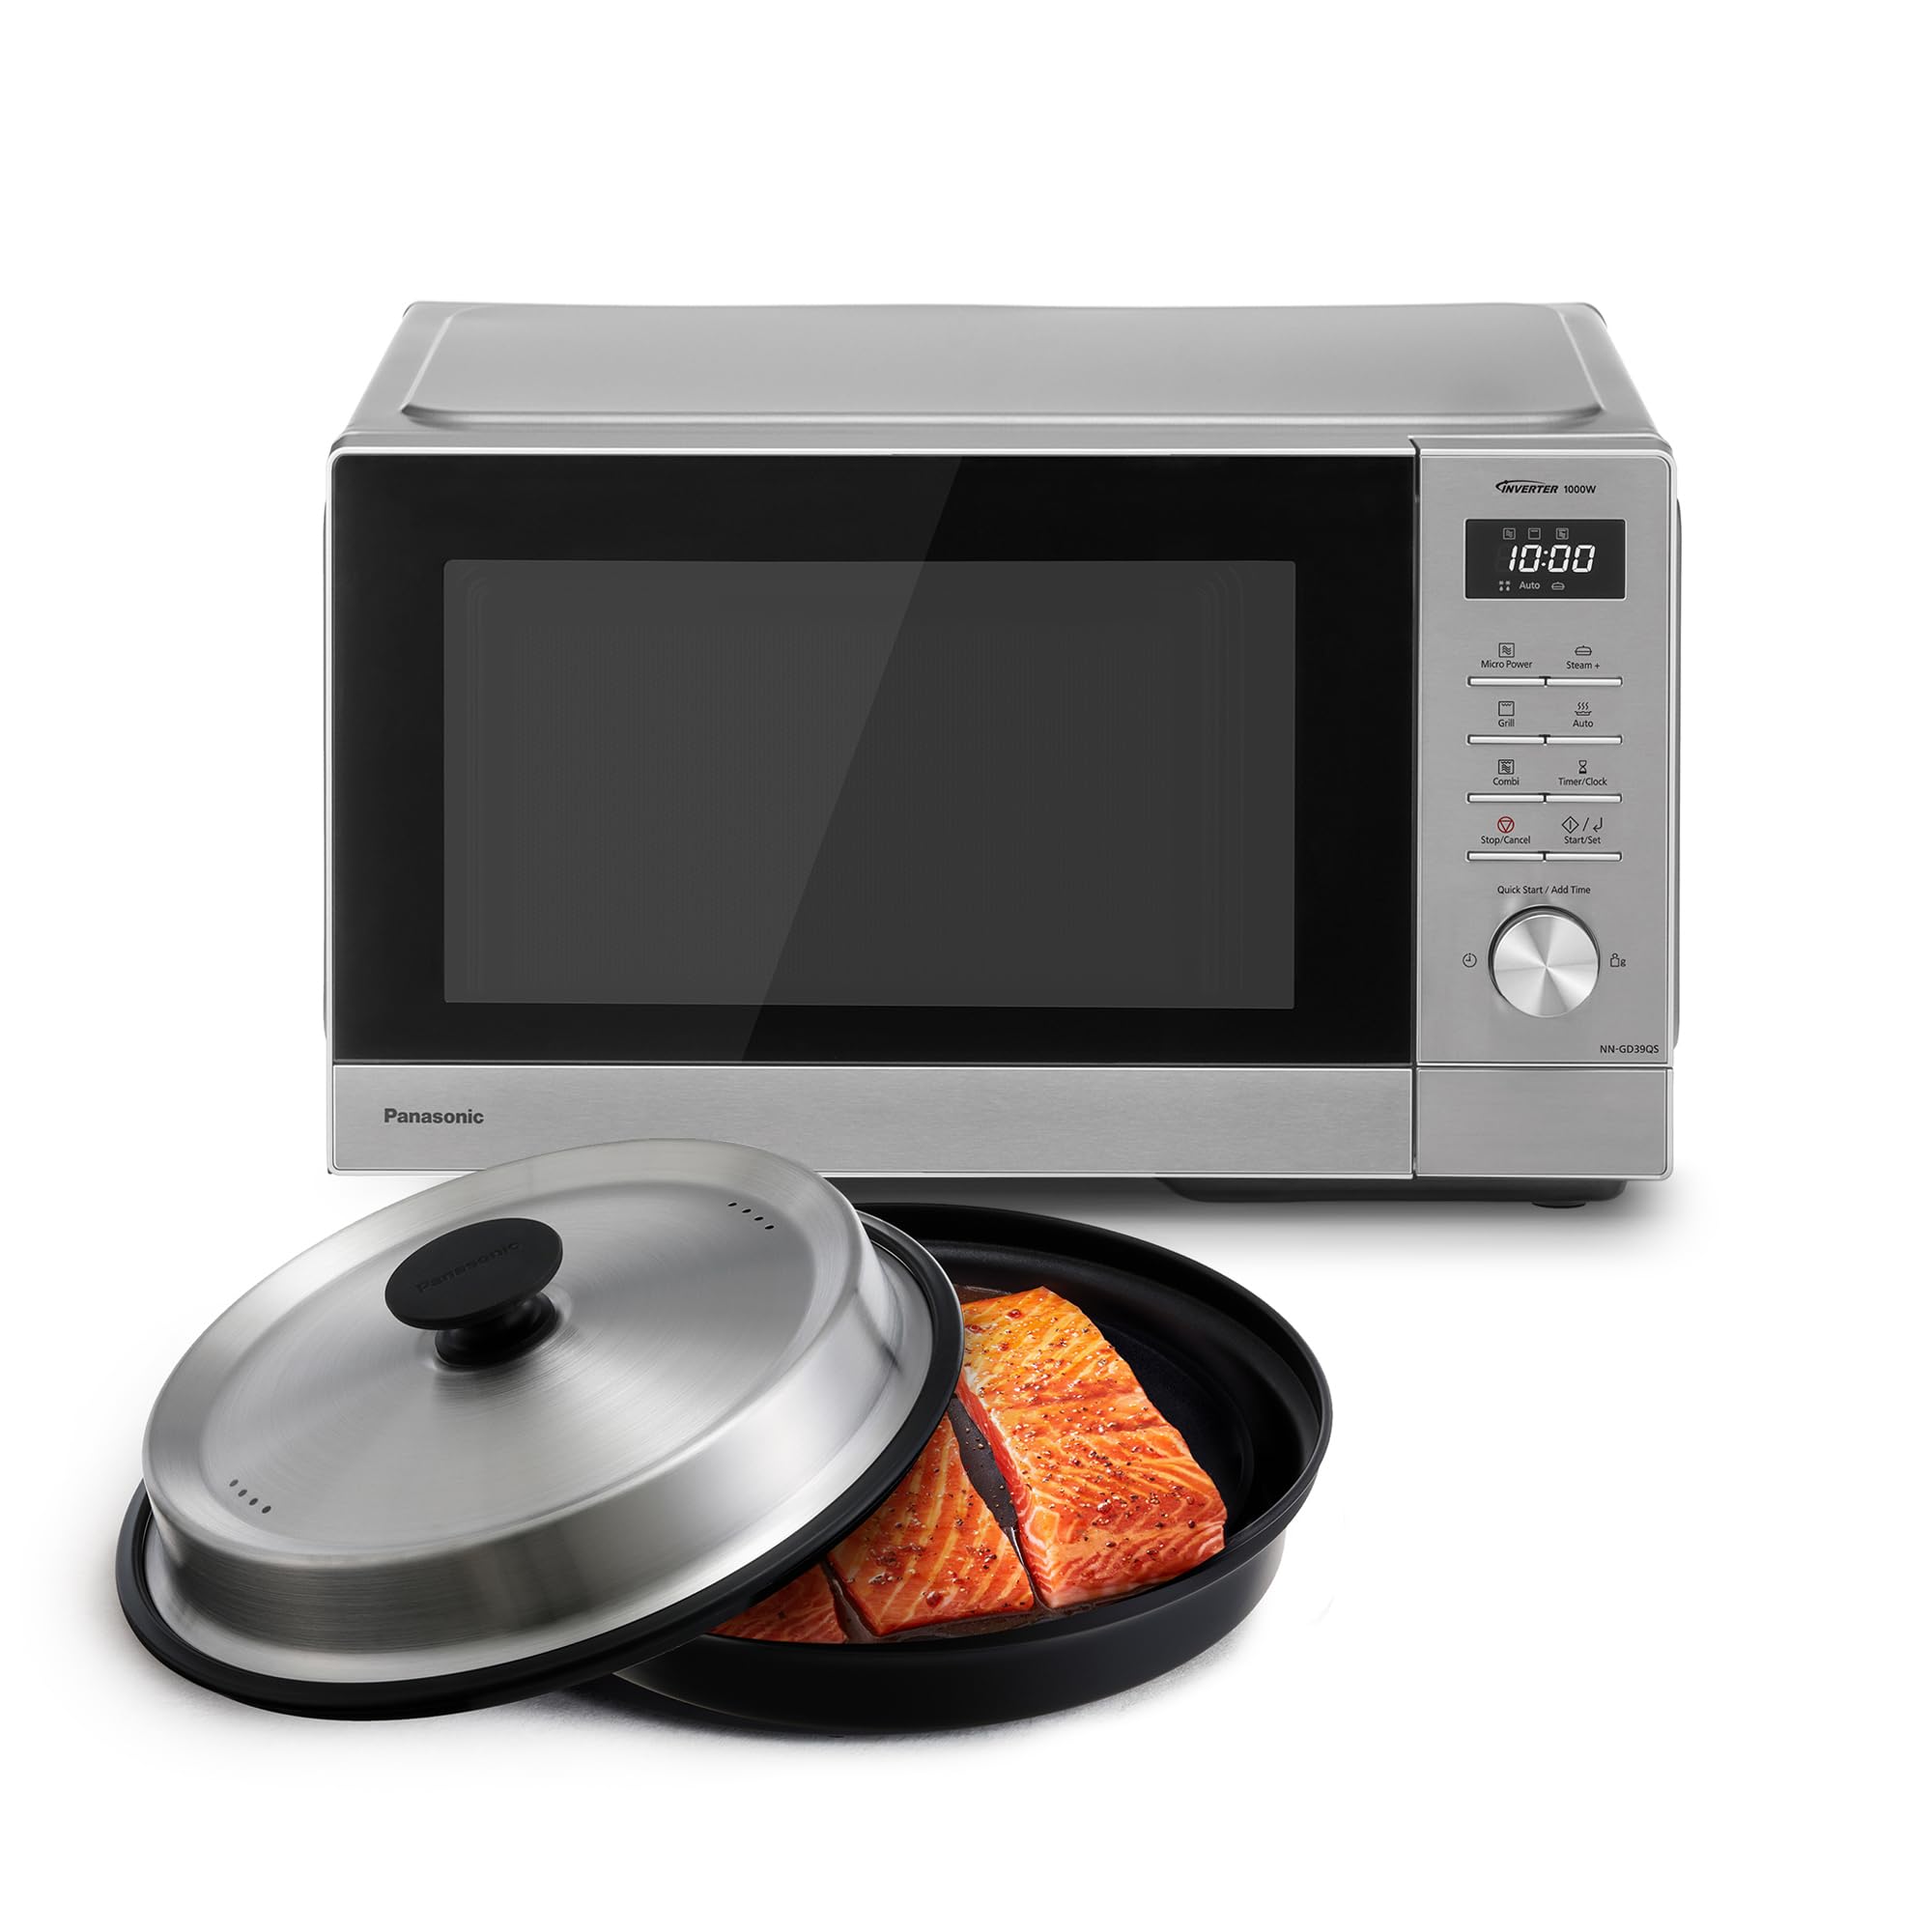
Image 5.6: Visual guide to the versatile cooking methods possible with the Steam+ Pot, including steaming, achieving crispy grill results, frying, and slow cooking, with example dishes for each.
5.7 Other Functions
- Quick Start: Press Quick Start / Add Time to start cooking immediately at full microwave power for 30 seconds. Each press adds 30 seconds.
- Add Cooking Time: During cooking, press Quick Start / Add Time to add 30 seconds to the current cooking time.
- Child Lock: To activate, press and hold the Stop/Cancel button for 3 seconds. The display will show a lock indicator. To deactivate, repeat the process.
- Timer/Clock: Use this button to set the current time or to use the oven as a kitchen timer.
6. Maintenance and Cleaning
Regular cleaning helps maintain the performance and longevity of your microwave oven.
6.1 Interior Cleaning
- After each use, wipe the interior with a damp cloth to remove food splatters.
- For stubborn stains, use a mild detergent or the Aqua Clean program.
- To use Aqua Clean: Place a bowl of water inside the oven. Select the Aqua Clean program (from the 18 automatic programs) and start. The steam generated will loosen food residue, making it easier to wipe clean.
- The interior is made of stainless steel for easy cleaning.

Image 6.1: Demonstrating the simple cleaning process using the Aqua Clean program, showing a hand wiping the microwave interior after the steam cycle.
6.2 Exterior Cleaning
- Wipe the exterior surfaces with a soft, damp cloth.
- Do not use abrasive cleaners or solvents.
- Clean the control panel gently with a damp cloth.
6.3 Accessories Cleaning
- The glass turntable, turntable ring, grill rack, and Steam+ tray components can be washed by hand with warm, soapy water or in a dishwasher (Steam+ tray is dishwasher safe).
- Ensure all accessories are dry before placing them back in the oven.
7. Troubleshooting
If you encounter any issues with your microwave oven, please refer to the following table for common problems and solutions.
| Problem | Possible Cause | Solution |
|---|---|---|
| Oven does not start | Power cord not plugged in; Door not closed properly; Fuse blown or circuit breaker tripped; Child lock activated. | Plug in the power cord; Close the door securely; Check household fuse/circuit breaker; Deactivate child lock. |
| Food not heating evenly | Food not stirred or rearranged; Incorrect power level or cooking time; Turntable not rotating. | Stir or rearrange food during cooking; Adjust power level/time; Ensure turntable and ring are correctly placed. |
| Grill not browning food | Incorrect grill power level; Food too far from heating element. | Increase grill power; Adjust food position closer to the grill element (if safe and applicable). |
| Oven light not working | Bulb needs replacement. | Contact qualified service personnel for bulb replacement. |
| Excessive steam inside oven | High moisture content in food. | This is normal for foods with high water content. Wipe interior after use. |
If the problem persists after trying these solutions, please contact customer support.
8. Specifications
| Feature | Specification |
|---|---|
| Brand | Panasonic |
| Model Name | NN-GD39QSEPG |
| Product Dimensions (DxWxH) | 37.8D x 49.5W x 29.2H cm |
| Color | Silver |
| Capacity | 29 Liters |
| Microwave Power | 1000W (7 power levels) |
| Grill Power | 1000W (3 power levels) |
| Material | Stainless Steel (Interior) |
| Control Type | Dial/Knob |
| Voltage | 230V (AC) |
| Frequency | 2.45 GHz |
| Item Weight | 12 Kilograms |
| Turntable Diameter | 28.8 cm |
| Special Features | Steam+ Tray, Combined Cooking, 18 Automatic Programs, Auto Defrost, Inverter Technology |
| Included Components | Glass Turntable, Turntable Ring, Grill Rack, Steam+ Tray |
9. Warranty and Support
9.1 Product Warranty
This Panasonic NN-GD39QSEPG Microwave Oven comes with a 2-year manufacturer's warranty from the date of purchase. This warranty covers defects in materials and workmanship under normal use. Please retain your proof of purchase for warranty claims.
The warranty does not cover:
- Damage caused by improper use, accident, abuse, or neglect.
- Damage resulting from unauthorized repairs or modifications.
- Normal wear and tear.
9.2 Customer Support
For technical assistance, warranty service, or any questions regarding your Panasonic microwave oven, please contact Panasonic customer support or your local retailer. Contact details can typically be found on the Panasonic official website or in the packaging materials.
When contacting support, please have your model number (NN-GD39QSEPG) and proof of purchase readily available.


