1. Introduction
This user manual provides detailed instructions for the installation, operation, and maintenance of your Jennov 6MP PoE IP Camera. This advanced security camera offers high-resolution surveillance with pan, tilt, and optical zoom capabilities, intelligent detection features, and robust outdoor performance. Please read this manual thoroughly before using the product to ensure proper setup and functionality.

Image: Front view of the Jennov 6MP PoE IP Camera, showcasing its dome design and lens array.
2. Safety Information
- Ensure the camera is installed by qualified personnel and in accordance with local electrical codes.
- Use only the power supply and accessories specified by the manufacturer.
- Do not expose the camera to extreme temperatures, humidity, or corrosive environments.
- Avoid pointing the camera directly at strong light sources, as this may damage the sensor.
- Disconnect power before performing any maintenance or cleaning.
- Keep out of reach of children.
3. Package Contents
Verify that all items listed below are included in your package. If any items are missing or damaged, please contact customer support.
- Jennov 6MP PoE IP Camera
- Ethernet Cable (1M)
- 12V 2A Power Supply
- User Manual
- Waterproof Cap
- Warning Sticker
- Mounting Screws
- Mounting Bracket
Video: This video demonstrates the unboxing process and shows all components included in the Jennov 6MP PoE IP Camera package.
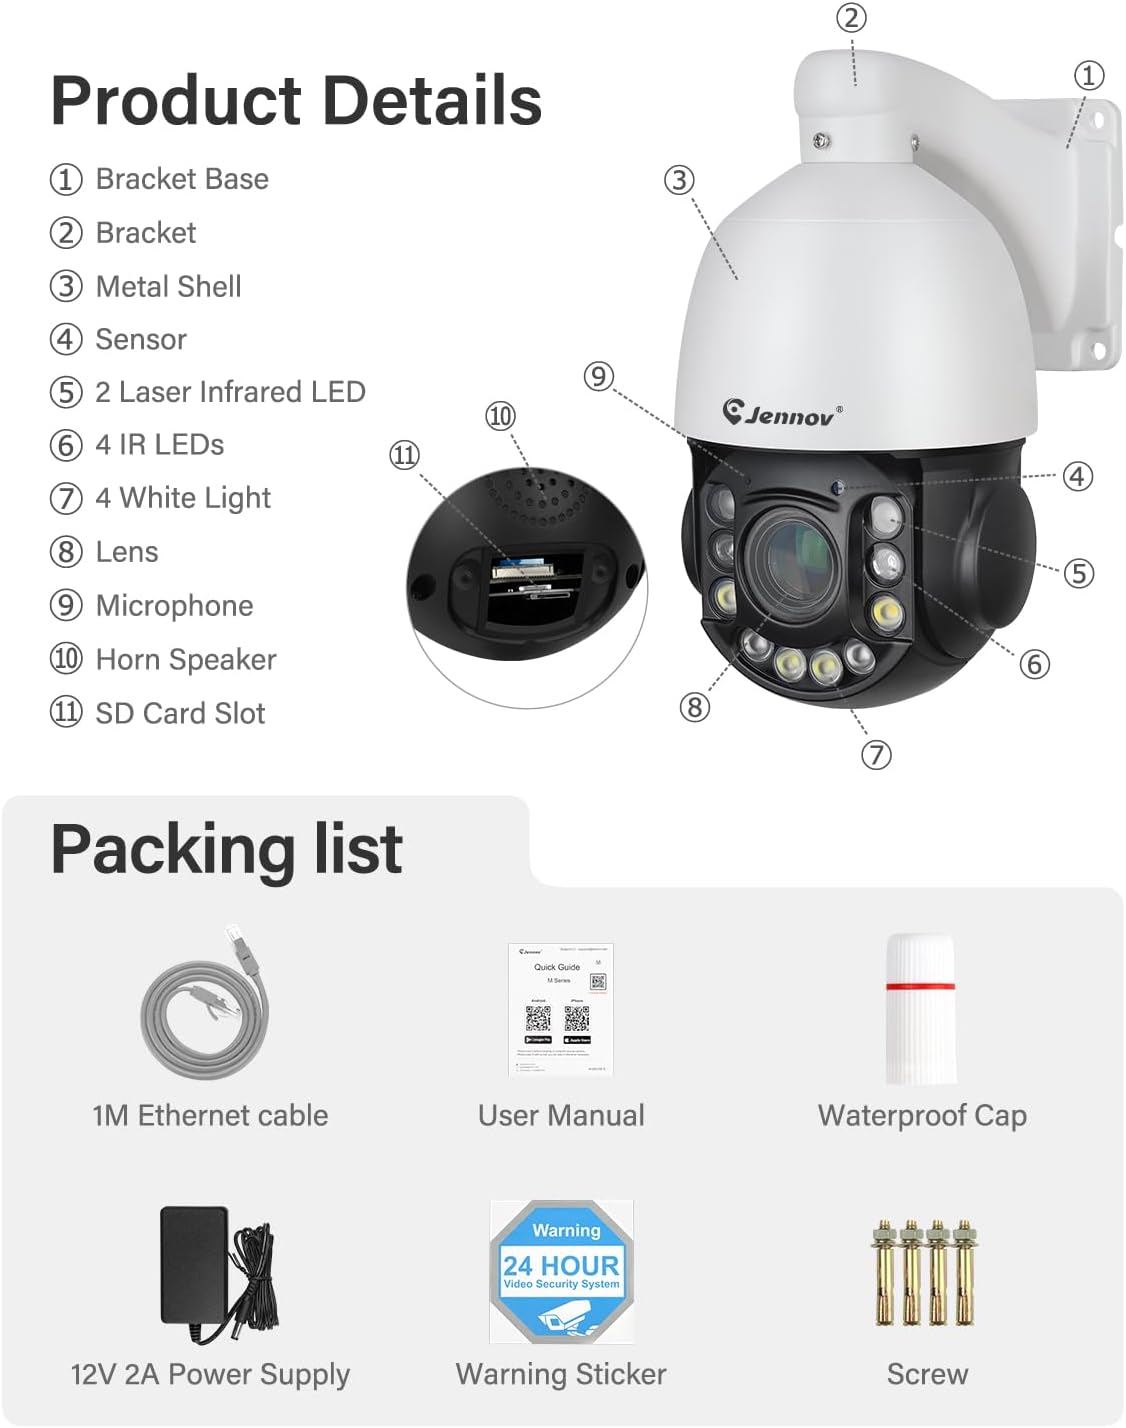
Image: A visual representation of the camera's components and the complete packing list.
4. Product Overview
The Jennov 6MP PoE IP Camera is designed for outdoor surveillance, featuring a robust dome form factor and advanced imaging capabilities. Key components include:
- Lens: Motorized 4.7~94mm lens for 20X optical zoom.
- Infrared Lights: 6 IR lights for night vision up to 160ft.
- White LEDs: 4 white LEDs for color night vision and spotlight alarm.
- Microphone & Speaker: For two-way audio communication.
- SD Card Slot: Supports up to 256GB Micro SD card (not included) for local storage.
- Ethernet Port: For Power over Ethernet (PoE) and data connection.
Image: A detailed diagram labeling the various parts of the Jennov PTZ camera, including the lens, IR lights, white LEDs, microphone, speaker, and SD card slot.
5. Setup
5.1 Mounting the Camera
The camera comes with a wall mount bracket. Choose a suitable outdoor location that provides the desired viewing angle and is within reach of your network cable. Secure the bracket firmly to a solid surface using the provided screws.
5.2 Power and Data Connection (PoE)
This camera supports Power over Ethernet (PoE), simplifying installation by delivering both power and data through a single Ethernet cable. Connect one end of the Ethernet cable to the camera's Ethernet port and the other end to a PoE NVR, PoE switch, or PoE injector.

Image: Diagram illustrating how to connect the camera using Power over Ethernet (PoE) to a PoE NVR or PoE switch, simplifying wiring.
5.3 Alternative Power Connection (DC)
If PoE is not available, you can power the camera using the included 12V 2A power supply. Connect the power supply to the camera's DC input port and plug it into a standard electrical outlet. An Ethernet cable will still be required for data connection to your router or NVR.

Image: This image shows both PoE and DC power connection methods for the camera, along with basic setup questions and answers.
5.4 Initial Setup
After connecting the camera, power it on. For initial setup and configuration, you can:
- Scan the QR code via the Videolink App (if applicable) for mobile access.
- Directly view the camera on your NVR User Interface (UI) if using an NVR system.
- Access the camera's web interface via its IP address for advanced settings.
6. Operating Instructions
6.1 Pan, Tilt, and Zoom (PTZ) Control
The camera offers 360° pan and 90° tilt capabilities, allowing you to remotely adjust the viewing angle. The 20X optical zoom and 10X digital zoom enable you to focus on specific details without compromising image quality.
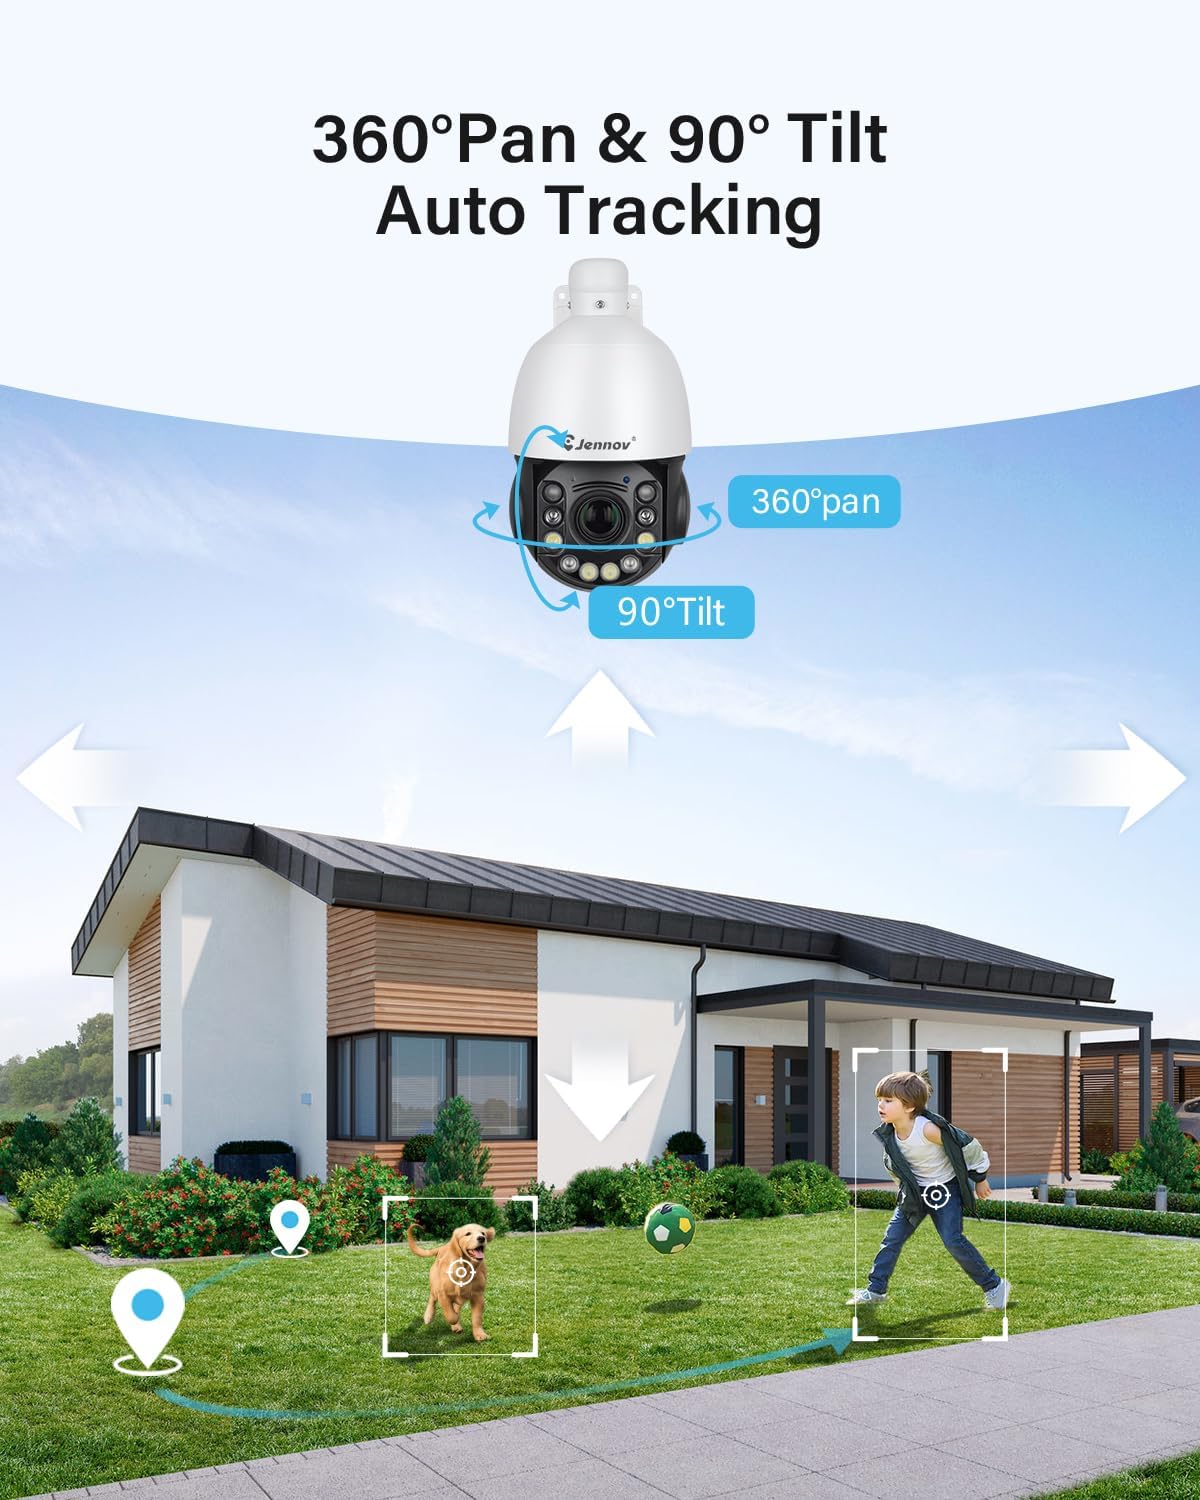
Image: Illustration showing the camera's 360-degree pan and 90-degree tilt movement, with auto-tracking functionality.
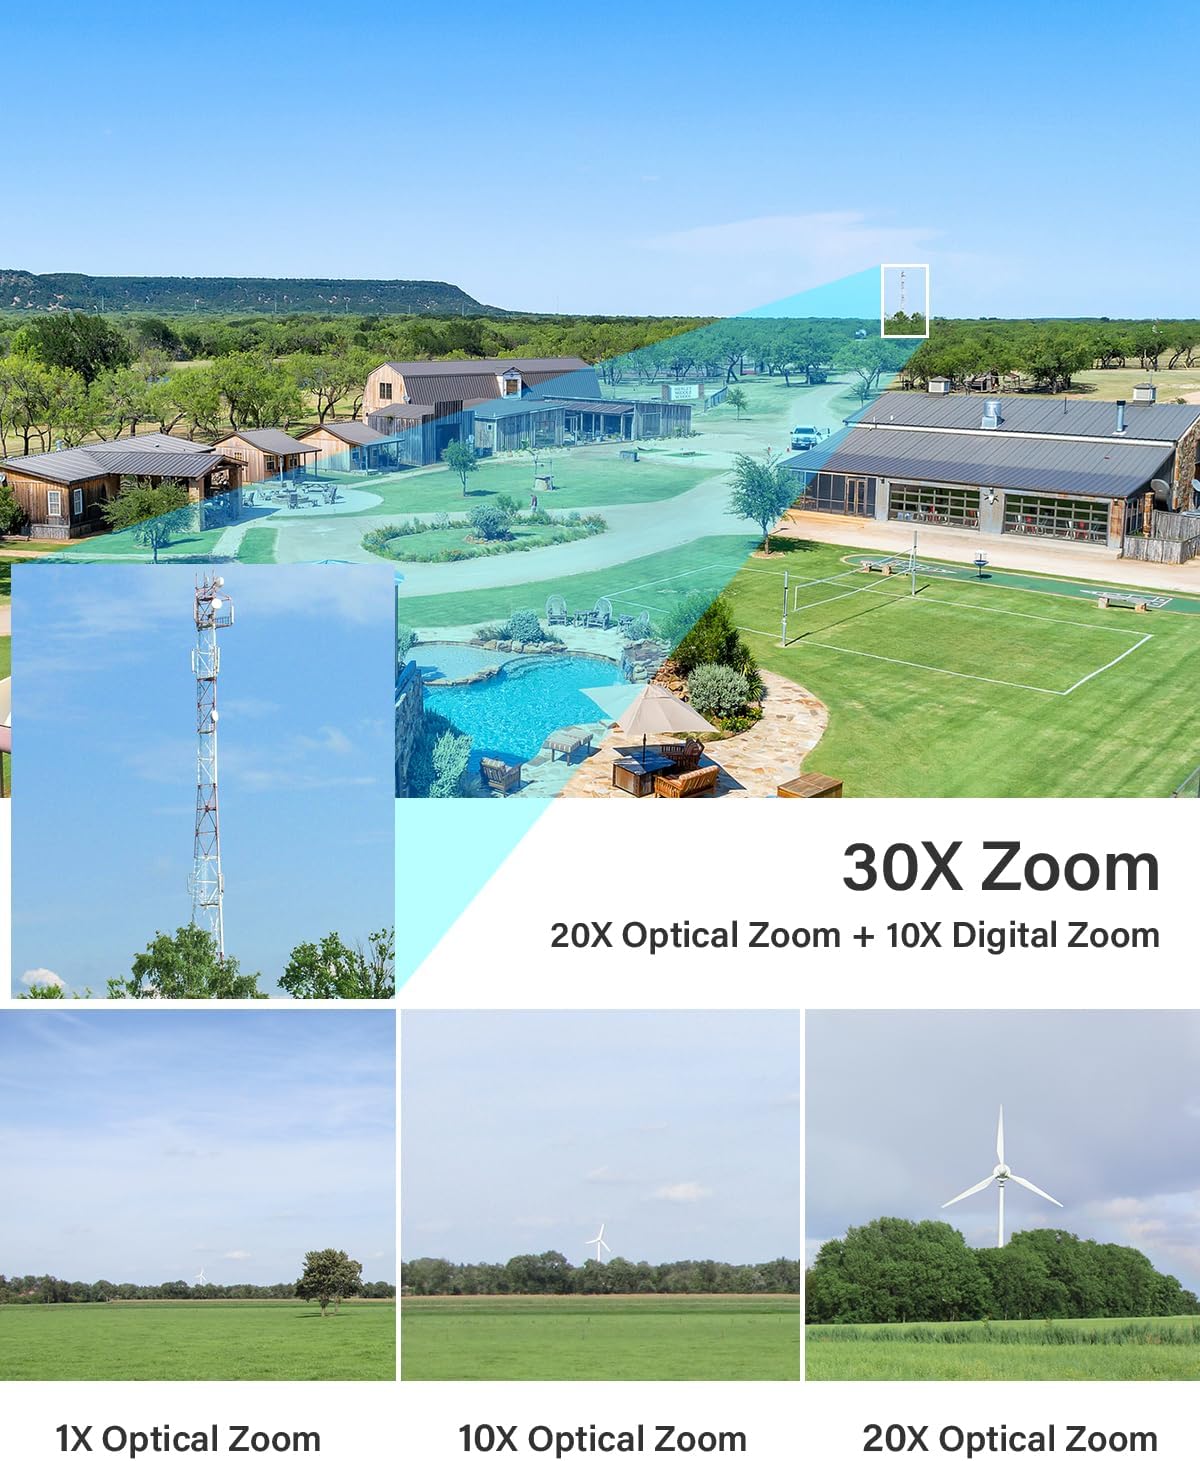
Image: Demonstrates the camera's 20X optical zoom and 10X digital zoom, showing clear details at various zoom levels.
6.2 Auto Tracking & Human Detection
The camera can automatically track detected human figures within its field of view. You can adjust the detection area and sensitivity to minimize false alarms. When a person is detected, the camera can send real-time video or snapshots to your mobile phone.
The system supports 8 cruising routes, each with up to 16 preset positions, allowing the camera to cyclically patrol designated areas.

Image: Illustrates the camera's ability to detect and differentiate between humans and vehicles, triggering alerts.
6.3 Color Night Vision & Sound-Light Alarm
Equipped with 6 infrared lights and 4 white LEDs, the camera offers three night vision modes:
- Infrared Mode: Standard black and white night vision.
- White Light Mode: Activates white LEDs for full-color night vision.
- Intelligent Mode: Automatically switches to color night vision when suspicious activity is detected.
When suspicious activities are detected, the camera can trigger an audio alarm and activate the white LEDs for enhanced deterrence.

Image: Comparison of night vision modes, showing the difference between infrared (black and white) and color night vision with spotlights activated.

Image: Depicts the camera's sound-light alarm system, showing how it can deter intruders with spotlights and sirens upon detection.
6.4 Two-Way Audio
The integrated microphone and speaker allow for real-time two-way communication. You can listen to the camera's surroundings and speak through the camera from your monitoring device.

Image: Illustrates the two-way audio feature, showing a person speaking through the camera to a delivery person.
6.5 Recording and Storage
The camera supports continuous recording, motion-triggered recording, and scheduled recording. Footage can be stored on a Micro SD card (up to 256GB, not included) or via an NVR/FTP server.

Image: Shows the camera's support for up to 256GB Micro SD card for local storage and compatibility with Jennov NVR/FTP for 24/7 recording.
6.6 Multi-user Sharing & Remote Access
You can share camera access with multiple users (up to 5 simultaneous viewers) through the main account. The camera feed can be viewed remotely on various devices, including smartphones, tablets, and desktop computers, using the dedicated application or web interface.

Image: Illustrates the capability to view the camera feed remotely on various devices such as smartphones, tablets, and laptops.
7. Maintenance
- Cleaning: Regularly clean the camera lens with a soft, damp cloth to ensure clear image quality. Do not use harsh chemicals or abrasive cleaners.
- Firmware Updates: Check for and install firmware updates periodically to ensure optimal performance, security, and access to new features. Refer to the manufacturer's website or app for update instructions.
- Cable Inspection: Periodically inspect all cables for signs of wear or damage, especially in outdoor environments.
- IP66 Waterproof: The camera is IP66 rated for outdoor use, ensuring protection against dust and strong jets of water. However, avoid submerging the camera in water.

Image: Shows the camera installed outdoors during rainfall, highlighting its IP66 waterproof rating.
8. Troubleshooting
If you encounter issues with your Jennov 6MP PoE IP Camera, refer to the common questions and solutions below:
Image: Provides answers to frequently asked questions regarding PoE compatibility, initial camera setup, and locating the reset button.
Common Issues & Solutions:
- Q: Is this PoE camera compatible with third-party software/system/NVR?
A: The PoE cameras are compatible with Videolink. If a third-party supports the Onvif protocol, then it is also compatible. - Q: How to get the camera working?
A: 1. Power up the camera. 2. Do the initial setup. 3. Scan the QR code via Videolink App or directly view the cam on the NVR UI. - Q: Where can I find the reset button?
A: You can open the cover on the back of the camera and find the reset button (next to the SD card slot). You can also reset the camera in the following ways:
Videolink: Click "Config" > Factory Reset
LMS: Right click IP address > Restore
AjDevTools: Click Start Search > Tick the camera IP address > Click Batch Reset - No Power: Ensure the power adapter is securely connected and the outlet is functional. If using PoE, verify the PoE NVR/switch is providing power and the Ethernet cable is not damaged.
- No Image: Check network connectivity. Ensure the camera is properly connected to the NVR/router. Verify IP address settings if configured manually.
- Poor Image Quality: Clean the camera lens. Check for obstructions in the camera's field of view. Ensure sufficient lighting for optimal image capture.
- Motion Detection Not Working: Verify motion detection settings in the camera's software. Adjust sensitivity and detection zones.
9. Specifications
| Feature | Specification |
|---|---|
| Model Name | PS6009 |
| Video Capture Resolution | 6MP |
| Indoor/Outdoor Usage | Outdoor |
| Connectivity Protocol | Ethernet, Onvif |
| Power Source | Corded Electric (PoE or 12V DC) |
| Mounting Type | Wall Mount |
| Form Factor | Dome |
| Special Features | HD Resolution, Night Vision (IR & Color), 2-Way Audio, PTZ Technology (Pan, Tilt, 20X Optical Zoom), Human Detection, Auto Tracking, Sound-Light Alarm, IP66 Waterproof |
| Product Dimensions | 4 x 4 x 10 inches |
| Item Weight | 4.47 pounds |
| Included Components | Camera, Ethernet cable, Power supply |
10. Warranty Information
Jennov products typically come with a limited warranty covering manufacturing defects. Please refer to the warranty card included in your package or visit the official Jennov website for specific warranty terms and conditions, including duration and coverage details. Keep your purchase receipt as proof of purchase for warranty claims.
11. Customer Support
For technical assistance, product inquiries, or warranty claims, please contact Jennov customer support through the following channels:
- Website: Visit the official Jennov website for FAQs, support resources, and contact forms.
- Email: Refer to your product packaging or the official website for customer service email addresses.
- Phone: Check the official Jennov website for available phone support numbers.
When contacting support, please have your product model number (PS6009) and purchase information ready.


