1. Introduction
This manual provides detailed instructions for the installation, operation, and maintenance of your MAHVEC 4G+64G Android Car Stereo. This unit is designed to enhance your driving experience with advanced features such as Wireless CarPlay, Android Auto, GPS navigation, Bluetooth 5.0, and a high-resolution IPS touch screen. Please read this manual thoroughly before installation and use to ensure proper functionality and safety.
2. Compatibility
This MAHVEC car stereo is specifically designed for Honda Civic models manufactured between 2013 and 2017. Before installation, verify that your vehicle's dashboard configuration matches the compatible designs shown below. Ensure the shape of your center console is suitable for this unit.
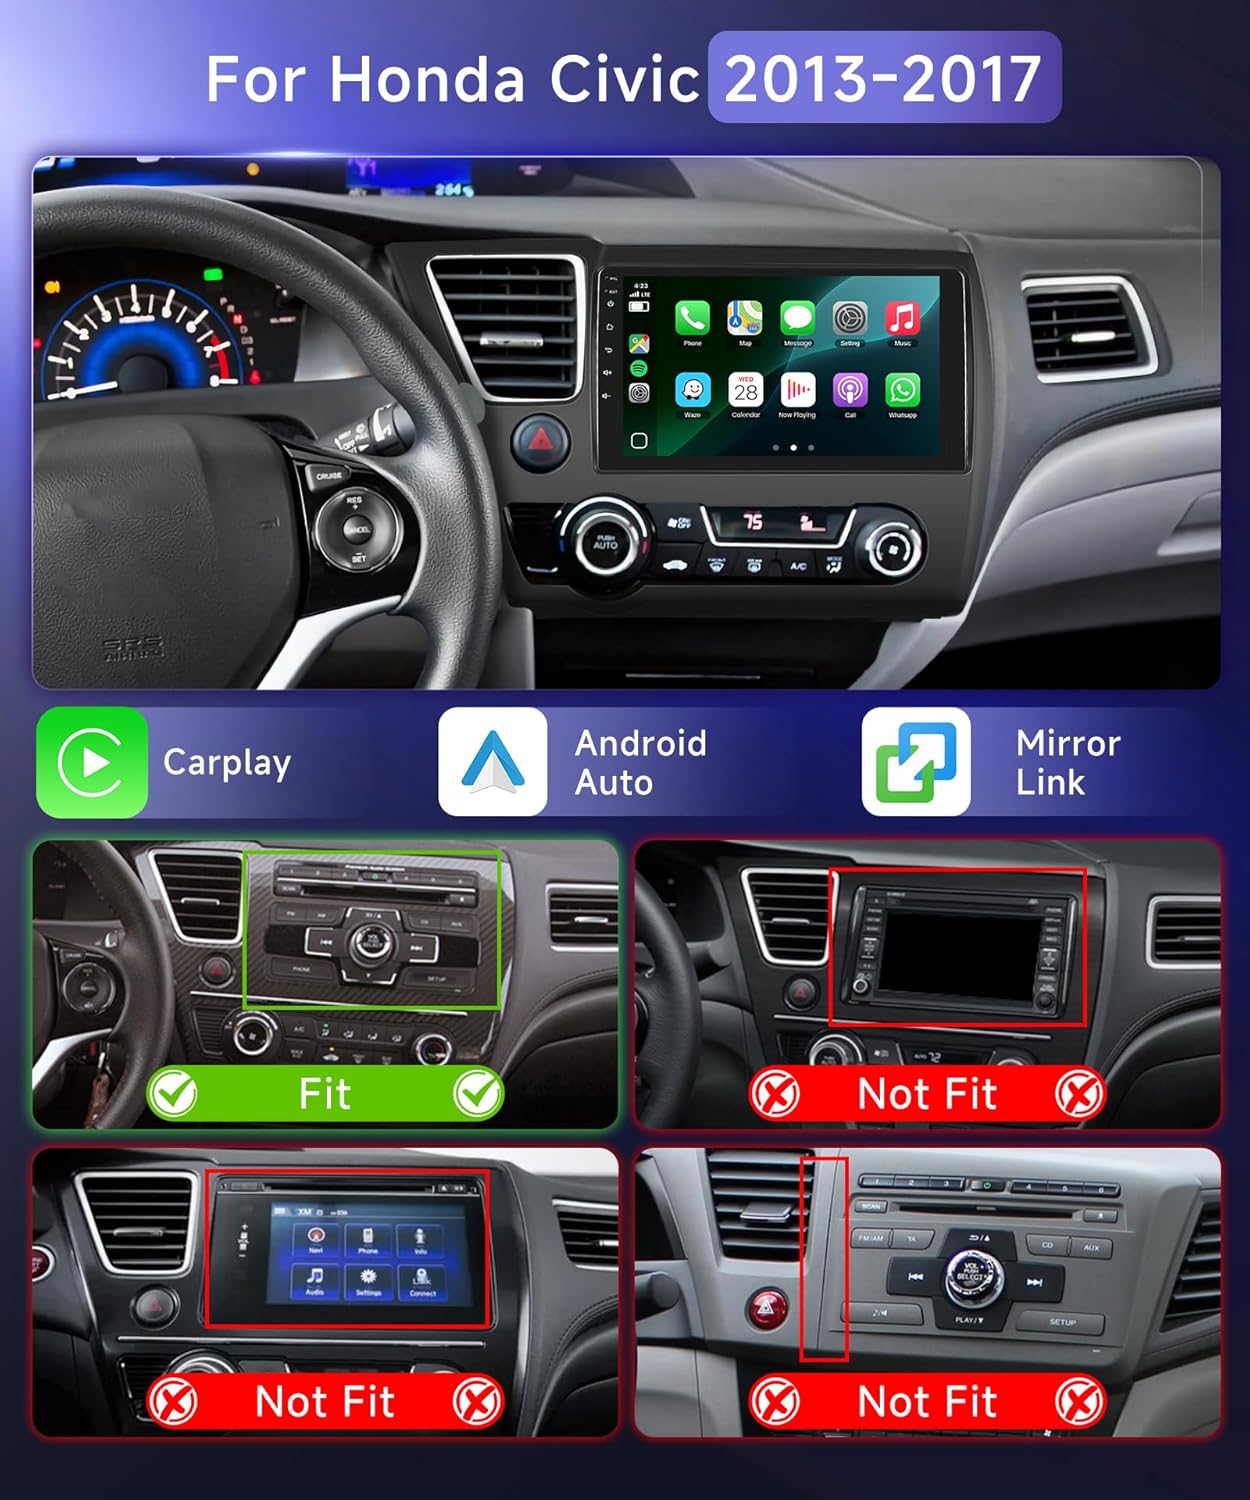
Figure 2.1: Dashboard compatibility for Honda Civic 2013-2017. The top image shows the MAHVEC stereo installed in a compatible dashboard. The bottom images illustrate incompatible dashboard types, marked with 'Not Fit'.
3. What's in the Box
Carefully unpack the box and ensure all items listed below are present and in good condition. If any items are missing or damaged, please contact customer support.
- MAHVEC Car Stereo Unit
- RCA Cable
- GPS Antenna
- Rear Camera Input Cable
- USB Cable
- User Manual (this document)
- Microphone (MIC)
- Rear Camera (AHD Backup Camera)
- Installation Tool Kit
- Power Cable (x2, for different vehicle configurations)
- Original USB Cable
- Canbus Decoder (if applicable for your vehicle model)

Figure 3.1: Contents of the MAHVEC car stereo package, including the main unit, cables, antennas, camera, and tools.
4. Setup and Installation
Professional installation is recommended. Disconnect the vehicle's battery before beginning installation to prevent electrical damage.
4.1 General Installation Steps
- Remove Original Radio: Carefully remove the existing car radio and dashboard trim using the provided installation tools. Refer to specific Honda Civic dashboard removal guides if needed.
- Connect Wiring Harness: Connect the MAHVEC car stereo's wiring harness to the vehicle's factory harness. Ensure all connections are secure.
- Install GPS Antenna: Mount the GPS antenna in a location with a clear view of the sky, typically on the dashboard or under the windshield, ensuring it is not obstructed by metal.
- Install WiFi/Bluetooth Antenna: Connect the WiFi/Bluetooth antenna to the designated port on the stereo unit.
- Test Connections: Before fully reassembling the dashboard, temporarily reconnect the car battery and power on the stereo to test basic functions (power, audio, touch screen).
- Secure Unit: Mount the MAHVEC car stereo into the dashboard opening using the provided frame and brackets.
- Reassemble Dashboard: Reinstall all dashboard trim pieces removed earlier.
4.2 Wiring Instructions
Refer to the following diagrams for detailed wiring connections. Ensure correct polarity and secure connections for all cables.

Figure 4.1: General wiring diagram for the car stereo, illustrating connections for power, audio, USB, and antenna.
4.3 Backup Camera Installation
The included AHD backup camera provides a 170° wide-angle view with night vision and IP69K waterproofing. Proper installation is crucial for safety.
- Mount Camera: Install the backup camera at the rear of your vehicle, typically near the license plate light, ensuring a clear view.
- Route Cable: Route the camera's video cable from the rear of the vehicle to the car stereo unit, ensuring it is protected from damage.
- Connect Power: Connect the camera's red power wire to the vehicle's reverse light positive (+) wire. Connect the black ground wire to a suitable chassis ground.
- Connect Video Input: Plug the camera's video RCA cable into the "CAM IN" or "REVERSE CAMERA" input on the car stereo.
- Reverse Trigger: Connect the reverse trigger cable (labeled "BACK" or "REVERSE") from the stereo's harness to the vehicle's reverse light signal wire. This tells the stereo to switch to the camera view when reverse gear is engaged.

Figure 4.2: Backup camera wiring diagram, showing connections for power, video, and reverse trigger.
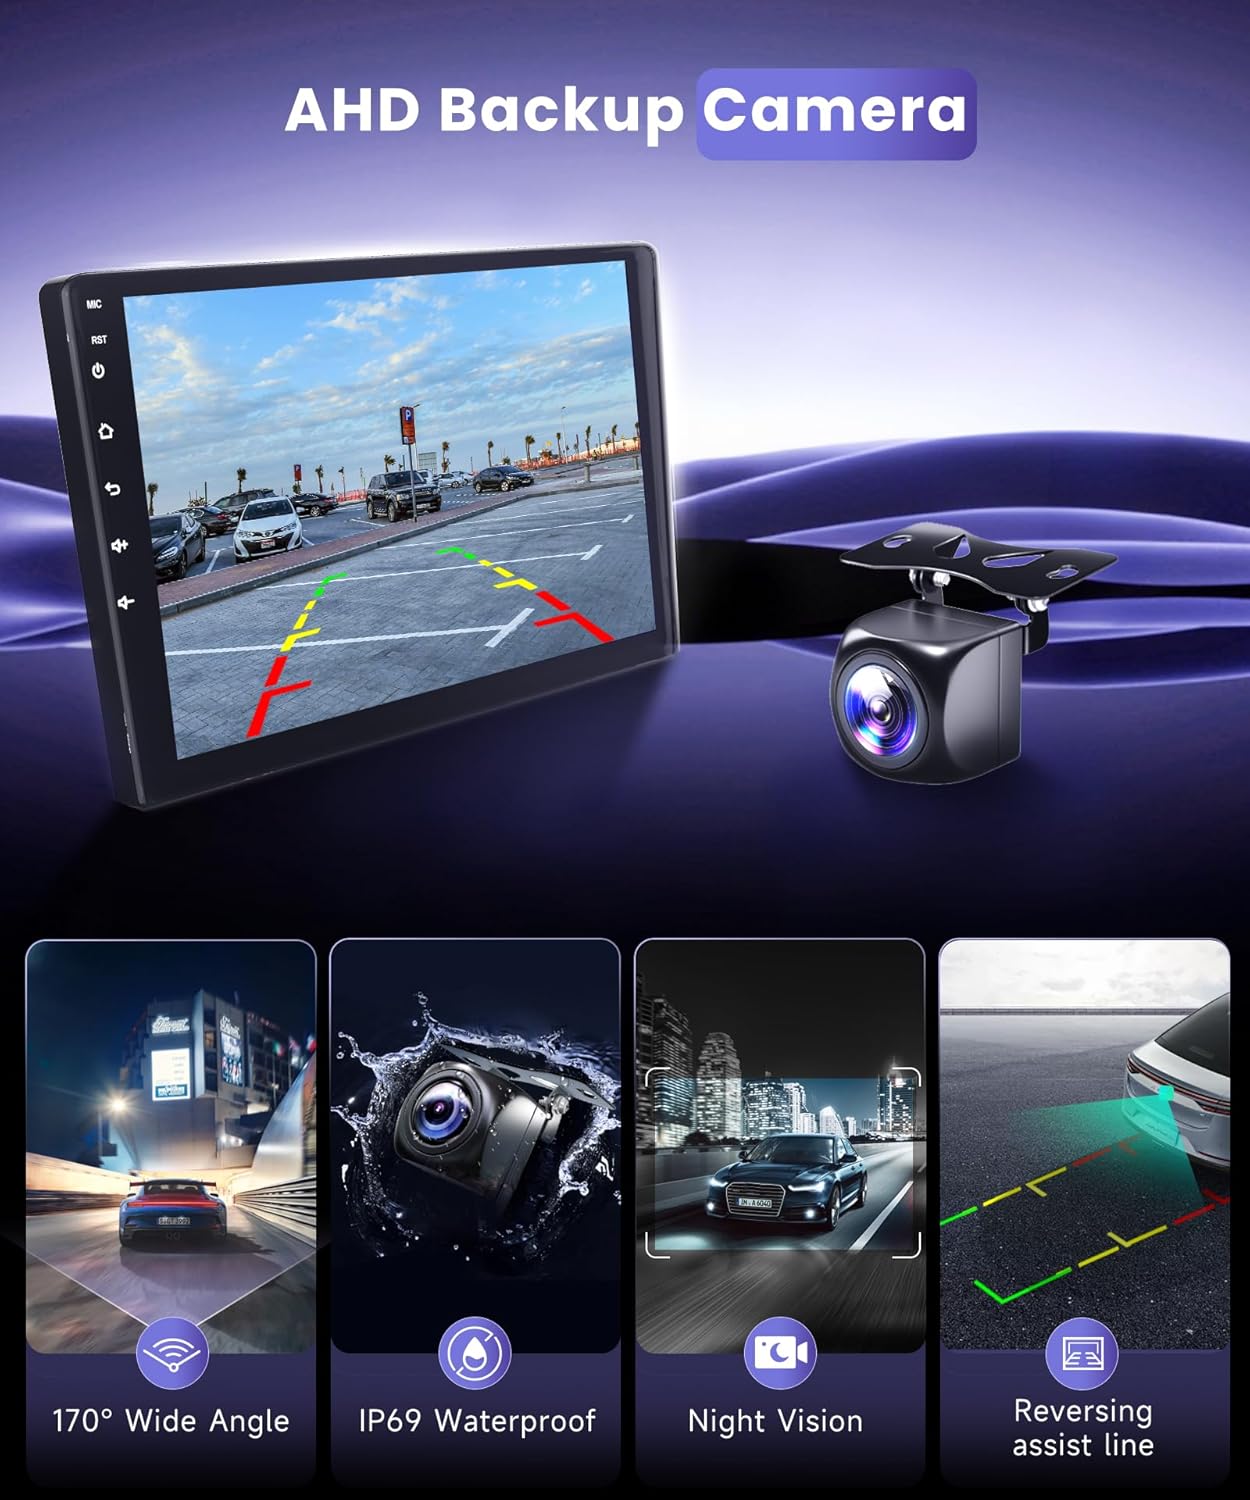
Figure 4.3: AHD Backup Camera features: 170° wide angle, IP69K waterproof, night vision, and reversing assist lines.
5. Operating Instructions
This section details the primary functions and features of your MAHVEC car stereo.
5.1 Power On/Off and Basic Interface
The unit powers on automatically with the vehicle's ignition. The 9-inch IPS touch screen provides a clear 1280x720P resolution display. The interface features a customizable 3-panel homepage and supports various user themes.

Figure 5.1: Overview of the MAHVEC car stereo's main display and key features.
5.2 Wireless CarPlay and Android Auto
The stereo supports wireless connections for Apple CarPlay and Android Auto, allowing seamless integration of your smartphone for navigation, music, and communication.
- Pair Bluetooth: On your smartphone, enable Bluetooth and pair it with the car stereo.
- Launch App: Open the "Apple CarPlay" or "Android Auto" application on the car stereo's touchscreen.
- Connect: Wait for the connection to establish. Your phone's interface will then be displayed on the stereo screen.

Figure 5.2: Connection steps for Wireless CarPlay and Android Auto.
5.3 Bluetooth 5.0
Bluetooth 5.0 enables hands-free calling, music streaming, and file transfers. The enhanced directional Bluetooth ensures precise positioning for calls.
- Hands-free Calling: Make and receive calls directly from the stereo screen.
- Bluetooth Music: Stream audio from your paired device.
- Bluetooth Transmission: Transfer files between devices.

Figure 5.3: Bluetooth 5.0 functionality for calls and audio.
5.4 GPS Navigation and WiFi
The unit includes offline GPS navigation and WiFi connectivity for online maps and updates. Real-time traffic updates can streamline your commute.
- Offline Maps: Pre-downloaded maps allow navigation without an internet connection.
- Online Maps: Connect to WiFi for real-time traffic, map updates, and access to online navigation services.
- WiFi Connection: Provides stable and fast internet access for online content and app downloads.

Figure 5.4: Offline and online GPS navigation with WiFi connectivity.
5.5 FM/RDS Radio
The built-in FM/RDS radio allows you to listen to music, news, and traffic updates. RDS (Radio Data System) provides additional information like station name and song title.

Figure 5.5: FM/RDS Radio interface.
5.6 DSP 32-Band EQ
The Digital Sound Processor (DSP) with a 32-band equalizer allows for precise audio customization, enhancing the car audio experience with rich, live-like sound. Adjust settings to match your preferences for various music genres.

Figure 5.6: DSP 32-band equalizer for audio customization.
5.7 Steering Wheel Control (SWC)
If your vehicle supports it, connect the SWC wires to enable hands-free control of audio volume, track adjustments, and call management directly from your steering wheel buttons.
5.8 MirrorLink
MirrorLink allows you to mirror your smartphone's screen onto the car stereo display, enabling you to view compatible apps and content directly on the larger screen.
5.9 Split Screen Functionality
The split-screen feature allows you to run two applications simultaneously on the display, such as navigation on one side and music on the other.

Figure 5.7: Split screen display for multitasking.
6. Maintenance
Proper maintenance ensures the longevity and optimal performance of your car stereo.
- Screen Cleaning: Use a soft, lint-free cloth to gently wipe the touch screen. For stubborn smudges, slightly dampen the cloth with water or a screen-safe cleaner. Avoid harsh chemicals.
- Software Updates: Periodically check for available software updates via the system settings. Updates can improve performance, add features, and fix bugs. Connect to a stable WiFi network for updates.
- Environmental Care: Avoid exposing the unit to extreme temperatures, direct sunlight for prolonged periods, or excessive moisture.
- Cable Connections: Ensure all cables remain securely connected. Loose connections can lead to intermittent issues.
7. Troubleshooting
If you encounter issues with your car stereo, refer to the following common troubleshooting steps. If the problem persists, contact customer support.
| Problem | Possible Cause | Solution |
|---|---|---|
| No Power | Loose power connection, blown fuse, vehicle battery issue. | Check power cables and fuse. Ensure vehicle battery is charged. |
| No Sound | Volume too low, mute activated, loose speaker wires, incorrect audio source. | Increase volume, check mute status, verify speaker connections, select correct audio source. |
| Touch Screen Unresponsive | Software glitch, screen protector interference. | Restart the unit. Remove and reapply screen protector if present. |
| GPS Signal Lost | Antenna obstruction, poor satellite reception. | Ensure GPS antenna has a clear view of the sky. Check antenna connection. |
| CarPlay/Android Auto Not Connecting | Bluetooth not paired, app not launched, phone compatibility issue. | Ensure Bluetooth is paired. Launch the correct app on the stereo. Check phone compatibility. |
| Backup Camera Not Displaying | Loose camera connection, incorrect wiring, reverse gear not engaged. | Check camera video and power connections. Verify reverse trigger wire. Ensure vehicle is in reverse. |
8. Specifications
Key technical specifications of the MAHVEC 4G+64G Car Stereo.
- Model: 4Core 4G+64G
- Operating System: Android
- Display Size: 9 Inches
- Screen Resolution: 1280x720P IPS Touch Screen
- Processor: 8Core Upgraded RK-3326S Chip (for 4G+64G variant)
- RAM: 4GB
- Internal Storage: 64GB
- Bluetooth Version: 5.0
- Connectivity: Bluetooth, USB, Wi-Fi
- Special Features: Wireless CarPlay, Android Auto, DSP 32EQ, GPS Navigation (Offline/Online), FM/RDS Radio, MirrorLink, Split Screen, Steering Wheel Control (SWC)
- Backup Camera: IP69K AHD (1280x720P, 170° Wide-Angle, Night Vision)
- Audio Output Mode: Stereo
- Item Weight: Approximately 3.5 pounds
- Package Dimensions: 15.43 x 9.76 x 3.74 inches
9. Warranty and Support
Your MAHVEC car stereo comes with a warranty and dedicated customer support.
9.1 Warranty Information
This product is covered by a 2-year warranty. Additionally, a 30-day return/replacement policy is available from the date of purchase. For details regarding protection plans, please refer to your purchase documentation.
9.2 Customer Support
For any questions, technical assistance, or warranty claims, please contact MAHVEC customer support through the Amazon messaging system. Our team is available to provide assistance.
You can also visit the official MAHVEC store on Amazon for more information and products: MAHVEC Amazon Store