1. Safety Information
Please read all instructions carefully before using the appliance and retain for future reference. Improper use may result in electric shock, fire, or serious injury.
- Always connect the appliance to a grounded power outlet.
- Do not immerse the appliance, power cord, or plug in water or other liquids.
- Keep hands and utensils away from the grinding burrs during operation.
- Unplug the appliance from the outlet when not in use and before cleaning.
- Do not operate any appliance with a damaged cord or plug, or after the appliance malfunctions or has been damaged in any manner.
- Use only accessories and attachments recommended by the manufacturer.
- This appliance is for household use only. Do not use outdoors.
- Allow the appliance to cool down before cleaning or storing.
2. Package Contents
Verify that all items listed below are included in your package. If any items are missing or damaged, please contact customer support.

Image: The Gevi espresso machine and burr grinder, along with all accompanying accessories, are neatly arranged on a wooden surface, showcasing the complete barista kit.
- GECME418E-U Espresso Machine (x1)
- GECGI406B-U7 Coffee Grinder (x1)
- Portafilter (x1)
- Portafilter Bracket (x1)
- 51mm Double Cup Filter (x1)
- 51mm Single Cup Filter (x1)
- Coffee Spoon (x1)
- Cleaning Brush (x1)
- Espresso Glasses (x2)
- Powder Chamber (x1)
- Tamper (x1)
- Milk Frothing Jug (x1)
- Cleaning Pin (x1)
3. Product Overview
The Gevi 20 Bar Espresso Coffee Machine with Burr Grinder Set is designed to provide a professional home barista experience, allowing you to craft a variety of coffee beverages with ease and precision.
Key Features:
- Professional 20 Bar Pressure System: Ensures optimal espresso extraction for rich flavor and crema.
- Powerful Steam System: Quickly turns milk into silky smooth microfoam for lattes and cappuccinos.
- Precision Grinding Settings: Features 35 precise grind settings for ultimate coffee customization.
- Advanced Conical Burrs: Provides consistent and quiet grinding, preserving coffee flavor.
- Built-in Pressure Gauge: Helps monitor extraction pressure for perfect shots.
- Adjustable Shot Volume: Customize your espresso shot size.
- Pre-infusion Function: Gently soaks coffee grounds for enhanced flavor extraction.
- Removable Water Tank: Easy to fill and clean.
- Cup Warmer: Keeps your cups warm for optimal coffee temperature.
- Removable Drip Tray: Simplifies cleaning and accommodates larger cups.

Image: Two espresso shots are being extracted into clear glass cups, highlighting the optimal flavor extraction capabilities of the machine, supported by features like 20 Bar Pump, NTC Control, Pre-infusion, and a Pressure Gauge.
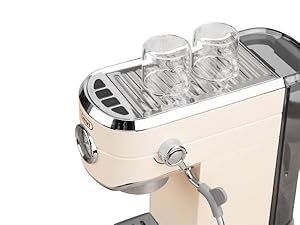
Image: A top-down view of the espresso machine's upper surface, illustrating the integrated cup warmer designed to keep espresso cups at an ideal temperature.

Image: A side view of the espresso machine, with a hand demonstrating the easy removal of the transparent water tank from the back of the unit.
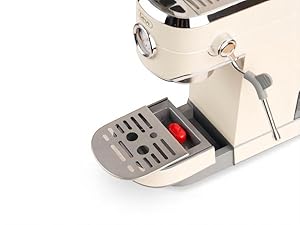
Image: A front view of the espresso machine, highlighting the removable drip tray which can be easily pulled out for cleaning or to accommodate taller cups.
4. Initial Setup
Follow these steps to set up your Gevi Espresso Machine and Burr Grinder for the first time:
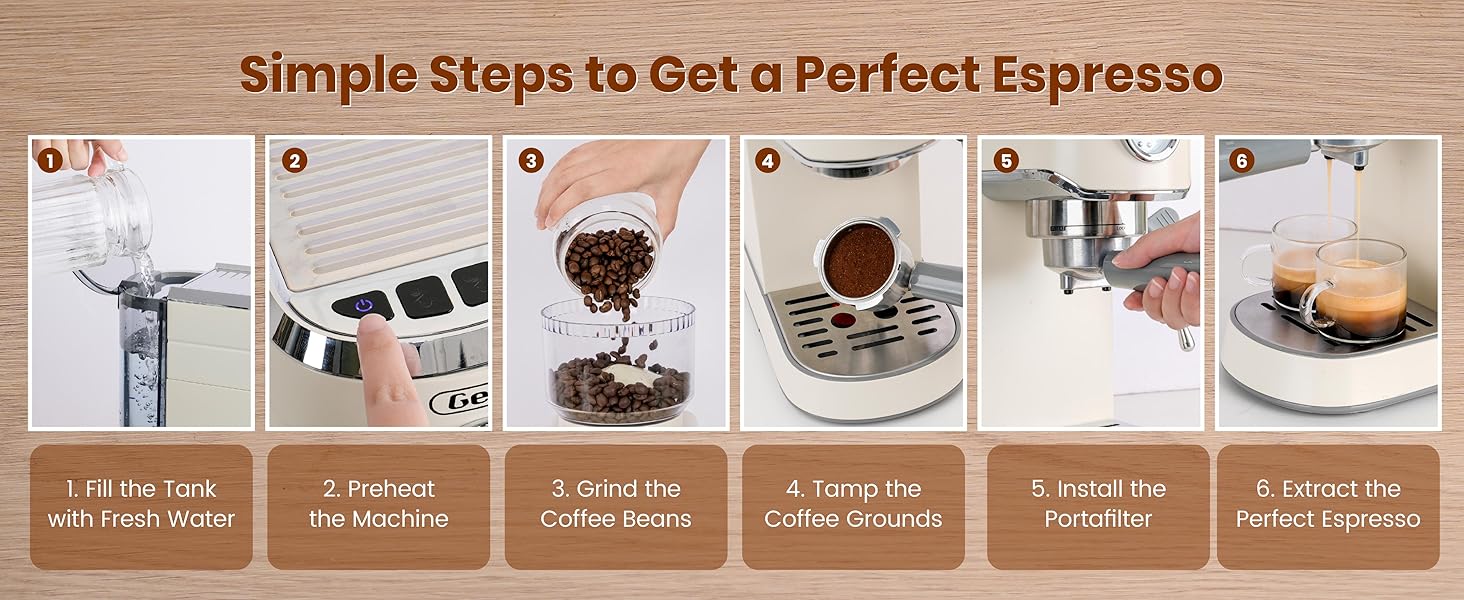
Image: A visual step-by-step guide illustrating the process of making espresso, from filling the water tank to extracting the perfect shot.
- Unpack and Clean: Carefully remove all packaging materials. Wash the water tank, portafilter, filter baskets, milk frothing jug, and powder chamber with warm soapy water. Rinse thoroughly and dry.
- Positioning: Place the espresso machine and grinder on a stable, flat, heat-resistant surface, away from water sources and direct sunlight.
- Fill Water Tank: Remove the water tank from the espresso machine and fill it with fresh, cold filtered water up to the MAX line. Reinsert the tank securely.
- Power Connection: Plug both the espresso machine and the grinder into grounded electrical outlets.
- Initial Rinse (Espresso Machine): Before first use, perform a rinse cycle. Fill the water tank, place a large cup under the portafilter, and run a brewing cycle without coffee grounds. Repeat for the steam wand by turning the steam knob to release hot water. This primes the system and cleans internal components.
- Grinder Assembly: Ensure the bean hopper is securely locked onto the grinder base.
5. Operating Instructions
5.1 Grinding Coffee Beans
The Gevi burr grinder offers 35 precise grind settings, allowing you to customize the coarseness for various brewing methods, from fine espresso to coarse French press.

Image: A detailed view of the coffee grinder's bean hopper, showing the dial with 35 precise grind settings categorized for Espresso, Drip-Pour Over, and French Press, along with visual examples of grind sizes.

Image: An overhead perspective of the Gevi burr grinder, illustrating the advanced conical burrs in action as coffee beans are processed, emphasizing precise grinding control.
- Add Beans: Pour fresh, whole coffee beans into the bean hopper.
- Select Grind Size: Rotate the bean hopper to select your desired grind setting. For espresso, choose a finer setting (typically 1-5).
- Select Grind Amount/Time: Use the grinder's controls to select the desired amount or grinding time.
- Grind: Place the portafilter or powder chamber under the dispenser and press the start button to begin grinding.
5.2 Brewing Espresso
The 20-bar pressure pump and pre-infusion feature ensure a rich and aromatic espresso shot with excellent crema.

Image: A close-up of the espresso machine's control panel, detailing the four brewing amount choices available for single and double shots, including default and customizable volume options.
- Preheat Machine: Turn on the espresso machine and allow it to preheat until the indicator lights are stable (refer to your machine's specific indicators).
- Prepare Portafilter: Place the appropriate filter basket (single or double) into the portafilter. Fill the basket with freshly ground coffee.
- Tamp Grounds: Use the tamper to press the coffee grounds firmly and evenly into the basket. Ensure a level surface.
- Attach Portafilter: Insert the portafilter into the group head of the espresso machine and twist it firmly to lock it into place.
- Place Cups: Position your preheated espresso cups on the drip tray directly under the portafilter spouts.
- Brew: Select your desired shot volume (single or double) using the control buttons. The machine will begin the brewing process. Monitor the pressure gauge for optimal extraction.
- Stop Brewing: The machine will automatically stop when the selected volume is reached. You can also manually stop the flow if desired.
5.3 Milk Frothing
Create creamy milk foam for lattes and cappuccinos using the powerful steam wand.

Image: A hand is shown holding a stainless steel milk frothing pitcher beneath the espresso machine's steam wand, actively frothing milk to create smooth microfoam.
- Fill Pitcher: Fill the milk frothing jug with cold milk (dairy or non-dairy) up to the recommended level.
- Activate Steam: Turn the steam knob to the steam position. Wait for the steam wand to purge any condensed water.
- Froth Milk: Immerse the tip of the steam wand just below the surface of the milk. Angle the pitcher slightly to create a vortex. Move the pitcher up and down to incorporate air and heat the milk.
- Monitor Temperature: Continue frothing until the milk reaches your desired temperature and texture (typically 140-150°F / 60-65°C).
- Clean Wand: Immediately wipe the steam wand with a damp cloth after use to prevent milk residue from drying. Purge a small amount of steam to clear any internal blockages.
5.4 Creating Various Coffee Drinks
With your Gevi machine, you can easily prepare a range of popular coffee beverages:

Image: The Gevi espresso machine is surrounded by various coffee beverages it can create, including Espresso, Americano, Latte, Mocha, and Cappuccino, showcasing its versatility.
- Espresso: A concentrated coffee shot, the base for many drinks.
- Americano: Espresso diluted with hot water.
- Latte: Espresso with steamed milk and a thin layer of foam.
- Cappuccino: Espresso with equal parts steamed milk and thick foam.
- Mocha: Latte with chocolate syrup.
6. Care and Maintenance
Regular cleaning and maintenance will ensure the longevity and optimal performance of your Gevi coffee machine and grinder.
6.1 Daily Cleaning
- Portafilter and Filter Baskets: After each use, remove the portafilter, discard used coffee grounds, and rinse the portafilter and filter basket under hot water. Use the cleaning brush to remove any stubborn residue.
- Drip Tray: Empty and rinse the drip tray daily. Wipe it dry before reinserting.
- Steam Wand: As mentioned in the operating instructions, wipe the steam wand immediately after frothing milk and purge steam to clear any blockages.
- Exterior: Wipe the exterior of both the espresso machine and grinder with a soft, damp cloth. Do not use abrasive cleaners or solvents.
6.2 Grinder Cleaning
Regular cleaning of the burr grinder is essential to maintain grind consistency and prevent oil buildup.
Video: This video demonstrates the proper procedure for cleaning the Gevi Burr Coffee Grinder after everyday use, ensuring optimal performance and longevity.
- Unplug: Always unplug the grinder before cleaning.
- Remove Bean Hopper: Rotate the bean hopper counter-clockwise until it stops, then lift it off. Store any remaining beans in an airtight container.
- Remove Upper Burr: Follow the grinder's instructions to remove the upper burr. Use the cleaning brush to remove coffee grounds from both burrs and the grinding chamber.
- Clean Powder Chamber: Empty and wash the powder chamber with warm soapy water, then rinse and dry.
- Reassemble: Reassemble the grinder components, ensuring the bean hopper is securely locked back into place.
6.3 Descaling
Over time, mineral deposits can build up in the machine, affecting performance. Descale your machine every 2-3 months, or more frequently if you have hard water.
- Prepare Descaling Solution: Mix a descaling solution according to the manufacturer's instructions (or use a mixture of white vinegar and water, 1:1 ratio).
- Fill Water Tank: Pour the descaling solution into the water tank.
- Run Cycles: Place a large container under the group head and steam wand. Run several brewing cycles (without coffee) and steam cycles until half of the solution is used.
- Rest: Turn off the machine and let it sit for 15-20 minutes.
- Complete Descaling: Turn the machine back on and run the remaining solution through the machine.
- Rinse: Rinse the water tank thoroughly and fill it with fresh water. Run several full tanks of fresh water through the machine to flush out any remaining descaling solution.
7. Troubleshooting
If you encounter any issues with your Gevi Espresso Machine or Burr Grinder, refer to the following common problems and solutions:
| Problem | Possible Cause | Solution |
|---|---|---|
| No coffee dispenses / Slow flow | Water tank empty; Clogged filter basket; Coffee ground too fine; Machine needs descaling. | Refill water tank; Clean filter basket; Adjust grind size coarser; Perform descaling. |
| Espresso is too weak / watery | Coffee ground too coarse; Not enough coffee in basket; Insufficient tamping. | Adjust grind size finer; Increase coffee dose; Tamp more firmly. |
| No steam from wand | Steam wand clogged; Machine not at steam temperature. | Clean steam wand with cleaning pin; Allow machine to fully heat up for steam. |
| Grinder not working | Not plugged in; Bean hopper not locked; Overloaded. | Check power connection; Ensure bean hopper is securely locked; Reduce amount of beans. |
| Grinder produces inconsistent grind | Burrs are dirty or worn; Incorrect grind setting. | Clean burrs thoroughly; Adjust grind setting as needed. |
If the problem persists after trying these solutions, please contact Gevi customer support.
8. Technical Specifications
| Feature | Specification |
|---|---|
| Brand | Gevi |
| Model Name | GECME418E-U+GECGI406B-U7 |
| Color | Ivory Beige |
| Product Dimensions | 12.28"D x 10.31"W x 12.4"H |
| Item Weight | 17.36 pounds |
| Pressure System | 20 Bar Professional Italian Pump |
| Grind Settings | 35 Precise Grind Settings |
| Filter Type | 51mm Double Cup Filter, 51mm Single Cup Filter |
| Special Features | Burr grinder, Barista Kit, Built-in pressure gauge, Adjustable shot volume, Pre-infusion, Auto shut-off, Removable water tank, Cup warmer |
9. Warranty and Customer Support
Gevi values your satisfaction. Every Gevi product (purchased via an official or authorized channel) is entitled to a 12-month warranty and lifetime technical support.
If you encounter any issues with your Gevi espresso machine or grinder, or have any questions, please do not hesitate to contact our customer support team. We are committed to providing prompt and helpful assistance.
Contact Information:
Please refer to the contact details provided on the Gevi official website or your purchase documentation for the most up-to-date support channels.


