1. Introduction
This manual provides comprehensive instructions for the installation, operation, and maintenance of your new Generic aftermarket carburetor. This carburetor is designed as a direct replacement part for specific Toro Snowthrower models to restore optimal engine performance.
Please read this manual thoroughly before attempting any installation or maintenance procedures. Proper installation and care are essential for the safe and efficient operation of your snowthrower.
2. Compatibility
This carburetor is compatible with the following Toro Snowthrower models:
- 38080, 824 Snowthrower (1980, SN 0000001-0999999)
- 38080, 824 Snowthrower (1981, SN 1000001-1999999)
- 38080, 824 Snowthrower (1990, SN 0000001-0999999)
- 38080, 824 Snowthrower (1991, SN 1000001-1999999)
- 38080, 824 Snowthrower (1992, SN 2000001-2999999)
- 38080, 824 Snowthrower (1993, SN 3900001-3999999)
- 38083, 824XL Power Throw Snowthrower (1997, SN 7900001-7999999)
- 38084, 824XL Power Throw Snowthrower (1997, SN 7900001-7999999)
- 38085, 824XL Power Throw Snowthrower (1997, SN 7900001-7999999)
- 38540, 824XL Power Throw Snowthrower (1997, SN 7900001-7999999)
- 38543, 824XL Power Throw Snowthrower (1997, SN 7900001-7999999)
- 38574, 824XL Power Throw Snowthrower (1997, SN 7900001-7999999)
Always verify your snowthrower's model and serial number to ensure correct part compatibility.
3. Package Contents
Upon opening the package, please verify that all components are present and undamaged:
- 1 x Carburetor
- 1 x Mounting Gasket
- 1 x Fuel Filter (may be included)
- 1 x Primer Bulb (may be included)
- 1 x Fuel Line (may be included)
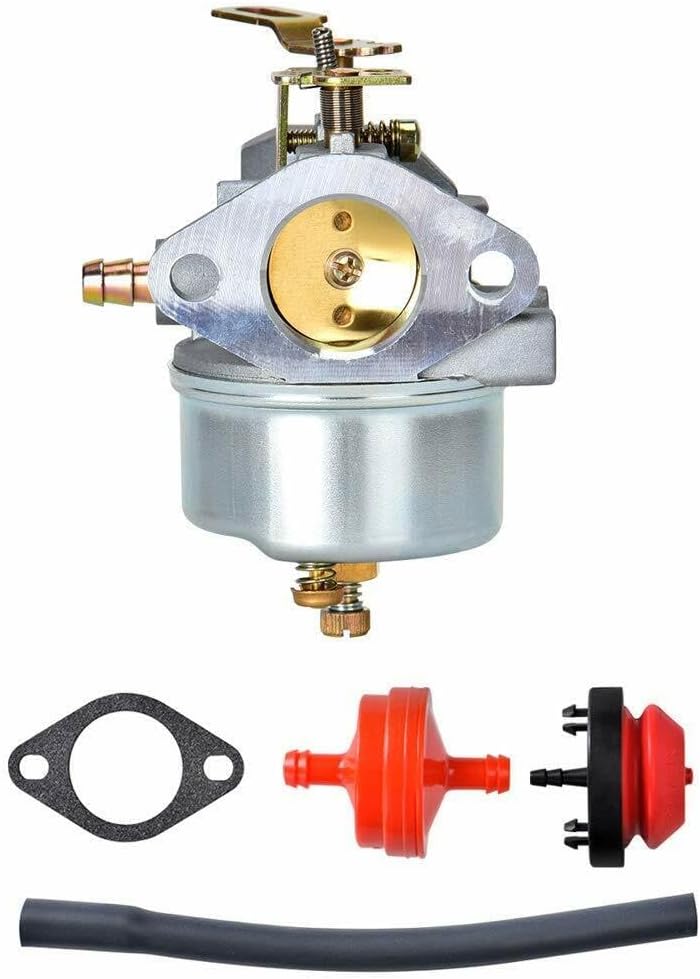
Image 1: Complete carburetor kit showing the main carburetor unit, a black mounting gasket, a red inline fuel filter, a red primer bulb, and a black fuel line.
4. Safety Information
WARNING: Always exercise caution when working with fuel systems and internal combustion engines. Failure to follow safety instructions can result in serious injury or property damage.
- Ensure the engine is completely cool before beginning any work.
- Disconnect the spark plug wire to prevent accidental starting.
- Work in a well-ventilated area to avoid inhaling fuel fumes.
- Have a fire extinguisher readily available.
- Wear appropriate personal protective equipment (PPE), such as gloves and eye protection.
- Drain all fuel from the tank and carburetor bowl into an approved container before removal.
5. Installation (Setup)
This section outlines the general steps for replacing a carburetor. Specific procedures may vary slightly depending on your exact snowthrower model. Refer to your snowthrower's original service manual for detailed instructions if needed.
5.1 Preparation
- Park the snowthrower on a level surface and engage the parking brake.
- Ensure the engine is off and cool. Disconnect the spark plug wire.
- Turn the fuel shut-off valve (if equipped) to the OFF position.
- Place an approved fuel container beneath the carburetor to catch any draining fuel.
5.2 Old Carburetor Removal
- Carefully disconnect the fuel line from the carburetor. Allow any remaining fuel to drain.
- Disconnect any linkages or springs attached to the carburetor (e.g., throttle, choke). Note their positions for reassembly. Taking photos can be helpful.
- Remove the mounting bolts or nuts that secure the carburetor to the engine.
- Gently pull the old carburetor away from the engine, ensuring not to damage any associated gaskets or insulators. Remove and discard the old gaskets.

Image 2: Side view of the carburetor, highlighting the mounting flange and the included gasket.
5.3 New Carburetor Installation
- Ensure the mounting surface on the engine is clean and free of old gasket material.
- Place the new mounting gasket(s) in their correct positions.
- Position the new carburetor onto the mounting studs or align with bolt holes.
- Secure the carburetor with the mounting bolts or nuts. Tighten them evenly to prevent warping, but do not overtighten.
- Reconnect all linkages and springs to their original positions. Refer to your photos if necessary.
- Connect the fuel line to the carburetor. If replacing the fuel filter or fuel line, do so now. Ensure all connections are secure and leak-free.
- If your kit included a new primer bulb, replace the old one if necessary.

Image 3: Front view of the carburetor, illustrating the air intake and fuel inlet port.
6. Operation
After installation, perform the following steps before starting the engine:
- Ensure all tools are removed from the engine area.
- Reconnect the spark plug wire.
- Turn the fuel shut-off valve to the ON position.
- Check for any fuel leaks around the carburetor and fuel lines. Address any leaks immediately.
- Prime the carburetor by pressing the primer bulb several times until fuel is visible in the bulb or it feels firm.
- Follow your snowthrower's manufacturer instructions for starting the engine.
The engine may require a few extra pulls or attempts to start initially as the fuel system fills completely.
7. Maintenance
Regular maintenance helps ensure the longevity and performance of your carburetor and snowthrower.
- Fuel Quality: Always use fresh, clean, unleaded gasoline. Ethanol in fuel can cause issues over time. Consider using a fuel stabilizer, especially during storage.
- Fuel Filter: Inspect and replace the inline fuel filter annually or if it appears clogged. A clogged filter restricts fuel flow and can cause engine performance issues.
- Storage: Before long-term storage (e.g., off-season), drain the fuel tank and run the engine until it runs out of fuel to clear the carburetor bowl. Alternatively, use a fuel stabilizer and run the engine for a few minutes to circulate it.
- Cleaning: If the carburetor becomes clogged with debris or varnish from old fuel, it may require cleaning. This typically involves disassembling the carburetor and cleaning jets and passages with carburetor cleaner. This procedure is advanced and may require professional assistance.
8. Troubleshooting
If your snowthrower experiences issues after carburetor replacement, consider the following common problems and solutions:
| Problem | Possible Cause | Solution |
|---|---|---|
| Engine will not start | No fuel, clogged fuel filter, incorrect choke/throttle setting, spark plug issue, air leak. | Check fuel level, replace fuel filter, verify choke/throttle, check spark plug, inspect for air leaks around carburetor mounting. |
| Engine runs rough or stalls | Dirty fuel, clogged jet, air leak, incorrect idle adjustment. | Drain and replace fuel, clean carburetor jets (advanced), check for air leaks, adjust idle screw (if applicable). |
| Fuel leaks | Loose fuel line connection, damaged gasket, float bowl issue. | Tighten fuel line clamps, replace gasket, inspect float and needle valve (advanced). |
| Engine lacks power | Restricted fuel flow, clogged air filter (not part of carburetor kit), incorrect adjustments. | Check fuel filter, clean/replace air filter, ensure linkages are moving freely. |
If troubleshooting steps do not resolve the issue, consult a qualified service technician.
9. Specifications
| Feature | Detail |
|---|---|
| Product Type | Aftermarket Carburetor |
| Brand | Generic |
| Model (Manufacturer's) | Generic |
| Item Weight | 1 pounds (approx.) |
| Product Dimensions | 1 x 1 x 1 inches (approx.) |
| Manufacturer Part Number | 1 |
| ASIN | B0F2ZSR7HN |
10. Warranty and Support
Specific warranty information for this Generic aftermarket carburetor is not provided in the product details. Please refer to the seller's policy on the purchase platform for any applicable warranty or return information.
For technical support or further assistance, please contact the seller directly through the platform where the purchase was made.


