CUSHYBITE PBLSV716B
User Manual: CUSHYBITE HP 18V Cordless Pet Stick Vacuum
Model: PBLSV716B
1. Introduction
Thank you for choosing the CUSHYBITE HP 18V Cordless Pet Stick Vacuum, model PBLSV716B. This manual provides essential information for the safe operation, maintenance, and troubleshooting of your new vacuum cleaner. Please read this manual thoroughly before using the product and keep it for future reference.
This cordless stick vacuum is designed for efficient floor-to-ceiling cleaning, featuring HP Technology for powerful suction. It is ideal for tackling pet hair, dirt, and debris on various surfaces including hard floors, carpets, and rugs.
2. Important Safety Information
Always follow basic safety precautions when using electrical appliances to reduce the risk of fire, electric shock, or injury.
- Read all instructions before using the appliance.
- Do not leave the vacuum unattended when plugged in. Unplug from outlet when not in use and before servicing.
- Do not use outdoors or on wet surfaces.
- Do not allow to be used as a toy. Close attention is necessary when used by or near children.
- Use only as described in this manual. Use only manufacturer's recommended attachments.
- Do not use with damaged cord or plug. If appliance is not working as it should, has been dropped, damaged, left outdoors, or dropped into water, return it to a service center.
- Do not pull or carry by cord, use cord as a handle, close a door on cord, or pull cord around sharp edges or corners. Do not run appliance over cord. Keep cord away from heated surfaces.
- Do not unplug by pulling on cord. To unplug, grasp the plug, not the cord.
- Do not handle plug or appliance with wet hands.
- Do not put any object into openings. Do not use with any opening blocked; keep free of dust, lint, hair, and anything that may reduce air flow.
- Keep hair, loose clothing, fingers, and all parts of body away from openings and moving parts.
- Do not pick up anything that is burning or smoking, such as cigarettes, matches, or hot ashes.
- Use extra care when cleaning on stairs.
- Do not use to pick up flammable or combustible liquids, such as gasoline, or use in areas where they may be present.
- Do not pick up toxic material, such as chlorine bleach, ammonia, or drain cleaner.
- Do not use without dust cup and/or filters in place.
- This product is compatible with all RYOBI 18V batteries. Ensure the battery is fully charged before use.
3. Product Components
Familiarize yourself with the parts of your CUSHYBITE HP 18V Cordless Pet Stick Vacuum.
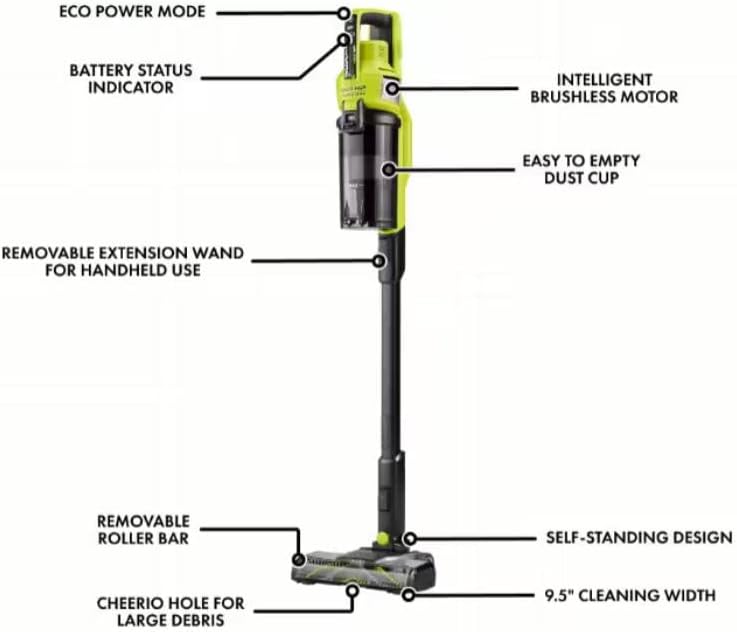
Figure 3.1: Labeled components of the vacuum cleaner.
- ECO Power Mode Button: For energy-efficient cleaning.
- Battery Status Indicator: Shows remaining battery life.
- Intelligent Brushless Motor: Provides powerful and efficient suction.
- Easy to Empty Dust Cup: For convenient debris disposal.
- Removable Extension Wand: Allows conversion to handheld use.
- Removable Roller Bar: For easy cleaning and maintenance.
- Cheerio Hole for Large Debris: Designed to pick up larger particles.
- 9.5" Cleaning Width: Wide cleaning path for efficiency.
- Self-Standing Design: Allows the vacuum to stand upright on its own.
The vacuum also includes a crevice tool and a brush for specialized cleaning tasks.
4. Setup and Assembly
Your CUSHYBITE HP 18V Cordless Pet Stick Vacuum requires minimal assembly.
- Unpack: Carefully remove all components from the packaging. Ensure all parts listed in Section 3 are present.
- Attach the Extension Wand: Insert the extension wand into the main vacuum body until it clicks securely into place.
- Attach the Floor Head: Connect the floor head to the bottom of the extension wand, ensuring it locks firmly.
- Insert Battery: Insert a charged RYOBI 18V battery into the battery slot on the main vacuum body. Ensure it clicks into place.
- First Charge: For optimal performance, fully charge the battery before first use.
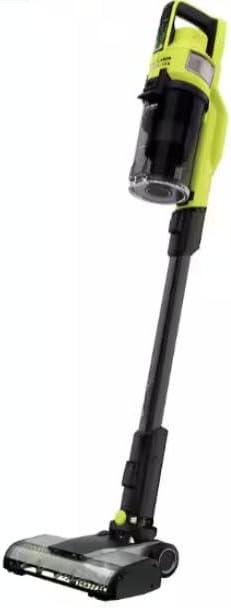
Figure 4.1: The vacuum fully assembled and ready for use.
5. Operating Instructions
Your vacuum offers versatile cleaning options.
5.1. Standard Stick Vacuum Mode
- Ensure the vacuum is fully assembled with the extension wand and floor head attached.
- Press the power button to turn on the vacuum.
- Use the ECO Power Mode button to switch between power settings as needed for different surfaces or debris levels.
- The LED lights on the roller bar will illuminate, helping to spot dirt and debris on the floor.
- Maneuver the vacuum across hard floors, carpets, and rugs. The 9.5" cleaning width ensures efficient coverage.
- The self-standing design allows you to pause cleaning and leave the vacuum upright without support.
5.2. Handheld Vacuum Mode
For cleaning cars, stairs, upholstery, and tight spaces:
- Detach the extension wand from the main vacuum body by pressing the release button.
- Attach the desired accessory (crevice tool or brush) directly to the main vacuum body.
- Turn on the vacuum and use it for targeted cleaning.
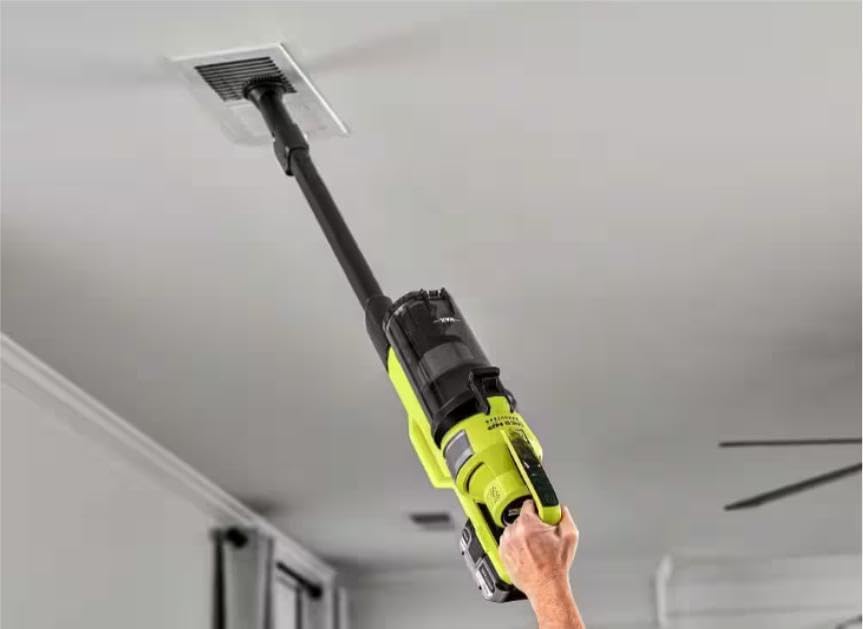
Figure 5.1: Using the vacuum in handheld mode for high-reach cleaning.
6. Maintenance
Regular maintenance ensures optimal performance and extends the life of your vacuum.
6.1. Emptying the Dust Cup
- Ensure the vacuum is turned off and the battery is removed.
- Locate the dust cup release button and press it to detach the dust cup from the main body.
- Hold the dust cup over a trash bin and open the bottom flap to empty the contents.
- Close the flap and reattach the dust cup to the vacuum until it clicks securely.
6.2. Cleaning the Filters
It is recommended to clean the filters regularly, especially if you notice a decrease in suction power.
- Remove the dust cup as described above.
- Carefully remove the filters from inside the dust cup.
- Tap the filters over a trash bin to remove loose dirt and debris.
- If necessary, rinse the filters with cold water. Ensure they are completely dry before reinserting them into the vacuum. Do not use hot water or detergents.
- Reassemble the filters and dust cup.
6.3. Cleaning the Roller Bar
Periodically check the roller bar for tangled hair or debris.
- Ensure the vacuum is off and the battery is removed.
- Detach the floor head from the extension wand.
- Locate the release mechanism for the roller bar (refer to Figure 3.1) and remove the roller bar.
- Use scissors or a brush to remove any tangled hair, string, or debris from the roller bar.
- Reinsert the roller bar until it clicks into place.
7. Troubleshooting
Refer to this section for common issues and their solutions.
| Problem | Possible Cause | Solution |
|---|---|---|
| Vacuum does not turn on. | Battery is not charged or not properly inserted. | Ensure the RYOBI 18V battery is fully charged and securely inserted. |
| Loss of suction. | Dust cup is full; Filters are clogged; Obstruction in nozzle or hose; Roller bar is tangled. | Empty the dust cup. Clean or replace filters. Check for and remove any obstructions. Clean the roller bar. |
| Roller bar not spinning. | Obstruction in roller bar; Roller bar not properly installed. | Remove any tangled hair or debris from the roller bar. Ensure the roller bar is correctly reinserted. |
| Vacuum makes unusual noise. | Obstruction in air path; Damaged component. | Check for and remove any obstructions in the dust cup, filters, or air path. If noise persists, contact customer support. |
8. Specifications
| Feature | Detail |
|---|---|
| Model Number | PBLSV716B |
| Brand | CUSHYBITE |
| Power Source | 18V Battery (RYOBI compatible) |
| Motor Type | Brushless (HP Technology) |
| Cleaning Width | 9.5 inches |
| Configurations | Up to 8 cleaning configurations (stick and handheld) |
| Special Features | Self-standing design, LED lights on roller bar, Easy-to-empty dust cup, Removable roller bar |
9. Warranty and Support
For warranty information or technical support, please refer to the documentation included with your purchase or contact CUSHYBITE customer service.
For best results and proper fitment, always compare the product's image and listed dimensions before purchase.
Manufacturer: CUSHYBITE
Date First Available: January 22, 2025