1. Introduction
The CUSHYBITE RYTIL Expand-It Universal Tiller Attachment is designed to transform your attachment-capable string trimmer into an efficient soil cultivator. This tool is ideal for preparing garden rows and flower beds, offering a practical solution for various soil preparation tasks. It features durable construction and adjustable settings for versatile use.
2. Safety Information
Always prioritize safety when operating power tools. Read and understand all instructions before use. Failure to follow safety guidelines can result in serious injury.
- Wear appropriate personal protective equipment (PPE): This includes safety glasses, gloves, and sturdy footwear.
- Ensure secure attachment: Verify that the tiller attachment is securely fastened to your string trimmer power head before operation.
- Clear the work area: Remove any rocks, debris, or obstacles that could be thrown by the tines.
- Maintain a firm grip: Always hold the string trimmer with both hands during operation.
- Keep bystanders away: Maintain a safe distance from others, especially children and pets.
- Inspect before each use: Check for loose parts, damage, or wear on the tines and shaft.
- Operate on stable ground: Avoid operating on excessively steep slopes or uneven terrain where you might lose balance.
3. Product Overview
The RYTIL Tiller Attachment is engineered for durability and ease of use. Key components include heavy-duty steel tines, a robust steel shaft, and transport wheels.
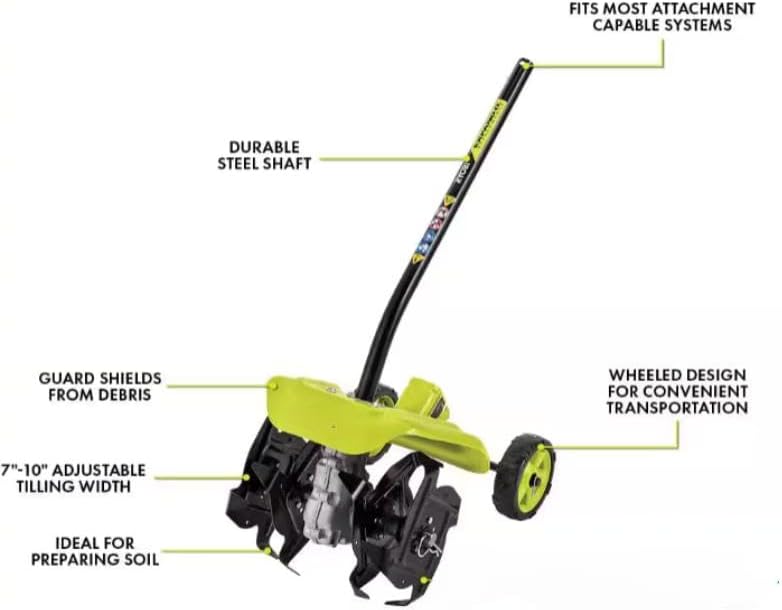
Figure 3.1: RYTIL Tiller Attachment with key features labeled. This image highlights the durable steel shaft, the guard for debris protection, the adjustable tilling width, the wheeled design for easy transport, and its compatibility with most attachment-capable systems.

Figure 3.2: An overall view of the RYTIL Expand-It Universal Tiller Attachment, showcasing its design and components.
- Heavy-Duty Steel Tines: Four robust tines designed for effective soil penetration and cultivation.
- Adjustable Tilling Width: Allows customization from 7 inches to 10 inches to suit various project needs.
- Wheels for Transport: Integrated wheels facilitate easy movement of the attachment.
- Guard: Provides protection from flying debris during operation.
- Durable Steel Shaft: Ensures long-lasting performance and stability.
4. Setup
Proper setup ensures safe and effective operation of your tiller attachment.
- Unpack Components: Carefully remove all parts from the packaging and ensure all components are present.
- Attach to Power Head: Align the tiller attachment shaft with the coupling on your attachment-capable string trimmer power head. Push the attachment into the coupling until it clicks into place or the locking mechanism engages. Refer to your string trimmer's manual for specific attachment instructions.
- Secure Connection: Tighten any locking knobs or levers on the string trimmer's coupling to ensure the tiller attachment is firmly secured and will not rotate or detach during use.
- Adjust Tilling Width (if applicable): If your model allows, adjust the tilling width between 7 and 10 inches by following the instructions provided with the attachment. This typically involves repositioning or adjusting the tines.
- Inspect for Stability: Gently shake the assembled unit to confirm all connections are tight and stable.
5. Operating Instructions
Follow these steps for effective and safe cultivation.

Figure 5.1: The RYTIL Tiller Attachment in operation, demonstrating its use for cultivating soil in a garden bed.
- Start the String Trimmer: Follow your string trimmer's instructions to start its engine or motor.
- Engage the Tiller: With the engine running at a moderate speed, gently lower the tines into the soil. Allow the tines to dig into the ground.
- Control Depth and Speed: Guide the tiller forward at a slow, steady pace. The depth of tilling can be controlled by the angle at which you hold the unit and the pressure applied. For deeper cultivation, make multiple passes.
- Cultivating Garden Rows and Flower Beds: The adjustable tilling width (7" to 10") allows you to adapt to different row sizes. Work in straight lines, overlapping slightly on each pass to ensure thorough cultivation.
- Utilize Wheels for Transport: When moving the tiller between work areas, tilt the unit back onto its wheels for easy transport, reducing strain.
- Avoid Obstacles: Be vigilant for hidden rocks, roots, or other obstacles that could damage the tines or cause kickback.
- Stop Operation: To stop, disengage the tiller (if applicable) and turn off the string trimmer engine/motor according to its manual.

Figure 5.2: A detailed view of the tiller's heavy-duty steel tines in action, demonstrating their effectiveness in breaking up soil and highlighting the adjustable tilling width.
6. Maintenance
Regular maintenance extends the life of your tiller attachment and ensures optimal performance.
- Cleaning: After each use, clean soil and debris from the tines and guard. A stiff brush or scraper can be used. Avoid using high-pressure water directly on bearings or seals.
- Inspection: Periodically inspect the tines for wear, bending, or damage. Replace worn or damaged tines immediately. Check the shaft for any signs of damage or corrosion.
- Lubrication: Consult your string trimmer's manual for any specific lubrication requirements for attachments. Generally, ensure the coupling mechanism is clean and lightly lubricated if recommended.
- Storage: Store the tiller attachment in a clean, dry place, away from direct sunlight and extreme temperatures.
7. Troubleshooting
This section addresses common issues you might encounter.
| Problem | Possible Cause | Solution |
|---|---|---|
| Tiller not engaging or spinning | Attachment not fully secured; Drive shaft issue in power head; Obstruction in tines. | Ensure attachment is fully seated and locked. Check power head manual. Clear any debris from tines. |
| Poor tilling performance | Worn tines; Incorrect operating speed; Soil too hard or wet. | Inspect and replace tines if worn. Adjust engine speed. Till when soil moisture is optimal. |
| Excessive vibration | Loose attachment; Bent or damaged tines; Debris wrapped around shaft. | Check attachment connection. Inspect tines for damage and replace if necessary. Remove any wrapped debris. |
8. Specifications
Technical details for the CUSHYBITE RYTIL Tiller Attachment.
- Model Number: RYTIL
- Brand: CUSHYBITE
- Tilling Width: Adjustable 7" to 10"
- Tine Material: Heavy-duty Steel
- Shaft Material: Durable Steel
- Compatibility: Designed for attachment-capable string trimmers (e.g., RYOBI Expand-It systems)
- ASIN: B0F2YN5SK7
9. Warranty and Support
For warranty information and customer support, please refer to the documentation provided with your purchase or contact CUSHYBITE customer service directly. Keep your proof of purchase for any warranty claims.
For further assistance, visit the CUSHYBITE official website or contact their customer support line.