OPPWONG QY6-0067
OPPWONG Print Head Replacement Kit Instruction Manual
Model: QY6-0067 (Universal Model: QY6-0075)
Compatible with IP4500, MP610, MP810, IP5300 Printers
1. Introduction
This manual provides essential instructions for the installation, operation, and maintenance of your OPPWONG Print Head Replacement Kit. This print head is designed for specific printer models to ensure optimal printing performance for photos, documents, and other materials.
Key features of this print head include:
- Protective Design: Equipped with a protective cover to safeguard internal components from damage.
- Durable Construction: Manufactured from high-quality ABS material for safety and extended service life.
- Quality Assurance: Each unit undergoes rigorous testing, including print tests, to ensure reliable performance.
- Compatibility: Specifically designed for IP4500, MP610, MP810, and IP5300 printer models.
2. Product Overview
Familiarize yourself with the components of your new print head.

Figure 2.1: Top view of the print head with its orange protective cover installed. This cover helps prevent damage to the delicate internal components during handling and storage.

Figure 2.2: Bottom view of the print head with the protective cover removed, revealing the print nozzle array and electrical contacts. These are the critical components for ink delivery and communication with the printer.

Figure 2.3: Angled view of the print head, showcasing its internal structure and the connection points for ink cartridges. The robust black casing is made from ABS material.
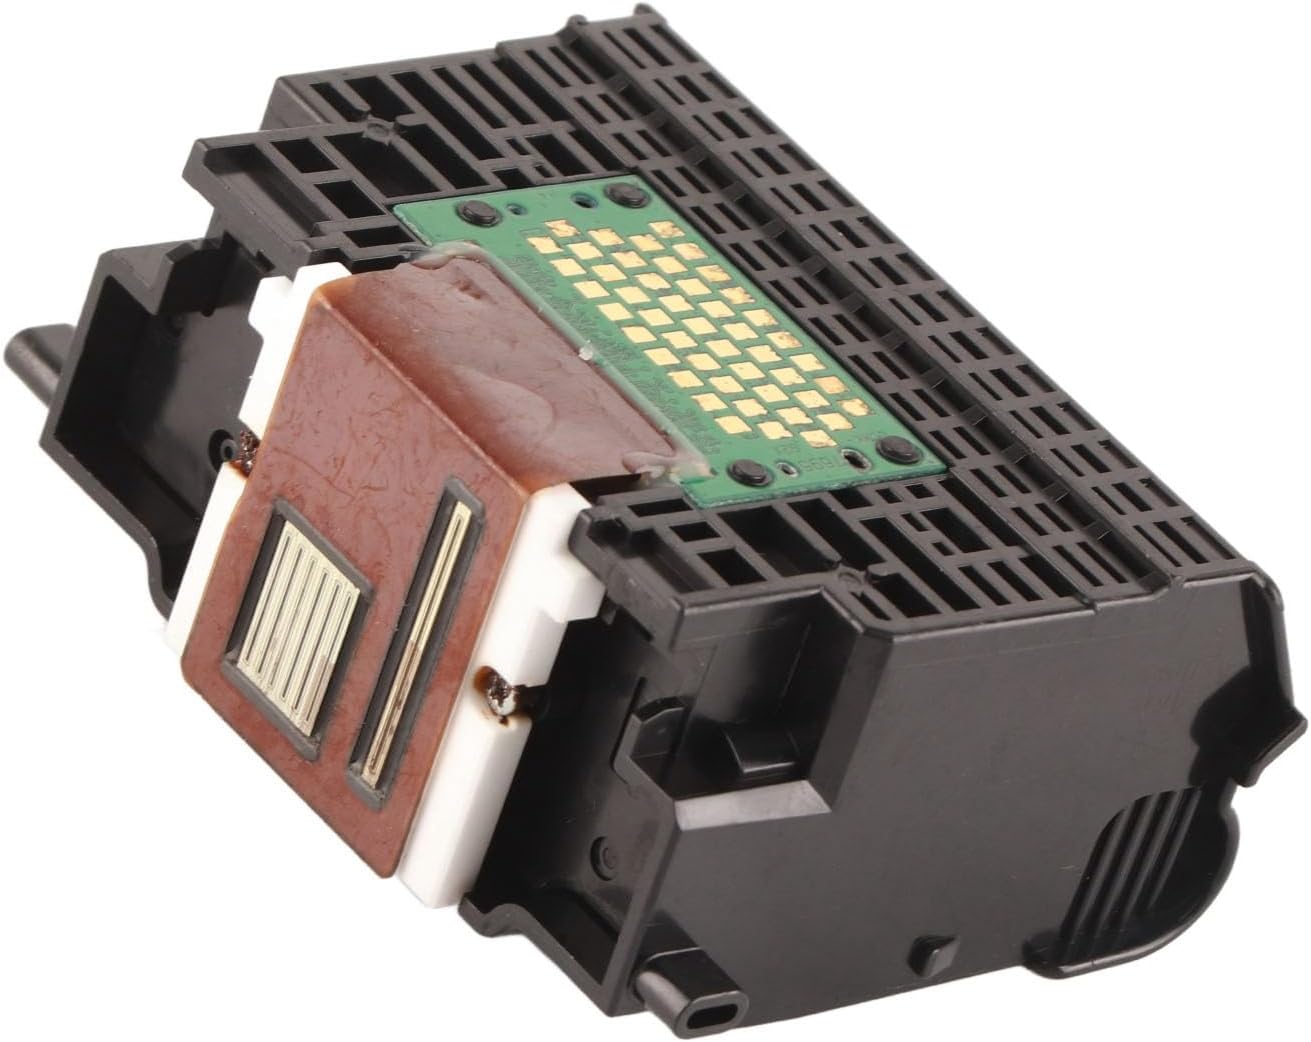
Figure 2.4: Side view highlighting the electrical contact points on the print head. These contacts ensure proper communication between the print head and the printer's main board.
3. Setup and Installation
Follow these steps to correctly install the print head into your compatible printer.
- Power Off Printer: Ensure your printer is turned off and unplugged from the power source before beginning installation.
- Open Printer Cover: Open the printer's top cover to access the print head carriage.
- Remove Old Print Head: Carefully remove the damaged or old print head. Refer to your printer's specific user manual for detailed instructions on removing the existing print head, as procedures may vary by model.
- Unpack New Print Head: Remove the new OPPWONG print head from its packaging. Handle it by the sides to avoid touching the electrical contacts or print nozzles.
- Remove Protective Cover: Gently remove the orange protective cover from the new print head (refer to Figure 2.1).
- Insert New Print Head: Align the new print head with the print head carriage in your printer. Press it down firmly until it clicks into place. Ensure it is seated correctly.
- Install Ink Cartridges: Install the appropriate ink cartridges into the new print head.
- Close Printer Cover: Close the printer's top cover.
- Power On Printer: Plug in and power on your printer. The printer may initiate an alignment or cleaning cycle automatically.
Note: If you encounter any resistance during installation, do not force the print head. Recheck alignment and consult your printer's manual.
4. Operating Instructions
Once the print head is installed, your printer should recognize it and be ready for use. Follow your printer's standard operating procedures for printing documents and photos.
- Print Quality Test: After installation, it is recommended to perform a print quality test or nozzle check from your printer's utility software to ensure all nozzles are firing correctly.
- Print Head Alignment: If print quality issues such as misaligned lines or blurry text occur, perform a print head alignment procedure through your printer's software or control panel.
- Regular Printing: To prevent ink from drying in the nozzles, use your printer regularly. If the printer is idle for extended periods, consider printing a test page once a week.
5. Maintenance
Proper maintenance can extend the life of your print head and ensure consistent print quality.
- Print Head Cleaning: If print quality deteriorates (e.g., streaks, missing colors), perform a print head cleaning cycle using your printer's utility software. Avoid excessive cleaning, as it consumes ink.
- Storage: If the print head needs to be removed and stored for an extended period, ensure it is placed in an airtight container to prevent the nozzles from drying out. Keep the orange protective cover on during storage.
- Ink Cartridge Replacement: Replace ink cartridges promptly when they are empty to prevent air from entering the print head, which can lead to clogs.
6. Troubleshooting
This section addresses common issues you might encounter.
- Poor Print Quality (Streaks, Fading, Missing Colors):
- Check ink levels and replace empty cartridges.
- Perform a print head cleaning cycle through your printer's software.
- Perform a print head alignment.
- Ensure the print head is correctly seated in the carriage.
- Printer Not Recognizing Print Head:
- Ensure the print head is fully and correctly installed.
- Turn the printer off, unplug it, wait a few minutes, then plug it back in and restart.
- Clean the electrical contacts on the print head and in the printer carriage with a lint-free cloth lightly dampened with distilled water (ensure completely dry before reinstallation).
- Error Messages:
- Refer to your printer's user manual for specific error code meanings and solutions.
- Ensure all protective tapes or covers have been removed from the print head and ink cartridges.
7. Specifications
| Attribute | Detail |
|---|---|
| Brand | OPPWONG |
| Model Number | QY6-0067 (Universal Model: QY6-0075) |
| Manufacturer Part Number | OPPWONGp374t0ivfy |
| Material | ABS |
| Function | Printer Printhead |
| Compatible Printer Models | IP4500, MP610, MP810, IP5300 |
| Package Dimensions | 13 x 9 x 8 cm |
| Item Weight | 100 g |
8. Warranty and Support
For warranty information and technical support, please refer to the documentation provided with your purchase or contact your retailer. Keep your proof of purchase for any warranty claims.
For further assistance, you may also visit the OPPWONG brand page or contact the seller directly.