Introduction
This manual provides comprehensive instructions for the assembly, operation, and maintenance of your VIWAT T-Shape 12x12 FT Greenhouse. Please read this manual carefully before assembly and use to ensure safe and efficient operation. Retain this manual for future reference.

Figure 1: VIWAT T-Shape 12x12 FT Greenhouse. This image shows the greenhouse in an outdoor environment, demonstrating its spacious design and potential for plant cultivation.
Safety Information
WARNING: This product contains sharp edges. Always wear appropriate protective gear, such as gloves and eye protection, during assembly and use. Assemble and use this product outdoors, away from direct sunlight and rain to prevent slips and falls. Always follow the manufacturer's instructions for safe installation and maintenance. Ensure the greenhouse is securely anchored to the ground to prevent wind damage.
Components List
Before beginning assembly, carefully unpack all components and verify that all parts are present and undamaged. Refer to the packing list provided with your product for a complete inventory. Key components include:
- Aluminum Frame Sections (Powder Coated, Black)
- 6mm Polycarbonate Panels (High Impact Resistant, UV Blocking)
- Adjustable Roof Vents (Quantity: 2)
- Hinged Doors (Independent Top and Bottom Openable Sections, Quantity: 1)
- Aluminum Door Locks
- Support Rods and Reinforcement Brackets
- Built-in Gutter System Components
- Fasteners and Assembly Tools (e.g., Hex Key)
Setup and Assembly
The VIWAT T-Shape Greenhouse features a revolutionary quick-assembly design with a quick-connect system and slide-in panels, significantly reducing installation time and improving stability.
Step 1: Frame Assembly
Begin by assembling the main aluminum frame structure. The quick-connect system allows for a fast and solid erection process. Follow the numbered steps in the diagram below for proper connection and locking.

Figure 2: Quick-Assembly Design. This image illustrates the three-step quick-assembly process, detailing how frame components are inserted and locked.
Step 2: Panel Installation
Once the frame is securely assembled, carefully slide the 6mm polycarbonate panels into the designated channels. These panels are engineered for high impact resistance, 99.99% light transmission, and effective blocking of harmful UV rays.
Step 3: Door and Vent Installation
Install the hinged doors and adjustable roof vents. Ensure all aluminum door locks and vent mechanisms operate smoothly and securely. The doors feature separate top and bottom hinged sections for versatile access and ventilation.
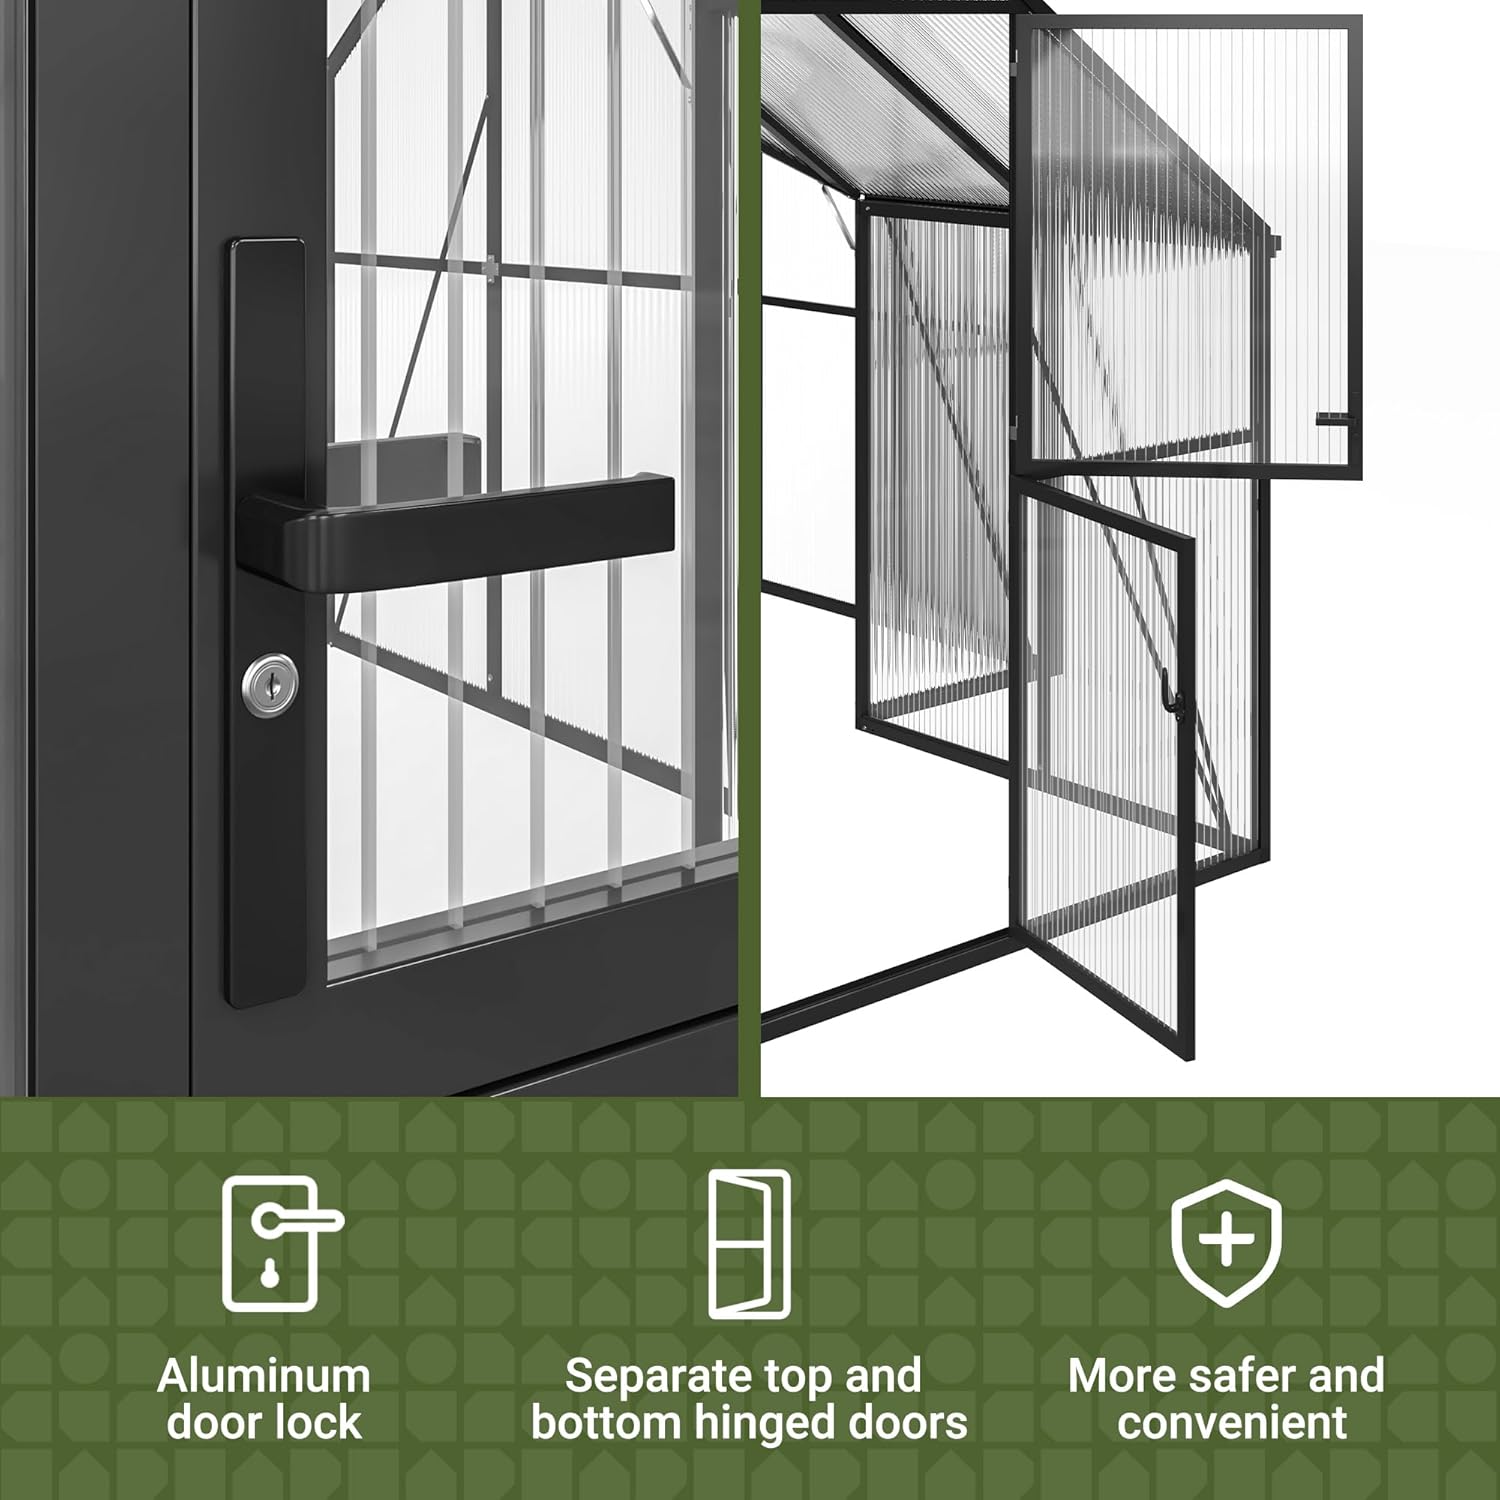
Figure 3: Door and Lock Details. This image highlights the aluminum door lock and the design of the separate top and bottom hinged doors for enhanced security and convenience.
Step 4: Reinforcement and Anchoring
Install all provided support rods and utilize the interior and exterior ground anchoring systems for maximum structural stability and strength. This greenhouse is designed to withstand wind resistance up to 56 mph and a roof snow load capacity of 18 lbs/ft².

Figure 4: Structural Features. This image displays key structural elements including adjustable sunroofs, the integrated gutter system, reinforced support rods, and the durable 6mm PC panels.
Operating Instructions
Ventilation
The greenhouse is equipped with two adjustable skylights and independent top and bottom openable hinged doors to ensure optimal air circulation.
- To adjust airflow, open the skylights to various angles as needed.
- For increased ventilation or access, open the top or bottom sections of the hinged doors independently.
Rainwater Management
The built-in metal drains allow for efficient collection and drainage of rainwater. Regularly inspect the drainage system to ensure it remains clear of debris and functions properly.
Maintenance
Regular maintenance will prolong the life and performance of your greenhouse.
- Cleaning Panels: Regularly clean polycarbonate panels with mild soap and water to maintain optimal light transmission. Avoid using abrasive cleaners or harsh chemicals that could damage the panels.
- Frame Inspection: Periodically check all frame connections and fasteners for tightness. Tighten any loose bolts or screws as necessary to ensure structural integrity and stability.
- Drainage System: Inspect the gutter system and drains for blockages, especially after heavy rainfall or during seasons with falling leaves. Clear any debris to ensure efficient rainwater runoff.
- Door and Vent Mechanisms: Lubricate hinges and locking mechanisms annually to ensure smooth operation and prevent corrosion.
Troubleshooting
- Issue: Poor Ventilation
- Solution: Ensure both roof vents and hinged doors are open to appropriate levels. Check for any internal or external obstructions blocking airflow.
- Issue: Water Leakage
- Solution: Inspect polycarbonate panel seals and ensure all panels are properly seated in their channels. Check the gutter system for blockages or damage, and ensure all fasteners are tight.
- Issue: Structural Instability
- Solution: Verify all frame connections are tight and ground anchoring systems are correctly installed and secured. Re-tighten any loose components.
For further assistance, please contact VIWAT customer support.
Specifications
Detailed specifications for the VIWAT T-Shape 12x12 FT Greenhouse:
| Feature | Detail |
|---|---|
| Model Number | VGH1212BG |
| Dimensions (L x W x H) | 141.7" x 141.7" x 90.8" |
| Frame Material | Aluminum (Powder Coated) |
| Cover Material | 6mm Polycarbonate (PC) |
| Number of Doors | 1 (with separate top and bottom hinged sections) |
| Number of Vents | 2 (Adjustable Roof Vents) |
| Wind Resistance | Up to 56 mph |
| Roof Snow Load | 18 lbs/ft² |
| Color | Black |
Figure 5: Greenhouse Dimensions. This diagram provides a visual representation of the key measurements of the T-Shape greenhouse.
Warranty and Support
VIWAT is committed to providing excellent customer service. We offer 24/7 customer support to assist with assembly, provide gardening insights, and address any product-related inquiries you may have. Please refer to your purchase documentation for specific warranty details and terms.
For support, please visit the VIWAT Store on Amazon or contact our customer service team directly.