Introduction
The TIDRADIO TD-H3 Plus is an advanced multi-band ham radio handheld designed for versatile communication. It features Bluetooth connectivity for wireless headsets, multiple programming options including wireless and Type-C, and a user-friendly interface. This manual provides detailed instructions for setting up, operating, maintaining, and troubleshooting your TD-H3 Plus radio.

1. Setup Guide
1.1 What's Included
Your TIDRADIO TD-H3 Plus package includes the following components:
- 2 x TD-H3 Plus Radios
- 2 x 18.8-inch Foldable CS Tactical Antennas
- 2 x TD-805S Antennas
- 2 x 6.1-inch Antennas
- 2 x Speaker Microphones
- 2 x 2500mAh Type-C Batteries
- 2 x Headsets with Microphones
- 2 x Desktop Chargers
- 2 x USB-C Charging (programming) Cables
- 2 x US Chargers
- 2 x Back Clips
- 1 x User Manual
- 2 x Lanyards
1.2 Initial Charging
Before first use, fully charge the 2500mAh Lithium Polymer battery. You can use the provided USB-C charging cable with a power bank, PC, car charger, wall adapter, or the desktop charger.
1.3 Wireless Headset Connection
The TD-H3 Plus supports connection to most wireless headsets. Follow these steps to pair your headset:
- Long press the BT key on the radio to turn on Bluetooth. The radio will announce "Bluetooth mode".
- Navigate to the Bluetooth menu (usually under "Radio Setting" or "Bluetooth" option in the main menu).
- Select "BT Mode" and ensure "Emitter" is chosen. This allows the radio to transmit audio to a headset.
- Go to "BT Pairing" and select "Pairable" to enable scanning for devices. The radio will display "Searching".
- Put your wireless headset into pairing mode.
- Once your headset appears in the list on the radio's screen, select it and confirm to connect. The radio will indicate "Conn success" upon successful pairing.

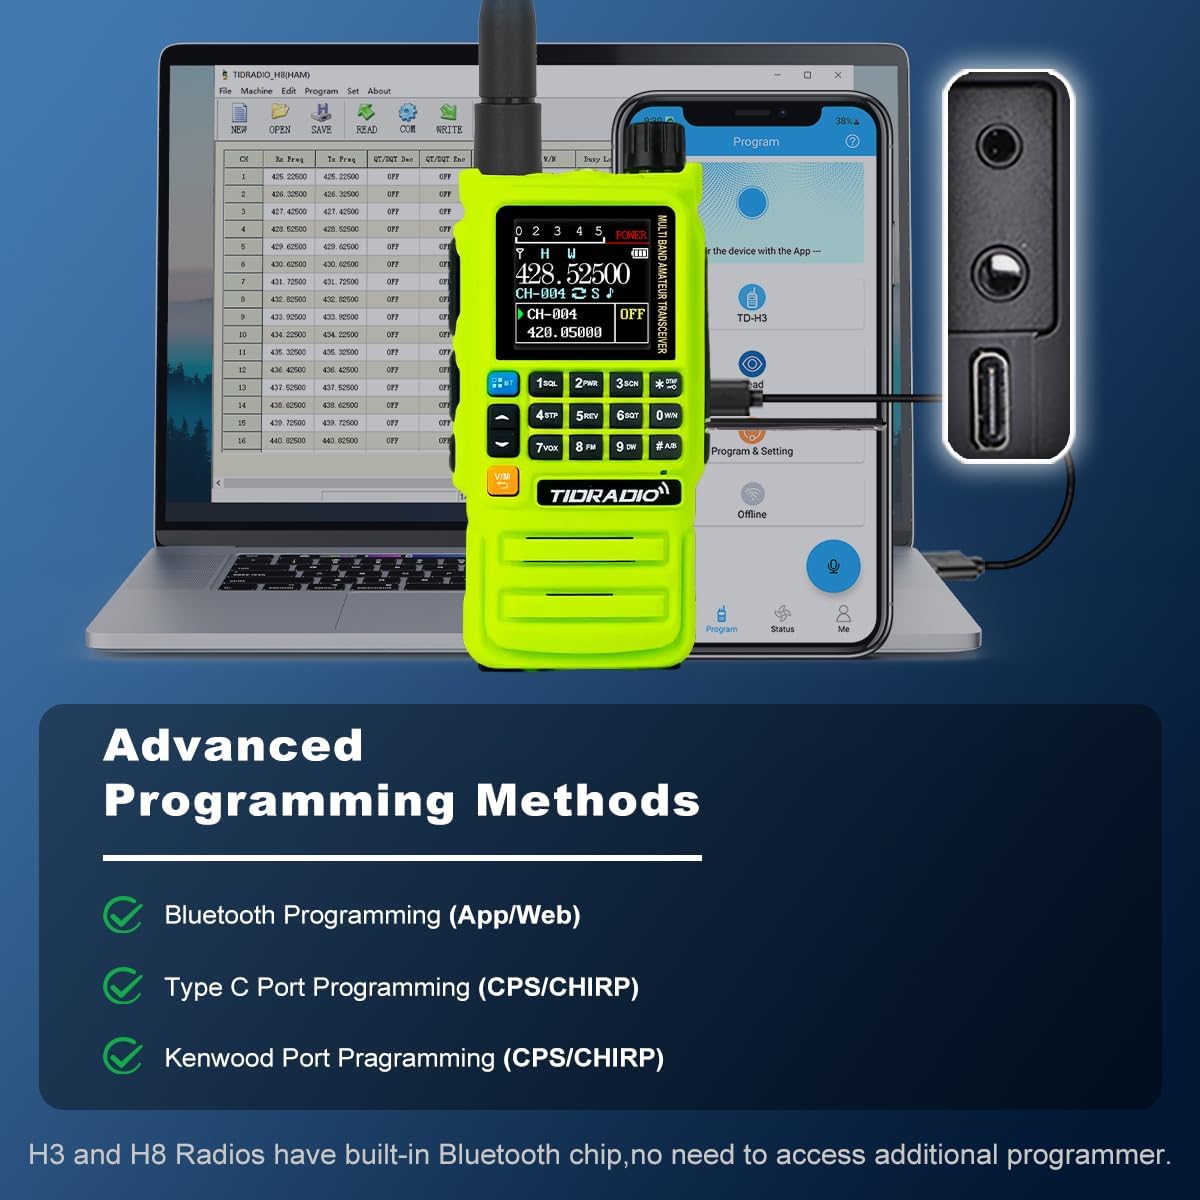
1.4 Multi-mode Programming
The TD-H3 Plus offers several programming methods for flexibility:
- Type-C Cable Programming: Use the side Type-C port for direct programming via a computer. This eliminates the need for older style programming cables.
- Bluetooth Programming: Program the radio wirelessly using a smartphone app or the Odmaster Website on a PC. This allows for quick and convenient programming, even offline if data is saved beforehand.
- Traditional 2-pin Interface: The radio retains the traditional 2-pin programming interface and is compatible with CHIRP and CPS programming software.
2. Operating Instructions
2.1 User Interface (UI) Navigation
The TD-H3 Plus features a new, more efficient UI design for easier navigation. Use the directional keys and OK/EXIT buttons to move through menus and confirm selections.

2.2 Frequency and Channel Management
- Channel Banks: The radio supports 199 channel banks for storing your preferred frequencies.
- Frequency Copy: Easily copy frequencies from other radios.
- Wireless Radio Replication: For H3 Plus models, hold side button 3 and turn the power knob to enter 'Copy' mode. Once both H3 devices are in this mode, press side button 3 again to transfer frequencies and settings from H3-A to H3-B.
- One Key Frequency Match: Hold down "1" to identify the frequency when another radio is transmitting. You can then save it directly to a new channel.
- Custom Channel Name: Customize channel names for easier identification.
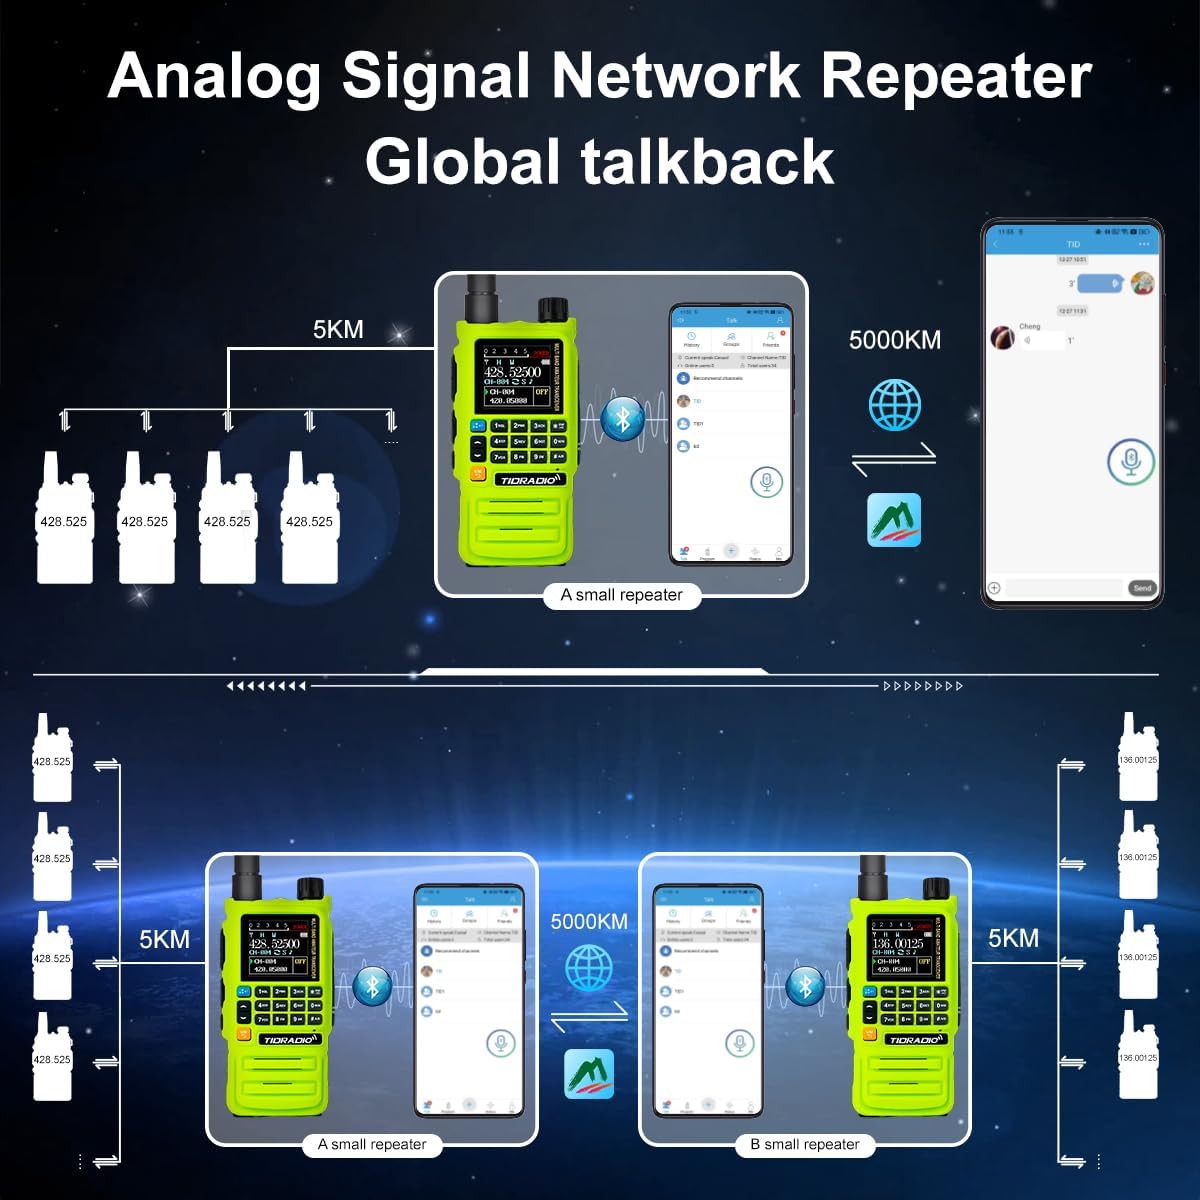
2.3 Repeater Operation
The TD-H3 Plus is repeater capable and supports quick repeater import via ODmaster. This allows for extended communication range.
2.4 NOAA Weather Receiver
The radio includes a NOAA Weather Receiver for emergency weather alerts, providing crucial information during outdoor activities or emergencies.
2.5 Dual PTT and Dual Watch
- Dual PTT: The radio features dual Push-To-Talk buttons, allowing for quick switching between two active channels.
- Dual Watch: Monitor two different frequencies simultaneously.
2.6 Enhanced Flashlight
The integrated φ8 flashlight provides enhanced brightness and durability for use in low-light conditions.
2.7 DTMF Lock
To safeguard your radio, you can set a DTMF lock. The code must be at least 5 digits. For example, use "12345" as the Kill/Stun code. Refer to the Troubleshooting section for unlocking instructions.
3. Maintenance
3.1 Battery Care
The 2500mAh battery provides long standby time. To maximize battery life:
- Always use the provided charging accessories.
- Avoid overcharging or completely draining the battery.
- Store the radio and battery in a cool, dry place when not in use for extended periods.
3.2 Cleaning
Clean the radio's exterior with a soft, damp cloth. Do not use harsh chemicals or abrasive cleaners. Ensure all ports are dry before charging or connecting accessories.
4. Troubleshooting
4.1 Unlocking DTMF Lock
If your radio is locked via DTMF, you can unlock it using one of the following methods:
- Via DTMF Command: Send the unlock code to the H3 radio via DTMF. If your Kill/Stun code was "12345", the unlock code would be "12345#" (the '#' is for unlocking and does not need to be set separately).
- Via CPS Software: Open the CPS software, navigate to "Edit" -> "DTMF", uncheck the Kill/Stun code option, and then click "Write" to unlock your H3 radio.
4.2 Firmware Upgrades
The TD-H3 Plus supports software-based firmware upgrades and ODmaster online upgrades. Over-The-Air (OTA) updates via phone and additional features will be available in future updates. Regularly check the official TIDRADIO website or app for the latest firmware versions.

5. Specifications
| Feature | Detail |
|---|---|
| Model Number | TD-H3 Plus |
| Brand | TIDRADIO |
| Transmitting Frequency Range | 136-174MHz, 340-390MHz, 200-230MHz, 400-470MHz |
| Receiving Frequency Range | 50-76MHz, 76-108MHz, 108-136MHz, 136-174MHz, 220-230MHz, 350-400MHz, 400-470MHz, 470-600MHz |
| Battery Capacity | 2500 mAh Lithium Polymer |
| Charging Method | USB-C (side port), Desktop Charger |
| Channels | 199 Channel Banks |
| Screen | 1.44" LCD Color Screen |
| Special Features | Bluetooth Connectivity (Headphone-connectable, Wireless Programming), Repeater Capable, Frequency Copy, Wireless Radio Replication, NOAA Weather Receiver, Dual PTT, Enhanced φ8 Flashlight, DTMF Lock, Dual Watch, Adjustable Squelch, Customizable on Phone |
| FCC ID | 2A4FBTD831 |
| Item Weight | 3.45 pounds (approximate, for 2-pack) |
| Package Dimensions | 10.43 x 9.02 x 5.2 inches (approximate) |
| Water Resistance Level | Water Resistant |


6. Warranty and Support
TIDRADIO is committed to providing innovative products and excellent customer support. For warranty information, technical assistance, or further inquiries, please refer to the official TIDRADIO website or contact their customer service directly. Keep your purchase receipt for warranty claims.