Product Overview
This Spkagy Carburetor & Tool Kit is designed to optimize the performance of compatible string trimmers. It provides a precision-machined carburetor for efficient fuel-air mixture, reducing stalling and enhancing cutting power. The kit also includes a comprehensive set of tools for easy installation, tuning, and maintenance.
Built with durable materials, this all-in-one solution ensures long-lasting reliability, making it suitable for both DIY enthusiasts and professional users. It streamlines repairs and helps maintain your trimmer's peak performance.
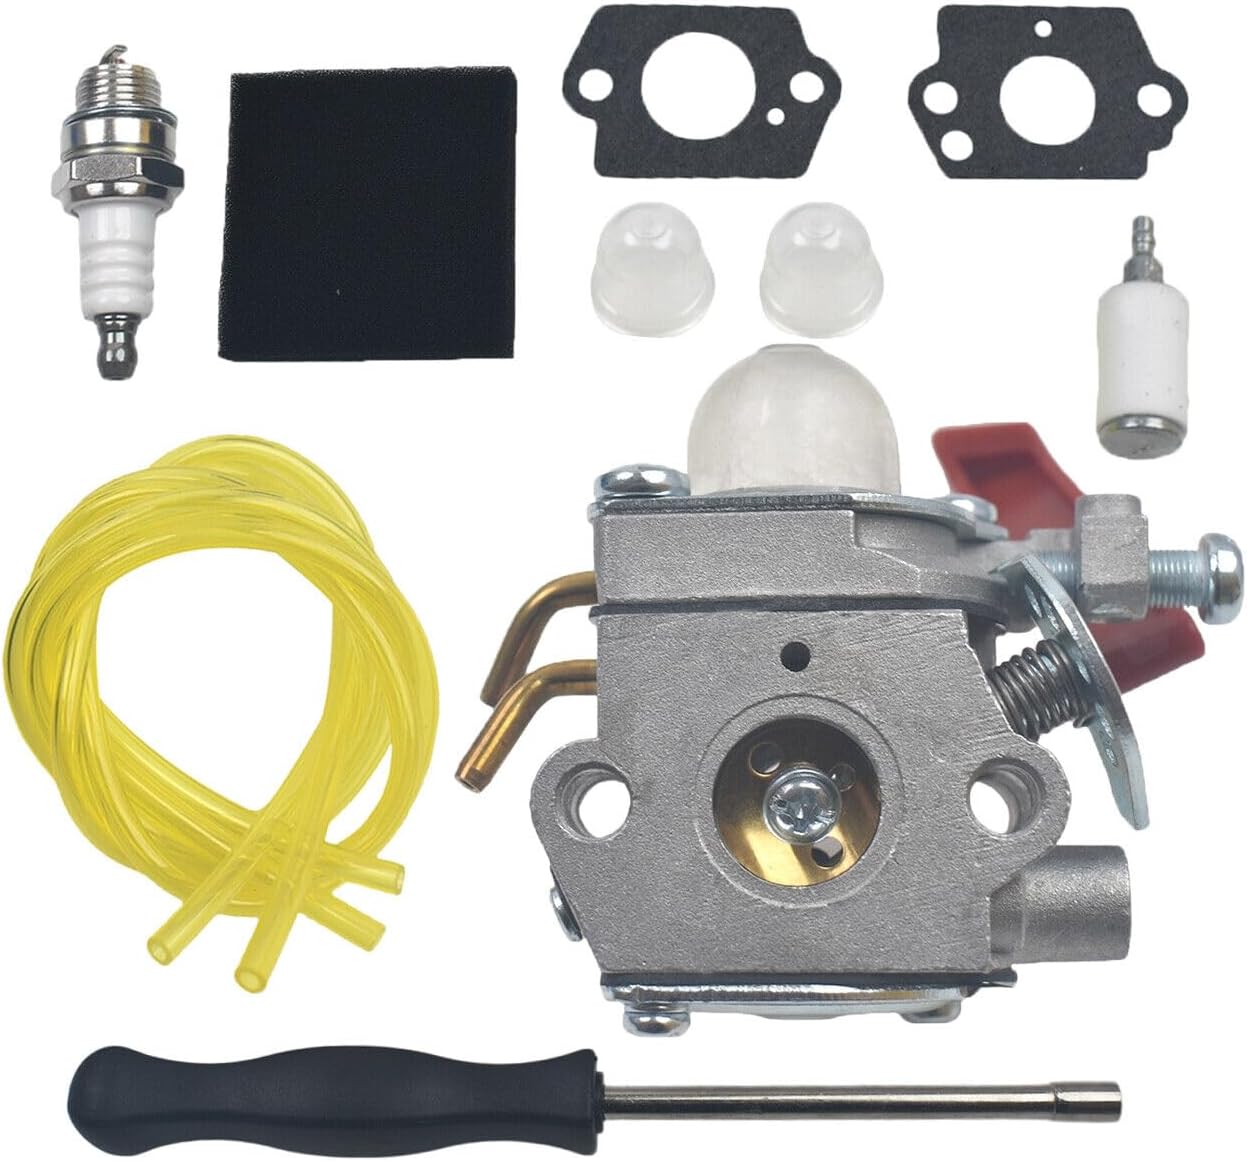
Image: The complete Spkagy Carburetor and Tool Kit, including the carburetor, spark plug, air filter, gaskets, primer bulbs, fuel filter, fuel lines, and a carburetor adjustment tool.
Product Contents
The Spkagy Carburetor & Tool Kit includes the following components:
- 1 x Carburetor
- 2 x Gasket
- 1 x Air Filter
- 2 x Primer Bulb
- 1 x Spark Plug
- 1 x Fuel Filter
- 2 x Fuel Line
- 1 x Carburetor Adjustment Tool
Fitment and Compatibility
This carburetor and tool kit is compatible with various string trimmer models, including but not limited to:
- Carburetor for Zama C1U-H47
- Carburetor for Homelite 984534001 string trimmers
- Carburetor for B25C String Trimmer UT-20768
- Carburetor for B25C String Trimmer UT-20770
- Carburetor for B25S String Trimmer UT-15182
- Carburetor for BC2500R String Trimmer UT-15200
- Homelite UT-20811-A Versa String Trimmer
- Homelite UT-20811-B Versa String Trimmer
Always verify your specific model number against the compatibility list before installation.
Setup and Installation
Safety First: Before beginning any work, ensure the string trimmer's engine is off and cool. Disconnect the spark plug wire to prevent accidental starting. Wear appropriate safety gear, including gloves and eye protection.
- Prepare the Trimmer: Place the trimmer on a stable, flat surface. Ensure the fuel tank is nearly empty or drain it if necessary to prevent spills.
- Remove Air Filter Assembly: Locate the air filter cover, usually held by screws or clips. Remove the cover and the old air filter.
- Disconnect Fuel Lines: Carefully identify and disconnect the fuel lines leading to and from the old carburetor. Be prepared for minor fuel spills. Note the routing of the lines for reinstallation.
- Remove Old Carburetor: Unbolt the old carburetor from the engine. There are typically two nuts holding it in place. Remove any old gaskets.
- Install New Gaskets and Carburetor: Place the new gaskets in their correct positions. Mount the new carburetor, ensuring it aligns properly with the intake manifold. Secure it with the original nuts, tightening them evenly.
- Connect Fuel Lines and Primer Bulbs: Reconnect the fuel lines to the new carburetor, following the original routing. Replace the old primer bulbs with the new ones provided in the kit if they are worn or cracked.
- Install New Air Filter: Insert the new air filter into the air filter housing and reattach the cover.
- Replace Spark Plug: Using a spark plug wrench, remove the old spark plug. Install the new spark plug from the kit, tightening it appropriately (do not overtighten). Reconnect the spark plug wire.
- Initial Fueling and Priming: Fill the fuel tank with the correct fuel/oil mixture for your trimmer. Press the primer bulb several times until fuel is visible and the bulb is firm.
- Carburetor Adjustment (if necessary): Most new carburetors are pre-set. However, if your trimmer does not start or runs poorly, minor adjustments to the idle and mixture screws may be required using the provided adjustment tool. Refer to your trimmer's original manual for specific adjustment procedures.

Image: A side view of the new carburetor, highlighting the choke lever and fuel line connections. This view is useful during installation to identify connection points.
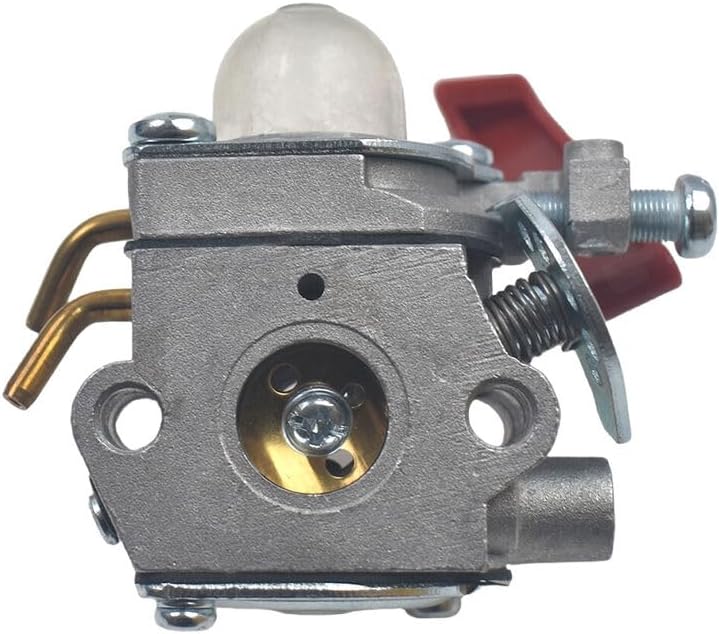
Image: A front view of the new carburetor, showing the air intake and mounting holes. This perspective helps in aligning the carburetor during installation.
Operating Instructions (General)
After successful installation, ensure your trimmer is fueled with the correct gasoline and oil mixture as specified by your trimmer's manufacturer. Always use fresh fuel.
- Starting Cold Engine: Set the choke to the "Full Choke" position. Press the primer bulb until it is firm and filled with fuel. Pull the starter cord until the engine "pops" or attempts to start.
- Starting Warm Engine: Set the choke to the "Half Choke" or "Run" position. Pull the starter cord.
- Running: Once the engine starts, gradually move the choke lever to the "Run" position. Allow the engine to warm up for a minute before operating at full throttle.
Maintenance
Regular maintenance ensures the longevity and optimal performance of your carburetor and trimmer.
- Air Filter: Inspect the air filter regularly (e.g., every 10-20 hours of operation or before each use in dusty conditions). Clean or replace the air filter if it is dirty or clogged. A clean air filter is crucial for proper engine performance.
- Fuel Filter: The fuel filter, located inside the fuel tank, should be checked periodically and replaced if it appears clogged or dirty. This prevents debris from reaching the carburetor.
- Spark Plug: Inspect the spark plug for wear, carbon buildup, or damage. Replace it annually or if performance issues arise. Ensure the gap is correct according to your trimmer's specifications.
- Fuel Lines: Check fuel lines for cracks, hardening, or leaks. Replace them if any damage is observed to prevent fuel delivery issues and fire hazards.
- Carburetor Cleaning: If the trimmer experiences persistent fuel-related issues, the carburetor may need internal cleaning. This typically involves disassembling the carburetor and cleaning its jets and passages with carburetor cleaner. This is an advanced procedure and should only be attempted by experienced users.
Troubleshooting
If your trimmer experiences issues after installing the new carburetor, consider the following common troubleshooting steps:
- Engine Not Starting:
- Check fuel level and ensure fresh, correctly mixed fuel.
- Verify spark plug connection and condition. Test for spark.
- Ensure primer bulb is working and fuel is reaching the carburetor.
- Check choke position.
- Engine Starts but Stalls:
- Ensure choke is fully open after warm-up.
- Check for clogged fuel filter or air filter.
- Carburetor may need minor idle speed adjustment.
- Poor Performance / Lack of Power:
- Inspect air filter for blockage.
- Check spark plug for fouling or incorrect gap.
- Carburetor mixture screws may require fine-tuning.
- Fuel Leaks:
- Ensure all fuel lines are securely connected and not cracked.
- Verify gaskets are properly seated and not damaged.
- Check primer bulb for cracks.
If issues persist, consult a qualified service technician or refer to your trimmer's specific service manual.
Specifications
| Attribute | Value |
|---|---|
| Brand | Spkagy |
| Model Number | Spkagy (Manufacturer's internal model number: 1) |
| Item Weight | 1 pounds |
| Package Dimensions | 1 x 1 x 1 inches |
| Exterior Finish | Aluminum |
| Automotive Fit Type | Universal Fit |