
Introduction
This manual provides essential information for the proper installation, operation, and maintenance of your new Generic replacement carburetor. This carburetor is designed for compatibility with Ariens 824 Model 932101 snowblowers. Please read these instructions thoroughly before proceeding with installation or use to ensure safe and efficient operation.
Safety Information
Always prioritize safety when working with fuel systems and power equipment. Failure to follow safety precautions can result in serious injury or property damage.
- Disconnect Spark Plug: Before performing any maintenance or installation, always disconnect the spark plug wire to prevent accidental engine startup.
- Work in a Well-Ventilated Area: Gasoline fumes are flammable and hazardous. Ensure adequate ventilation.
- Handle Fuel Carefully: Gasoline is highly flammable. Avoid spills and keep away from open flames or ignition sources.
- Wear Protective Gear: Use safety glasses and gloves to protect against fuel, chemicals, and sharp edges.
- Allow Engine to Cool: Never work on a hot engine. Allow sufficient time for the engine and exhaust system to cool down.
Installation
This section outlines the general procedure for replacing a carburetor. Specific steps may vary slightly depending on your snowblower model. Refer to your snowblower's original service manual for detailed instructions if necessary.
Tools Required
- Socket wrench set
- Screwdriver set (flathead and Phillips)
- Pliers
- Fuel line clamps or pinch-off tool
- Clean rags
- New fuel line (optional, recommended if old line is brittle)
Preparation
- Ensure the snowblower engine is cool.
- Turn off the fuel supply valve (if equipped) or drain the fuel tank into an approved container.
- Disconnect the spark plug wire.
- Remove any shrouds or covers that obstruct access to the carburetor.
Carburetor Removal
- Carefully disconnect the fuel line from the carburetor. Be prepared for residual fuel to leak.
- Disconnect any throttle linkage, choke linkage, and governor springs attached to the carburetor. Note their positions for reassembly.
- Unbolt the carburetor from the engine intake manifold. There may be two or more nuts holding it in place.
- Remove the old carburetor and any old gaskets. Inspect the intake manifold for debris or damage.

Image 1: Front view of the Generic carburetor with a new gasket. This image shows the main body of the carburetor, the intake port, and the included mounting gasket, which is crucial for a proper seal during installation.
Carburetor Installation
- Ensure the mounting surfaces on the engine and carburetor are clean and free of old gasket material.
- Place the new gasket(s) in the correct position between the carburetor and the engine intake manifold.
- Mount the new carburetor onto the engine, aligning it with the bolt holes.
- Secure the carburetor with the bolts, tightening them evenly to prevent warping. Do not overtighten.
- Reconnect the throttle linkage, choke linkage, and governor springs to their original positions. Ensure they move freely.
- Reconnect the fuel line to the carburetor. Secure it with a clamp.
- Replace any shrouds or covers removed earlier.
- Reconnect the spark plug wire.

Image 2: Side view of the Generic carburetor, highlighting the fuel inlet port. This port is where the fuel line from the tank connects to the carburetor.
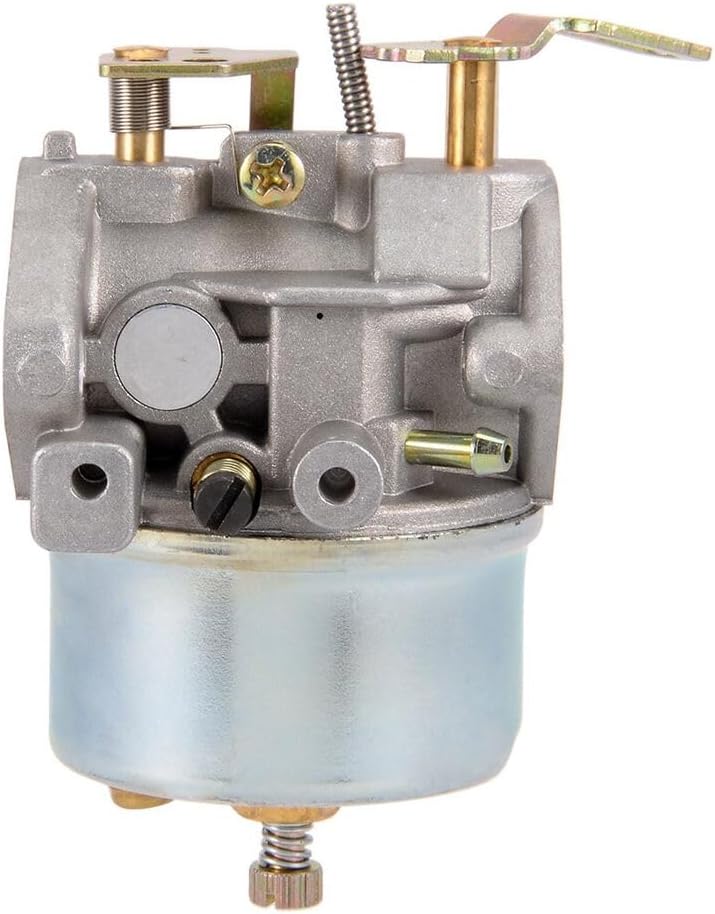
Image 3: Another side view of the Generic carburetor, showing various linkage attachment points for the throttle and choke mechanisms. Proper connection of these linkages is essential for engine control.
Operating Instructions
After installation, perform the following checks before attempting to start the engine.
Post-Installation Checks
- Fuel Leaks: Inspect all fuel line connections for any signs of leakage. Tighten connections if necessary.
- Linkage Movement: Verify that the throttle and choke linkages move freely and return to their default positions.
- Tightness: Ensure all bolts and fasteners are securely tightened.
Initial Engine Start-Up
- Open the fuel supply valve.
- Prime the carburetor if your snowblower has a primer bulb, typically 3-5 pushes.
- Set the choke to the FULL CHOKE position.
- Set the throttle to the FAST position.
- Pull the starter cord firmly until the engine starts.
- Once the engine starts, gradually move the choke to the OFF position as the engine warms up.
- Allow the engine to warm up for a few minutes before operating the snowblower.

Image 4: Top-down view of the Generic carburetor intake, showing the butterfly valve. This view is important for understanding air flow and choke operation.
Maintenance
Regular maintenance of your carburetor and fuel system will ensure optimal performance and extend the life of your snowblower.
Cleaning
- Exterior Cleaning: Keep the exterior of the carburetor clean from dirt, debris, and fuel residue.
- Air Filter: Regularly check and clean or replace the air filter as per your snowblower's manual. A clogged air filter can affect carburetor performance.
- Fuel Bowl: If the engine runs poorly, the carburetor fuel bowl may need to be drained or cleaned to remove sediment. This typically involves removing the drain screw or the entire bowl.
Fuel System Care
- Fresh Fuel: Always use fresh, clean gasoline. Stale fuel can cause deposits and clog carburetor passages.
- Fuel Stabilizer: Use a fuel stabilizer, especially if storing the snowblower for extended periods.
- Fuel Filter: Check and replace the in-line fuel filter (if present) periodically.
Storage
- Before long-term storage, either run the engine until it runs out of fuel or drain the fuel tank and carburetor bowl completely. This prevents fuel degradation and carburetor clogging.
Troubleshooting
If your snowblower experiences issues after carburetor replacement, consider the following common problems and solutions:
- Engine Will Not Start:
- Check for fuel in the tank.
- Ensure the fuel valve is open.
- Verify spark plug connection and condition.
- Confirm choke is set correctly.
- Check for proper fuel flow to the carburetor.
- Engine Runs Rough or Idles Poorly:
- Ensure all linkages are connected and moving freely.
- Check for air leaks around the carburetor mounting gaskets.
- Inspect the air filter for clogs.
- Consider if fuel is stale or contaminated.
- Fuel Leaks:
- Check all fuel line connections and clamps.
- Ensure carburetor bowl drain screw is tight.
- Inspect carburetor gaskets for proper sealing.
If issues persist, consult a qualified service technician or your snowblower's original service manual.
Specifications
| Feature | Detail |
|---|---|
| Product Type | Replacement Carburetor |
| Compatibility | Ariens 824 Model 932101 Snowblower |
| Manufacturer | Generic |
| Item Model Number | Generic |
| Product Dimensions | 1 x 1 x 1 inches (approximate) |
| Item Weight | 1 pound (approximate) |
Warranty and Support
This Generic replacement carburetor is manufactured to meet or exceed original equipment specifications. For any warranty claims or technical support, please contact the seller directly through your purchase platform. Keep your proof of purchase for any warranty inquiries.