1. Introduction
Thank you for choosing the Amenitlif 8000 BTU Portable Air Conditioner. This appliance is designed to provide efficient cooling, dehumidification, and fan circulation for rooms up to 350 sq.ft. Please read this manual thoroughly before installation and operation to ensure proper use and maintenance. Keep this manual for future reference.

Image 1.1: Amenitlif 8000 BTU Portable Air Conditioner and its remote control.
2. Safety Information
Please observe the following safety precautions to reduce the risk of electric shock, fire, or injury.
- Read all instructions before using this appliance.
- This appliance is for indoor use only.
- Ensure the power supply matches the voltage specified on the rating label.
- Do not operate the unit with a damaged cord or plug.
- Do not block air outlets or inlets. Maintain at least 12 inches (30 cm) clearance from walls and other objects.
- Do not insert objects into the air outlets.
- Always unplug the unit before cleaning or servicing.
- Keep the unit on a flat, stable surface to prevent tipping.
- Do not use in wet environments such as bathrooms or laundry rooms.
- Do not attempt to repair or modify the unit yourself. Contact qualified service personnel.
3. Package Contents
Verify that all items listed below are present in your package. If any parts are missing or damaged, contact customer support.

Image 3.1: Included accessories for the portable air conditioner.
- Portable Air Conditioner Unit
- Remote Control (x1)
- Exhaust Hose (x1)
- Slide Bar (Window Venting Kit) (x1)
- Slide Bar Connector (x1)
- Exhaust Pipe Joint (x2)
- User Manual
4. Product Features
The Amenitlif Portable Air Conditioner offers multiple functions and user-friendly features:

Image 4.1: Key features of the portable air conditioner.
- 3-in-1 Functionality: Offers Cooling, Fan, and Dehumidifier modes for versatile climate control.
- Powerful Cooling: 8,000 BTU cooling capacity suitable for rooms up to 350 sq.ft.
- Quiet Operation: Operates at a low noise level of ≤54dB, ideal for bedrooms and offices.
- Smart Controls: Features an intuitive touch panel and a full-function remote control.
- 24-Hour Timer: Programmable timer for automatic on/off scheduling.
- Sleep Mode: Designed for comfortable overnight operation with reduced noise and gradual temperature adjustments.
- Self-Evaporation System: Most condensed water evaporates automatically through the exhaust hose, reducing the need for manual drainage.
- Portability: Equipped with four stainless steel castor wheels for easy movement between rooms.
- Adjustable Airflow: Directional louvers allow you to direct the cool air where needed.

Image 4.2: The 3-in-1 functionality of the unit: Cool, Dry, and Fan modes.
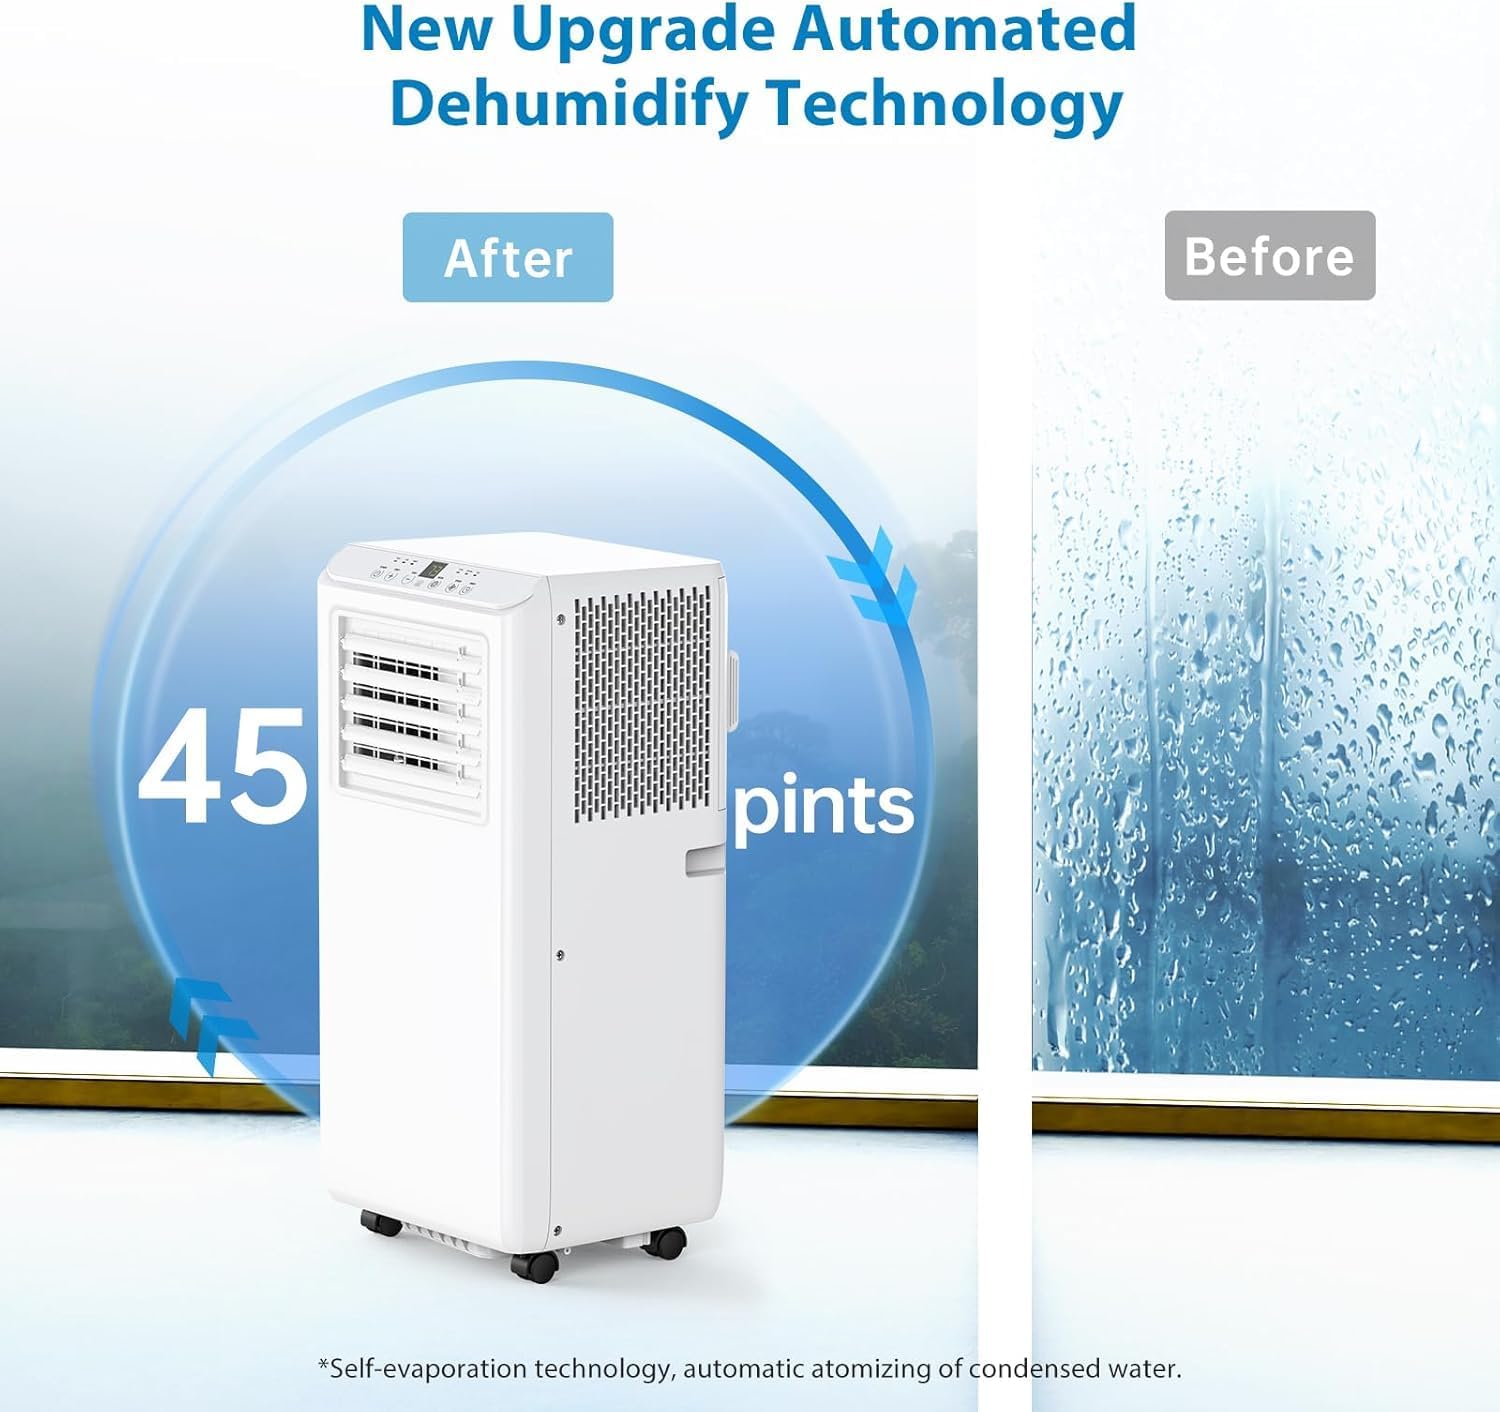
Image 4.3: Automated dehumidification technology, capable of removing up to 45 pints of moisture per day.
5. Setup and Installation
Follow these steps to properly install your portable air conditioner.

Image 5.1: Step-by-step guide for exhaust hose and window kit installation.
- Connect Hose Connector: Connect one of the exhaust pipe joints to one end of the exhaust hose.
- Connect Window Kit: Connect the other exhaust pipe joint to the other end of the exhaust hose.
- Attach to AC: Attach the assembled exhaust hose connector to the exhaust air outlet located on the back of the air conditioner unit.
- Extend Window Kit: Extend the adjustable window kit (slide bar) to fit the width or height of your window opening. Tighten the nuts to secure its length.
- Install Window Partitions: Install the window kit into your window opening. This kit is designed for both horizontal and vertical sliding windows.
- Insert Ventilation Tube: Insert the exhaust hose adapter into the opening of the window kit, ensuring a secure fit to prevent air leakage.
Ensure all connections are tight to maximize cooling efficiency and prevent hot air from re-entering the room.
6. Operation
Your portable air conditioner can be operated using the control panel on the unit or the included remote control.
6.1 Control Panel

Image 6.1: The simple and clear control panel.
- Power Button: Turns the unit on or off.
- Temp + / - Buttons: Adjusts the desired temperature in Cool mode (61°F to 89°F).
- Mode Button: Cycles through Cooling, Fan, and Dehumidifier modes.
- Speed Button: Adjusts fan speed (Low/High) in Fan and Cool modes.
- Timer Button: Sets the 24-hour timer for automatic on/off.
6.2 Remote Control

Image 6.2: The remote control allows adjustment from anywhere in the room.
The remote control duplicates the functions of the control panel, allowing convenient operation from a distance.
6.3 Operating Modes
- Cool Mode: Provides powerful cooling. Set your desired temperature using the Temp +/- buttons.
- Fan Mode: Circulates air without cooling. Choose between Low and High fan speeds.
- Dehumidifier Mode: Removes excess moisture from the air. The unit will operate at a fixed fan speed.
6.4 Sleep Mode

Image 6.3: Temperature progression in Sleep Mode for enhanced comfort.
Activate Sleep Mode for quiet operation and energy saving during the night. In this mode, the set temperature will gradually increase over several hours to maintain comfort while you sleep.
7. Maintenance
Regular maintenance ensures optimal performance and extends the lifespan of your air conditioner.
7.1 Filter Cleaning

Image 7.1: Removing the washable filter for cleaning.
The air filter should be cleaned every two weeks or more frequently depending on usage and air quality.
- Turn off and unplug the unit.
- Locate the filter panel on the side or back of the unit.
- Gently pull out the filter.
- Wash the filter with warm, soapy water. Rinse thoroughly.
- Allow the filter to air dry completely before reinserting it into the unit.
7.2 Drainage
This unit features a self-evaporation system, meaning most condensed water is expelled through the exhaust hose. However, in areas of high humidity, the internal water tank may fill up. If the tank becomes full, the unit will stop operating and display an error code (refer to troubleshooting). In such cases, manually drain the water:
- Turn off and unplug the unit.
- Place a shallow pan or tray under the drainage port (usually located at the bottom rear of the unit).
- Remove the drain plug.
- Allow all water to drain out.
- Replace the drain plug securely.
8. Troubleshooting
Before contacting customer support, please refer to the following common issues and solutions:
| Problem | Possible Cause | Solution |
|---|---|---|
| Unit does not turn on | No power supply Power cord not plugged in Full water tank | Check power outlet Ensure plug is securely inserted Drain water tank |
| Unit not cooling effectively | Dirty air filter Blocked air intake/outlet Window kit not properly installed Room size too large | Clean air filter Clear obstructions Ensure window kit is sealed Verify room size is within specifications |
| Loud noise during operation | Unit not on a level surface Loose parts | Place unit on a flat, stable surface Contact customer support if noise persists |
| Water leakage | Drain plug not secured Unit tilted | Ensure drain plug is tight Place unit on a level surface |
9. Specifications
| Specification | Detail |
|---|---|
| Brand | Amenitlif |
| Model Number | EWfUuGb394VWDebCB19nHwIOFl7e |
| Cooling Power | 8000 BTU |
| Coverage Area | Up to 350 sq.ft. |
| Dehumidification Capacity | 45 Pints/Day |
| Noise Level | ≤54 dB |
| Voltage | 115V |
| Wattage | 860W |
| Annual Energy Consumption | 900 Watts |
| Product Dimensions (D x W x H) | 15.08 x 13.39 x 34.76 inches |
| Item Weight | 50.7 pounds |
| Color | White |
| Special Features | Remote Controlled, 3-in-1 Function, Self-Evaporation |
10. Warranty and Support
For warranty information or technical support, please refer to the contact details provided with your purchase documentation or visit the official Amenitlif website. Keep your proof of purchase for warranty claims.