DUDUPET B0F2SDC46T
DUDUPET 5L Automatic Cat Feeder & 4L Water Dispenser User Manual
Model: B0F2SDC46T
Introduction
This user manual provides comprehensive instructions for the DUDUPET 5L Automatic Cat Feeder and 4L Water Dispenser. Designed for convenience and pet well-being, this 2-in-1 system ensures your cats or small dogs are consistently fed and hydrated. Please read this manual thoroughly before operation to ensure proper setup and use.

The DUDUPET 2-in-1 Automatic Pet Feeder and Water Dispenser, featuring a 5L food capacity and 4L water capacity, designed for consistent feeding and hydration.
Key Features
- Innovative 2-in-1 Design: Combines a 4L gravity-sensing water dispenser and a 5L automatic food dispenser into one compact unit.
- Transparent Monitoring: Visible windows for both food and water compartments allow for easy monitoring of levels.
- Precise Feeding Schedule: Program up to 6 meals per day with adjustable portions (1-15 portions per meal) to prevent overeating and ensure a balanced diet.
- Voice Recording: Record a 10-second personalized message to call your pet at meal times, providing comfort and familiarity.
- Dual Power Supply: Operates via adapter or backup battery power (batteries not included) to ensure uninterrupted feeding during power outages.
- Advanced Water Filtration: The water fountain features a 5-layer filtration system for continuous supply of clean and healthy water.
- Food Freshness: Includes a desiccant bag and a four-layer freshness preservation system to keep dry food fresh and crispy.
- Easy to Clean: Detachable food hopper, bowl, and water tank simplify cleaning and maintenance.
Setup Guide
- Unpack Components: Carefully remove all components from the packaging. Ensure all parts listed in the packing list are present.
- Install Base and Trays: Place the main feeder base on a flat, stable surface. Install the water bowl and food tray onto the base, ensuring they are securely seated.
- Power Connection: Connect the power adapter to the feeder and plug it into a wall outlet. For backup power, install 3 D-cell batteries (not included) into the battery compartment at the bottom of the unit.
- Fill Water Tank: Unscrew the water outlet cover counter-clockwise and add clean water to the left-side water tank. Screw the cover back on tightly. The gravity-sensing design will automatically fill the water bowl.
- Fill Food Hopper: Open the lid of the food compartment and fill it with dry pet food. Ensure the desiccant bag is placed in its designated slot on the lid to maintain food freshness.
- Initial Power On: Once connected, the display screen will light up, indicating the device is ready for programming.

Exploded view of the DUDUPET feeder components, including the water bucket, water bowl, food bowls, and main machine base.
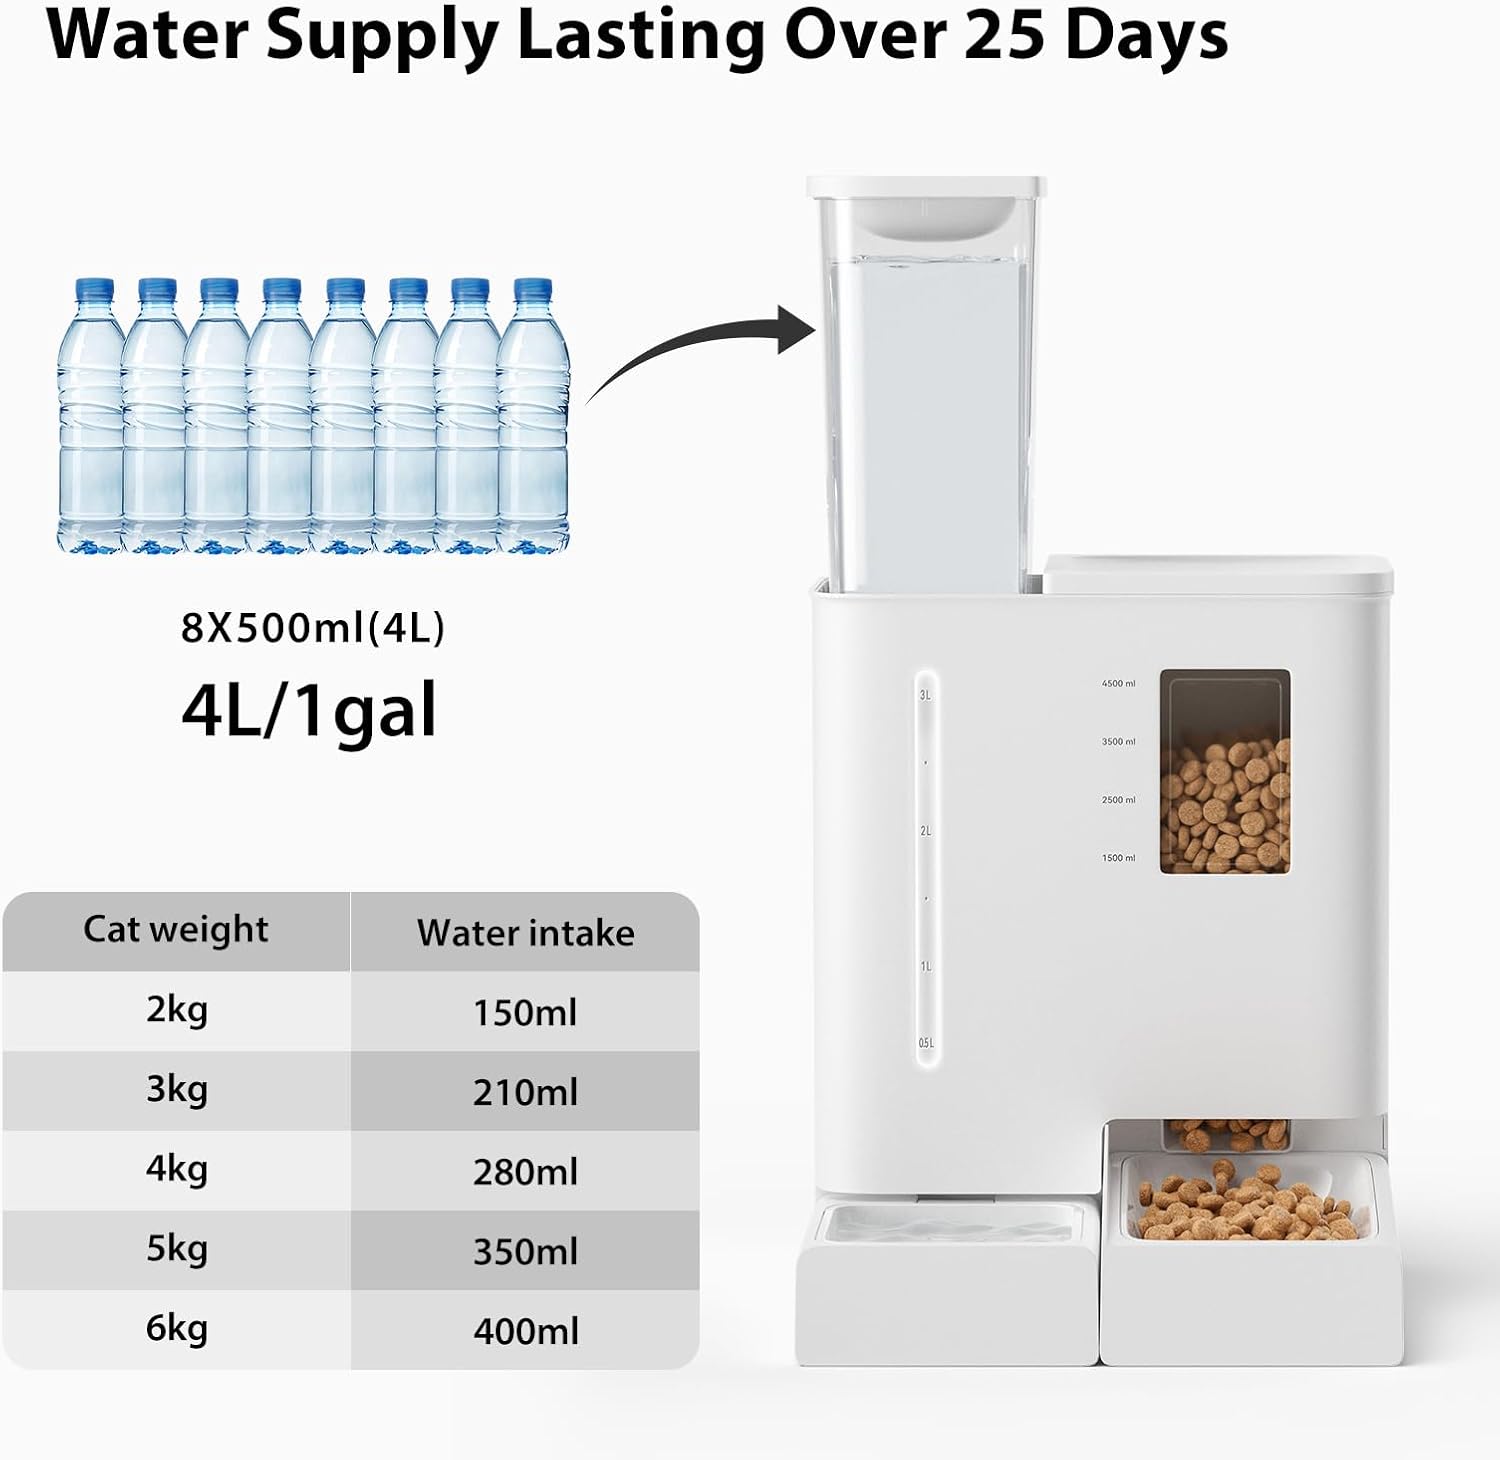
The 4L water tank, demonstrating how to fill it and its capacity for continuous water supply.

The 5L food hopper, illustrating its capacity and the recommended food portions based on pet weight.
This video demonstrates how to connect the power supply and install the water and food components of the DUDUPET Automatic Pet Feeder.
Operating Instructions
Setting Current Time:
- Unlock Screen: In the locked screen state, press and hold the paw print button for 3 seconds to unlock the screen. You will hear two beeps and the unlock icon will light up.
- Enter Time Setting: Long press the gear icon button for 3 seconds to enter the current time setting. The "hour" digits will blink.
- Adjust Hour: Use the "+" and "-" keys to adjust the hour (AM/PM 0-12).
- Adjust Minute: Short press the gear icon button to enter the minute setting. The "minute" digits will blink. Use the "+" and "-" keys to adjust the minute (0-59).
- Confirm Time: Short press the gear icon button again to confirm the current set time and return to the main operating page.
Setting Daily Feeding Schedule:
- Enter Schedule Mode: In the unlocked state, short press the gear icon button to enter the feeding schedule setting mode. The default entry will be for the first meal ("M-1" blinking).
- View/Select Meal: Use the "+" and "-" keys to view schedules for other meals. The selected meal number will blink. Alternatively, you can directly enter the feeding time and portion setting for the first meal.
- Set Meal Time: Long press the gear icon button to enter the meal time setting. The "hour" digits will blink. Use "+" and "-" to adjust the hour. Short press the gear icon to confirm the hour and enter the minute setting. Adjust minutes with "+" and "-".
- Set Feeding Portion: Short press the gear icon button to enter the feeding portion setting. The display will show "P-00" blinking. Use "+" and "-" to adjust the feeding portion (0-15).
- Confirm and Proceed: After setting is completed, short press the gear icon button to confirm and proceed to the next meal setting. When the sixth meal is set, short press the gear icon to return to the main interface. Times not set will not be stored.
Voice Recording for Feeding:
- Start Recording: Press and hold the recording key (microphone icon) for 1 second. You will hear a "beep" indicating the start of recording.
- End Recording: Release the button to hear a prompt sound, indicating the end of recording. The maximum recording length is 10 seconds.
- Playback: The recording will automatically play back once it's completed. Repeat this process each time to change your recording. Playback only occurs when there is a recording.
- Automatic Playback: When feeding time arrives, the recorded message plays after dispensing food.
Manual Feeding:
- Dispense Food: In the unlocked state, press the paw print feeding button on the front of the feeder to dispense one portion each time.
- Monitor Feedings: After successful feeding, the total number of feedings for the day displayed on the screen will increase accordingly. Note: Feeding schedules remain unaffected by manual feeding.
This video demonstrates the manual feeding function and general overview of the DUDUPET Automatic Pet Feeder.
Maintenance
Regular cleaning is essential for your pet's health and the longevity of the feeder. It is recommended to clean the feeder regularly.
- Disassemble: Remove the water tank, open the lid, and empty the food bucket. Remove the cat food bowl and water bowl along with their trays.
- Clean Components: Rinse the water tank, food bowl, and water bowl tray with clean water or clean with food-grade detergent.
- Clean Main Unit: Wipe the base of the integrated machine with a damp cloth. Do not rinse the main machine base with water.
- Dry: Allow all components to air dry completely before reassembling.

Detachable components of the DUDUPET feeder for easy cleaning.
This video provides instructions on how to disassemble and clean the various components of the DUDUPET Automatic Pet Feeder and Water Dispenser.
Troubleshooting
- Feeder Not Dispensing Food:
- Check if the food hopper is empty. Refill if necessary.
- Ensure the power adapter is securely plugged in or batteries are properly installed and charged.
- Verify that the feeding schedule is correctly set and the current time is accurate.
- Check for any food blockages in the dispenser mechanism. Clear any obstructions.
- Water Dispenser Not Filling:
- Ensure the water tank is filled and properly seated on the base.
- Check for any debris or blockages in the water outlet or bowl.
- Display Screen Not Working:
- Confirm the power supply is connected and active.
- If using batteries, check their charge level and replace if low.
- Voice Recording Issues:
- Ensure you are pressing and holding the recording button for the correct duration.
- Re-record the message to ensure it was captured properly.
- Reset All Settings:
- In the unlocked state, press and hold the "+" and "-" buttons simultaneously for 6 seconds. The device will emit a "beep" sound (lasting 1s) indicating that all feeding plans, feeding records, recordings, etc., are cleared and reset to factory defaults.
- Ambient Light Switch:
- When powered by the adapter: In the unlocked state, press and hold the "+" key for 3 seconds to turn off the ambient light. Press and hold for another 3 seconds to turn on the ambient light.
- When powered by batteries: The ambient light is off by default and cannot be turned on to conserve power.
Specifications
| Attribute | Detail |
|---|---|
| Brand | DUDUPET |
| Model | B0F2SDC46T |
| Food Capacity | 5 Liters |
| Water Capacity | 4 Liters |
| Material | Food-grade Plastic (ABS) |
| Power Supply | Adapter (USB) / 3 x D-cell Batteries (not included) |
| Dimensions | 8 x 8 x 13 inches |
| Item Weight | 8.23 pounds |
| Voice Recording Length | 10 seconds |
| Max Meals per Day | 6 |
| Portions per Meal | 1-15 |
Warranty & Support
For warranty information, technical support, or any inquiries regarding your DUDUPET Automatic Pet Feeder and Water Dispenser, please refer to the contact information provided on the product packaging or visit the official DUDUPET website. Keep your purchase receipt for warranty claims.
Ask a question about this manual
Ask about setup, troubleshooting, compatibility, parts, safety, or missing instructions. Manuals+ will review the question and use this page’s manual context to help answer it.