Curtainboro FQGXX_MKJG
Curtainboro 8x4 Ft Resin Outdoor Storage Shed User Manual
Model: FQGXX_MKJG
Introduction
Thank you for choosing the Curtainboro 8x4 Ft Resin Outdoor Storage Shed. This manual provides comprehensive instructions for the assembly, operation, maintenance, and troubleshooting of your new storage shed. Please read this manual carefully before beginning assembly and retain it for future reference.
Key Features:
- Premium Quality Materials: Crafted from high-grade polypropylene resin for excellent weather resistance and vibrant color retention.
- Effective Ventilation and Natural Light: Equipped with ventilation panels and two built-in windows for optimal air circulation and interior brightness.
- Smart Design for Weather Protection: Sloping roof design for efficient rainwater drainage and a secure, lockable door for enhanced security.
- User-Friendly Installation: Designed for straightforward assembly with detailed instructions, pre-cut, and pre-drilled components.
- Spacious 8x4 FT Storage Solution: Ample space for gardening tools, lawn equipment, bicycles, and other outdoor items.

Figure 1: The Curtainboro 8x4 Ft Resin Outdoor Storage Shed, showcasing its black exterior, white trim, and two windows. A ladder is positioned against the shed, which is located beside a residential building.
Important Safety Information
Please read and understand all safety warnings and instructions before assembling or using this product. Failure to follow these instructions may result in serious injury or property damage.
- Always wear appropriate safety gear, including gloves and eye protection, during assembly.
- Ensure the assembly area is clear of obstructions and well-lit.
- This shed is designed for storage purposes only. Do not use it as a dwelling or for purposes other than its intended use.
- Do not store flammable liquids, chemicals, or other hazardous materials inside the shed.
- Secure the shed to a level, stable foundation to prevent tipping, especially in windy conditions.
- Keep children and pets away from the assembly area.
- Do not climb on the roof of the shed.
- Periodically check all fasteners and connections to ensure they remain tight and secure.
Components and Parts List
Before beginning assembly, verify that all parts listed below are present and undamaged. If any parts are missing or damaged, do not proceed with assembly. Contact customer support for assistance.

Figure 2: Key components and design features of the shed, highlighting the plastic protective case, anti-collision edge, door with a latch, window for natural light, waterproof floor, and the wooden look resin material.
Typical Components (Illustrative):
- Wall Panels (Front, Back, Side)
- Roof Panels
- Floor Panels
- Door Panels and Frame
- Window Panels
- Support Beams and Brackets
- Hardware (Screws, Bolts, Nuts, Washers)
- Door Latch/Lock Mechanism
- Ventilation Grilles
- Plastic Protective Cases for corners
- Anti-collision Edges
Refer to the separate packing list included with your product for a precise inventory of all parts and hardware.
Setup and Assembly Instructions
Assembly typically requires two people and takes approximately 3-4 hours. Follow these steps carefully for proper installation.
Tools Required (Not Included):
- Phillips Head Screwdriver
- Adjustable Wrench or Socket Set
- Rubber Mallet (optional, for gentle tapping)
- Level
- Measuring Tape
- Safety Gloves and Eye Protection
Site Preparation:
- Choose a Level Location: Select a flat, level area for the shed. An uneven surface can lead to assembly difficulties and structural instability.
- Clear the Area: Remove any debris, rocks, or vegetation from the chosen site.
- Prepare a Foundation: While the shed includes a floor, a solid, level foundation (e.g., concrete slab, gravel base, or treated wood platform) is highly recommended for long-term stability and drainage.
Assembly Steps:
- Unpack and Identify Parts: Lay out all components and hardware. Refer to the parts list to ensure everything is present.
- Assemble the Floor: Connect the floor panels according to the instructions, ensuring they are securely interlocked and form a stable base.
- Install Wall Panels: Begin attaching the wall panels to the floor base, starting with a corner. Ensure panels are correctly oriented and securely fastened using the provided hardware.
- Attach Door and Window Frames: Integrate the door and window frames into the designated wall sections as you build up the structure.
- Secure Roof Supports: Install the internal support beams and brackets that will hold the roof panels.
- Place Roof Panels: Carefully position and secure the roof panels. Ensure the sloping design is correctly oriented for water runoff.
- Install Doors and Windows: Attach the door panels to their hinges and install the window panes. Ensure doors open and close smoothly and windows are sealed.
- Add Finishing Touches: Install the door latch, ventilation grilles, and any decorative or protective caps/covers.
- Anchor the Shed: For added stability, especially in high-wind areas, anchor the shed to its foundation using appropriate anchoring kits (sold separately, if not included).

Figure 3: An angled view of the shed during assembly, illustrating the structure of the side and back walls with their distinctive black resin panels and white window frames.
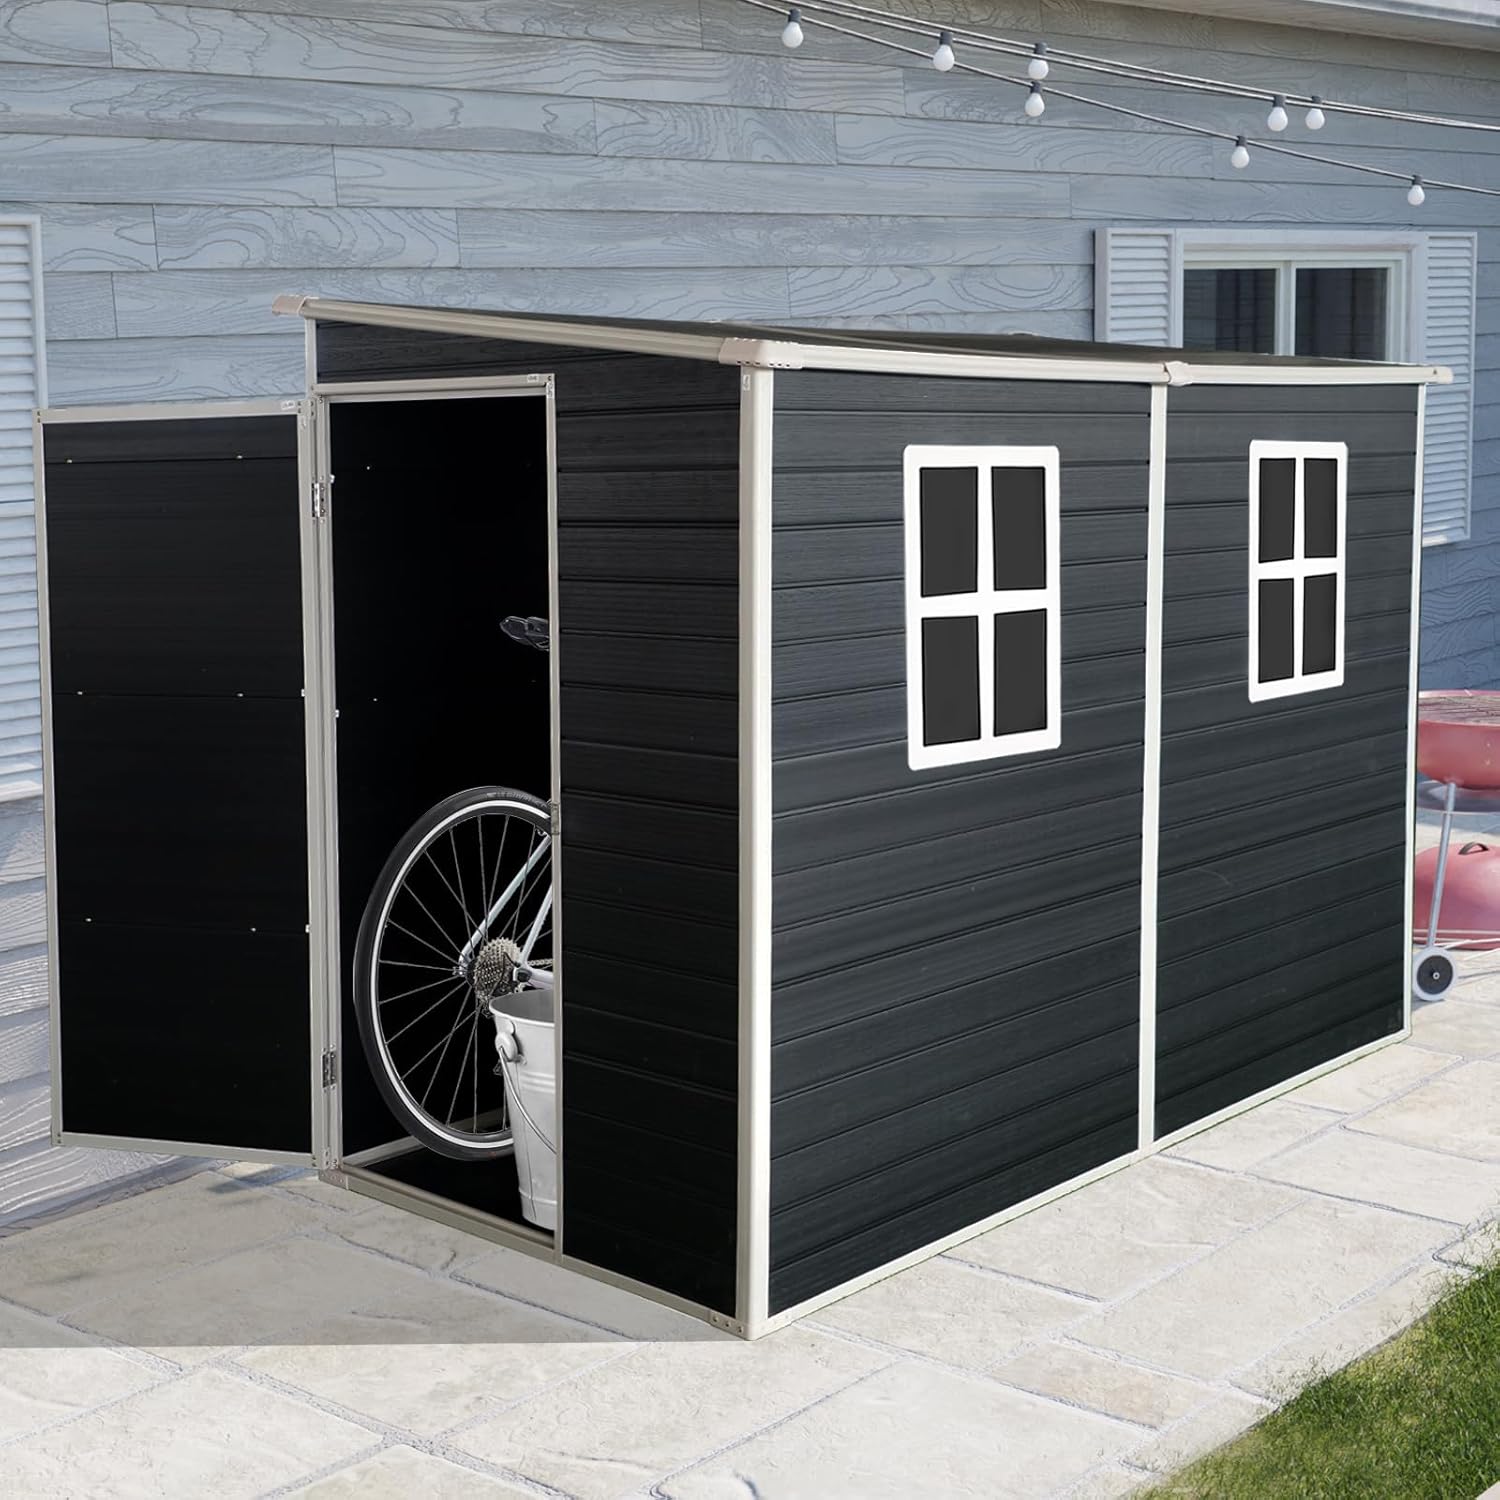
Figure 4: The completed shed with its door open, demonstrating its storage capacity by showing a bicycle and a bucket neatly stored within.
Operation
The Curtainboro storage shed is designed for straightforward use to protect your outdoor items.
Storing Items:
- Ensure items stored inside are clean and dry to prevent moisture buildup and mold.
- Distribute weight evenly across the floor to maintain stability.
- Utilize shelving or organizational units (not included) to maximize vertical storage space and keep items tidy.
- Do not overload the shed beyond its structural capacity.
Door and Locking Mechanism:
- The shed features a lockable door for enhanced security. Use a padlock (not included) with the integrated latch mechanism.
- Always ensure the door is fully closed and latched when not in use to protect contents from weather and unauthorized access.
Ventilation and Natural Light:
- The built-in ventilation panels promote air circulation, reducing condensation and odors. Do not block these vents.
- The two windows provide natural light, making it easier to locate items inside the shed during the day.

Figure 5: Examples of the shed's versatility, including its use as a utility room, a pet house, a garbage bin enclosure, and a general storage shed.
Maintenance and Care
Regular maintenance will extend the life and appearance of your storage shed.
- Cleaning: Clean the shed periodically with mild soap and water. Use a soft brush or cloth. Avoid abrasive cleaners or harsh chemicals, as they can damage the resin material. Rinse thoroughly with clean water.
- Drainage: Ensure the area around the shed is clear of debris to allow for proper water runoff from the sloping roof.
- Inspection: Annually inspect all panels, connections, and hardware for any signs of wear, damage, or loosening. Tighten any loose screws or bolts.
- Snow Load: In areas with heavy snowfall, regularly remove accumulated snow from the roof to prevent excessive weight and potential damage.
- Ventilation: Keep the ventilation panels clear of obstructions to ensure proper airflow and prevent condensation buildup inside.

Figure 6: The shed's resilience against elements, demonstrating its UV protection under sunlight and its waterproof capabilities during rainfall.
Troubleshooting
This section addresses common issues you might encounter with your storage shed.
| Problem | Possible Cause | Solution |
|---|---|---|
| Door does not close properly or sticks. |
|
|
| Water leakage inside the shed. |
|
|
| Condensation inside the shed. |
|
|
| Shed feels unstable or wobbly. |
|
|
Specifications
| Attribute | Detail |
|---|---|
| Product Name | 8x4 Ft Resin Outdoor Storage Shed |
| Brand | Curtainboro |
| Model Number | FQGXX_MKJG |
| Color | Black |
| Material | Polypropylene Resin (Plastic) |
| Product Dimensions (L x W x H) | 100"W x 52.5"D x 74.25"H (approx. 8.33 ft W x 4.38 ft D x 6.19 ft H) |
| Item Weight | 173.1 Pounds |
| Assembly Required | Yes (Approx. 3-4 hours with two people) |
| Windows | 2 (for natural light) |
| Ventilation | Integrated ventilation panels |
| Lockable | Yes (Padlock not included) |
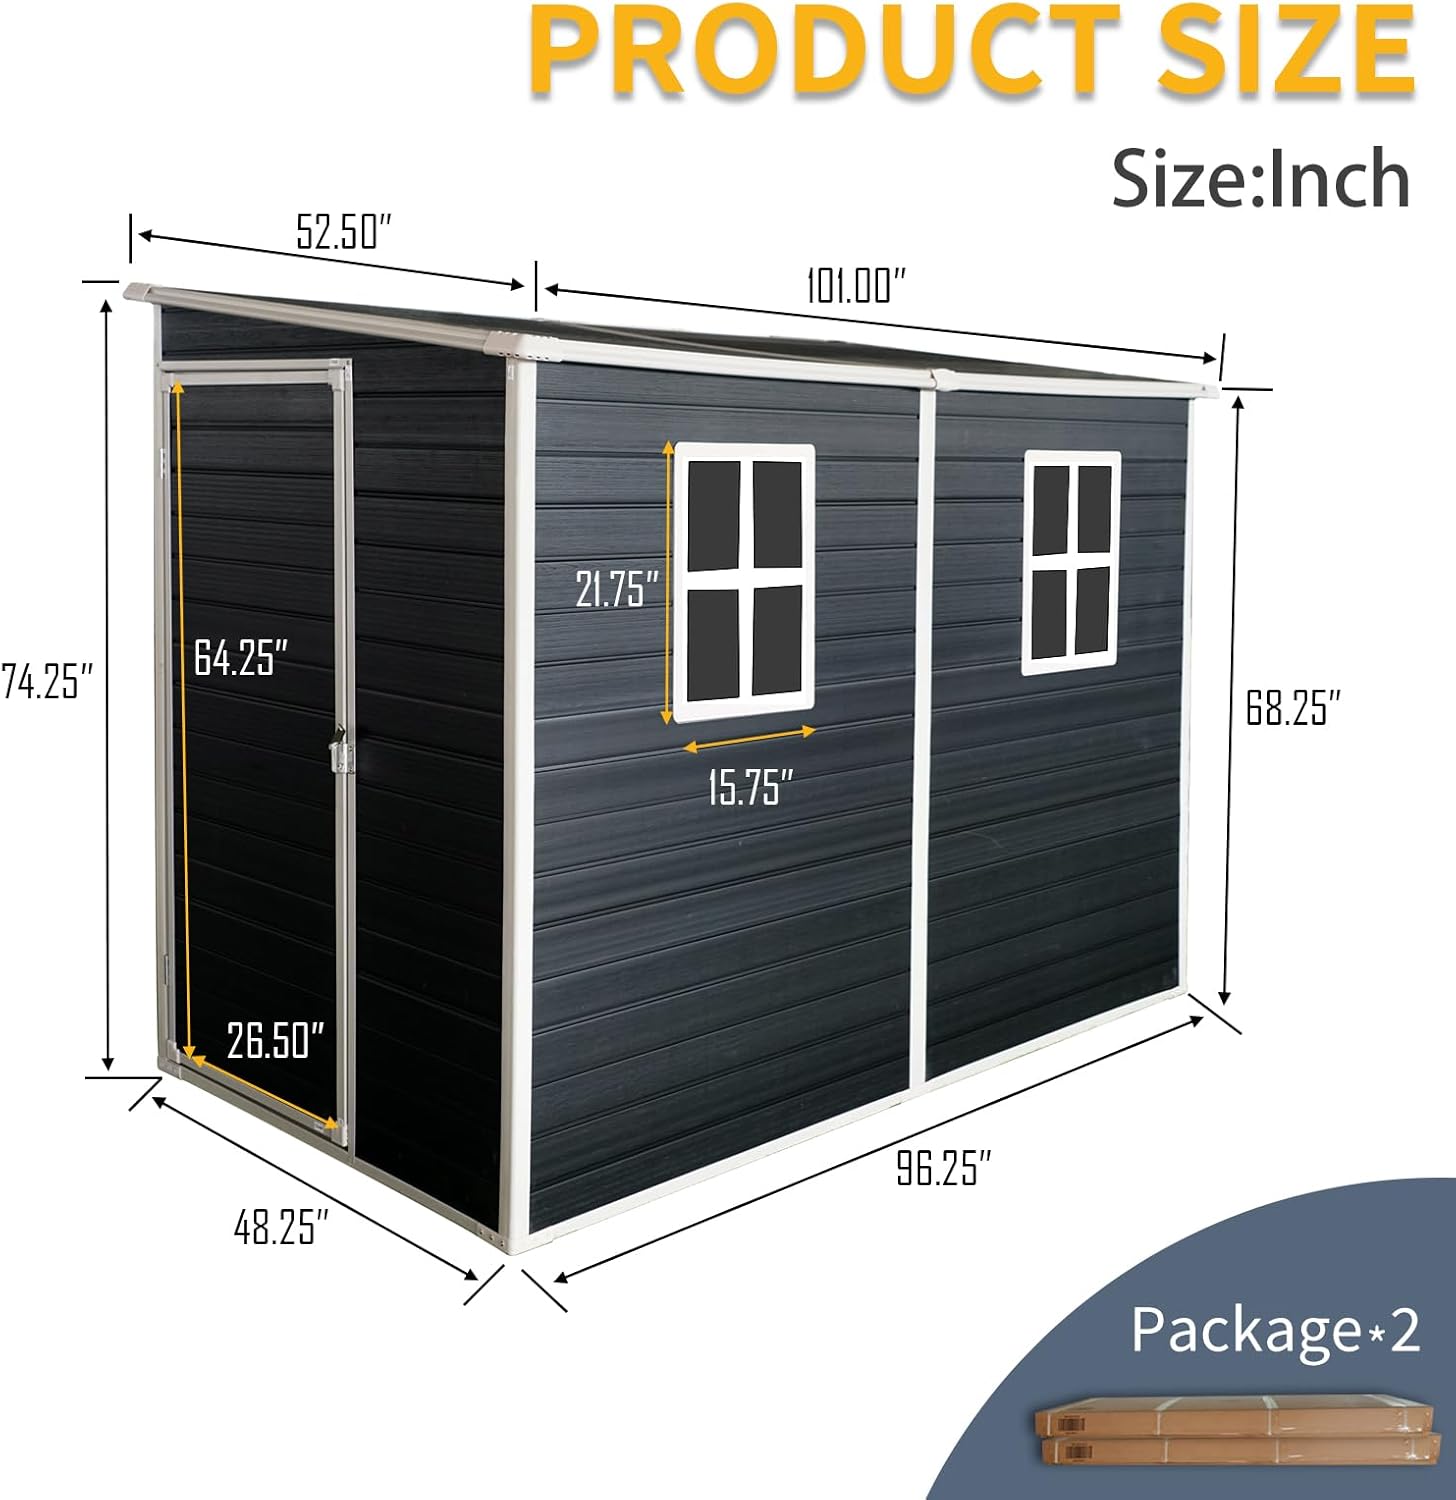
Figure 7: Detailed dimensions of the shed in inches, including overall size and specific measurements for the door and windows.

Figure 8: Detailed dimensions of the shed in feet, providing an alternative measurement view for overall size and specific openings.
Warranty Information
Curtainboro products are manufactured to high-quality standards. For specific warranty details, including coverage period and terms, please refer to the warranty card included with your product or visit the official Curtainboro website. Keep your proof of purchase for any warranty claims.
Customer Support
If you have any questions, require assistance with assembly, or need to report missing/damaged parts, please contact Curtainboro customer support.
- Online Support: Visit the Curtainboro Brand Store on Amazon for FAQs and contact options.
- Email: Refer to your product packaging or warranty card for direct email support.
- Phone: Refer to your product packaging or warranty card for direct phone support.
Please have your model number (FQGXX_MKJG) and proof of purchase ready when contacting support.