1. Introduction
Thank you for choosing the Homleke Shoe Rack Bench. This manual provides essential information for the safe assembly, operation, and maintenance of your new furniture. Please read these instructions carefully before use and retain them for future reference.
Safety Information
- Ensure the bench is assembled correctly according to the instructions.
- Do not exceed the weight limit of 440 lbs (200 kg) for safe use.
- Keep the bench away from direct heat sources and open flames.
- Avoid placing excessively heavy objects on the flip-open storage box to prevent tipping.
- Periodically check all connections and fasteners to ensure they remain tight.
2. Package Contents
Before beginning assembly, verify that all components listed below are present and undamaged. If any parts are missing or damaged, please contact customer support.
- Bench Frame Components (Side Panels, Back Panel, Base)
- Flip-Top Lid with Cushion
- Adjustable Shelves (2)
- Hardware Pack (Screws, Dowels, Shelf Pins, Hinges, Adjustable Feet)
- Assembly Tools (e.g., Hex Key, Screwdriver)
- Instruction Manual
3. Assembly Instructions
Assembly is designed to be straightforward. Follow the numbered steps carefully. It is recommended to assemble the bench on a soft, clean surface to prevent scratches.
- Unpack and Identify Parts: Carefully remove all components from the packaging and lay them out. Compare them with the parts list to ensure everything is present.
- Attach Side Panels: Connect the side panels to the base and back panel using the provided screws and dowels. Ensure all connections are secure.
- Install Adjustable Shelves: Insert the shelf pins into the desired holes on the inner sides of the bench frame. Place the two adjustable shelves onto the pins. The shelves can be positioned at three different heights to accommodate various items.
- Attach Flip-Top Lid: Secure the flip-top lid, which includes the cushion, to the bench frame using the provided hinges. Ensure the hinges are aligned correctly for smooth operation.
- Install Adjustable Feet: Screw the adjustable feet into the pre-drilled holes at the bottom of each leg. Adjust them as needed to level the bench on uneven surfaces.
- Final Check: Once assembled, gently shake the bench to ensure all connections are stable. Tighten any loose screws.
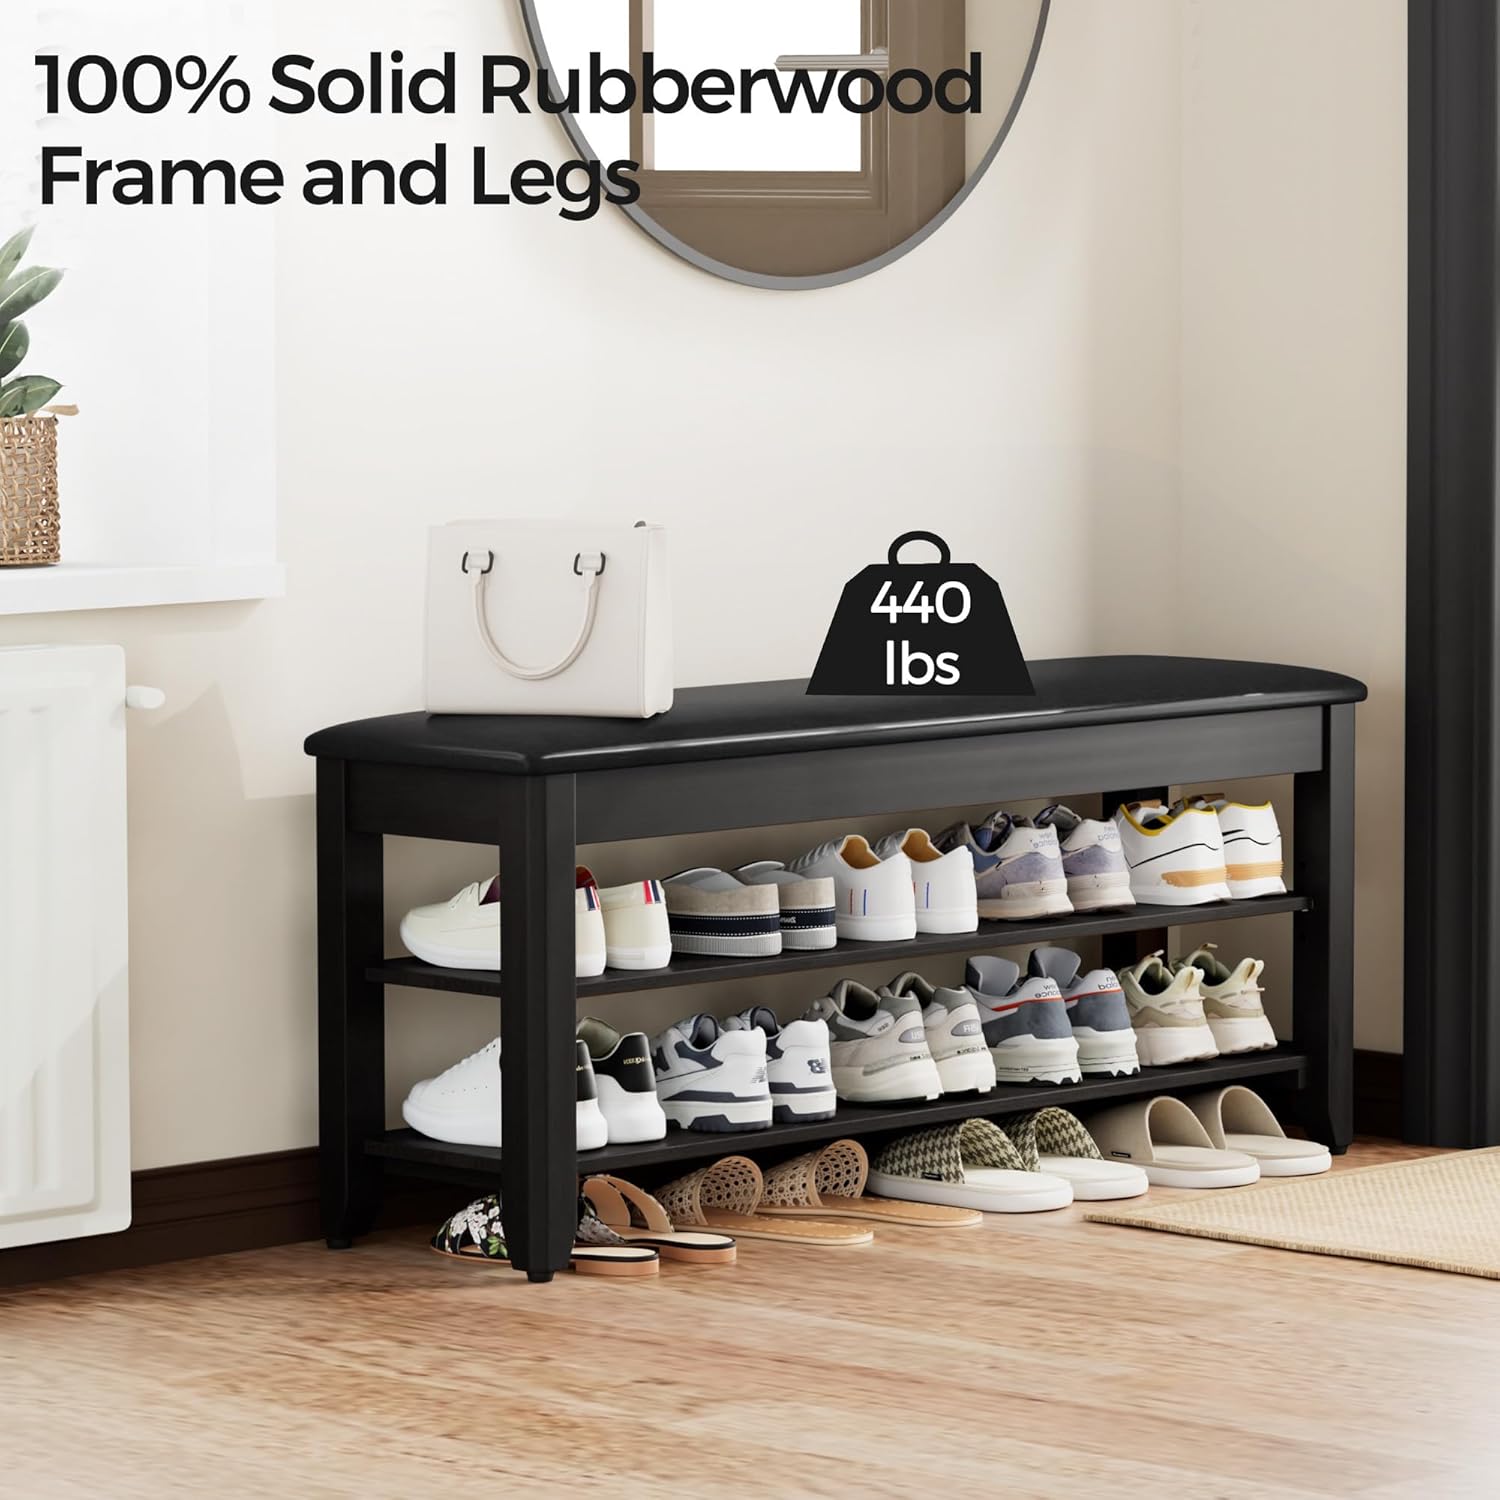
Figure 3.1: This diagram illustrates the key dimensions of the shoe rack bench: 11.8 inches deep, 39.4 inches wide, and 16.4 inches high. The internal storage depth is 2.2 inches.
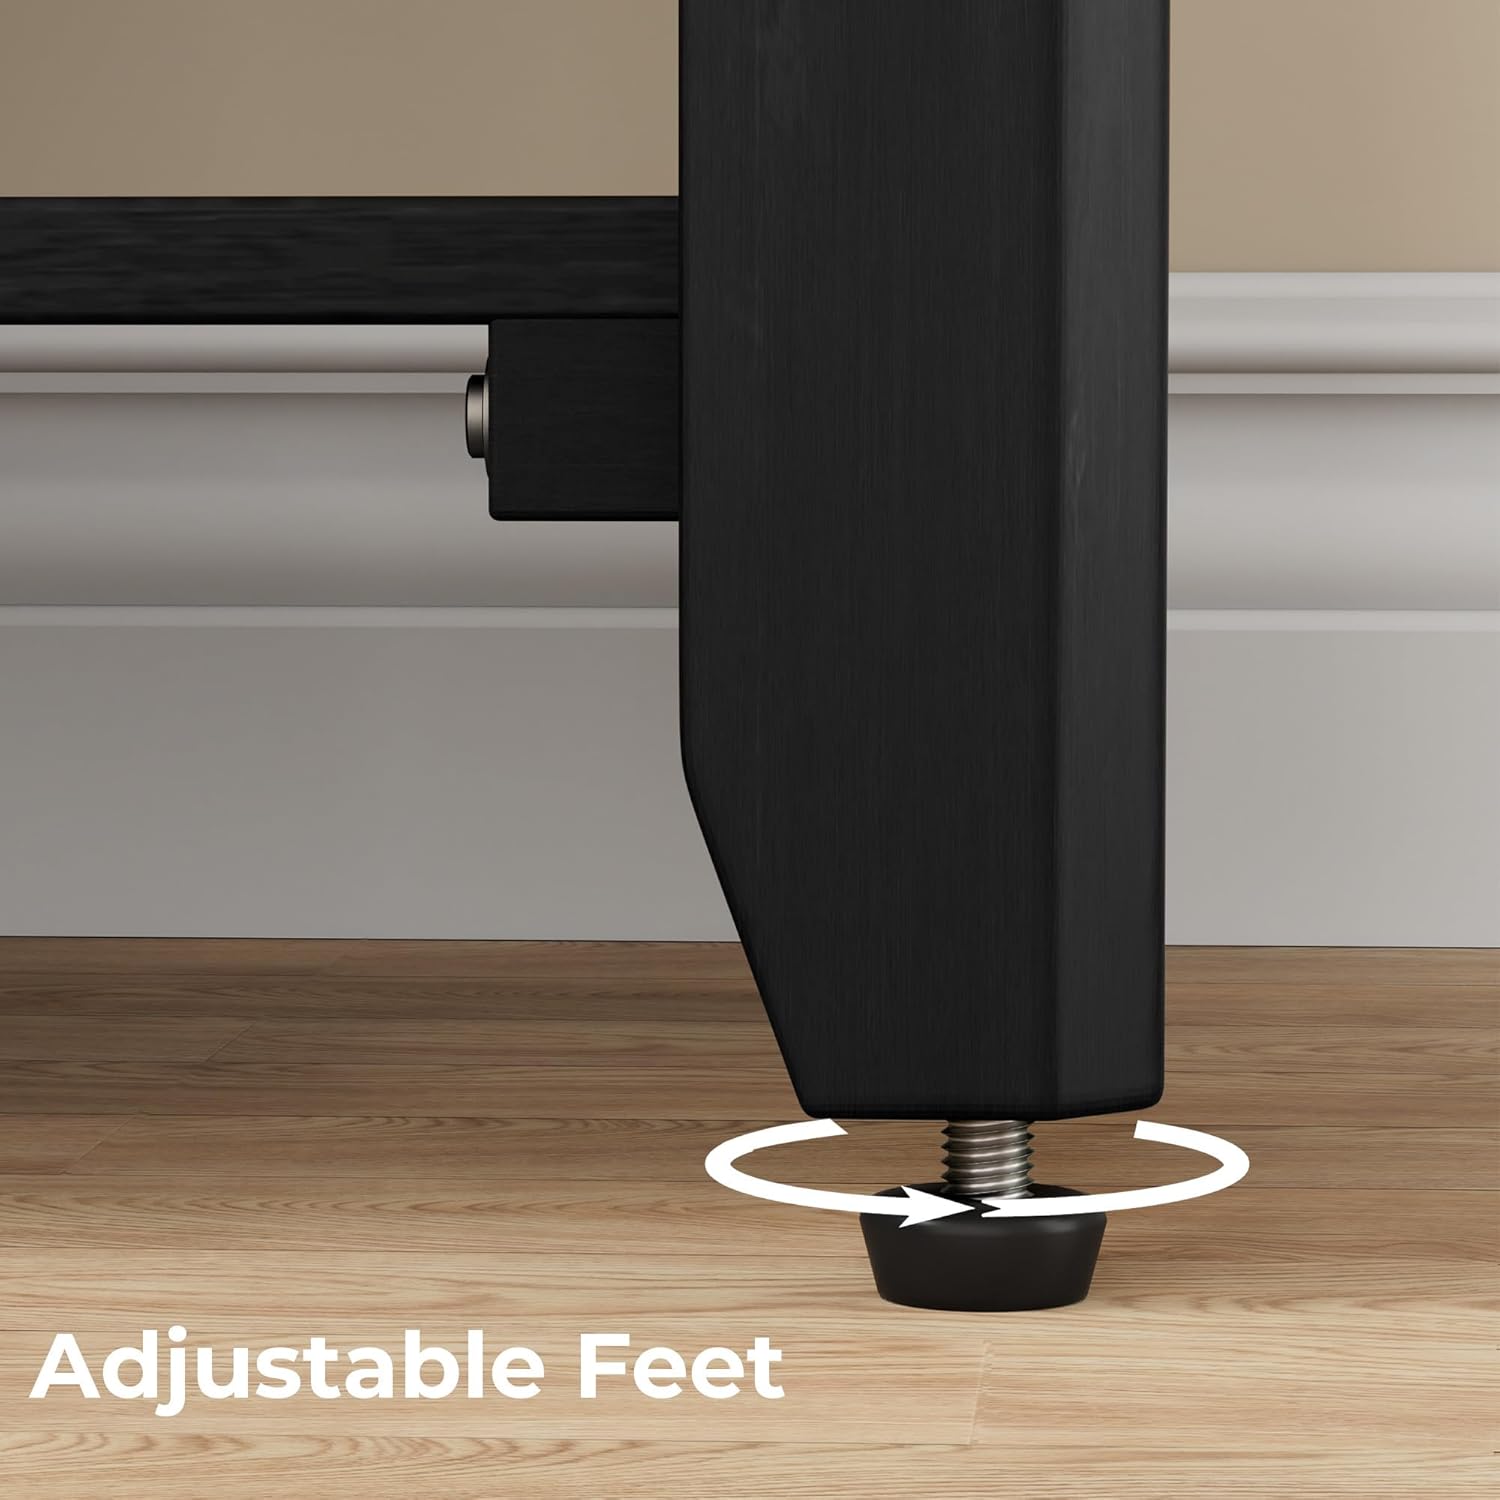
Figure 3.2: A detailed view of the adjustable shelf feature, showing three possible positions for the shelf pins, allowing customization for different shoe heights or other items.

Figure 3.3: This image focuses on the adjustable feet at the base of the bench, which can be rotated to level the bench on uneven surfaces and protect floors.
4. Operating Instructions
The Homleke Shoe Rack Bench is designed for versatile use in various areas of your home.
Shoe Storage
- The two lower shelves are designed to store approximately 9-10 pairs of shoes, depending on their size.
- Utilize the adjustable shelf feature to customize the height between shelves. This is particularly useful for accommodating taller boots or larger footwear.
Flip-Top Storage
- Gently lift the cushioned top to access the hidden storage compartment.
- This compartment is ideal for storing small items such as keys, gloves, scarves, shoe care products, or other entryway essentials.
Seating Functionality
- The padded artificial leather cushion provides a comfortable surface for sitting while putting on or taking off shoes.
- Ensure the bench is placed on a stable, level surface before sitting.

Figure 4.1: This image shows the Homleke Shoe Rack Bench in a hallway setting. The flip-top lid is open, revealing internal storage for small items like umbrellas and books. The two lower shelves are filled with various pairs of shoes.

Figure 4.2: A close-up view of the black PU leather cushion, emphasizing its padded texture for comfortable seating.

Figure 4.3: The image highlights the robust construction of the bench, indicating a weight capacity of 440 lbs, suitable for seating. The bench is made from 100% solid Rubberwood.
5. Care and Maintenance
Proper care will extend the life and appearance of your shoe rack bench.
- Cleaning the Wood: Wipe wooden surfaces with a soft, damp cloth. Avoid harsh chemicals or abrasive cleaners, which can damage the finish. Dry immediately with a clean cloth.
- Cleaning the Cushion: For the artificial leather cushion, wipe with a damp cloth and mild soap if necessary. Do not saturate the material. Allow to air dry.
- Dusting: Regularly dust all surfaces with a dry, soft cloth.
- Avoid Direct Sunlight: Prolonged exposure to direct sunlight can cause fading or damage to the wood and cushion.
- Check Fasteners: Periodically inspect all screws and connections and tighten them if they have become loose.
6. Troubleshooting
If you encounter any issues with your shoe rack bench, refer to the following common problems and solutions:
| Problem | Possible Cause | Solution |
|---|---|---|
| Bench wobbles after assembly. | Uneven floor surface; loose connections; unevenly installed adjustable feet. | Ensure all screws are tightened. Adjust the leveling feet by rotating them until the bench is stable. Move the bench to a level surface if possible. |
| Flip-top lid does not close smoothly. | Hinges are misaligned or loose. | Check hinge alignment and tighten screws. Ensure no items in the storage compartment are obstructing the lid. |
| Shelves are not stable. | Shelf pins are not fully inserted or are missing. | Ensure all four shelf pins are securely inserted into the frame at the same height for each shelf. |
If you experience issues not covered here, please contact Homleke customer support for assistance.
7. Specifications
| Feature | Detail |
|---|---|
| Model Number | BS58H |
| Product Dimensions (D x W x H) | 11.8" x 39.4" x 17.3" |
| Color | Black |
| Material | Solid Rubberwood Frame, Artificial Leather Cushion |
| Item Weight | 22.4 pounds |
| Weight Capacity | 440 lbs (200 kg) |
| Storage Capacity | 3 tiers, approximately 9-10 pairs of shoes; hidden flip-top compartment. |
| Special Features | Flip-top storage, adjustable shelves, padded cushion, adjustable feet. |
8. Warranty and Support
Homleke stands behind the quality of its products. For specific warranty details, please refer to the warranty card included with your purchase or visit the official Homleke website. If you require assistance, have questions, or need to report a missing or damaged part, please contact Homleke customer support through the retailer where the product was purchased or via the contact information provided on the Homleke brand page.
For more information, visit the Homleke Store on Amazon.