Crelander CR-T40-pink
Crelander 10.1 Inch Android 13 Tablet User Manual
Model: CR-T40-pink
1. Introduction
This manual provides detailed instructions for the safe and efficient use of your Crelander 10.1 Inch Android 13 Tablet. Please read this manual thoroughly before operating the device and retain it for future reference.
The Crelander 10.1 Inch Android 13 Tablet is a versatile device designed for productivity, entertainment, and communication. It features a powerful processor, ample storage, a vibrant display, and comprehensive connectivity options, including 4G LTE calling.
2. Package Contents
Upon opening the package, verify that all items are present and in good condition. The standard package includes:
- Crelander 10.1 Inch Android 13 Tablet
- Protective Case
- Wireless Keyboard
- Wireless Mouse
- Stylus Pen
- USB Charging Cable
- USB-C to USB-A Adapter (OTG)
- User Manual (this document)

Figure 2.1: Crelander Tablet and included accessories.
3. Device Layout and Features
Familiarize yourself with the physical layout of your tablet.
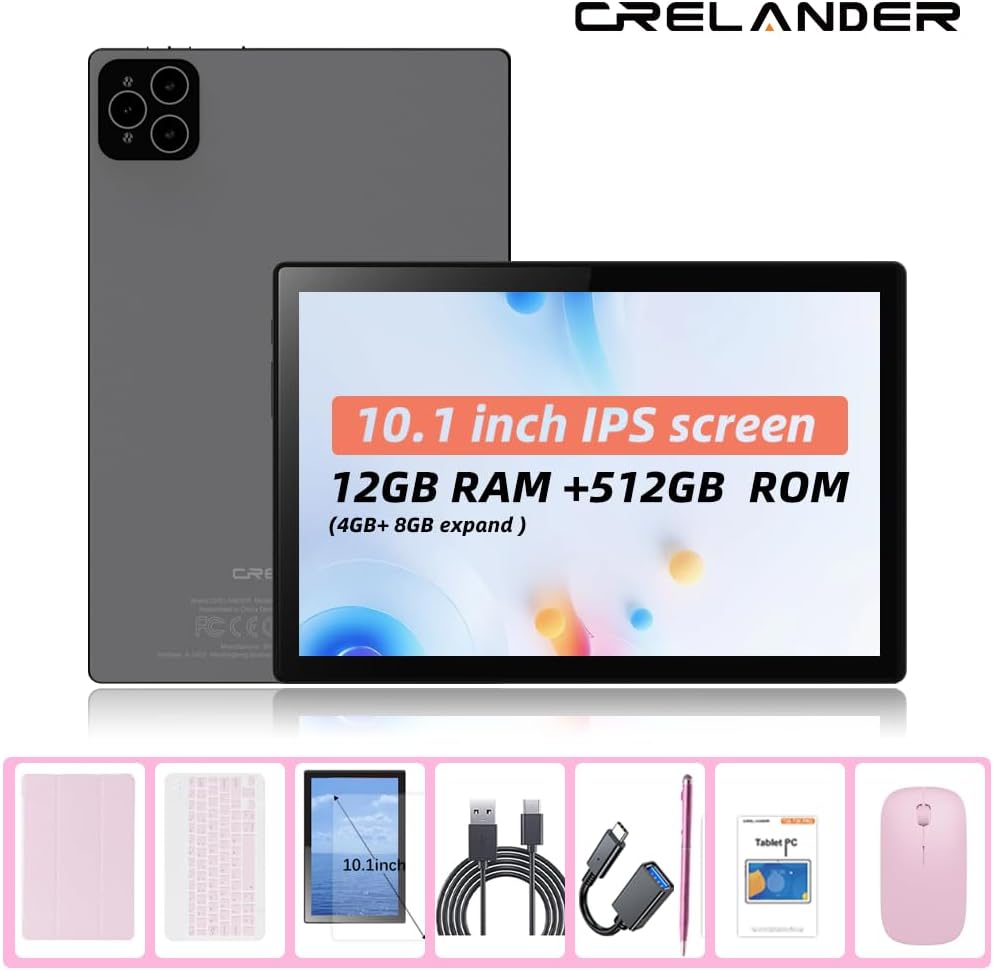
Figure 3.1: Front and Rear View of the Tablet.
Key Features:
- 10.1-inch IPS HD Display: 1280x800 pixel resolution for clear and vibrant visuals.
- Android 13 Operating System: Enhanced performance and user experience.
- High Performance: 12GB RAM (with potential virtual expansion) and 512GB internal storage (ROM).
- Expandable Storage: Supports up to 1TB TF (microSD) card for additional storage.
- 4G LTE Calling: Integrated SIM card slot for cellular connectivity and voice calls.
- Dual Cameras: Front and rear cameras for photos, videos, and video calls.
- Facial Recognition: For secure and convenient unlocking.
- 8000mAh Battery: Long-lasting power for extended use.
- Wireless Connectivity: Bluetooth and Wi-Fi (802.11n) for seamless connections.
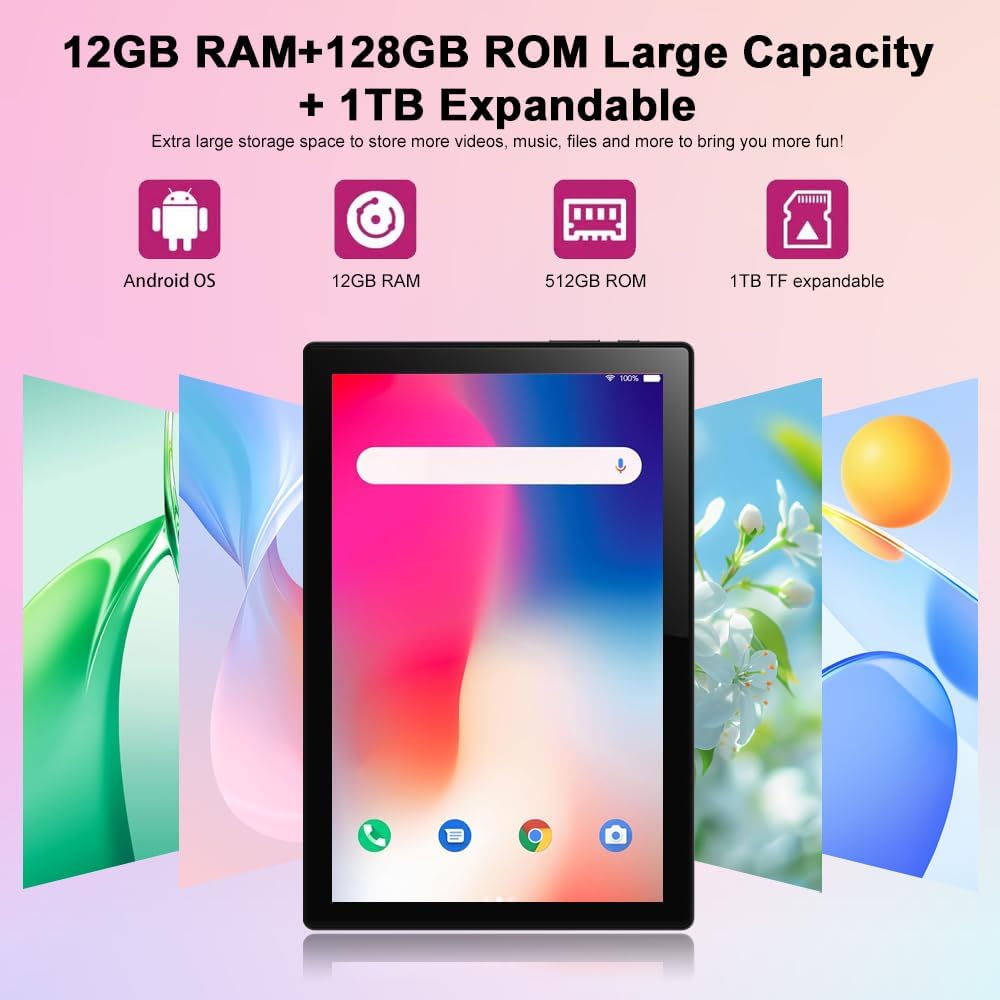
Figure 3.2: Storage and RAM Capabilities.

Figure 3.3: Display Specifications.
4. Getting Started: Setup
4.1 Charging the Tablet
Before first use, fully charge the tablet. Connect the USB charging cable to the tablet's charging port and the other end to a compatible USB power adapter (not included) or a computer's USB port. The battery indicator on the screen will show charging status.
4.2 Powering On/Off
- To Power On: Press and hold the Power button until the Crelander logo appears.
- To Power Off: Press and hold the Power button until the power options menu appears, then select "Power off".
- To Restart: Press and hold the Power button until the power options menu appears, then select "Restart".
4.3 Initial Setup Wizard
Upon first power-on, the tablet will guide you through an initial setup process. This includes:
- Selecting your language.
- Connecting to a Wi-Fi network.
- Setting up your Google account (optional, but recommended for app downloads).
- Setting up screen lock (PIN, pattern, password, or facial recognition).
4.4 Inserting a SIM Card (for 4G LTE Calling)
The tablet supports Micro SIM cards for 2G/3G/4G cellular connectivity and calling.
- Locate the SIM card tray on the side of the tablet.
- Use the provided SIM ejector tool (if included) or a small paperclip to open the tray.
- Carefully place the Micro SIM card into the designated slot on the tray, ensuring correct orientation.
- Gently push the tray back into the tablet until it clicks into place.

Figure 4.1: Inserting a Micro SIM Card.
4.5 Inserting a MicroSD (TF) Card
To expand storage, insert a MicroSD (TF) card (up to 1TB, not included).
- Locate the MicroSD card slot, often combined with the SIM tray or a separate slot.
- Insert the MicroSD card into the slot with the gold contacts facing down, until it clicks into place.
- The tablet will recognize the card, and you may be prompted to format it for internal or portable storage.
5. Operating the Tablet
5.1 Basic Navigation
The Android 13 operating system uses touch gestures for navigation:
- Tap: To open apps, select items, or activate buttons.
- Swipe: To scroll through pages, menus, or switch between home screens.
- Pinch-to-Zoom: To zoom in or out on images, maps, or web pages.
- Long Press: To access contextual menus or move app icons.
5.2 Connecting Accessories (Keyboard, Mouse, Stylus)
The included keyboard and mouse connect via Bluetooth. The stylus is typically passive and does not require pairing.
- Enable Bluetooth: Go to Settings > Connected devices > Bluetooth and turn Bluetooth on.
- Pair Keyboard/Mouse: Put the keyboard/mouse into pairing mode (refer to their individual manuals if needed). Select the device from the list of available Bluetooth devices on your tablet and follow on-screen prompts to pair.
5.3 Using Facial Recognition
Set up facial recognition for quick and secure unlocking.
- Go to Settings > Security & privacy > Device unlock > Face unlock.
- Follow the on-screen instructions to register your face using the front camera.
- Ensure good lighting and hold the tablet at eye level during registration.

Figure 5.1: Facial Recognition in Use (Illustrative).
5.4 Wi-Fi and Cellular Data
- Wi-Fi: Access Settings > Network & internet > Internet to connect to available Wi-Fi networks.
- Cellular Data: If a SIM card is inserted, enable mobile data via Settings > Network & internet > SIMs.

Figure 5.2: Android OS and Wireless Connectivity.
6. Maintenance and Care
- Cleaning: Use a soft, lint-free cloth to clean the screen and body. Avoid abrasive cleaners or solvents.
- Battery Care: Avoid extreme temperatures. For long-term storage, charge the battery to about 50%.
- Software Updates: Regularly check for system updates via Settings > System > System update to ensure optimal performance and security.
- Storage Management: Periodically clear cache, uninstall unused apps, and transfer large files to external storage (MicroSD card) to maintain performance.
- Protection: Use the provided protective case to guard against drops and scratches.
7. Troubleshooting
| Problem | Possible Solution |
|---|---|
| Tablet does not power on. | Ensure the tablet is charged. Connect to a charger for at least 30 minutes before attempting to power on again. |
| Cannot connect to Wi-Fi. | Check if Wi-Fi is enabled in settings. Restart your router. Forget the network and reconnect. |
| SIM card not detected. | Ensure the SIM card is correctly inserted and is a Micro SIM. Restart the tablet. Check with your carrier if the SIM is active. |
| Tablet is slow or unresponsive. | Close unused apps. Clear app caches. Restart the tablet. Consider a factory reset as a last resort (backup data first). |
| Battery drains quickly. | Reduce screen brightness. Disable unused features like Bluetooth/GPS. Close background apps. Limit notifications. |
8. Specifications
| Feature | Detail |
|---|---|
| Model Number | CR-T40-pink |
| Operating System | Android 13 |
| Display | 10.1-inch IPS HD Touchscreen (1280 x 800 pixels) |
| Processor | MT6763 |
| RAM | 12GB |
| Internal Storage (ROM) | 512GB |
| Expandable Storage | Up to 1TB via MicroSD (TF) card |
| Cameras | Front and Rear (specific MP not detailed in all specs, but 5MP/13MP mentioned in image) |
| Battery | 8000mAh (Built-in rechargeable) |
| Connectivity | Wi-Fi (802.11n), Bluetooth, 4G LTE (Micro SIM) |
| Dimensions (LxWxH) | 10 x 0.3 x 7 inches |
| Weight | 3.3 pounds |
| Color | Pink |
9. Warranty and Support
Crelander products are designed for reliability and performance. For warranty information, technical support, or service inquiries, please refer to the contact information provided with your purchase or visit the official Crelander website.
Please retain your proof of purchase for warranty claims.
Related Documents - CR-T40-pink
 |
CRELANDER W30 Tablet PC User Manual User manual for the CRELANDER W30 10.1-inch IPS Tablet PC, including charging instructions, operating guidelines, maintenance tips, and safety warnings. |
 |
Crelander T30 PRO Tablet PC User Manual User manual for the Crelander T30 PRO Tablet PC, covering basic operation, tips, maintenance, and FCC compliance. |
 |
Creality Ender-3 Pro Series 3D Printer Guide Book Comprehensive guide for the Creality Ender-3 Pro Series 3D printer, covering setup, operation, software installation, printing, troubleshooting, and after-sales service. Includes detailed instructions, safety notes, and component identification. |
 |
Mini-Copter Model Rocket Kit Assembly Instructions | Apogee Components Detailed assembly instructions and parts list for the Apogee Components Mini-Copter model rocket kit (Kit #05012). Learn how to build this high-performance helicopter-style rocket. |
 |
Pellet Stove User Manual: Installation, Operation, and Maintenance Comprehensive user manual for pellet stoves, covering installation requirements, operation instructions, maintenance procedures, troubleshooting, and warranty information. Includes technical specifications and safety precautions for models CR-01 through CR-10-2. |
 |
CREALITY CR-10 Series 3D Printer User Manual Comprehensive user manual for the CREALITY CR-10 Series 3D printers, including CR-10, CR-10S, CR-10 S4, CR-10 S5, and CR-10 mini models. Covers installation, setup, operation, software, and after-sales service. |
Ask a question about this manual
Ask about setup, troubleshooting, compatibility, parts, safety, or missing instructions. Manuals+ will review the question and use this page’s manual context to help answer it.